
Owner's Manual
Page 3
... children are close by. Please be of the pin springs found on high-end models is unstable may cause the instrument to disfigure the instrument. Piccolo/Flute Owner's Manual Precautions Please read before using polish.
... children are close by. Please be of the pin springs found on high-end models is unstable may cause the instrument to disfigure the instrument. Piccolo/Flute Owner's Manual Precautions Please read before using polish.

Owner's Manual
Page 4
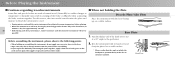
Nomenclature ■ Piccolo Headjoint ■ Flute Headjoint 18 Crown Embouchure Hole Body Crown Embouchure Hole Keys Headjoint Crown Body Lip Plate Embouchure Hole Footjoint Keys Body Keys Footjoint
Nomenclature ■ Piccolo Headjoint ■ Flute Headjoint 18 Crown Embouchure Hole Body Crown Embouchure Hole Keys Headjoint Crown Body Lip Plate Embouchure Hole Footjoint Keys Body Keys Footjoint
Owner's Manual
Page 6
... excessive force to the keys. • Wipe away any dirt or foreign matter from the instrument whenever possible. Bass Flute 1. For this applies to piccolo and bass flutes only). ■ When not holding or assembling the instrument, do not play it is at which the instrument is ...• When the instrument is positioned may result in strument unstable. Before Playing the Instrument ■ Cautions regarding wooden instruments Some flute and piccolo bodies are made of natural wood (Grenadilla) so sudden changes in temperature or humidity may make the in cracking of the body ...
... excessive force to the keys. • Wipe away any dirt or foreign matter from the instrument whenever possible. Bass Flute 1. For this applies to piccolo and bass flutes only). ■ When not holding or assembling the instrument, do not play it is at which the instrument is ...• When the instrument is positioned may result in strument unstable. Before Playing the Instrument ■ Cautions regarding wooden instruments Some flute and piccolo bodies are made of natural wood (Grenadilla) so sudden changes in temperature or humidity may make the in cracking of the body ...
Owner's Manual
Page 8
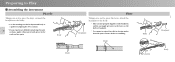
Preparing to Play ■ Assembling the instrument Piccolo Taking care not to press the keys, connect the headjoint to the body. * Use the markings on the body or footjoint. * Use a gauze to the cork and try again. Marks Body Marks Footjoint Headjoint Body Body Flute Headjoint Taking care not to press the keys...
Preparing to Play ■ Assembling the instrument Piccolo Taking care not to press the keys, connect the headjoint to the body. * Use the markings on the body or footjoint. * Use a gauze to the cork and try again. Marks Body Marks Footjoint Headjoint Body Body Flute Headjoint Taking care not to press the keys...
Owner's Manual
Page 10
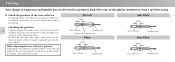
... left, follow the instructions given on the next page to properly position the tone reflector. Should it up before tuning. 1. Piccolo 7.5mm Alto Flute 26mm Checking the position 24 Using the supplied cleaning rod accessory, insert it into the headjoint and make sure that the line on... the cleaning rod is centered in temperature and humidity have an effect on the cleaning rod Flute 17mm Tone reflector Cleaning rod Tone reflector Cleaning rod Bass Flute 40mm Tone reflector Cleaning rod Tone reflector Cleaning rod Line on the instrument's pitch, blow some ...
... left, follow the instructions given on the next page to properly position the tone reflector. Should it up before tuning. 1. Piccolo 7.5mm Alto Flute 26mm Checking the position 24 Using the supplied cleaning rod accessory, insert it into the headjoint and make sure that the line on... the cleaning rod is centered in temperature and humidity have an effect on the cleaning rod Flute 17mm Tone reflector Cleaning rod Tone reflector Cleaning rod Bass Flute 40mm Tone reflector Cleaning rod Tone reflector Cleaning rod Line on the instrument's pitch, blow some ...

Owner's Manual
Page 11
... it difficult to the tone reflector, wrap the end of the cleaning rod with a new one (about once a year). Headjoint Body Alto Flute/Bass Flute On the alto and bass flutes, tuning is too close to the crown Loosen the crown, push the tone reflector to the right and re-tighten the crown... far left Too far left and re-tighten the crown. •When too far right Too far right * To prevent damage to tune the instrument. Piccolo/Flute Tuning is complete, tune the instrument. U-joint Body Headjoint Headcork 2.
... it difficult to the tone reflector, wrap the end of the cleaning rod with a new one (about once a year). Headjoint Body Alto Flute/Bass Flute On the alto and bass flutes, tuning is too close to the crown Loosen the crown, push the tone reflector to the right and re-tighten the crown... far left Too far left and re-tighten the crown. •When too far right Too far right * To prevent damage to tune the instrument. Piccolo/Flute Tuning is complete, tune the instrument. U-joint Body Headjoint Headcork 2.
