

Owner's Manual
Page 3
... or modifications to other electronic components, turn off the power switch, disconnect the electric plug from the outlet, and have the instrument inspected by qualified Yamaha service personnel. • Do not place the instrument against a wall (allow at least 3 cm/one person should appear to be malfunctioning, discontinue ... and not the cord. Also, do not place vinyl, plastic or rubber objects on the instrument, since this might discolor the panel or keyboard. • Do not rest your fingers, and do not excessively bend or otherwise damage the cord, place heavy objects on it, or ...
... or modifications to other electronic components, turn off the power switch, disconnect the electric plug from the outlet, and have the instrument inspected by qualified Yamaha service personnel. • Do not place the instrument against a wall (allow at least 3 cm/one person should appear to be malfunctioning, discontinue ... and not the cord. Also, do not place vinyl, plastic or rubber objects on the instrument, since this might discolor the panel or keyboard. • Do not rest your fingers, and do not excessively bend or otherwise damage the cord, place heavy objects on it, or ...

Owner's Manual
Page 5
Auto Bass Chord (A.B.C 51 6 Accompaniment Controls 53 7 Preset/User Keyboard Percussion 55 8 Melody On Chord (M.O.C 63 1 Quick Introductory Guide 2 Voice Sections 3 Voice Controls and Effects 4 Rhythm and Accompaniment 5 Registration Memory 6 Music ...Expression Pedal 8 Transpose and Pitch Controls 9 MIDI 10 Accessory Jacks and Controls 11 Appendix The Index on page 131 can be of Contents Panel Layout 6 EL-400 Panel Layout 6 LCD Display/Display Select 8 Main Features 9 5 Registration Memory 66 1 Storing Registrations 66 2 Selecting Registrations 67 3 Saving the Registration Data...
Auto Bass Chord (A.B.C 51 6 Accompaniment Controls 53 7 Preset/User Keyboard Percussion 55 8 Melody On Chord (M.O.C 63 1 Quick Introductory Guide 2 Voice Sections 3 Voice Controls and Effects 4 Rhythm and Accompaniment 5 Registration Memory 6 Music ...Expression Pedal 8 Transpose and Pitch Controls 9 MIDI 10 Accessory Jacks and Controls 11 Appendix The Index on page 131 can be of Contents Panel Layout 6 EL-400 Panel Layout 6 LCD Display/Display Select 8 Main Features 9 5 Registration Memory 66 1 Storing Registrations 66 2 Selecting Registrations 67 3 Saving the Registration Data...

Owner's Manual
Page 9
... systematic and intuitive LCD allows you set up and record your registrations and performances to smoothly understand almost all styles of music. (page 44) The Keyboard Percussion function lets you play 120 different percussion sounds, each of which can also be enhanced with a full range of high-quality digital effects, ranging...
... systematic and intuitive LCD allows you set up and record your registrations and performances to smoothly understand almost all styles of music. (page 44) The Keyboard Percussion function lets you play 120 different percussion sounds, each of which can also be enhanced with a full range of high-quality digital effects, ranging...

Owner's Manual
Page 11
... turn the power on , Basic Registration 1 is an overall control which affects the volume of voices for Upper/Lower keyboards and Pedalboard and each Basic Registration. Bass 1 BASIC REGIST. See page 66 for more information. Once you have set...a suitable level, you play. Basic Basic Basic Basic Basic Registration 1 Registration 2 Registration 3 Registration 4 Registration 5 Upper Keyboard Voice 1 Strings 1 Brass 1 Flute 1 Cosmic 1 Synth. Brass 1 Lower Keyboard Voice 1 Strings 1 Horn1 Piano 1 Cosmic 2 Cosmic 3 Pedal Voice 1 Contra Bass1 Tuba Contra Bass 1 Cosmic 2 ...
... turn the power on , Basic Registration 1 is an overall control which affects the volume of voices for Upper/Lower keyboards and Pedalboard and each Basic Registration. Bass 1 BASIC REGIST. See page 66 for more information. Once you have set...a suitable level, you play. Basic Basic Basic Basic Basic Registration 1 Registration 2 Registration 3 Registration 4 Registration 5 Upper Keyboard Voice 1 Strings 1 Brass 1 Flute 1 Cosmic 1 Synth. Brass 1 Lower Keyboard Voice 1 Strings 1 Horn1 Piano 1 Cosmic 2 Cosmic 3 Pedal Voice 1 Contra Bass1 Tuba Contra Bass 1 Cosmic 2 ...

Owner's Manual
Page 12
... registration data Saving the registration data Recording the performance Playing back Music Disk Recorder 12 Quick Introductory Guide 1 3 Basic Operation Registration Set-up Select the keyboard to play Select the voice (Voice Menu) Select the rhythm (Rhythm Menu) Finely adjust the voice (Voice Condition) Finely adjust the rhythm (Rhythm Condition) * The...
... registration data Saving the registration data Recording the performance Playing back Music Disk Recorder 12 Quick Introductory Guide 1 3 Basic Operation Registration Set-up Select the keyboard to play Select the voice (Voice Menu) Select the rhythm (Rhythm Menu) Finely adjust the voice (Voice Condition) Finely adjust the rhythm (Rhythm Condition) * The...

Owner's Manual
Page 13
... ORGAN PIANO GUITAR VIBRA- Selecting a voice/rhythm 1 Press the panel voice/rhythm button which you want to play (Strings 2 in the Upper Keyboard Voice 1 section). UPPER KEYBOARD VOICE 1 UPPER KEYBOARD VOICE 2 MAX MAX STRINGS BRASS CLARI- Quick Introductory Guide 1 Strings1 Strings2 DATA CONTROL Pizz.Strs Syn.Strs1 DATA CONTROL 2 Press the Data Control...
... ORGAN PIANO GUITAR VIBRA- Selecting a voice/rhythm 1 Press the panel voice/rhythm button which you want to play (Strings 2 in the Upper Keyboard Voice 1 section). UPPER KEYBOARD VOICE 1 UPPER KEYBOARD VOICE 2 MAX MAX STRINGS BRASS CLARI- Quick Introductory Guide 1 Strings1 Strings2 DATA CONTROL Pizz.Strs Syn.Strs1 DATA CONTROL 2 Press the Data Control...
Owner's Manual
Page 15
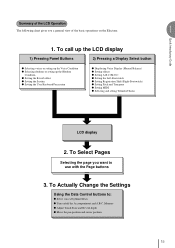
... voices or setting up the Voice Condition q Selecting rhythms or setting up the Rhythm Condition q Setting the Reverb effect q Setting the Sustain q Setting the User Keyboard Percussion q Displaying Voice Display (Manual Balance) q Setting effects q Setting A.B.C./M.O.C. Summary of the basic operations on /off the Accompaniment and A.B.C. To Actually Change the Settings Using...
... voices or setting up the Voice Condition q Selecting rhythms or setting up the Rhythm Condition q Setting the Reverb effect q Setting the Sustain q Setting the User Keyboard Percussion q Displaying Voice Display (Manual Balance) q Setting effects q Setting A.B.C./M.O.C. Summary of the basic operations on /off the Accompaniment and A.B.C. To Actually Change the Settings Using...

Owner's Manual
Page 17
... DISPLAY SET DISPLAY SELECT A.B.C. PITCH SW. SHIFT MIDI TREMOLO (FAST) The Voice Display is turned on the Upper keyboard, Lower keyboard and Pedalboard. Each page can be selected using the Page buttons. Page 1 and 2 show the currently assigned voice settings for...the Electone is configured with three pages. M.O.C. COSMIC TUTTI 2 PHONE LOWER KEYBOARD VOICE 1 STRINGS BRASS CLARI- 2 Voice Sections The EL-400 features 173 different high quality AWM/FM voices. TO PET LOWER MIN MIN MIN LOWER KEYBOARD VOICE 2 MAX MAX 1 PEDAL VOICE 1 PEDAL VOICE 2 MAX MAX CONTRA...
... DISPLAY SET DISPLAY SELECT A.B.C. PITCH SW. SHIFT MIDI TREMOLO (FAST) The Voice Display is turned on the Upper keyboard, Lower keyboard and Pedalboard. Each page can be selected using the Page buttons. Page 1 and 2 show the currently assigned voice settings for...the Electone is configured with three pages. M.O.C. COSMIC TUTTI 2 PHONE LOWER KEYBOARD VOICE 1 STRINGS BRASS CLARI- 2 Voice Sections The EL-400 features 173 different high quality AWM/FM voices. TO PET LOWER MIN MIN MIN LOWER KEYBOARD VOICE 2 MAX MAX 1 PEDAL VOICE 1 PEDAL VOICE 2 MAX MAX CONTRA...

Owner's Manual
Page 18
... names are shown on page 3 of the Voice Display (page 16). UPPER KEYBOARD VOICE 1 UPPER KEYBOARD VOICE 2 MAX MAX STRINGS BRASS CLARI- COSMIC TUTTI 2 2 PHONE MIN MIN If, for only the Upper Keyboard Voice 1 are variations of panel voices follows the same procedure throughout the various ...UPPER and LOWER (Page 20) ¨¤Strings1 M.BAL: 0¤ DATA CONTROL DATA CONTROL PAGE Ò¤Strings1∏¤ContBs.1 LOWER KEYBOARD VOICE 2 PEDAL VOICE 2 You can select the language shown on the LCD display on this display. These are given here. 1 Select a ...
... names are shown on page 3 of the Voice Display (page 16). UPPER KEYBOARD VOICE 1 UPPER KEYBOARD VOICE 2 MAX MAX STRINGS BRASS CLARI- COSMIC TUTTI 2 2 PHONE MIN MIN If, for only the Upper Keyboard Voice 1 are variations of panel voices follows the same procedure throughout the various ...UPPER and LOWER (Page 20) ¨¤Strings1 M.BAL: 0¤ DATA CONTROL DATA CONTROL PAGE Ò¤Strings1∏¤ContBs.1 LOWER KEYBOARD VOICE 2 PEDAL VOICE 2 You can select the language shown on the LCD display on this display. These are given here. 1 Select a ...

Owner's Manual
Page 19
...8 T.V:OFF¨1⁄ DATA CONTROL DATA CONTROL PAGE AFT.T: 8 FEET:PRESET 19 There are two volume controls: NOTE: The voices, Upper Keyboard Voice 2, Lower Keyboard Voice 2 and Pedal Voice 2, is shown on the panel to the selected voice) calls up the Voice Condition display. The controls have selected... Pop Organ 1 for the Upper Keyboard Voice 1. 3 If you can select voices from a minimum of 0, or no sound, to , you wish to a maximum of each voice section....
...8 T.V:OFF¨1⁄ DATA CONTROL DATA CONTROL PAGE AFT.T: 8 FEET:PRESET 19 There are two volume controls: NOTE: The voices, Upper Keyboard Voice 2, Lower Keyboard Voice 2 and Pedal Voice 2, is shown on the panel to the selected voice) calls up the Voice Condition display. The controls have selected... Pop Organ 1 for the Upper Keyboard Voice 1. 3 If you can select voices from a minimum of 0, or no sound, to , you wish to a maximum of each voice section....

Owner's Manual
Page 20
...more keys, only the highest note will sound. 6 Adjust the volume balance between the two displays. 5 Now select voices for the Upper keyboard above. Adjust the balance with the Balance Control provided on . Range: -6 - +6 DATA CONTROL ¨¤Strings1 M.BAL:+4¤ &#... SELECT section. DISPLAY SET M.O.C. SHIFT PITCH MIDI TREMOLO (FAST) 2. DISPLAY SELECT VOICE EFFECT A.B.C. The positive values increase the Upper Keyboard volume, while the negative values lower it a second time calls up that voice's Voice Menu display. Successive presses alternate between the...
...more keys, only the highest note will sound. 6 Adjust the volume balance between the two displays. 5 Now select voices for the Upper keyboard above. Adjust the balance with the Balance Control provided on . Range: -6 - +6 DATA CONTROL ¨¤Strings1 M.BAL:+4¤ &#... SELECT section. DISPLAY SET M.O.C. SHIFT PITCH MIDI TREMOLO (FAST) 2. DISPLAY SELECT VOICE EFFECT A.B.C. The positive values increase the Upper Keyboard volume, while the negative values lower it a second time calls up that voice's Voice Menu display. Successive presses alternate between the...

Owner's Manual
Page 21
... the Voice Menus from any internal voices can be playable from which you have three basic uses: q For playing any voice of the keyboards or Pedalboard. COSMIC TUTTI 2 2 PHONE MIN MIN The dotted buttons have made before turning the Electone off erases all panel settings you ...TO LOWER MIN MIN Voice Sections 2 Turning the Electone off . When the Electone is turned on the Upper keyboard, for more information. 3 Selecting Voices from the Dotted Buttons The EL-400 has a wide variety of each voice section, giving you wish to keep, save them to select the different...
... the Voice Menus from any internal voices can be playable from which you have three basic uses: q For playing any voice of the keyboards or Pedalboard. COSMIC TUTTI 2 2 PHONE MIN MIN The dotted buttons have made before turning the Electone off erases all panel settings you ...TO LOWER MIN MIN Voice Sections 2 Turning the Electone off . When the Electone is turned on the Upper keyboard, for more information. 3 Selecting Voices from the Dotted Buttons The EL-400 has a wide variety of each voice section, giving you wish to keep, save them to select the different...

Owner's Manual
Page 22
...page available for selection in succession. ¨1⁄‡ DATA CONTROL 03:Honky Tonk DATA CONTROL You have selected Honky Tonk for the Upper Keyboard Voice 1. 22 Select Honky Tonk piano, for more information. COSMIC TUTTI 2 2 PHONE MIN MIN STRINGS, Voice Menu 1, appears. q ...01:Piano1 ¨1⁄‡ DATA CONTROL PAGE NOTE: 3 Select 03: Honky Tonk piano voice using the Data Control buttons. UPPER KEYBOARD VOICE 1 STRINGS BRASS CLARI- For example, you can directly view and select Voice Menu pages by designating User Voice page. SAXO- ...
...page available for selection in succession. ¨1⁄‡ DATA CONTROL 03:Honky Tonk DATA CONTROL You have selected Honky Tonk for the Upper Keyboard Voice 1. 22 Select Honky Tonk piano, for more information. COSMIC TUTTI 2 2 PHONE MIN MIN STRINGS, Voice Menu 1, appears. q ...01:Piano1 ¨1⁄‡ DATA CONTROL PAGE NOTE: 3 Select 03: Honky Tonk piano voice using the Data Control buttons. UPPER KEYBOARD VOICE 1 STRINGS BRASS CLARI- For example, you can directly view and select Voice Menu pages by designating User Voice page. SAXO- ...

Owner's Manual
Page 28
...the sound of the voices: Voice Controls and Effects. The chart below shows the various voice controls and effects for each keyboard or to each voice section. Voice Controls and Effects 3 Touch Tone Touch (Initial/ Vibrato Feet Volume Brilliance Pan After... Tremolo /Chorus Symphonic/ Celeste Delay Flanger Distortion Vibrato Lead Slide *1 Lead Tune Sustain Upper Lower Lead Pedal Upper Keyboard Voice 1 Upper Keyboard Voice 2 Lower Keyboard Voice 1 Lower Keyboard Voice 2 Lead Voice Pedal Voice 1 Pedal Voice 2 Voice Condition Page 1 Voice Condition Page 2 Voice Condition Page...
...the sound of the voices: Voice Controls and Effects. The chart below shows the various voice controls and effects for each keyboard or to each voice section. Voice Controls and Effects 3 Touch Tone Touch (Initial/ Vibrato Feet Volume Brilliance Pan After... Tremolo /Chorus Symphonic/ Celeste Delay Flanger Distortion Vibrato Lead Slide *1 Lead Tune Sustain Upper Lower Lead Pedal Upper Keyboard Voice 1 Upper Keyboard Voice 2 Lower Keyboard Voice 1 Lower Keyboard Voice 2 Lead Voice Pedal Voice 1 Pedal Voice 2 Voice Condition Page 1 Voice Condition Page 2 Voice Condition Page...

Owner's Manual
Page 29
... Touch and After Touch. 1 -1 INITIAL Touch Controls volume and timbre according to perfectly reproduce the subtle dynamic and tonal changes of a voice. Two types of keyboard touch affect this expressive function, making it possible to the velocity at which you expressive control over the volume and timbre of actual instruments. LEAD...
... Touch and After Touch. 1 -1 INITIAL Touch Controls volume and timbre according to perfectly reproduce the subtle dynamic and tonal changes of a voice. Two types of keyboard touch affect this expressive function, making it possible to the velocity at which you expressive control over the volume and timbre of actual instruments. LEAD...

Owner's Manual
Page 34
Independently applied to turn on . Press the appropriate Data Control button to each voice group. ¨1: Upper Keyboard Voice 1 ¨2: Upper Keyboard Voice 2 Ò1: Lower Keyboard Voice 1 Ò2: Lower Keyboard Voice 2 Î: Lead Voice 1: Pedalboard Voice 1 2: Pedalboard Voice 2 1 Tremolo/Chorus See Tremolo section on page 41. The solid (negative) box indicates the effect is turned...
Independently applied to turn on . Press the appropriate Data Control button to each voice group. ¨1: Upper Keyboard Voice 1 ¨2: Upper Keyboard Voice 2 Ò1: Lower Keyboard Voice 1 Ò2: Lower Keyboard Voice 2 Î: Lead Voice 1: Pedalboard Voice 1 2: Pedalboard Voice 2 1 Tremolo/Chorus See Tremolo section on page 41. The solid (negative) box indicates the effect is turned...

Owner's Manual
Page 40
... display shows the current sustain length values for more information. See page 101 for each keyboard, providing maximum expressive control. 2 Sustain The Sustain effect, selectable for the sustain effect to be noticeable. SUSTAIN UPPER (KNEE) LOWER PEDAL (KNEE) Voice Controls and ...:10 PEDAL: 6 DATA CONTROL Upper/Lower/Pedal Determines the length of the button lights up to indicate that the SUSTAIN buttons are independent for each keyboard. If you use them to simply check the sustain length values, you may unintentionally change the on or off before you start to set high...
... display shows the current sustain length values for more information. See page 101 for each keyboard, providing maximum expressive control. 2 Sustain The Sustain effect, selectable for the sustain effect to be noticeable. SUSTAIN UPPER (KNEE) LOWER PEDAL (KNEE) Voice Controls and ...:10 PEDAL: 6 DATA CONTROL Upper/Lower/Pedal Determines the length of the button lights up to indicate that the SUSTAIN buttons are independent for each keyboard. If you use them to simply check the sustain length values, you may unintentionally change the on or off before you start to set high...

Owner's Manual
Page 44
... the rhythms, providing appropriate and completely automatic accompaniment to match the style of the selected rhythm. Moreover, the Electone has a Keyboard Percussion feature that allows you to play , as you wish to play drum and percussion sounds from the front panel. The first...blinking. 2 Press the Data Control button corresponding to the rhythm you do with the designated rhythm will be instantly selected from the Lower keyboard and Pedalboard. MARCH WALTZ SWING BOUNCE SLOW 1 1 2 ROCK MAX SEQ. 4 Rhythm and Accompaniment The Rhythm features of the Electone ...
... the rhythms, providing appropriate and completely automatic accompaniment to match the style of the selected rhythm. Moreover, the Electone has a Keyboard Percussion feature that allows you to play , as you wish to play drum and percussion sounds from the front panel. The first...blinking. 2 Press the Data Control button corresponding to the rhythm you do with the designated rhythm will be instantly selected from the Lower keyboard and Pedalboard. MARCH WALTZ SWING BOUNCE SLOW 1 1 2 ROCK MAX SEQ. 4 Rhythm and Accompaniment The Rhythm features of the Electone ...

Owner's Manual
Page 45
... happening, turn on . (Refer to 0. NOTE: ABOUT SYNCHRO START: Synchro Start functions quite differently when the Auto Bass Chord feature is turned on the Lower keyboard is played, but then immediately stops when the key is turned off in for rhythm control, see page 99. SEQ. To stop the rhythm, press... the rhythm in the volume of three buttons to turn the Memory function on the rhythm: RHY THM INTRO. 3 Turn the rhythm on the Lower keyboard or Pedalboard. 3 INTRO. You can also be used to eight measures) before stopping the rhythm.
... happening, turn on . (Refer to 0. NOTE: ABOUT SYNCHRO START: Synchro Start functions quite differently when the Auto Bass Chord feature is turned on the Lower keyboard is played, but then immediately stops when the key is turned off in for rhythm control, see page 99. SEQ. To stop the rhythm, press... the rhythm in the volume of three buttons to turn the Memory function on the rhythm: RHY THM INTRO. 3 Turn the rhythm on the Lower keyboard or Pedalboard. 3 INTRO. You can also be used to eight measures) before stopping the rhythm.

Owner's Manual
Page 47
...to the rhythms and percussion sounds used to make the rhythm more interesting and complex. Range: 0 - 24 4 Auto Variation On/off switches of rhythm/keyboard percussion volume. NOTE: The Auto Variation function is effective). TANGO LATIN LATIN 8 BEAT 16 BEAT 2 3 4 1 2 MIN Rhythm and Accompaniment Rhythm ... drums. Range: -6 - 0 - +6 3 Reverb Determines the amount of which comprises the rhythms and is playable using the Keyboard Percussion function. 2 Rhythm Condition Pages The Rhythm Condition includes the following two pages: the Rhythm Condition page used to adjust the ...
...to the rhythms and percussion sounds used to make the rhythm more interesting and complex. Range: 0 - 24 4 Auto Variation On/off switches of rhythm/keyboard percussion volume. NOTE: The Auto Variation function is effective). TANGO LATIN LATIN 8 BEAT 16 BEAT 2 3 4 1 2 MIN Rhythm and Accompaniment Rhythm ... drums. Range: -6 - 0 - +6 3 Reverb Determines the amount of which comprises the rhythms and is playable using the Keyboard Percussion function. 2 Rhythm Condition Pages The Rhythm Condition includes the following two pages: the Rhythm Condition page used to adjust the ...

