Owners Manual
Page 33
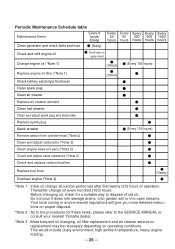
...twenty (20) hours of old oil. Before changing oil, check for these items, please refer to the SERVICE MANUAL or consult your nearest Yamaha dealer. *Note 3 : More frequent oil changing, oil filter replacement and air cleaner service on operating conditions. Do not pour it down ... include dusty environment, high ambient temperature, heavy engine loading. - 26 - Periodic Maintenance Schedule table Maintenance Items Every 8 hours (Daily) Clean generator and check bolts and nuts ˔ (Daily) Every Every Every Every Every 20 50 200 500 1000 hours hours hours hours hours Check and...
...twenty (20) hours of old oil. Before changing oil, check for these items, please refer to the SERVICE MANUAL or consult your nearest Yamaha dealer. *Note 3 : More frequent oil changing, oil filter replacement and air cleaner service on operating conditions. Do not pour it down ... include dusty environment, high ambient temperature, heavy engine loading. - 26 - Periodic Maintenance Schedule table Maintenance Items Every 8 hours (Daily) Clean generator and check bolts and nuts ˔ (Daily) Every Every Every Every Every 20 50 200 500 1000 hours hours hours hours hours Check and...
Owners Manual
Page 40
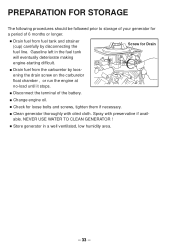
... will eventually deteriorate making engine-starting difficult. Spray with oiled cloth. PREPARATION FOR STORAGE The following procedures should be followed prior to storage of your generator for a period of 6 months or longer. ˙ Drain fuel from the carburetor by loosening the drain screw on the carburetor float chamber , ... tank and strainer (cup) carefully by disconnecting the fuel line. Screw for loose bolts and screws, tighten them if necessary. ˙ Clean generator thoroughly with preservative if available. Gasoline left in a well ventilated, low humidity area. - 33 -
... will eventually deteriorate making engine-starting difficult. Spray with oiled cloth. PREPARATION FOR STORAGE The following procedures should be followed prior to storage of your generator for a period of 6 months or longer. ˙ Drain fuel from the carburetor by loosening the drain screw on the carburetor float chamber , ... tank and strainer (cup) carefully by disconnecting the fuel line. Screw for loose bolts and screws, tighten them if necessary. ˙ Clean generator thoroughly with preservative if available. Gasoline left in a well ventilated, low humidity area. - 33 -
Owners Manual
Page 42
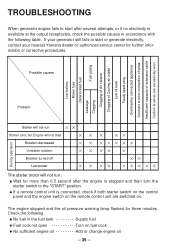
... fuel tank Supply fuel ˙ Fuel cock not open Turn on . Check the following table. If your nearest Yamaha dealer or authorized service center for further information or corrective procedures. TROUBLESHOOTING When generator engine fails to start after the engine is stopped and then turn the starter switch to start . Possible causes...
... fuel tank Supply fuel ˙ Fuel cock not open Turn on . Check the following table. If your nearest Yamaha dealer or authorized service center for further information or corrective procedures. TROUBLESHOOTING When generator engine fails to start after the engine is stopped and then turn the starter switch to start . Possible causes...
Owners Manual
Page 44
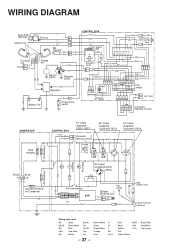
... LBlu Grn/Y Org Grn/Y Org Grn Gry -M +M B L.IG ST OFF Key ON switch START Blk (AC 120V) R Grn Org Blk Connector Grn/Y Gry R (Remote control) GENERATOR Field Winding Brush Brush Voltmeter Pilot lamp CONTROL BOX Fuse Blk R Blk AC output receptacle (120V) REC1 AC output receptacle (120/240V) REC3 AC output...
... LBlu Grn/Y Org Grn/Y Org Grn Gry -M +M B L.IG ST OFF Key ON switch START Blk (AC 120V) R Grn Org Blk Connector Grn/Y Gry R (Remote control) GENERATOR Field Winding Brush Brush Voltmeter Pilot lamp CONTROL BOX Fuse Blk R Blk AC output receptacle (120V) REC1 AC output receptacle (120/240V) REC3 AC output...
Owners Manual
Page 45
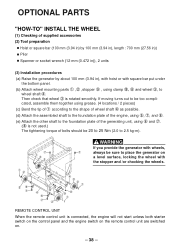
... THE WHEEL (1) Checking of bolts should be 20 to 25 Nm (2.0 to 2.5 kg-m). ᶉ ᶃ ᶄ ᶅ WARNING If you provide the generator with wheels, ᶉ always be too complicated, assemble them together using grease. (4 locations / 2 pieces) (c) Bend the tip of ᶃ according to the... length : 700 mm (27.56 in)) ˙ Plier ˙ Spanner or socket wrench (12 mm (0.472 in)), 2 units (3) Installation procedures (a) Raise the generator by about 100 mm (3.94 in), with hoist or with the stopper and /or chocking the wheels. ᶃ ᶄ ᶅᶈ ᶉ ᶇ ...
... THE WHEEL (1) Checking of bolts should be 20 to 25 Nm (2.0 to 2.5 kg-m). ᶉ ᶃ ᶄ ᶅ WARNING If you provide the generator with wheels, ᶉ always be too complicated, assemble them together using grease. (4 locations / 2 pieces) (c) Bend the tip of ᶃ according to the... length : 700 mm (27.56 in)) ˙ Plier ˙ Spanner or socket wrench (12 mm (0.472 in)), 2 units (3) Installation procedures (a) Raise the generator by about 100 mm (3.94 in), with hoist or with the stopper and /or chocking the wheels. ᶃ ᶄ ᶅᶈ ᶉ ᶇ ...


