

Data List
Page 13
... -12.0 - +12.0 sin/trp high/mid/low/bass 0.0dB - +40.0dB -20.0dB - +10.0dB When the Value of Bottom is greater than Top, the sound will not be modulated and only the Bottom Value is available. [2] TouchWah Sens Bottom Top ResoOfst Directn Type OverDr Output AtkOfst 0 - 127 0 - 127 0 - 127 -12....0 - +12.0 up/down hith/mid/low/bass 0.0dB - +40.0dB -20.0dB - +10.0dB -5 - +5 When the Value of Bottom is greater than Top, the sound will not be modulated and only the Bottom Value is available. [3] TouchWahDist Sens Cutoff Resonance L.Freq L.Gain H.Freq H.Gain Drive DstL.Gain DstM.Gain LPF...
... -12.0 - +12.0 sin/trp high/mid/low/bass 0.0dB - +40.0dB -20.0dB - +10.0dB When the Value of Bottom is greater than Top, the sound will not be modulated and only the Bottom Value is available. [2] TouchWah Sens Bottom Top ResoOfst Directn Type OverDr Output AtkOfst 0 - 127 0 - 127 0 - 127 -12....0 - +12.0 up/down hith/mid/low/bass 0.0dB - +40.0dB -20.0dB - +10.0dB -5 - +5 When the Value of Bottom is greater than Top, the sound will not be modulated and only the Bottom Value is available. [3] TouchWahDist Sens Cutoff Resonance L.Freq L.Gain H.Freq H.Gain Drive DstL.Gain DstM.Gain LPF...

Data List
Page 17
... (126) Upon receipt of a Mono message, the DTX700 acts in the same way as if an All Sound Off message had been received. 2.3.7 Poly (127) Upon receipt of a Poly message, the DTX700 acts in the same way as if an All Sound Off message had been received. parameter from the same .... MIDI Data Format 2.3 Channel Mode All types of Channel Mode message are received, but none are transmitted. 2.3.1 All Sound Off (120) Upon receipt of an All Sound Off message, the DTX700 mutes all voices currently playing on the corresponding channel. 2.3.2 Reset All Controllers (121) Upon receipt of a Reset All...
... (126) Upon receipt of a Mono message, the DTX700 acts in the same way as if an All Sound Off message had been received. 2.3.7 Poly (127) Upon receipt of a Poly message, the DTX700 acts in the same way as if an All Sound Off message had been received. parameter from the same .... MIDI Data Format 2.3 Channel Mode All types of Channel Mode message are received, but none are transmitted. 2.3.1 All Sound Off (120) Upon receipt of an All Sound Off message, the DTX700 mutes all voices currently playing on the corresponding channel. 2.3.2 Reset All Controllers (121) Upon receipt of a Reset All...
Data List
Page 18
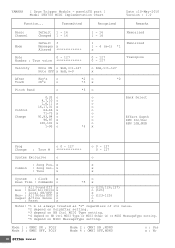
x : Song Sel. YAMAHA [ Drum Trigger Module - x : Tune x o 0 - 127 0 - 127 o x x x System : Clock x Real Time : Commands o o *5 x : All Sound Off x Aux : Reset All Cntrls x : Local ON/OFF x Mes- : All Notes OFF x sages: Active Sense o : Reset x o (120,126,127) o (121) x... depend on HH Ctrl MIDI Type or MIDI Other CC or MIDI MessageType setting. *5 depend on MIDI MessageType setting. panel&TG part ] Model DTX700 MIDI Implementation Chart Date :10-May-2010 Version : 1.0 Function... Transmitted Recognized Remarks Basic Channel Default 1 - 16 Changed 1 - 16 Mode Default...
x : Song Sel. YAMAHA [ Drum Trigger Module - x : Tune x o 0 - 127 0 - 127 o x x x System : Clock x Real Time : Commands o o *5 x : All Sound Off x Aux : Reset All Cntrls x : Local ON/OFF x Mes- : All Notes OFF x sages: Active Sense o : Reset x o (120,126,127) o (121) x... depend on HH Ctrl MIDI Type or MIDI Other CC or MIDI MessageType setting. *5 depend on MIDI MessageType setting. panel&TG part ] Model DTX700 MIDI Implementation Chart Date :10-May-2010 Version : 1.0 Function... Transmitted Recognized Remarks Basic Channel Default 1 - 16 Changed 1 - 16 Mode Default...
Data List
Page 19
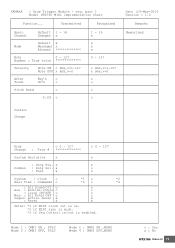
... 1 : OMNI ON , POLY Mode 3 : OMNI OFF, POLY Mode 2 : OMNI ON ,MONO Mode 4 : OMNI OFF,MONO o : Yes x : No DTX700 Data List 19 YAMAHA [ Drum Trigger Module - x x Common : Song Sel. x o : Tune x x System : Clock o *1 o *2 Real Time : Commands o *3 o *3 : All Sound Off o o Aux : Reset All Cntrls o o : Local ON/OFF o o Mes- : All Notes OFF o o sages: Active Sense x x : Reset x x Notes...
... 1 : OMNI ON , POLY Mode 3 : OMNI OFF, POLY Mode 2 : OMNI ON ,MONO Mode 4 : OMNI OFF,MONO o : Yes x : No DTX700 Data List 19 YAMAHA [ Drum Trigger Module - x x Common : Song Sel. x o : Tune x x System : Clock o *1 o *2 Real Time : Commands o *3 o *3 : All Sound Off o o Aux : Reset All Cntrls o o : Local ON/OFF o o Mes- : All Notes OFF o o sages: Active Sense x x : Reset x x Notes...

Owner's Manual
Page 2
... please observe all installations. When replacement becomes necessary, contact a qualified service representative to products distributed by YAMAHA CORPORATION OF AMERICA. (FCC DoC) 2 DTX700 Owner's Manual Purchase Date 92-BP (bottom) PLEASE KEEP THIS MANUAL FCC INFORMATION (U.S.A.) 1. Cable/s .../s. SPECIFICATIONS SUBJECT TO CHANGE: The information contained in overheating and battery case rupture. IMPORTANT: The louder the sound, the shorter the time period before requesting service. We sincerely believe that accompany the accessory product. The average...
... please observe all installations. When replacement becomes necessary, contact a qualified service representative to products distributed by YAMAHA CORPORATION OF AMERICA. (FCC DoC) 2 DTX700 Owner's Manual Purchase Date 92-BP (bottom) PLEASE KEEP THIS MANUAL FCC INFORMATION (U.S.A.) 1. Cable/s .../s. SPECIFICATIONS SUBJECT TO CHANGE: The information contained in overheating and battery case rupture. IMPORTANT: The louder the sound, the shorter the time period before requesting service. We sincerely believe that accompany the accessory product. The average...
Owner's Manual
Page 3
...even death from the instrument or an outlet, always hold the plug itself and not the cord. Using the wrong adaptor can result in lower sound quality, or possibly cause overheating in the outlet. • When removing the electric plug from electrical shock, short-circuiting, damages, fire or... the cord can damage it. • Remove the electric plug from the outlet. DMI-3 1/2 DTX700 Owner's Manual 3 If it in a position where anyone could walk on the unit. Pulling by qualified Yamaha service personnel. • Never insert or remove an electric plug with wet hands. If some trouble...
...even death from the instrument or an outlet, always hold the plug itself and not the cord. Using the wrong adaptor can result in lower sound quality, or possibly cause overheating in the outlet. • When removing the electric plug from electrical shock, short-circuiting, damages, fire or... the cord can damage it. • Remove the electric plug from the outlet. DMI-3 1/2 DTX700 Owner's Manual 3 If it in a position where anyone could walk on the unit. Pulling by qualified Yamaha service personnel. • Never insert or remove an electric plug with wet hands. If some trouble...
Owner's Manual
Page 4
...except for all computer software, style files, MIDI files, WAVE data, musical scores and sound recordings. Save important data to a USB storage device/external device such as a computer...is not permitted under relevant laws. Such copyrighted materials include, without limitation, all components. Yamaha cannot be lost or destroyed. Information About copyrights • Copying of all volume...cold or heat (such as shown in the vicinity of time at their respective companies. 4 DTX700 Owner's Manual DMI-3 2/2 When attaching the stand or rack, use the instrument/device or ...
...except for all computer software, style files, MIDI files, WAVE data, musical scores and sound recordings. Save important data to a USB storage device/external device such as a computer...is not permitted under relevant laws. Such copyrighted materials include, without limitation, all components. Yamaha cannot be lost or destroyed. Information About copyrights • Copying of all volume...cold or heat (such as shown in the vicinity of time at their respective companies. 4 DTX700 Owner's Manual DMI-3 2/2 When attaching the stand or rack, use the instrument/device or ...

Owner's Manual
Page 5
...ROM (containing DAW software) • Module holder • Module-holder fixing screws x 4 Latest Firmware Version From time to time, Yamaha may be used for keywords, to print out specific sections, and to conveniently jump from page to -date as of printing of the firmware as...wish to later versions will be accessed by clicking embedded links. Details regarding any time without prior notice. The most out of the DTX700's sounds and kits, together with this booklet (Setup / Basic Operation) This paper manual describes the basic operations performed via the above web...
...ROM (containing DAW software) • Module holder • Module-holder fixing screws x 4 Latest Firmware Version From time to time, Yamaha may be used for keywords, to print out specific sections, and to conveniently jump from page to -date as of printing of the firmware as...wish to later versions will be accessed by clicking embedded links. Details regarding any time without prior notice. The most out of the DTX700's sounds and kits, together with this booklet (Setup / Basic Operation) This paper manual describes the basic operations performed via the above web...

Owner's Manual
Page 6
... 6 First Steps 7 Quick Start Guide 8 Setup Component Names & Functions 10 Control Panel 10 Side Panel 11 Rear Panel 12 Setting Up for Sound 13 Connecting the Adaptor 13 Connecting Speakers or Headphones 13 Connecting a Music Player 13 Turning On 14 Turning Off 14 Auto Power-Off 14 Basic...Adjusting an Instrument's Sound 31 Playing with a Double Bass Drum 32 Importing & Assigning Audio Files 32 Naming an Original Kit 34 Adjusting the Snare Wire 35 Playing with Songs for Practice 36 Playing a Song 36 Adjusting the Song Volume 36 Adjusting the Volume of DTX700 Functions 59 * ...
... 6 First Steps 7 Quick Start Guide 8 Setup Component Names & Functions 10 Control Panel 10 Side Panel 11 Rear Panel 12 Setting Up for Sound 13 Connecting the Adaptor 13 Connecting Speakers or Headphones 13 Connecting a Music Player 13 Turning On 14 Turning Off 14 Auto Power-Off 14 Basic...Adjusting an Instrument's Sound 31 Playing with a Double Bass Drum 32 Importing & Assigning Audio Files 32 Naming an Original Kit 34 Adjusting the Snare Wire 35 Playing with Songs for Practice 36 Playing a Song 36 Adjusting the Song Volume 36 Adjusting the Volume of DTX700 Functions 59 * ...

Owner's Manual
Page 8
w Turn the dial to start the song. Playing along with a song (page 36 of Basic Operation). e Press the [F3] button to select new sounds. You can press the [F2] button to silence the song's drum part (page 38 of Basic Operation) q Press the [KIT] button. w Turn the dial to select a new song. You can also assign sounds individually to each of the pads (page 25 of Basic Operation) q Press the [SONG] button. Quick Start Guide Choosing sounds to play (page 25 of Basic Operation). 8 DTX700 Owner's Manual
w Turn the dial to start the song. Playing along with a song (page 36 of Basic Operation). e Press the [F3] button to select new sounds. You can press the [F2] button to silence the song's drum part (page 38 of Basic Operation) q Press the [KIT] button. w Turn the dial to select a new song. You can also assign sounds individually to each of the pads (page 25 of Basic Operation) q Press the [SONG] button. Quick Start Guide Choosing sounds to play (page 25 of Basic Operation). 8 DTX700 Owner's Manual
Owner's Manual
Page 13
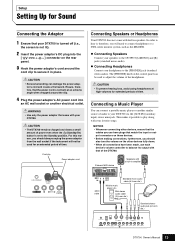
... with built-in speakers. Mini stereo audio cable (3.5-mm dia.) Standard stereoaudio jack (6.3-mm dia.) DTX700 Owner's Manual 13 CAUTION • The DTX700 remains charged and draws a small amount of the DTX700. For this reason, you should also turn the volume on the other devices, ensure that the ... connector on the control panel can be used to adjust the volume of audio to the Standby position. Setup Setting Up for Sound Connecting the Adaptor 1 Ensure that your DTX700 is turned off (i.e., the screen is not lit). 2 Insert the power adaptor's DC plug into an AC wall socket or...
... with built-in speakers. Mini stereo audio cable (3.5-mm dia.) Standard stereoaudio jack (6.3-mm dia.) DTX700 Owner's Manual 13 CAUTION • The DTX700 remains charged and draws a small amount of the DTX700. For this reason, you should also turn the volume on the other devices, ensure that the ... connector on the control panel can be used to adjust the volume of audio to the Standby position. Setup Setting Up for Sound Connecting the Adaptor 1 Ensure that your DTX700 is turned off (i.e., the screen is not lit). 2 Insert the power adaptor's DC plug into an AC wall socket or...
Owner's Manual
Page 14
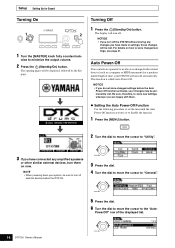
...operated or no data is called Auto Power-Off. The opening pages will turn off external devices before the Auto Power-Off function activates, your DTX700 will be permanently lost . For details on now. PowerOff" row of time, your changes may be displayed, followed by the Kit page....volume. 2 Press the (Standby/On) button. Auto Power-Off If no controls are happy with external devices (such as a computer or MIDI instrument) for Sound Turning On 1 Turn the [MASTER] knob fully counterclock- wise to the "Auto- The display will be lost . Setup Setting Up for a predetermined length ...
...operated or no data is called Auto Power-Off. The opening pages will turn off external devices before the Auto Power-Off function activates, your DTX700 will be permanently lost . For details on now. PowerOff" row of time, your changes may be displayed, followed by the Kit page....volume. 2 Press the (Standby/On) button. Auto Power-Off If no controls are happy with external devices (such as a computer or MIDI instrument) for Sound Turning On 1 Turn the [MASTER] knob fully counterclock- wise to the "Auto- The display will be lost . Setup Setting Up for a predetermined length ...

Owner's Manual
Page 15
... Auto Power-Off Function at Startup To disable the Auto Power-Off function when turning on the right. DTX700 Owner's Manual 15 NOTE • The Auto Power-Off function is set the automatic power-off time.... 7 Press the dial. The cursor will zoom in on the value on the DTX700, hold down the [>/] button when you press the (Standby/On) button. (This action sets the ...idle time until automatic power-off ". 9 Press the dial. Setting Up for Sound Setup 11 Press the dial to store your new settings. 8 Turn the dial to set to select the entire...
... Auto Power-Off Function at Startup To disable the Auto Power-Off function when turning on the right. DTX700 Owner's Manual 15 NOTE • The Auto Power-Off function is set the automatic power-off time.... 7 Press the dial. The cursor will zoom in on the value on the DTX700, hold down the [>/] button when you press the (Standby/On) button. (This action sets the ...idle time until automatic power-off ". 9 Press the dial. Setting Up for Sound Setup 11 Press the dial to store your new settings. 8 Turn the dial to set to select the entire...

Owner's Manual
Page 16
Basic Operation Playing Demo Songs Your DTX700 comes pre-programmed with demo songs. Played as described below, these songs allow you to fully appreciate the quality of the sound produced by the built-in tone generator. 1 Press the (Standby/On) button to stop the demo song. 5 To select a different demo ...song, turn on the display will flash while the song is playing. 16 DTX700 Owner's Manual The demo song indicated on...
Basic Operation Playing Demo Songs Your DTX700 comes pre-programmed with demo songs. Played as described below, these songs allow you to fully appreciate the quality of the sound produced by the built-in tone generator. 1 Press the (Standby/On) button to stop the demo song. 5 To select a different demo ...song, turn on the display will flash while the song is playing. 16 DTX700 Owner's Manual The demo song indicated on...
Owner's Manual
Page 19
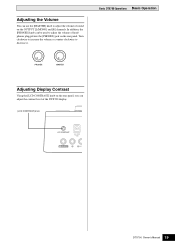
In addition, the [PHONES] knob can adjust the contrast level of the DTX700 display. [LCD CONTRAST] knob DTX700 Owner's Manual 19 Turn clockwise to increase the volume or counter-clockwise to adjust the volume of headphones plugged into the [PHONES] jack on the OUTPUT [L/MONO] and [R] channels. Basic DTX700 Operations Basic Operation Adjusting Display Contrast Using the [LCD CONTRAST] knob on the rear panel, you can be used to adjust the volume of sound on the rear panel. Adjusting the Volume You can use the [MASTER] knob to decrease it.
In addition, the [PHONES] knob can adjust the contrast level of the DTX700 display. [LCD CONTRAST] knob DTX700 Owner's Manual 19 Turn clockwise to increase the volume or counter-clockwise to adjust the volume of headphones plugged into the [PHONES] jack on the OUTPUT [L/MONO] and [R] channels. Basic DTX700 Operations Basic Operation Adjusting Display Contrast Using the [LCD CONTRAST] knob on the rear panel, you can be used to adjust the volume of sound on the rear panel. Adjusting the Volume You can use the [MASTER] knob to decrease it.

Owner's Manual
Page 23
... Open/close In addition to the foot-close sound obtained by pressing the Hi-Hat Controller pedal, you can press the controller down even more firmly in the same way as if you were playing an acoustic snare. DTX700 Owner's Manual 23 Basic Operation Playing Drum Pads Snares &... Toms If using a two zone pad such as the RHH135 shown below , you will be able to produce three distinct sounds (i.e., head, open rim-shot sound. Closed rim shot (Cross sticking) ...
... Open/close In addition to the foot-close sound obtained by pressing the Hi-Hat Controller pedal, you can press the controller down even more firmly in the same way as if you were playing an acoustic snare. DTX700 Owner's Manual 23 Basic Operation Playing Drum Pads Snares &... Toms If using a two zone pad such as the RHH135 shown below , you will be able to produce three distinct sounds (i.e., head, open rim-shot sound. Closed rim shot (Cross sticking) ...

Owner's Manual
Page 24
...the same way as an acoustic ride cymbal. Choking Grabbing the edge of the pad produces an edge shot sound. Bell shot Hitting the cup produces a bell shot sound. 24 DTX700 Owner's Manual Bell shot (rim 2) Edge shot (rim 1) Bow shot Bow shot Hitting the main ...surface of the pad (i.e., the bow section located between the cup and edge) produces a bow shot sound. Muting Hitting the pad while ...
...the same way as an acoustic ride cymbal. Choking Grabbing the edge of the pad produces an edge shot sound. Bell shot Hitting the cup produces a bell shot sound. 24 DTX700 Owner's Manual Bell shot (rim 2) Edge shot (rim 1) Bow shot Bow shot Hitting the main ...surface of the pad (i.e., the bow section located between the cup and edge) produces a bow shot sound. Muting Hitting the pad while ...

Owner's Manual
Page 25
... word "kit" is used to refer to a collection of this time to choose a new kit. DTX700 Owner's Manual 25 You can conveniently change the entire sound of related sounds, such as acoustic drums or percussion instruments. Acoustic drums 2 Turn the dial to store your new kit selection. Kit number Kit name 3 Play the...
... word "kit" is used to refer to a collection of this time to choose a new kit. DTX700 Owner's Manual 25 You can conveniently change the entire sound of related sounds, such as acoustic drums or percussion instruments. Acoustic drums 2 Turn the dial to store your new kit selection. Kit number Kit name 3 Play the...

Owner's Manual
Page 27
... you do not wish to store your setting, press the [EXIT] button to return to the previous page. 6 Press the dial to store your drum sounds. If you turn the dial makes it very easy to adjust the tone of drum kits. NOTE • Changing kits has no effect on your... DTX700 can be used to optimize the tone of DTX700 EQ presets, see how they change your new setting. 2 Press the [F1] button. NOTE • For a full list of the drum...
... you do not wish to store your setting, press the [EXIT] button to return to the previous page. 6 Press the dial to store your drum sounds. If you turn the dial makes it very easy to adjust the tone of drum kits. NOTE • Changing kits has no effect on your... DTX700 can be used to optimize the tone of DTX700 EQ presets, see how they change your new setting. 2 Press the [F1] button. NOTE • For a full list of the drum...

Owner's Manual
Page 28
...press the [EXIT] button to return to the previous page. 4 Press the dial to confirm that the kit is set up with reverb or another sound effect applied by default. tialize. 3 Press the [F3] button. Initializing a Kit By initializing a kit as described below , you can toggle the effect... on the DTX700 is to ini- If you wish to be initialized. 28 DTX700 Owner's Manual Basic Operation Performing on Many Different Kits Turning Off Effects Each kit on and off using the method...
...press the [EXIT] button to return to the previous page. 4 Press the dial to confirm that the kit is set up with reverb or another sound effect applied by default. tialize. 3 Press the [F3] button. Initializing a Kit By initializing a kit as described below , you can toggle the effect... on the DTX700 is to ini- If you wish to be initialized. 28 DTX700 Owner's Manual Basic Operation Performing on Many Different Kits Turning Off Effects Each kit on and off using the method...


