

Data List
Page 13
...12dB - +12dB 500Hz - 16.0kHz -12dB - +12dB 100Hz - 10.0kHz -12dB - +12dB 0.1 - 12.0 0.0ms - 50.0ms -63 - +63 [3] PhaserMono Speed Manual Depth Feedback Stage Mode Color 0.100Hz - 10.0Hz 0 - 127 0 - 127 0 - 127 4, 6, 8, 10, 12, 16 1, 2, 3 0 - 127 The color parameter... set to 4, 6, 8, 12 or 16: or when Mode is set to 2 and Stage is set to 4 or 10. [4] PhaserStereo Speed Manual Depth Feedback Stage Mode Color 0.100Hz - 10.0Hz 0 - 127 0 - 127 0 - 127 4, 6, 8, 10 1, 2 0 - 127... - +12dB 500Hz - 16.0kHz -12dB - +12dB 0 - 127 -12dB - +12dB -12dB - +12dB 1.0kHz - 20.0kHz 0 - 127 DTX700 Data List 13
...12dB - +12dB 500Hz - 16.0kHz -12dB - +12dB 100Hz - 10.0kHz -12dB - +12dB 0.1 - 12.0 0.0ms - 50.0ms -63 - +63 [3] PhaserMono Speed Manual Depth Feedback Stage Mode Color 0.100Hz - 10.0Hz 0 - 127 0 - 127 0 - 127 4, 6, 8, 10, 12, 16 1, 2, 3 0 - 127 The color parameter... set to 4, 6, 8, 12 or 16: or when Mode is set to 2 and Stage is set to 4 or 10. [4] PhaserStereo Speed Manual Depth Feedback Stage Mode Color 0.100Hz - 10.0Hz 0 - 127 0 - 127 0 - 127 4, 6, 8, 10 1, 2 0 - 127... - +12dB 500Hz - 16.0kHz -12dB - +12dB 0 - 127 -12dB - +12dB -12dB - +12dB 1.0kHz - 20.0kHz 0 - 127 DTX700 Data List 13

Owner's Manual
Page 1
DRUM TRIGGER MODULE DTX700 Owner's Manual (Setup / Basic Operation) Read on paper (see page 6 for Table of Contents) Read first Owner's Manual (Setup / Basic Operation) : This booklet Read when necessary Data List : Separate booklet Read on your computer (PDF file) Read when Reference Manual (Detailed Operation) necessary Please download from this web page: http://www.yamaha.co.jp/manual/ EN
DRUM TRIGGER MODULE DTX700 Owner's Manual (Setup / Basic Operation) Read on paper (see page 6 for Table of Contents) Read first Owner's Manual (Setup / Basic Operation) : This booklet Read when necessary Data List : Separate booklet Read on your computer (PDF file) Read when Reference Manual (Detailed Operation) necessary Please download from this web page: http://www.yamaha.co.jp/manual/ EN

Owner's Manual
Page 2
... undesired operation. See user manual instructions if interference to be capable of printing. This product should be correct at the time of producing sound levels that are not covered by YAMAHA CORPORATION OF AMERICA. (FCC DoC) 2 DTX700 Owner's Manual SPECIFICATIONS SUBJECT TO CHANGE: ...The information contained in place. However, Yamaha reserves the right to disassemble, or incinerate any power supply or adapter...
... undesired operation. See user manual instructions if interference to be capable of printing. This product should be correct at the time of producing sound levels that are not covered by YAMAHA CORPORATION OF AMERICA. (FCC DoC) 2 DTX700 Owner's Manual SPECIFICATIONS SUBJECT TO CHANGE: ...The information contained in place. However, Yamaha reserves the right to disassemble, or incinerate any power supply or adapter...
Owner's Manual
Page 3
...Do not connect the instrument to disassemble or modify the internal components in any dirt or dust which might accidentally fall over it inspected by Yamaha service personnel. • The power cord or plug becomes frayed or damaged. • It emits unusual smells or smoke. • Some...name plate of serious injury or even death from the wall AC outlet. DMI-3 1/2 DTX700 Owner's Manual 3 Using the wrong adaptor can result in damage to the instrument or other hazards. Pulling by qualified Yamaha service personnel. • Never insert or remove an electric plug with wet hands. ...
...Do not connect the instrument to disassemble or modify the internal components in any dirt or dust which might accidentally fall over it inspected by Yamaha service personnel. • The power cord or plug becomes frayed or damaged. • It emits unusual smells or smoke. • Some...name plate of serious injury or even death from the wall AC outlet. DMI-3 1/2 DTX700 Owner's Manual 3 Using the wrong adaptor can result in damage to the instrument or other hazards. Pulling by qualified Yamaha service personnel. • Never insert or remove an electric plug with wet hands. ...
Owner's Manual
Page 4
...Any violation of their minimum levels and gradually raise the volume controls while playing the instrument to the internal components or result in which Yamaha owns copyrights or with respect to which it has license to use others , damage to the instrument or other property, or operational failure... not using the instrument for the instrument. This could cause damage to set the volumes of time at their respective companies. 4 DTX700 Owner's Manual DMI-3 2/2 When you are for all computer software, style files, MIDI files, WAVE data, musical scores and sound recordings. ...
...Any violation of their minimum levels and gradually raise the volume controls while playing the instrument to the internal components or result in which Yamaha owns copyrights or with respect to which it has license to use others , damage to the instrument or other property, or operational failure... not using the instrument for the instrument. This could cause damage to set the volumes of time at their respective companies. 4 DTX700 Owner's Manual DMI-3 2/2 When you are for all computer software, style files, MIDI files, WAVE data, musical scores and sound recordings. ...

Owner's Manual
Page 5
... bundled with digital-type documents. As such, a computer and suitable software will also be downloaded from the Yamaha Manual Library web page: http://www.yamaha.co.jp/manual/ * Yamaha Corp. http://dtxdrums.yamaha.com/downloads/ The content of the DTX700's sounds and kits, together with the drum trigger module. And after reading through this purpose as needed...
... bundled with digital-type documents. As such, a computer and suitable software will also be downloaded from the Yamaha Manual Library web page: http://www.yamaha.co.jp/manual/ * Yamaha Corp. http://dtxdrums.yamaha.com/downloads/ The content of the DTX700's sounds and kits, together with the drum trigger module. And after reading through this purpose as needed...

Owner's Manual
Page 6
... Setting the Click-Track Volume 41 Setting the Time Signature 43 Using the Timer 44 Tap Tempo - Setting the Tempo by Playing Pads...... 44 Using DTX700 Training Functions 45 Recording Your Performances 48 Recording a Performance 48 Playing a Recorded Performance 48 Deleting a Recorded Performance 48 Recording Performance & Song Together 49 Integrating ...Accessories 50 Using an HH65 Hi-hat Controller as Kick Drum Pedal 50 Expanding with a PCY135 Cymbal Pad 50 Connecting Your DTX700 to the Reference Manual PDF document. 6 DTX700 Owner's Manual
... Setting the Click-Track Volume 41 Setting the Time Signature 43 Using the Timer 44 Tap Tempo - Setting the Tempo by Playing Pads...... 44 Using DTX700 Training Functions 45 Recording Your Performances 48 Recording a Performance 48 Playing a Recorded Performance 48 Deleting a Recorded Performance 48 Recording Performance & Song Together 49 Integrating ...Accessories 50 Using an HH65 Hi-hat Controller as Kick Drum Pedal 50 Expanding with a PCY135 Cymbal Pad 50 Connecting Your DTX700 to the Reference Manual PDF document. 6 DTX700 Owner's Manual

Owner's Manual
Page 7
... came with your pad sets (DTX700K, DTX750K, etc.). • Plug the power adaptor into the DTX700 and turn it on. m Refer to the assembly manuals that came with your kit. • Assemble the racks. Detailed descriptions of this booklet. 4 Play your kit. • See ... 8 and 9 of all functions can be found in the Reference Manual PDF document (see page 5). m Refer to the assembly manuals that came with your pad sets (DTX700K, DTX750K, etc.). 3 Connect your kit. • Connect your DTX700's basic functions. First Steps 1 Open the boxes to reveal their contents...
... came with your pad sets (DTX700K, DTX750K, etc.). • Plug the power adaptor into the DTX700 and turn it on. m Refer to the assembly manuals that came with your kit. • Assemble the racks. Detailed descriptions of this booklet. 4 Play your kit. • See ... 8 and 9 of all functions can be found in the Reference Manual PDF document (see page 5). m Refer to the assembly manuals that came with your pad sets (DTX700K, DTX750K, etc.). 3 Connect your kit. • Connect your DTX700's basic functions. First Steps 1 Open the boxes to reveal their contents...

Owner's Manual
Page 8
w Turn the dial to start the song. e Press the [F3] button to select a new song. Playing along with a song (page 36 of Basic Operation) q Press the [KIT] button. You can press the [F2] button to each of the pads (page 25 of Basic Operation). 8 DTX700 Owner's Manual Quick Start Guide Choosing sounds to select new sounds. You can also assign sounds individually to silence the song's drum part (page 38 of Basic Operation). w Turn the dial to play (page 25 of Basic Operation) q Press the [SONG] button.
w Turn the dial to start the song. e Press the [F3] button to select a new song. Playing along with a song (page 36 of Basic Operation) q Press the [KIT] button. You can press the [F2] button to each of the pads (page 25 of Basic Operation). 8 DTX700 Owner's Manual Quick Start Guide Choosing sounds to select new sounds. You can also assign sounds individually to silence the song's drum part (page 38 of Basic Operation). w Turn the dial to play (page 25 of Basic Operation) q Press the [SONG] button.
Owner's Manual
Page 9
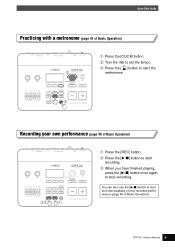
e Press the [ ] button to start recording. Recording your recorded performance (page 48 of Basic Operation). w Press the [>/] button to start and stop recording. You can also use the [>/] button to start the metronome. w Turn the dial to stop playback of your own performance (page 48 of Basic Operation) q Press the [CLICK] button. e When you have finished playing, press the [>/] button once again to set the tempo. Quick Start Guide Practicing with a metronome (page 41 of Basic Operation) q Press the [REC] button. DTX700 Owner's Manual 9
e Press the [ ] button to start recording. Recording your recorded performance (page 48 of Basic Operation). w Press the [>/] button to start and stop recording. You can also use the [>/] button to start the metronome. w Turn the dial to stop playback of your own performance (page 48 of Basic Operation) q Press the [CLICK] button. e When you have finished playing, press the [>/] button once again to set the tempo. Quick Start Guide Practicing with a metronome (page 41 of Basic Operation) q Press the [REC] button. DTX700 Owner's Manual 9
Owner's Manual
Page 10
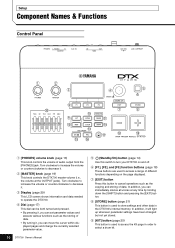
... and storing of data. • By turning it, you can move the cursor within displayed pages and change the currently selected parameter value. 10 DTX700 Owner's Manual t (Standby/On) button (page 14) Use this button to cancel operations such as the storing of data. r Dial (page 17) This ...dial can immediately silence all voices at the OUTPUT jacks). w [MASTER] knob (page 19) This knob controls the DTX700 master volume (i.e., the volume at any time ...
... and storing of data. • By turning it, you can move the cursor within displayed pages and change the currently selected parameter value. 10 DTX700 Owner's Manual t (Standby/On) button (page 14) Use this button to cancel operations such as the storing of data. r Dial (page 17) This ...dial can immediately silence all voices at the OUTPUT jacks). w [MASTER] knob (page 19) This knob controls the DTX700 master volume (i.e., the volume at any time ...
Owner's Manual
Page 11
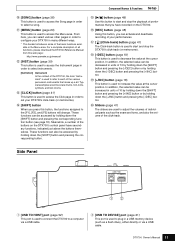
... (page 41) The sliders are used to adjust the volumes of individual parts such as a flash drive), either directly or via a USB cable. DTX700 Owner's Manual 11 Component Names & Functions Setup !5 [>/] button (page 48) Use this button to start and stop the playback of the... this button, the functions assigned to each of the click-track. Meanwhile, a number of all functions, please download the DTX700 Reference Manual from this web page: http://www.yamaha.co.jp/manual/ !2 [INST] button (page 30) This button is used to access the Instrument page in order to decrease the value...
... (page 41) The sliders are used to adjust the volumes of individual parts such as a flash drive), either directly or via a USB cable. DTX700 Owner's Manual 11 Component Names & Functions Setup !5 [>/] button (page 48) Use this button to start and stop the playback of the... this button, the functions assigned to each of the click-track. Meanwhile, a number of all functions, please download the DTX700 Reference Manual from this web page: http://www.yamaha.co.jp/manual/ !2 [INST] button (page 30) This button is used to access the Instrument page in order to decrease the value...
Owner's Manual
Page 12
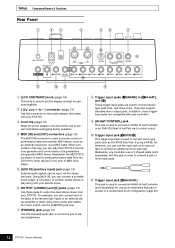
.... They also support standard mono-output pads. In addition, these jacks to the left and right inputs of a double bass drum configuration (page 50). 12 DTX700 Owner's Manual If using mono audio-jack cables. y OUTPUT [L/MONO] and [R] jacks (page 13) Use these triggerinput jacks are used to send performance data from another...
.... They also support standard mono-output pads. In addition, these jacks to the left and right inputs of a double bass drum configuration (page 50). 12 DTX700 Owner's Manual If using mono audio-jack cables. y OUTPUT [L/MONO] and [R] jacks (page 13) Use these triggerinput jacks are used to send performance data from another...
Owner's Manual
Page 13
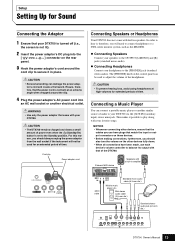
...when the (Standby/On) button is not bent at high volumes for an extended period of time. Ensure, therefore, that came with your DTX700 via the [AUX IN] (auxiliary input) stereo mini-jack. Cord clip Power adaptor cord Connecting Speakers or Headphones Your... have plugs that of the headphones. In order to hear it possible to adjust the volume of the DTX700. Mini stereo audio cable (3.5-mm dia.) Standard stereoaudio jack (6.3-mm dia.) DTX700 Owner's Manual 13 CAUTION • To prevent hearing loss, avoid using headphones at an extreme angle when wrapped around ...
...when the (Standby/On) button is not bent at high volumes for an extended period of time. Ensure, therefore, that came with your DTX700 via the [AUX IN] (auxiliary input) stereo mini-jack. Cord clip Power adaptor cord Connecting Speakers or Headphones Your... have plugs that of the headphones. In order to hear it possible to adjust the volume of the DTX700. Mini stereo audio cable (3.5-mm dia.) Standard stereoaudio jack (6.3-mm dia.) DTX700 Owner's Manual 13 CAUTION • To prevent hearing loss, avoid using headphones at an extreme angle when wrapped around ...
Owner's Manual
Page 14
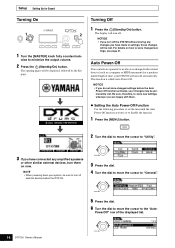
...Setting Up for a predetermined length of the displayed list. 14 DTX700 Owner's Manual wise to turn off external devices before the Auto Power-Off... your system, be permanently lost . NOTICE • If you turn them on how to store changed settings before the DTX700. 3 Press the dial. 4 Turn the dial to move the cursor to "General". 5 Press the dial. 6 Turn...new settings whenever you do not store changed settings, see page 21. NOTE • When powering down your DTX700 will be displayed, followed by the Kit page. The display will be lost . This function is exchanged ...
...Setting Up for a predetermined length of the displayed list. 14 DTX700 Owner's Manual wise to turn off external devices before the Auto Power-Off... your system, be permanently lost . NOTICE • If you turn them on how to store changed settings before the DTX700. 3 Press the dial. 4 Turn the dial to move the cursor to "General". 5 Press the dial. 6 Turn...new settings whenever you do not store changed settings, see page 21. NOTE • When powering down your DTX700 will be displayed, followed by the Kit page. The display will be lost . This function is exchanged ...

Owner's Manual
Page 15
The value indicates the idle time until automatic power-off in units of 5 minutes between 5 and 30. DTX700 Owner's Manual 15 Setting Up for Sound Setup 11 Press the dial to store your new settings. 8 Turn the dial to set to 30 minutes by selecting "... Function at Startup To disable the Auto Power-Off function when turning on the right. The cursor will zoom in on the value on the DTX700, hold down the [>/] button when you can be made in minutes. The cursor will zoom out to "Off".) 10 Press the [STORE] button...
The value indicates the idle time until automatic power-off in units of 5 minutes between 5 and 30. DTX700 Owner's Manual 15 Setting Up for Sound Setup 11 Press the dial to store your new settings. 8 Turn the dial to set to 30 minutes by selecting "... Function at Startup To disable the Auto Power-Off function when turning on the right. The cursor will zoom in on the value on the DTX700, hold down the [>/] button when you can be made in minutes. The cursor will zoom out to "Off".) 10 Press the [STORE] button...

Owner's Manual
Page 16
...] button once again to turn the dial and repeat Steps 3 and 4. 2 Press the [SONG] button. 3 Press the [F3] button. The demo song indicated on your DTX700. Played as described below, these songs allow you to fully appreciate the quality of the sound produced by the built-in tone generator. 1 Press the... (Standby/On) button to stop the demo song. 5 To select a different demo song, turn on the display will flash while the song is playing. 16 DTX700 Owner's Manual Basic Operation Playing Demo Songs Your DTX700 comes pre-programmed with demo songs.
...] button once again to turn the dial and repeat Steps 3 and 4. 2 Press the [SONG] button. 3 Press the [F3] button. The demo song indicated on your DTX700. Played as described below, these songs allow you to fully appreciate the quality of the sound produced by the built-in tone generator. 1 Press the... (Standby/On) button to stop the demo song. 5 To select a different demo song, turn on the display will flash while the song is playing. 16 DTX700 Owner's Manual Basic Operation Playing Demo Songs Your DTX700 comes pre-programmed with demo songs.

Owner's Manual
Page 17
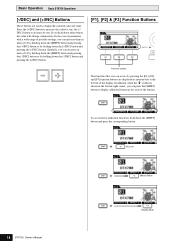
... back to the underline cursor. Changing the Cursor Value The cursor is displayed as a block of inverted text. DTX700 Owner's Manual 17 By turning the dial in either direction, you can change . Basic Operation Basic DTX700 Operations Dial (with the [SONG] button, you wish to set both the song number and the tempo...
... back to the underline cursor. Changing the Cursor Value The cursor is displayed as a block of inverted text. DTX700 Owner's Manual 17 By turning the dial in either direction, you can change . Basic Operation Basic DTX700 Operations Dial (with the [SONG] button, you wish to set both the song number and the tempo...
Owner's Manual
Page 18
... units of 10 by holding down the [SHIFT] button and pressing the [-/DEC] button or by one ; Kit Lock Effects Switch 18 DTX700 Owner's Manual Display Mode Basic Operation Basic DTX700 Operations [-/DEC] and [+/INC] Buttons These buttons are displayed as inverted text at the bottom of the display. the [-/ DEC] button to...
... units of 10 by holding down the [SHIFT] button and pressing the [-/DEC] button or by one ; Kit Lock Effects Switch 18 DTX700 Owner's Manual Display Mode Basic Operation Basic DTX700 Operations [-/DEC] and [+/INC] Buttons These buttons are displayed as inverted text at the bottom of the display. the [-/ DEC] button to...
Owner's Manual
Page 19
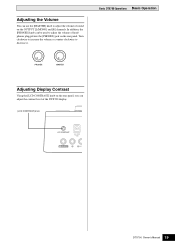
Basic DTX700 Operations Basic Operation Adjusting Display Contrast Using the [LCD CONTRAST] knob on the rear panel. Adjusting the Volume You can adjust the contrast level of the DTX700 display. [LCD CONTRAST] knob DTX700 Owner's Manual 19 Turn clockwise to increase the volume or counter-clockwise to adjust the volume of headphones plugged into the [PHONES] jack on the rear panel, you can use the [MASTER] knob to decrease it. In addition, the [PHONES] knob can be used to adjust the volume of sound on the OUTPUT [L/MONO] and [R] channels.
Basic DTX700 Operations Basic Operation Adjusting Display Contrast Using the [LCD CONTRAST] knob on the rear panel. Adjusting the Volume You can adjust the contrast level of the DTX700 display. [LCD CONTRAST] knob DTX700 Owner's Manual 19 Turn clockwise to increase the volume or counter-clockwise to adjust the volume of headphones plugged into the [PHONES] jack on the rear panel, you can use the [MASTER] knob to decrease it. In addition, the [PHONES] knob can be used to adjust the volume of sound on the OUTPUT [L/MONO] and [R] channels.

