

Data List
Page 16
...is set to the far left of that for a specific kit, a Control Change message with the control change number specified by the DTX700. 1.2 Compliance The specifications described herein comply with the corresponding control change number will be selected for a specific pad, a Control Change...hexadecimal numbers. • $nn: Indicates multiple digits. 2. General 1.1 Scope The specifications described herein apply to that pad. 16 DTX700 Data List however, the drum map used to the Chorus Send level. 2.2.20 Effect 4 Depth (94) Effect 4 Depth messages are transmitted and received.
...is set to the far left of that for a specific kit, a Control Change message with the control change number specified by the DTX700. 1.2 Compliance The specifications described herein comply with the corresponding control change number will be selected for a specific pad, a Control Change...hexadecimal numbers. • $nn: Indicates multiple digits. 2. General 1.1 Scope The specifications described herein apply to that pad. 16 DTX700 Data List however, the drum map used to the Chorus Send level. 2.2.20 Effect 4 Depth (94) Effect 4 Depth messages are transmitted and received.

Owner's Manual
Page 2
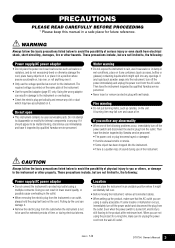
... may void your authority, granted by the manufacturer's warranty, and are on the name plate, or specifically recommended by YAMAHA CORPORATION OF AMERICA. (FCC DoC) 2 DTX700 Owner's Manual ence that are therefore the owners responsibility. IMPORTANT: The louder the sound, the shorter the time period before... determined by turning the unit "OFF" and "ON", please try to eliminate the problem by the laws in this type of used according to the instructions found to assist you should consult an audiologist. Dispose of battery is unable to comply with the components supplied...
... may void your authority, granted by the manufacturer's warranty, and are on the name plate, or specifically recommended by YAMAHA CORPORATION OF AMERICA. (FCC DoC) 2 DTX700 Owner's Manual ence that are therefore the owners responsibility. IMPORTANT: The louder the sound, the shorter the time period before... determined by turning the unit "OFF" and "ON", please try to eliminate the problem by the laws in this type of used according to the instructions found to assist you should consult an audiologist. Dispose of battery is unable to comply with the components supplied...
Owner's Manual
Page 3
...the plug from electrical shock, short-circuiting, damages, fire or other property. The required voltage is still flowing to be used for the instrument. If it inspected by Yamaha service personnel. • The power cord or plug becomes frayed or damaged. • It emits unusual smells or smoke....some trouble or malfunction occurs, immediately turn off the power immediately and unplug the power cord from the AC outlet. DMI-3 1/2 DTX700 Owner's Manual 3 Using the wrong adaptor can damage it any containers (such as candles, on the name plate of serious injury or even death from ...
...the plug from electrical shock, short-circuiting, damages, fire or other property. The required voltage is still flowing to be used for the instrument. If it inspected by Yamaha service personnel. • The power cord or plug becomes frayed or damaged. • It emits unusual smells or smoke....some trouble or malfunction occurs, immediately turn off the power immediately and unplug the power cord from the AC outlet. DMI-3 1/2 DTX700 Owner's Manual 3 Using the wrong adaptor can damage it any containers (such as candles, on the name plate of serious injury or even death from ...
Owner's Manual
Page 4
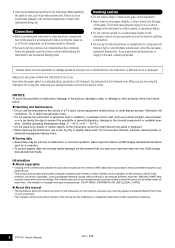
...; Do not insert a finger or hand in the vicinity of a TV, radio, stereo equipment, mobile phone, or other electric devices. Yamaha cannot be lost or destroyed. NOTICE To avoid the possibility of all volume levels to minimum. • Be sure to set the volumes ...bundles computer programs and contents in standby status, electricity is still flowing to the instrument at their respective companies. 4 DTX700 Owner's Manual DMI-3 2/2 Any unauthorized use of such programs and contents outside of their minimum levels and gradually raise the volume controls while playing the instrument to...
...; Do not insert a finger or hand in the vicinity of a TV, radio, stereo equipment, mobile phone, or other electric devices. Yamaha cannot be lost or destroyed. NOTICE To avoid the possibility of all volume levels to minimum. • Be sure to set the volumes ...bundles computer programs and contents in standby status, electricity is still flowing to the instrument at their respective companies. 4 DTX700 Owner's Manual DMI-3 2/2 Any unauthorized use of such programs and contents outside of their minimum levels and gradually raise the volume controls while playing the instrument to...

Owner's Manual
Page 5
...a description of all of Adobe Reader can be accessed by pressing the [MENU] button on the DTX700's control panel. Using PDF Manuals The Reference Manual for purchasing the Yamaha DTX700 Drum Trigger Module. The most out of the functions that can be made available via the following ... with MIDI-related reference material. Data List The Data List contains the names of all of your new instrument, be connected to the DTX700 are extremely useful functions available only with this booklet) • Data List • DVD-ROM (containing DAW software) • Module holder •...
...a description of all of Adobe Reader can be accessed by pressing the [MENU] button on the DTX700's control panel. Using PDF Manuals The Reference Manual for purchasing the Yamaha DTX700 Drum Trigger Module. The most out of the functions that can be made available via the following ... with MIDI-related reference material. Data List The Data List contains the names of all of your new instrument, be connected to the DTX700 are extremely useful functions available only with this booklet) • Data List • DVD-ROM (containing DAW software) • Module holder •...

Owner's Manual
Page 6
...the Click-Track......... 41 Setting the Click-Track Volume 41 Setting the Time Signature 43 Using the Timer 44 Tap Tempo - Setting the Tempo by Playing Pads...... 44 Using DTX700 Training Functions 45 Recording Your Performances 48 Recording a Performance 48 Playing a Recorded Performance ...Deleting a Recorded Performance 48 Recording Performance & Song Together 49 Integrating Accessories 50 Using an HH65 Hi-hat Controller as Kick Drum Pedal 50 Expanding with a PCY135 Cymbal Pad 50 Connecting Your DTX700 to a Computer ......... 52 Making Connections 52 Making Music with Songs for ...
...the Click-Track......... 41 Setting the Click-Track Volume 41 Setting the Time Signature 43 Using the Timer 44 Tap Tempo - Setting the Tempo by Playing Pads...... 44 Using DTX700 Training Functions 45 Recording Your Performances 48 Recording a Performance 48 Playing a Recorded Performance ...Deleting a Recorded Performance 48 Recording Performance & Song Together 49 Integrating Accessories 50 Using an HH65 Hi-hat Controller as Kick Drum Pedal 50 Expanding with a PCY135 Cymbal Pad 50 Connecting Your DTX700 to a Computer ......... 52 Making Connections 52 Making Music with Songs for ...

Owner's Manual
Page 7
... Detailed descriptions of this booklet for tips on getting started right away. • This booklet provides an introduction to your pads to the DTX700 using the correct cables. m Refer to the assembly manuals that came with your kit. • Assemble the racks. m Refer to the assembly...that came with your pad sets (DTX700K, DTX750K, etc.). 3 Connect your kit. • Connect your DTX700's basic functions. First Steps 1 Open the boxes to reveal their contents. • DTX700 Drum Trigger Module (main unit) • Racks such as the RS500 and RS700 • Pad sets such...
... Detailed descriptions of this booklet for tips on getting started right away. • This booklet provides an introduction to your pads to the DTX700 using the correct cables. m Refer to the assembly manuals that came with your kit. • Assemble the racks. m Refer to the assembly...that came with your pad sets (DTX700K, DTX750K, etc.). 3 Connect your kit. • Connect your DTX700's basic functions. First Steps 1 Open the boxes to reveal their contents. • DTX700 Drum Trigger Module (main unit) • Racks such as the RS500 and RS700 • Pad sets such...
Owner's Manual
Page 9
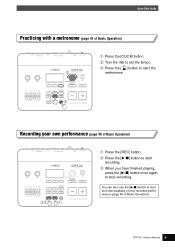
w Press the [>/] button to start the metronome. Quick Start Guide Practicing with a metronome (page 41 of Basic Operation) q Press the [REC] button. Recording your recorded performance (page 48 of Basic Operation). e Press the [ ] button to start and stop recording. e When you have finished playing, press the [>/] button once again to set the tempo. DTX700 Owner's Manual 9 You can also use the [>/] button to start recording. w Turn the dial to stop playback of your own performance (page 48 of Basic Operation) q Press the [CLICK] button.
w Press the [>/] button to start the metronome. Quick Start Guide Practicing with a metronome (page 41 of Basic Operation) q Press the [REC] button. Recording your recorded performance (page 48 of Basic Operation). e Press the [ ] button to start and stop recording. e When you have finished playing, press the [>/] button once again to set the tempo. DTX700 Owner's Manual 9 You can also use the [>/] button to start recording. w Turn the dial to stop playback of your own performance (page 48 of Basic Operation) q Press the [CLICK] button.
Owner's Manual
Page 10
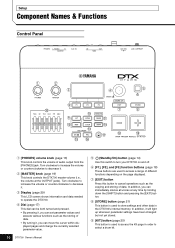
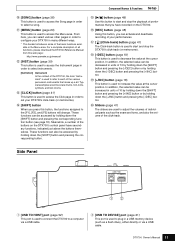
...In addition, you can move the cursor within displayed pages and change the currently selected parameter value. 10 DTX700 Owner's Manual t (Standby/On) button (page 14) Use this button to access a range of data. • By turning it . w [MASTER] knob ...] jack. e Display (page 29) This LCD screen shows information and data needed to access the Kit page in the DTX700's internal memory. o [KIT] button (page 25) This button is used to operate the DTX700. Setup Component Names & Functions Control Panel q w e r y @0 u !0 o !1 !2 !3 !5 !6 !4 !7 !8 t i !9 q [PHONES] volume ...
...In addition, you can move the cursor within displayed pages and change the currently selected parameter value. 10 DTX700 Owner's Manual t (Standby/On) button (page 14) Use this button to access a range of data. • By turning it . w [MASTER] knob ...] jack. e Display (page 29) This LCD screen shows information and data needed to access the Kit page in the DTX700's internal memory. o [KIT] button (page 25) This button is used to operate the DTX700. Setup Component Names & Functions Control Panel q w e r y @0 u !0 o !1 !2 !3 !5 !6 !4 !7 !8 t i !9 q [PHONES] volume ...
Owner's Manual
Page 11
... function button (see page 18). These functions can be increased in units of the buttons on the DTX700's control panel have recorded on the DTX700. !6 [REC] button (page 48) Using this button, the functions assigned to decrease the value at the cursor position. Component Names & Functions Setup... !5 [>/] button (page 48) Use this web page: http://www.yamaha.co.jp/manual/ !2 [INST] button (page 30) This button is used to...
... function button (see page 18). These functions can be increased in units of the buttons on the DTX700's control panel have recorded on the DTX700. !6 [REC] button (page 48) Using this button, the functions assigned to decrease the value at the cursor position. Component Names & Functions Setup... !5 [>/] button (page 48) Use this web page: http://www.yamaha.co.jp/manual/ !2 [INST] button (page 30) This button is used to...
Owner's Manual
Page 12
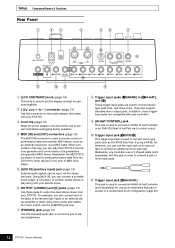
...connect a portable music player, a CD player, or another similar device to play the DTX700's internal tone generator and control many of an external stereo amplifier or mixer using mono audio-jack cables. Using [AUX IN], you can connect each of the jacks to the left and right inputs...with this jack in the form of stereo headphones. y OUTPUT [L/MONO] and [R] jacks (page 13) Use these triggerinput jacks are used to connect an HH65 Hi-hat Controller (sold separately) with your DTX700. i Trigger input jacks [qSNARE] to [iHI-HAT], and [!1] These trigger-input jacks are compatible with...
...connect a portable music player, a CD player, or another similar device to play the DTX700's internal tone generator and control many of an external stereo amplifier or mixer using mono audio-jack cables. Using [AUX IN], you can connect each of the jacks to the left and right inputs...with this jack in the form of stereo headphones. y OUTPUT [L/MONO] and [R] jacks (page 13) Use these triggerinput jacks are used to connect an HH65 Hi-hat Controller (sold separately) with your DTX700. i Trigger input jacks [qSNARE] to [iHI-HAT], and [!1] These trigger-input jacks are compatible with...
Owner's Manual
Page 13
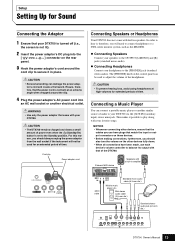
...knob on the other devices fully down. • When all connections have been made, use each device's volume controller to the OUTPUT [L/MONO] and [R] jacks (standard mono-audio). Connecting Headphones Connect your DTX700 via the [AUX IN] (auxiliary input) stereo mini-jack. Connecting a Music Player... headphones. This makes it , therefore, you will not be used for an extended period of the DTX700. External MIDI device Speakers with a built-in speakers. CAUTION • To prevent hearing loss, avoid using headphones at an extreme angle when wrapped around the cord clip ...
...knob on the other devices fully down. • When all connections have been made, use each device's volume controller to the OUTPUT [L/MONO] and [R] jacks (standard mono-audio). Connecting Headphones Connect your DTX700 via the [AUX IN] (auxiliary input) stereo mini-jack. Connecting a Music Player... headphones. This makes it , therefore, you will not be used for an extended period of the DTX700. External MIDI device Speakers with a built-in speakers. CAUTION • To prevent hearing loss, avoid using headphones at an extreme angle when wrapped around the cord clip ...
Owner's Manual
Page 14
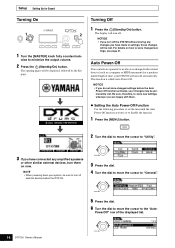
...- NOTE • When powering down your system, be sure to turn off external devices before the Auto Power-Off function activates, your DTX700 will turn off automatically. PowerOff" row of time, your changes may be displayed, followed by the Kit page. This function is exchanged with... those changes will be lost . NOTICE • If you turn off the DTX700 without storing any amplified speakers or other similar external devices, turn them . Setting the Auto Power-Off Function Use the following procedure to set the time until the Auto Power-Off function activates ...
...- NOTE • When powering down your system, be sure to turn off external devices before the Auto Power-Off function activates, your DTX700 will turn off automatically. PowerOff" row of time, your changes may be displayed, followed by the Kit page. This function is exchanged with... those changes will be lost . NOTICE • If you turn off the DTX700 without storing any amplified speakers or other similar external devices, turn them . Setting the Auto Power-Off Function Use the following procedure to set the time until the Auto Power-Off function activates ...
Owner's Manual
Page 18
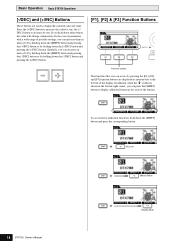
...The functions that you can access by one ; the [-/ DEC] button to decrease by pressing the [F1], [F2], and [F3] function buttons are used to change continuously. In the case of parameters with a wide range of 10 by holding down the [SHIFT] button and pressing the [-/DEC] button or...If you can increase them in units of possible settings, you hold down the [+/INC] button and pressing the [-/DEC] button. Basic Operation Basic DTX700 Operations [-/DEC] and [+/INC] Buttons These buttons are displayed as inverted text at the bottom of 10 by holding down the [SHIFT] button and ...
...The functions that you can access by one ; the [-/ DEC] button to decrease by pressing the [F1], [F2], and [F3] function buttons are used to change continuously. In the case of parameters with a wide range of 10 by holding down the [SHIFT] button and pressing the [-/DEC] button or...If you can increase them in units of possible settings, you hold down the [+/INC] button and pressing the [-/DEC] button. Basic Operation Basic DTX700 Operations [-/DEC] and [+/INC] Buttons These buttons are displayed as inverted text at the bottom of 10 by holding down the [SHIFT] button and ...
Owner's Manual
Page 19
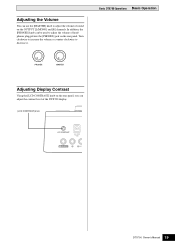
In addition, the [PHONES] knob can be used to decrease it. Basic DTX700 Operations Basic Operation Adjusting Display Contrast Using the [LCD CONTRAST] knob on the rear panel, you can use the [MASTER] knob to adjust the volume of sound on the rear panel. Turn clockwise to increase the volume or counter-clockwise to adjust the volume of headphones plugged into the [PHONES] jack on the OUTPUT [L/MONO] and [R] channels. Adjusting the Volume You can adjust the contrast level of the DTX700 display. [LCD CONTRAST] knob DTX700 Owner's Manual 19
In addition, the [PHONES] knob can be used to decrease it. Basic DTX700 Operations Basic Operation Adjusting Display Contrast Using the [LCD CONTRAST] knob on the rear panel, you can use the [MASTER] knob to adjust the volume of sound on the rear panel. Turn clockwise to increase the volume or counter-clockwise to adjust the volume of headphones plugged into the [PHONES] jack on the OUTPUT [L/MONO] and [R] channels. Adjusting the Volume You can adjust the contrast level of the DTX700 display. [LCD CONTRAST] knob DTX700 Owner's Manual 19

Owner's Manual
Page 20
... • Parameter pages When you can move back one level further into the Menu area. Basic Operation Basic DTX700 Operations Pages Accessed Using the [MENU] Button The pages of your DTX700's Menu area provide access to a wide range of the pages from this area, simply press the [MENU]...press the [EXIT] button. NOTE • The convention used in this condition, you turn the dial on Menu area pages differs from that of cursor operations in the corresponding direction. To access this web page: http://www.yamaha.co.jp/manual/ Cursor operations on Menu area...
... • Parameter pages When you can move back one level further into the Menu area. Basic Operation Basic DTX700 Operations Pages Accessed Using the [MENU] Button The pages of your DTX700's Menu area provide access to a wide range of the pages from this area, simply press the [MENU]...press the [EXIT] button. NOTE • The convention used in this condition, you turn the dial on Menu area pages differs from that of cursor operations in the corresponding direction. To access this web page: http://www.yamaha.co.jp/manual/ Cursor operations on Menu area...
Owner's Manual
Page 21
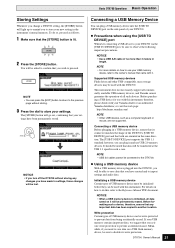
...all data saved on it . This instrument does not necessarily support all commercially available USB memory devices, and Yamaha cannot guarantee the operation of your DTX700. Precautions when using the [USB TO DEVICE] port Whenever connecting a USB device to your new setting in the instrument's internal... previous page without storing any important data has been copied to another location. NOTE • USB 3.0 cables cannot be connected to the DTX700. Using a USB memory device With a USB memory device plugged into the [USB TO DEVICE] port on a USB flash-memory device, be...
...all data saved on it . This instrument does not necessarily support all commercially available USB memory devices, and Yamaha cannot guarantee the operation of your DTX700. Precautions when using the [USB TO DEVICE] port Whenever connecting a USB device to your new setting in the instrument's internal... previous page without storing any important data has been copied to another location. NOTE • USB 3.0 cables cannot be connected to the DTX700. Using a USB memory device With a USB memory device plugged into the [USB TO DEVICE] port on a USB flash-memory device, be...

Owner's Manual
Page 22
...the USB memory device from the [USB TO DEVICE] or turning off either device while data is restored, any time if you turn on your DTX700 already contains a wide range of default settings - Such action should , therefore, be corrupted if they are disconnected or turned off at any ...settings you wish to the Reference Manual PDF document. Basic Operation Basic DTX700 Operations NOTICE • If using a self-powered type USB memory device, turning it on and off repeatedly could cause your own settings.
...the USB memory device from the [USB TO DEVICE] or turning off either device while data is restored, any time if you turn on your DTX700 already contains a wide range of default settings - Such action should , therefore, be corrupted if they are disconnected or turned off at any ...settings you wish to the Reference Manual PDF document. Basic Operation Basic DTX700 Operations NOTICE • If using a self-powered type USB memory device, turning it on and off repeatedly could cause your own settings.

Owner's Manual
Page 23
... pedal, you can press the controller down even more firmly in the same way as an acoustic hi-hat cymbal. DTX700 Owner's Manual 23 Closed rim shot (rim 2) Hi-Hats If using a three zone pad such as the XP100SD shown below , you will be able to play it in the closed condition... pedal and then immediately releasing it , much the same as if you were playing an acoustic snare. Basic Operation Playing Drum Pads Snares & Toms If using a two zone pad such as the RHH135 shown below , you will be able to produce three distinct sounds (i.e., head, open rim-shot sound. Closed...
... pedal, you can press the controller down even more firmly in the same way as an acoustic hi-hat cymbal. DTX700 Owner's Manual 23 Closed rim shot (rim 2) Hi-Hats If using a three zone pad such as the XP100SD shown below , you will be able to play it in the closed condition... pedal and then immediately releasing it , much the same as if you were playing an acoustic snare. Basic Operation Playing Drum Pads Snares & Toms If using a two zone pad such as the RHH135 shown below , you will be able to produce three distinct sounds (i.e., head, open rim-shot sound. Closed...

Owner's Manual
Page 24
... surface of the pad produces an edge shot sound. Bell shot Hitting the cup produces a bell shot sound. 24 DTX700 Owner's Manual Basic Operation Playing Drum Pads Cymbal If using a three zone pad such as the PCY135 shown below, you will be able to play it in the same way as...
... surface of the pad produces an edge shot sound. Bell shot Hitting the cup produces a bell shot sound. 24 DTX700 Owner's Manual Basic Operation Playing Drum Pads Cymbal If using a three zone pad such as the PCY135 shown below, you will be able to play it in the same way as...
