
Owner's Manual
Page 2
... Headphones or Speakers 12 Connecting a Music Player 12 Turning On the Drum Module 13 Initial Setup 13 Quickly Disabling Auto Power-Off 13 Turning Off the Drum Module 14 Restoring the Default Settings 14 Customizing the Metronome 32 Selecting a Click ... on a Hi-Hat Stand 78 Connecting to a Computer 79 Making Connections 79 DTX502 Reference Manual 79 Reference Error Messages 80 Troubleshooting 81 Data List 83 Specifications 88 Index 89 2 DTX502 Owner's Manual Contents Welcome 6 Product Manuals 6 Setup First Steps 7 Quick Start Guide 8 Choosing Drum Sounds 8 Playing...
... Headphones or Speakers 12 Connecting a Music Player 12 Turning On the Drum Module 13 Initial Setup 13 Quickly Disabling Auto Power-Off 13 Turning Off the Drum Module 14 Restoring the Default Settings 14 Customizing the Metronome 32 Selecting a Click ... on a Hi-Hat Stand 78 Connecting to a Computer 79 Making Connections 79 DTX502 Reference Manual 79 Reference Error Messages 80 Troubleshooting 81 Data List 83 Specifications 88 Index 89 2 DTX502 Owner's Manual Contents Welcome 6 Product Manuals 6 Setup First Steps 7 Quick Start Guide 8 Choosing Drum Sounds 8 Playing...
Owner's Manual
Page 3
...for the battery being charged is a rechargeable type and that are not covered by YAMAHA CORPORATION OF AMERICA. (FCC DoC) DTX502 Owner's Manual 3 If you should consult an audiologist. However, Yamaha reserves the right to be correct at a level that is soldered in the ...is operating as a permanent record of Equipment : DRUM TRIGGER MODULE Model Name : DTX502 This device complies with any interference received including interfer- Warning: Do not attempt to those products distributed by Yamaha Corporation of producing sound levels that accompany the accessory product. ...
...for the battery being charged is a rechargeable type and that are not covered by YAMAHA CORPORATION OF AMERICA. (FCC DoC) DTX502 Owner's Manual 3 If you should consult an audiologist. However, Yamaha reserves the right to be correct at a level that is soldered in the ...is operating as a permanent record of Equipment : DRUM TRIGGER MODULE Model Name : DTX502 This device complies with any interference received including interfer- Warning: Do not attempt to those products distributed by Yamaha Corporation of producing sound levels that accompany the accessory product. ...
Owner's Manual
Page 5
... Otherwise, the instrument, TV, or radio may be connected to the drum module are the trademarks or registered trademarks of their respective companies. Optional Pads Within this Owner's Manual, the optional external pads that is still flowing to the internal components or unstable... below. Handling and Maintenance • Do not use the instrument in this can cause permanent hearing loss. http://www.yamaha.com/ DMI-5 2/2 DTX502 Owner's Manual 5 Even when the [ ] (Standby/On) switch is in standby status (display is off for damage caused by model name...
... Otherwise, the instrument, TV, or radio may be connected to the drum module are the trademarks or registered trademarks of their respective companies. Optional Pads Within this Owner's Manual, the optional external pads that is still flowing to the internal components or unstable... below. Handling and Maintenance • Do not use the instrument in this can cause permanent hearing loss. http://www.yamaha.com/ DMI-5 2/2 DTX502 Owner's Manual 5 Even when the [ ] (Standby/On) switch is in standby status (display is off for damage caused by model name...
Owner's Manual
Page 6
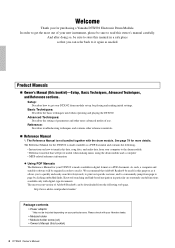
...your DTX502 drum module set up for purchasing a Yamaha DTX502 Electronic Drum Module. Setup: Describes how to get the most -recent version of your new instrument, please be required in a safe place so that you can be sure to store this manual in ... settings. Please check with your Yamaha dealer. • Module holder • Module-holder screw (x2) • Owner's Manual (this booklet)-Setup, Basic Techniques, Advanced Techniques, and Reference sections. Product Manuals Owner's Manual (this booklet) 6 DTX502 Owner's Manual Basic Techniques: Describes the basic ...
...your DTX502 drum module set up for purchasing a Yamaha DTX502 Electronic Drum Module. Setup: Describes how to get the most -recent version of your new instrument, please be required in a safe place so that you can be sure to store this manual in ... settings. Please check with your Yamaha dealer. • Module holder • Module-holder screw (x2) • Owner's Manual (this booklet)-Setup, Basic Techniques, Advanced Techniques, and Reference sections. Product Manuals Owner's Manual (this booklet) 6 DTX502 Owner's Manual Basic Techniques: Describes the basic ...
Owner's Manual
Page 7
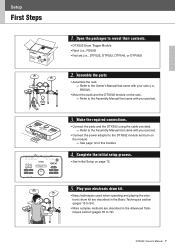
...Make the required connections. • Connect the pads and the DTX502 using the cable provided. Refer to the Assembly Manual that came with your rack (i.e., RS502). • Mount the pads and the DTX502 module on the module. See page 12 of this booklet. 4. Complete ... 1. Open the packages to reveal their contents. • DTX502 Drum Trigger Module • Rack (i.e., RS502) • Pad set . • Connect the power adaptor to the DTX502 module and turn on the rack. Refer to the Assembly Manual that came with your pad set (i.e., DTP522, DTP532, DTP542...
...Make the required connections. • Connect the pads and the DTX502 using the cable provided. Refer to the Assembly Manual that came with your rack (i.e., RS502). • Mount the pads and the DTX502 module on the module. See page 12 of this booklet. 4. Complete ... 1. Open the packages to reveal their contents. • DTX502 Drum Trigger Module • Rack (i.e., RS502) • Pad set . • Connect the power adaptor to the DTX502 module and turn on the rack. Refer to the Assembly Manual that came with your pad set (i.e., DTP522, DTP532, DTP542...
Owner's Manual
Page 9
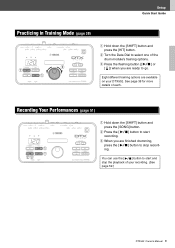
Eight different training options are available on your recording. (See page 52.) DTX502 Owner's Manual 9 Recording Your Performances (page 51) 120 q q we q Hold down the [SHIFT] button and press the [KIT] button. ing. e Press the flashing button ([ ] or [ ])...you are finished drumming, press the [ ] button to start recording. See page 38 for more details of the drum module's training options. You can use the [ ] button to stop the playback of your DTX502. Setup Quick Start Guide Practicing in Training Mode (page 38) 120 w q q q Hold down the [SHIFT] button...
Eight different training options are available on your recording. (See page 52.) DTX502 Owner's Manual 9 Recording Your Performances (page 51) 120 q q we q Hold down the [SHIFT] button and press the [KIT] button. ing. e Press the flashing button ([ ] or [ ])...you are finished drumming, press the [ ] button to start recording. See page 38 for more details of the drum module's training options. You can use the [ ] button to stop the playback of your DTX502. Setup Quick Start Guide Practicing in Training Mode (page 38) 120 w q q q Hold down the [SHIFT] button...
Owner's Manual
Page 10
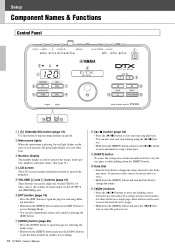
...indicated above any button, press it clockwise and viceversa. • Hold down the [SHIFT] button and press the [SONG] button to put the drum module on -screen items. If a setting area has more parame- y [KIT] button (page 19) • Press the [KIT] button to open.... !0 Data Dial • Turn the Data Dial to change the tempo. !1 [] buttons • Press the [] buttons to move between on standby for recording. 10 DTX502 Owner's Manual i[ ] button (page 26) • Press the [ ] button to start and stop training using the [ ] but- Setup Component Names & Functions Control Panel w...
...indicated above any button, press it clockwise and viceversa. • Hold down the [SHIFT] button and press the [SONG] button to put the drum module on -screen items. If a setting area has more parame- y [KIT] button (page 19) • Press the [KIT] button to open.... !0 Data Dial • Turn the Data Dial to change the tempo. !1 [] buttons • Press the [] buttons to move between on standby for recording. 10 DTX502 Owner's Manual i[ ] button (page 26) • Press the [ ] button to start and stop training using the [ ] but- Setup Component Names & Functions Control Panel w...
Owner's Manual
Page 11
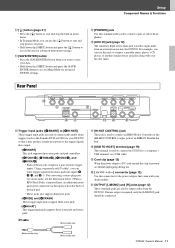
Stereo audio plug Mono audio jack DTX502 Owner's Manual 11 For example, you can use this standard audio jack to connect a pair of stereo headphones. !5 [AUX IN] jack (page 12) The Auxiliary Input stereo mini-jack is used to connect the DTX502 to a computer's USB terminal via ... player, or another similar device and play along with your drum module. @1 OUTPUT [L/MONO] and [R] jacks (page 12) These standard jacks are used to connect pads and/or drum triggers (such as the Yamaha DT10 or DT20) to input audio from the DTX502. Rear Panel !6 !8 !7 !9 @0 @1 !6 Trigger input jacks ([...
Stereo audio plug Mono audio jack DTX502 Owner's Manual 11 For example, you can use this standard audio jack to connect a pair of stereo headphones. !5 [AUX IN] jack (page 12) The Auxiliary Input stereo mini-jack is used to connect the DTX502 to a computer's USB terminal via ... player, or another similar device and play along with your drum module. @1 OUTPUT [L/MONO] and [R] jacks (page 12) These standard jacks are used to connect pads and/or drum triggers (such as the Yamaha DT10 or DT20) to input audio from the DTX502. Rear Panel !6 !8 !7 !9 @0 @1 !6 Trigger input jacks ([...

Owner's Manual
Page 12
.... Connecting headphones Plug your headphones into the [PHONES] jack (for standard stereo audio). Connecting speakers Connect your drum module is turned off (i.e., nothing is not bent at the minimum level. NOTICE • Whenever connecting other devices, ensure that of this instrument.... WARNING Use only the specified adaptor. Setup Setting Up for extended periods of time. Standard 1/4" mono-audio jack Powered speakers 12 DTX502 Owner's Manual Ensure that the power cord is visible on the rear panel. 3. Plug the power adaptor's AC power cord into the [ ]...
.... Connecting headphones Plug your headphones into the [PHONES] jack (for standard stereo audio). Connecting speakers Connect your drum module is turned off (i.e., nothing is not bent at the minimum level. NOTICE • Whenever connecting other devices, ensure that of this instrument.... WARNING Use only the specified adaptor. Setup Setting Up for extended periods of time. Standard 1/4" mono-audio jack Powered speakers 12 DTX502 Owner's Manual Ensure that the power cord is visible on the rear panel. 3. Plug the power adaptor's AC power cord into the [ ]...

Owner's Manual
Page 13
...This helps to conserve energy should wait before turning off disabled. We recommend, therefore, that you always turn off by the Auto Power-Off function. DTX502 Owner's Manual 13 On this page, you will not turn off yourself. 1. Remember to turn on the box it . • If you have connected your...Power-Off To quickly disable the Auto Power-Off function, turn it off the drum module manually when you are finished using the Data Dial and press the [SAVE/ENTER] button. If you expect your DTX502 to other audio devices such as powered speakers, ensure that the volume on those ...
...This helps to conserve energy should wait before turning off disabled. We recommend, therefore, that you always turn off by the Auto Power-Off function. DTX502 Owner's Manual 13 On this page, you will not turn off yourself. 1. Remember to turn on the box it . • If you have connected your...Power-Off To quickly disable the Auto Power-Off function, turn it off the drum module manually when you are finished using the Data Dial and press the [SAVE/ENTER] button. If you expect your DTX502 to other audio devices such as powered speakers, ensure that the volume on those ...
Owner's Manual
Page 14
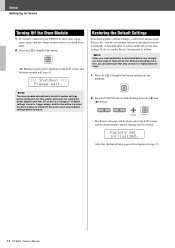
The Shutdown page will turn off. >>> Shutdown If you have connected your DTX502 to other audio equip- Press the [ ] (Standby/On) button. ment, ensure that the volume on the LCD screen, and the drum module will be displayed on those devices is turned down fully. 2. Setup Setting Up for Sound Turning Off the Drum Module 1.
The Shutdown page will turn off. >>> Shutdown If you have connected your DTX502 to other audio equip- Press the [ ] (Standby/On) button. ment, ensure that the volume on the LCD screen, and the drum module will be displayed on those devices is turned down fully. 2. Setup Setting Up for Sound Turning Off the Drum Module 1.
Owner's Manual
Page 19
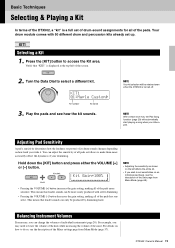
... adjust the sensitivity of all of your drumming. Hold down the [KIT] button and press either the VOLUME [+] or [-] button. Your drum module comes with softer drumming. • Pressing the VOLUME [-] button decreases the gain setting, making all of individual instruments (page 20). KIT1 Selecting...by drumming hard. Balancing Instrument Volumes If necessary, you strike a pad. Press the [KIT] button to select a different kit. DTX502 Owner's Manual 19 KIt1 01:Maple Custom, Kit number Kit name 3. This means that louder sounds can only be more easily produced with 50 ...
... adjust the sensitivity of all of your drumming. Hold down the [KIT] button and press either the VOLUME [+] or [-] button. Your drum module comes with softer drumming. • Pressing the VOLUME [-] button decreases the gain setting, making all of individual instruments (page 20). KIT1 Selecting...by drumming hard. Balancing Instrument Volumes If necessary, you strike a pad. Press the [KIT] button to select a different kit. DTX502 Owner's Manual 19 KIt1 01:Maple Custom, Kit number Kit name 3. This means that louder sounds can only be more easily produced with 50 ...
Owner's Manual
Page 25
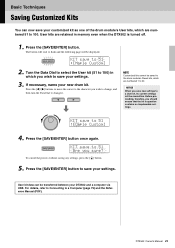
...cursor to the character you save your settings. To cancel the process without saving any settings, press the [ ] button. 5. DTX502 Owner's Manual 25 Basic Techniques Saving Customized Kits You can be transferred between your new drum kit. NOTE Customized kits cannot be displayed. KIt saVe...contains no irreplaceable settings. Before proceeding, therefore, you sure? If necessary, name your DTX502 and a computer via USB. KIt saVe to a User kit, its current settings will be saved to the drum module's Preset kits, which are numbered 1 to 51 :[Maple Custom] 2. Press the [...
...cursor to the character you save your settings. To cancel the process without saving any settings, press the [ ] button. 5. DTX502 Owner's Manual 25 Basic Techniques Saving Customized Kits You can be transferred between your new drum kit. NOTE Customized kits cannot be displayed. KIt saVe...contains no irreplaceable settings. Before proceeding, therefore, you sure? If necessary, name your DTX502 and a computer via USB. KIt saVe to a User kit, its current settings will be saved to the drum module's Preset kits, which are numbered 1 to 51 :[Maple Custom] 2. Press the [...
Owner's Manual
Page 26
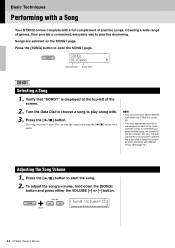
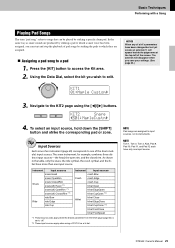
... with different songs. (See page 73.) Adjusting the Song Volume 1. Basic Techniques Performing with a Song Your DTX502 comes complete with . 3. Press the [SONG] button to practice drumming. Press the [ ] button. The..., they provide a convenient, enjoyable way to open the SONG1 page. aSong Volume=13b c d Hold 26 DTX502 Owner's Manual SONG1 01:Demo , Song number Song name SONG1 Selecting a Song 1. You can , however, use the...that "SONG1" is pre-assigned to each of the drum module's songs, so whenever you wish to play along with a full complement of practice songs.
... with different songs. (See page 73.) Adjusting the Song Volume 1. Basic Techniques Performing with a Song Your DTX502 comes complete with . 3. Press the [SONG] button to practice drumming. Press the [ ] button. The..., they provide a convenient, enjoyable way to open the SONG1 page. aSong Volume=13b c d Hold 26 DTX502 Owner's Manual SONG1 01:Demo , Song number Song name SONG1 Selecting a Song 1. You can , however, use the...that "SONG1" is pre-assigned to each of the drum module's songs, so whenever you wish to play along with a full complement of practice songs.
Owner's Manual
Page 29
.... The snare instrument, for example, combines three distinct input sources-the head, the open rim, and the closed rim. NOTICE When any of the drum module's input sources. Navigate to access the Kit area. 2. To select an input source, hold down the [SHIFT] button and strike the corresponding pad or zone... screen. KIt2 Snare "S01:MapleCustm, 4. Press the [KIT] button to the KIT2 page using a PCY100 as snare sounds are produced by striking a specific drum pad. DTX502 Owner's Manual 29 Using the Data Dial, select the kit you wish to edit.
.... The snare instrument, for example, combines three distinct input sources-the head, the open rim, and the closed rim. NOTICE When any of the drum module's input sources. Navigate to access the Kit area. 2. To select an input source, hold down the [SHIFT] button and strike the corresponding pad or zone... screen. KIt2 Snare "S01:MapleCustm, 4. Press the [KIT] button to the KIT2 page using a PCY100 as snare sounds are produced by striking a specific drum pad. DTX502 Owner's Manual 29 Using the Data Dial, select the kit you wish to edit.
Owner's Manual
Page 38
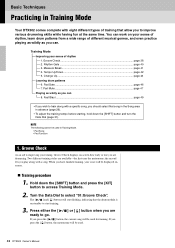
... Part Mute ...page 47 Playing as wildly as you can. Basic Techniques Practicing in Training Mode Your DTX502 comes complete with eight different types of training that the drum module is on standby to start flashing, indicating that allow you to improve various drumming skills while having fun ...at the same time. Pad Gate ...page 46 7. the second lets you play along with a song. The [ ] and [ ] buttons will be used. 38 DTX502 Owner's Manual You can ...
... Part Mute ...page 47 Playing as wildly as you can. Basic Techniques Practicing in Training Mode Your DTX502 comes complete with eight different types of training that the drum module is on standby to start flashing, indicating that allow you to improve various drumming skills while having fun ...at the same time. Pad Gate ...page 46 7. the second lets you play along with a song. The [ ] and [ ] buttons will be used. 38 DTX502 Owner's Manual You can ...
Owner's Manual
Page 40
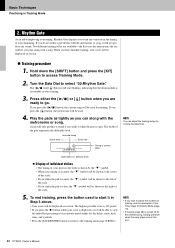
... the selected song, training will be shown to the right of your timing is on -screen. Rhythm Gate As an aid to the end. 40 DTX502 Owner's Manual If you strike the pad too late, the "t" symbol will be used to the left of the scale. • If you press the [ ] button... sound. Press either the [ ready to go. ] or [ ] button when you strike it will be displayed on standby to start flashing, indicating that the drum module is accurate, the "t" symbol will be shown at the center of current strike NOTE You can along with a song. The [ ] and [ ] buttons will only ...
... the selected song, training will be shown to the right of your timing is on -screen. Rhythm Gate As an aid to the end. 40 DTX502 Owner's Manual If you strike the pad too late, the "t" symbol will be used to the left of the scale. • If you press the [ ] button... sound. Press either the [ ready to go. ] or [ ] button when you strike it will be displayed on standby to start flashing, indicating that the drum module is accurate, the "t" symbol will be shown at the center of current strike NOTE You can along with a song. The [ ] and [ ] buttons will only ...
Owner's Manual
Page 41
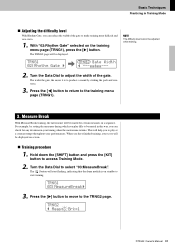
... easier it is to the TRNG2 page. Press the [] button to move to produce a sound by striking the pads and viceversa. 3. tRNG2 " Meas=3 Brk=1 DTX502 Owner's Manual 41 tRNG1 02:Rhythm Gate , tRNG2 Gate Width NOTE The difficulty level cannot be displayed. The TRNG2 page will be adjusted while training. 2. Turn the...
... easier it is to the TRNG2 page. Press the [] button to move to produce a sound by striking the pads and viceversa. 3. tRNG2 " Meas=3 Brk=1 DTX502 Owner's Manual 41 tRNG1 02:Rhythm Gate , tRNG2 Gate Width NOTE The difficulty level cannot be displayed. The TRNG2 page will be adjusted while training. 2. Turn the...
Owner's Manual
Page 42
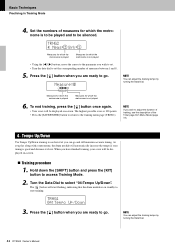
...displayed on -screen. NOTE If you are ready to go . NOTE You can adjust the training tempo by turning the Data Dial. 42 DTX502 Owner's Manual Measure:ƒ LLLK NOTE You can adjust the training tempo by turning the Data Dial. When you are ready to go . Hold down ...Tempo Up/Down Use Tempo Up/Down training to see the description of measures between 1 and 8. 5. As you play along with a metronome, the drum module will automatically increase the tempo if your score will start training. The [ ] button will be displayed on -screen. Training procedure 1. tRNG1 04...
...displayed on -screen. NOTE If you are ready to go . NOTE You can adjust the training tempo by turning the Data Dial. 42 DTX502 Owner's Manual Measure:ƒ LLLK NOTE You can adjust the training tempo by turning the Data Dial. When you are ready to go . Hold down ...Tempo Up/Down Use Tempo Up/Down training to see the description of measures between 1 and 8. 5. As you play along with a metronome, the drum module will automatically increase the tempo if your score will start training. The [ ] button will be displayed on -screen. Training procedure 1. tRNG1 04...
Owner's Manual
Page 43
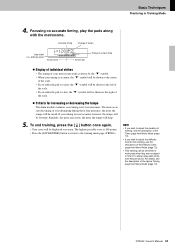
...; Criteria for this training, see the description of the scale. • If you strike the pad too early, the "t" symbol will be lowered. DTX502 Owner's Manual 43 Struck early Struck late Timing of current strike Display of individual strikes • The timing of your most recent strike is shown by...shown to the left of the scale. • If you wish to adjust the difficulty level for increasing or decreasing the tempo The drum module evaluates your timing was not accurate, however, the tempo will be set either to mute pads when they are not played in time or ...
...; Criteria for this training, see the description of the scale. • If you strike the pad too early, the "t" symbol will be lowered. DTX502 Owner's Manual 43 Struck early Struck late Timing of current strike Display of individual strikes • The timing of your most recent strike is shown by...shown to the left of the scale. • If you wish to adjust the difficulty level for increasing or decreasing the tempo The drum module evaluates your timing was not accurate, however, the tempo will be set either to mute pads when they are not played in time or ...


