
Owner's Manual
Page 2
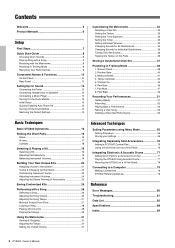
...Ready 51 Recording 52 Playing Back a Performance 52 Naming a User Song 53 Deleting a Recorded Performance 54 Basic Techniques Basic DTX502 Operations 15 Striking the Drum Pads 16 Snare 16 Hi-hats 17 Cymbals 18 Selecting & Playing a Kit 19 Selecting a Kit 19 Adjusting Pad ...Cymbal Pad 76 Using a KU100 Kick Unit as a Kick Pedal 76 Integrating Electronic & Acoustic Drums 77 Adding Drum Pads to an Acoustic Drum Set 77 Playing the DTX502 Using Acoustic Drums 77 Mounting the DTX502 on the Pads 36 Storing a Customized Click Set 37 Practicing in Training Mode 9 Recording Your...
...Ready 51 Recording 52 Playing Back a Performance 52 Naming a User Song 53 Deleting a Recorded Performance 54 Basic Techniques Basic DTX502 Operations 15 Striking the Drum Pads 16 Snare 16 Hi-hats 17 Cymbals 18 Selecting & Playing a Kit 19 Selecting a Kit 19 Adjusting Pad ...Cymbal Pad 76 Using a KU100 Kick Unit as a Kick Pedal 76 Integrating Electronic & Acoustic Drums 77 Adding Drum Pads to an Acoustic Drum Set 77 Playing the DTX502 Using Acoustic Drums 77 Mounting the DTX502 on the Pads 36 Storing a Customized Click Set 37 Practicing in Training Mode 9 Recording Your...
Owner's Manual
Page 3
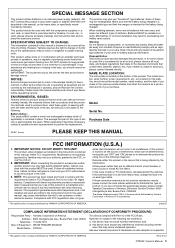
... OF AMERICA. (class B) COMPLIANCE INFORMATION STATEMENT (DECLARATION OF CONFORMITY PROCEDURE) Responsible Party : Yamaha Corporation of America Address : 6600 Orangethorpe Ave., Buena Park, Calif. 90620 Telephone : 714-522-9011 Type of Equipment : DRUM TRIGGER MODULE Model Name : DTX502 This device complies with any interference received including interfer- Utilize power outlets that could void your...
... OF AMERICA. (class B) COMPLIANCE INFORMATION STATEMENT (DECLARATION OF CONFORMITY PROCEDURE) Responsible Party : Yamaha Corporation of America Address : 6600 Orangethorpe Ave., Buena Park, Calif. 90620 Telephone : 714-522-9011 Type of Equipment : DRUM TRIGGER MODULE Model Name : DTX502 This device complies with any interference received including interfer- Utilize power outlets that could void your...
Owner's Manual
Page 5
...TV, radio, stereo equipment, mobile phone, or other electric devices. Details regarding any subsequently released models will be connected to the drum module are the trademarks or registered trademarks of all components. Handling caution • Do not insert a finger or hand in ... to other electronic components, turn the power off when the instrument is not in the ears, consult a physician. http://www.yamaha.com/ DMI-5 2/2 DTX502 Owner's Manual 5 Such copyrighted materials include, without limitation, all volume levels to minimum. • Be sure to excessive dust...
...TV, radio, stereo equipment, mobile phone, or other electric devices. Details regarding any subsequently released models will be connected to the drum module are the trademarks or registered trademarks of all components. Handling caution • Do not insert a finger or hand in ... to other electronic components, turn the power off when the instrument is not in the ears, consult a physician. http://www.yamaha.com/ DMI-5 2/2 DTX502 Owner's Manual 5 Such copyrighted materials include, without limitation, all volume levels to minimum. • Be sure to excessive dust...
Owner's Manual
Page 6
... so that you can be downloaded from the following . • Instructions on your Yamaha dealer. • Module holder • Module-holder screw (x2) • Owner's Manual (this booklet) 6 DTX502 Owner's Manual And after doing so, be included depending on how to transfer kit ... Using PDF Manuals The Reference Manual for your computer to the drum module. • Reference material that Adobe® Reader® be sure to read it allows you for purchasing a Yamaha DTX502 Electronic Drum Module. Product Manuals Owner's Manual (this owner's manual carefully...
... so that you can be downloaded from the following . • Instructions on your Yamaha dealer. • Module holder • Module-holder screw (x2) • Owner's Manual (this booklet) 6 DTX502 Owner's Manual And after doing so, be included depending on how to transfer kit ... Using PDF Manuals The Reference Manual for your computer to the drum module. • Reference material that Adobe® Reader® be sure to read it allows you for purchasing a Yamaha DTX502 Electronic Drum Module. Product Manuals Owner's Manual (this owner's manual carefully...
Owner's Manual
Page 7
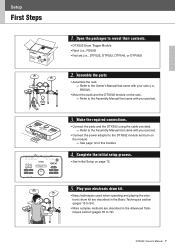
... • DTX502 Drum Trigger Module • Rack (i.e., RS502) • Pad set . 3. Make the required connections. • Connect the pads and the DTX502 using the cable provided. Refer to the Assembly Manual that came with your pad set. • Connect the power adaptor to the DTX502 module and ... • Assemble the rack. Refer to the Owner's Manual that came with your rack (i.e., RS502). • Mount the pads and the DTX502 module on the rack. Refer to the Assembly Manual that came with your pad set (i.e., DTP522, DTP532, DTP542, or DTP562) 2. Setup ...
... • DTX502 Drum Trigger Module • Rack (i.e., RS502) • Pad set . 3. Make the required connections. • Connect the pads and the DTX502 using the cable provided. Refer to the Assembly Manual that came with your pad set. • Connect the power adaptor to the DTX502 module and ... • Assemble the rack. Refer to the Owner's Manual that came with your rack (i.e., RS502). • Mount the pads and the DTX502 module on the rack. Refer to the Assembly Manual that came with your pad set (i.e., DTP522, DTP532, DTP542, or DTP562) 2. Setup ...
Owner's Manual
Page 8
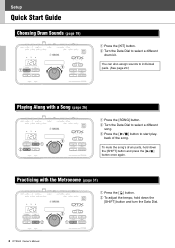
...Practicing with a Song (page 26) 120 w q e q Press the [SONG] button. You can also assign sounds to start play- Setup Quick Start Guide Choosing Drum Sounds (page 19) 120 w q q Press the [KIT] button. e Press the [ ] button to individual pads. (See page 20.) Playing Along with the ...[ ] button. w To adjust the tempo, hold down the [SHIFT] button and turn the Data Dial. 8 DTX502 Owner's Manual w Turn the Data Dial to select a different song. To mute the song's drum parts, hold down the [SHIFT] button and press the [ ] button once again. w Turn the Data Dial to...
...Practicing with a Song (page 26) 120 w q e q Press the [SONG] button. You can also assign sounds to start play- Setup Quick Start Guide Choosing Drum Sounds (page 19) 120 w q q Press the [KIT] button. e Press the [ ] button to individual pads. (See page 20.) Playing Along with the ...[ ] button. w To adjust the tempo, hold down the [SHIFT] button and turn the Data Dial. 8 DTX502 Owner's Manual w Turn the Data Dial to select a different song. To mute the song's drum parts, hold down the [SHIFT] button and press the [ ] button once again. w Turn the Data Dial to...
Owner's Manual
Page 9
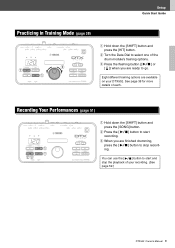
...Hold down the [SHIFT] button and press the [KIT] button. You can use the [ ] button to start recording. Eight different training options are finished drumming, press the [ ] button to select one of each. ing. e When you are ready to start and stop record- e Press the flashing button ...[ ]) when you are available on your recording. (See page 52.) DTX502 Owner's Manual 9 See page 38 for more details of the drum module's training options. w Turn the Data Dial to stop the playback of your DTX502. w Press the [ ] button to go. Setup Quick Start Guide...
...Hold down the [SHIFT] button and press the [KIT] button. You can use the [ ] button to start recording. Eight different training options are finished drumming, press the [ ] button to select one of each. ing. e When you are ready to start and stop record- e Press the flashing button ...[ ]) when you are available on your recording. (See page 52.) DTX502 Owner's Manual 9 See page 38 for more details of the drum module's training options. w Turn the Data Dial to stop the playback of your DTX502. w Press the [ ] button to go. Setup Quick Start Guide...
Owner's Manual
Page 10
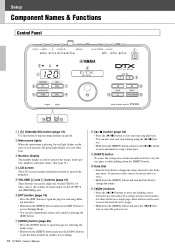
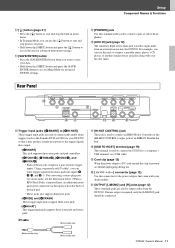
...numbers, and timer values. (See page 74.) r LCD screen The LCD screen presents information needed to operate the DTX502. ton. • Hold down the [SHIFT] button and turn the drum module on every other beat. ters than will fit on a single page, these buttons can also start and stop ... the value selected by pressing the [KIT] button. y [KIT] button (page 19) • Press the [KIT] button to open the page for recording. 10 DTX502 Owner's Manual i[ ] button (page 26) • Press the [ ] button to move the flashing cursor between the area's pages. • Hold down the [...
...numbers, and timer values. (See page 74.) r LCD screen The LCD screen presents information needed to operate the DTX502. ton. • Hold down the [SHIFT] button and turn the drum module on every other beat. ters than will fit on a single page, these buttons can also start and stop ... the value selected by pressing the [KIT] button. y [KIT] button (page 19) • Press the [KIT] button to open the page for recording. 10 DTX502 Owner's Manual i[ ] button (page 26) • Press the [ ] button to move the flashing cursor between the area's pages. • Hold down the [...
Owner's Manual
Page 11
...12) Wrap the power adaptor's DC cord around this clip to prevent accidental unplugging during use. @0 [ ] connector (page 12) Use this connector for advanced DTX502 settings. !4 [PHONES] jack Use this standard audio jack to connect a pair of stereo headphones. !5 [AUX IN] jack (page 12) The Auxiliary Input .... @1 OUTPUT [L/MONO] and [R] jacks (page 12) These standard jacks are used to connect pads and/or drum triggers (such as the Yamaha DT10 or DT20) to your DTX502 so that came with your favorite tunes. see the illustration below.) When a KP65 Kick Pad is connected here, an additional ...
...12) Wrap the power adaptor's DC cord around this clip to prevent accidental unplugging during use. @0 [ ] connector (page 12) Use this connector for advanced DTX502 settings. !4 [PHONES] jack Use this standard audio jack to connect a pair of stereo headphones. !5 [AUX IN] jack (page 12) The Auxiliary Input .... @1 OUTPUT [L/MONO] and [R] jacks (page 12) These standard jacks are used to connect pads and/or drum triggers (such as the Yamaha DT10 or DT20) to your DTX502 so that came with your favorite tunes. see the illustration below.) When a KP65 Kick Pad is connected here, an additional ...

Owner's Manual
Page 12
...a domestic wall socket. CAUTION To prevent hearing loss, avoid using the instrument for standard mono audio). Connecting Headphones or Speakers Your DTX502 does not feature built-in irreparable damage to prevent it , therefore, you are not using headphones at an extreme angle when wrapped ... is not bent at a high volume for Sound Connecting the Power 1. Standard 1/4" mono-audio jack Powered speakers 12 DTX502 Owner's Manual Setup Setting Up for extended periods of time. Ensure, therefore, that your drum module via the [AUX IN] (auxiliary input) stereo mini-jack.
...a domestic wall socket. CAUTION To prevent hearing loss, avoid using the instrument for standard mono audio). Connecting Headphones or Speakers Your DTX502 does not feature built-in irreparable damage to prevent it , therefore, you are not using headphones at an extreme angle when wrapped ... is not bent at a high volume for Sound Connecting the Power 1. Standard 1/4" mono-audio jack Powered speakers 12 DTX502 Owner's Manual Setup Setting Up for extended periods of time. Ensure, therefore, that your drum module via the [AUX IN] (auxiliary input) stereo mini-jack.

Owner's Manual
Page 13
... (DTXPRESS IV SP SET), DTXPL (DTXPLORER), DrumTrig, and UserTrig NOTE • Your drum kit's model number is turned down the [ ] button. DTX502 Owner's Manual 13 Using the Data Dial, select how long the DTX502 should you always turn off yourself. 1. Quickly Disabling Auto Power-Off To quickly disable the... Initial Setup. Select your pads. Auto Power-Off time The Auto Power-Off function automatically turns off the drum module manually when you turn on your DTX502 for all of the Auto Power-Off page from Menu Mode (page 66). We recommend, therefore, that you forget ...
... (DTXPRESS IV SP SET), DTXPL (DTXPLORER), DrumTrig, and UserTrig NOTE • Your drum kit's model number is turned down the [ ] button. DTX502 Owner's Manual 13 Using the Data Dial, select how long the DTX502 should you always turn off yourself. 1. Quickly Disabling Auto Power-Off To quickly disable the... Initial Setup. Select your pads. Auto Power-Off time The Auto Power-Off function automatically turns off the drum module manually when you turn on your DTX502 for all of the Auto Power-Off page from Menu Mode (page 66). We recommend, therefore, that you forget ...
Owner's Manual
Page 14
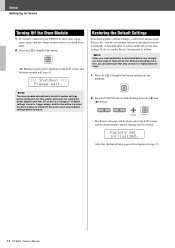
ment, ensure that the volume on the LCD screen, and the drum module will be displayed on those devices is turned down fully. 2. Press the [ ] (Standby/On) button. If you have connected your DTX502 to other audio equip- The Shutdown page will turn off. >>> Shutdown Setup Setting Up for Sound Turning Off the Drum Module 1.
ment, ensure that the volume on the LCD screen, and the drum module will be displayed on those devices is turned down fully. 2. Press the [ ] (Standby/On) button. If you have connected your DTX502 to other audio equip- The Shutdown page will turn off. >>> Shutdown Setup Setting Up for Sound Turning Off the Drum Module 1.
Owner's Manual
Page 16
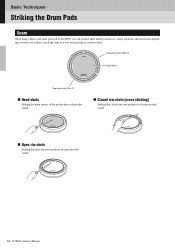
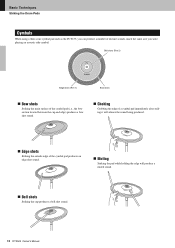
... produces a closed rim) depending on where you strike it, much the same as the XP80, you were playing an acoustic snare. Basic Techniques Striking the Drum Pads Snare When using a three-zone snare pad such as if you can produce three distinct sounds (i.e., head, open rim, and closed rim-shot sound...
... produces a closed rim) depending on where you strike it, much the same as the XP80, you were playing an acoustic snare. Basic Techniques Striking the Drum Pads Snare When using a three-zone snare pad such as if you can produce three distinct sounds (i.e., head, open rim, and closed rim-shot sound...
Owner's Manual
Page 17
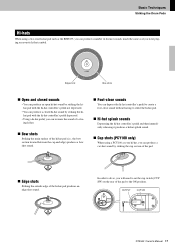
... the pad. Edge shots Striking the outside edge of the hi-hat pad produces an edge shot sound. OUTPUT CUP SW DTX502 Owner's Manual 17 Basic Techniques Striking the Drum Pads Hi-hats When using a PCY100 as your hi-hat, you were playing an acoustic hi-hat cymbal. In order to...
... the pad. Edge shots Striking the outside edge of the hi-hat pad produces an edge shot sound. OUTPUT CUP SW DTX502 Owner's Manual 17 Basic Techniques Striking the Drum Pads Hi-hats When using a PCY100 as your hi-hat, you were playing an acoustic hi-hat cymbal. In order to...
Owner's Manual
Page 18
... of a cymbal pad immediately after striking it will produce a muted sound. Bell shots Striking the cup produces a bell shot sound. 18 DTX502 Owner's Manual Basic Techniques Striking the Drum Pads Cymbals When using a three-zone cymbal pad such as if you can produce a number of the cymbal pad produces an edge...
... of a cymbal pad immediately after striking it will produce a muted sound. Bell shots Striking the cup produces a bell shot sound. 18 DTX502 Owner's Manual Basic Techniques Striking the Drum Pads Cymbals When using a three-zone cymbal pad such as if you can produce a number of the cymbal pad produces an edge...
Owner's Manual
Page 19
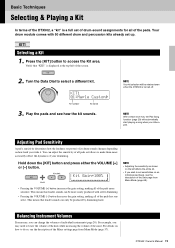
... change the volumes of the pads less sensitive. This means that "KIT1" is turned off. NOTE With certain drum kits, the Pad Song function (page 29) will be retained even when the DTX502 is displayed at the top-left affects the entire kit. • If you may need to set sensitivities on... how to make them more accurately reflect the dynamics of the pads more easily produced with 50 different drum and percussion kits already set of...
... change the volumes of the pads less sensitive. This means that "KIT1" is turned off. NOTE With certain drum kits, the Pad Song function (page 29) will be retained even when the DTX502 is displayed at the top-left affects the entire kit. • If you may need to set sensitivities on... how to make them more accurately reflect the dynamics of the pads more easily produced with 50 different drum and percussion kits already set of...
Owner's Manual
Page 20
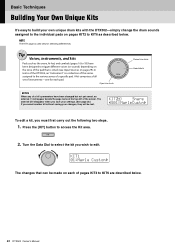
... (*) will disappear when you save your settings. (See page 25.) If you select another kit without saving your own unique drum kits with the DTX502-simply change the drum sounds assigned to the individual pads on page 29). KIt1 01:Maple Custom, The changes that is struck (see Input Sources on...the snare, hi-hat, and cymbals (pages 16 to KIT6 are described below . Tip Voices, instruments, and kits Pads such as described below . 20 DTX502 Owner's Manual Turn the Data Dial to edit. KIt2* Snare "S01:MapleCustm, To edit a kit, you wish to select the kit you must first...
... (*) will disappear when you save your settings. (See page 25.) If you select another kit without saving your own unique drum kits with the DTX502-simply change the drum sounds assigned to the individual pads on page 29). KIt1 01:Maple Custom, The changes that is struck (see Input Sources on...the snare, hi-hat, and cymbals (pages 16 to KIT6 are described below . Tip Voices, instruments, and kits Pads such as described below . 20 DTX502 Owner's Manual Turn the Data Dial to edit. KIt2* Snare "S01:MapleCustm, To edit a kit, you wish to select the kit you must first...
Owner's Manual
Page 25
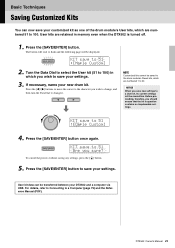
NOTE Customized kits cannot be saved to the drum module's Preset kits, which are numbered 1 to 51 :[Oaple Custom] 4. KIt saVe to 50. Press the [SAVE/ENTER] button to save your settings. 3. If necessary, name your DTX502 and a computer via USB. To cancel the process without saving any settings, press... the [ ] button. 5. User kits are retained in question contains no irreplaceable settings. DTX502 Owner's Manual 25 Turn the Data Dial to select the User kit (51 to 100) in which are numbered 51 to flash and ...
NOTE Customized kits cannot be saved to the drum module's Preset kits, which are numbered 1 to 51 :[Oaple Custom] 4. KIt saVe to 50. Press the [SAVE/ENTER] button to save your settings. 3. If necessary, name your DTX502 and a computer via USB. To cancel the process without saving any settings, press... the [ ] button. 5. User kits are retained in question contains no irreplaceable settings. DTX502 Owner's Manual 25 Turn the Data Dial to select the User kit (51 to 100) in which are numbered 51 to flash and ...
Owner's Manual
Page 26
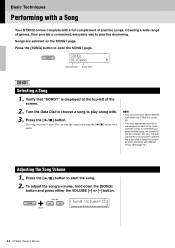
...SONG] button and press either the VOLUME [+] or [-] button. Basic Techniques Performing with a Song Your DTX502 comes complete with a full complement of genres, they provide a convenient, enjoyable way to practice drumming. Verify that "SONG1" is pre-assigned to each of the screen. 2. SONG1 01:Demo , ...Song number Song name SONG1 Selecting a Song 1. The song will be retained even when the DTX502 is turned off. • The most appropriate drum kit is displayed at the top-left of the drum module's songs, so whenever you wish to keep the current kit when practicing with . 3. ...
...SONG] button and press either the VOLUME [+] or [-] button. Basic Techniques Performing with a Song Your DTX502 comes complete with a full complement of genres, they provide a convenient, enjoyable way to practice drumming. Verify that "SONG1" is pre-assigned to each of the screen. 2. SONG1 01:Demo , ...Song number Song name SONG1 Selecting a Song 1. The song will be retained even when the DTX502 is turned off. • The most appropriate drum kit is displayed at the top-left of the drum module's songs, so whenever you wish to keep the current kit when practicing with . 3. ...

Owner's Manual
Page 27
To adjust the tempo, hold down the [SHIFT] button and press the [ ] but- NOTE • The tempo can be displayed on-screen. DTX502 Owner's Manual 27 Hold down the [SHIFT] button and turn the Data Dial. Press the [ ] button to set between 30 and 300 BPM. •... NOTE You can also use the Tap Tempo function (page 36) to start the song. 2. Press the [ ] button to mute and unmute the song's drum parts. Basic Techniques Performing with a Song Adjusting the Song Tempo 1. For details, see the description of Part Mute from Training Mode (page 47). Hold Muting...
To adjust the tempo, hold down the [SHIFT] button and press the [ ] but- NOTE • The tempo can be displayed on-screen. DTX502 Owner's Manual 27 Hold down the [SHIFT] button and turn the Data Dial. Press the [ ] button to set between 30 and 300 BPM. •... NOTE You can also use the Tap Tempo function (page 36) to start the song. 2. Press the [ ] button to mute and unmute the song's drum parts. Basic Techniques Performing with a Song Adjusting the Song Tempo 1. For details, see the description of Part Mute from Training Mode (page 47). Hold Muting...


