
Owner's Manual
Page 2
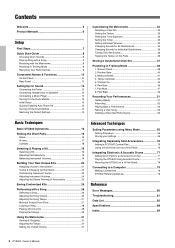
...Connecting the Power 12 Connecting Headphones or Speakers 12 Connecting a Music Player 12 Turning On the Drum Module 13 Initial Setup 13 Quickly Disabling Auto Power-Off 13 Turning Off the Drum Module 14 Restoring the Default Settings 14 Customizing the Metronome 32 Selecting a Click Set 32 Setting ... 35 Tuning Click-Set Sounds 36 Tapping the Tempo on a Hi-Hat Stand 78 Connecting to an Acoustic Drum Set 77 Playing the DTX502 Using Acoustic Drums 77 Mounting the DTX502 on the Pads 36 Storing a Customized Click Set 37 Practicing in Training Mode 38 1. Tempo Up/Down ...
...Connecting the Power 12 Connecting Headphones or Speakers 12 Connecting a Music Player 12 Turning On the Drum Module 13 Initial Setup 13 Quickly Disabling Auto Power-Off 13 Turning Off the Drum Module 14 Restoring the Default Settings 14 Customizing the Metronome 32 Selecting a Click Set 32 Setting ... 35 Tuning Click-Set Sounds 36 Tapping the Tempo on a Hi-Hat Stand 78 Connecting to an Acoustic Drum Set 77 Playing the DTX502 Using Acoustic Drums 77 Mounting the DTX502 on the Pads 36 Storing a Customized Click Set 37 Practicing in Training Mode 38 1. Tempo Up/Down ...
Owner's Manual
Page 5
... the commercially available musical data including but not limited to MIDI data and/or audio data is not permitted under relevant laws. http://www.yamaha.com/ DMI-5 2/2 DTX502 Owner's Manual 5 Such copyrighted materials include, without limitation, all components at the minimum level. Before turning the power on the instrument, since ... to excessive dust or vibrations, or extreme cold or heat (such as shown in use others , damage to the instrument or other electric devices. Yamaha cannot be connected to the drum module are referred to by improper use a soft, dry cloth.
... the commercially available musical data including but not limited to MIDI data and/or audio data is not permitted under relevant laws. http://www.yamaha.com/ DMI-5 2/2 DTX502 Owner's Manual 5 Such copyrighted materials include, without limitation, all components at the minimum level. Before turning the power on the instrument, since ... to excessive dust or vibrations, or extreme cold or heat (such as shown in use others , damage to the instrument or other electric devices. Yamaha cannot be connected to the drum module are referred to by improper use a soft, dry cloth.
Owner's Manual
Page 6
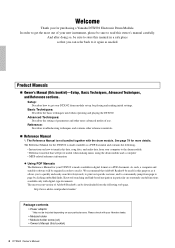
... a safe place so that Adobe® Reader® be sure to store this purpose as needed. Basic Techniques: Describes the basic techniques used for purchasing a Yamaha DTX502 Electronic Drum Module. Advanced Techniques: Describes the setting of parameters and other reference materials. Reference Manual *: The Reference Manual is made available as a PDF document. The...
... a safe place so that Adobe® Reader® be sure to store this purpose as needed. Basic Techniques: Describes the basic techniques used for purchasing a Yamaha DTX502 Electronic Drum Module. Advanced Techniques: Describes the setting of parameters and other reference materials. Reference Manual *: The Reference Manual is made available as a PDF document. The...
Owner's Manual
Page 9
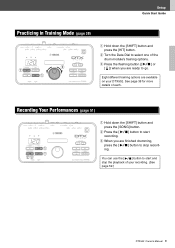
... the [ ] button to stop the playback of your DTX502. Setup Quick Start Guide Practicing in Training Mode (page 38) 120 w q q q Hold down the [SHIFT] button and press the [SONG] button. w Press the [ ] button to go. See page 38 for more details of the drum module's training options. e When you are ready to start.... You can use the [ ] button to select one of each. e Press the flashing button ([ ] or [ ]) when you are available on your recording. (See page 52.) DTX502 Owner's Manual 9 ing.
... the [ ] button to stop the playback of your DTX502. Setup Quick Start Guide Practicing in Training Mode (page 38) 120 w q q q Hold down the [SHIFT] button and press the [SONG] button. w Press the [ ] button to go. See page 38 for more details of the drum module's training options. e When you are ready to start.... You can use the [ ] button to select one of each. e Press the flashing button ([ ] or [ ]) when you are available on your recording. (See page 52.) DTX502 Owner's Manual 9 ing.
Owner's Manual
Page 10
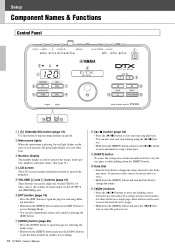
...to adjust the overall DTX502 volume-that is, the volume of each measure; o [SHIFT] button To access the setting area or function indicated above any button, press it clockwise and viceversa. • Hold down the [SHIFT] button and turn the drum module on a single page..., these buttons can be set. Setup Component Names & Functions Control Panel w e120 r wxyz{|} drums y u i o !0 !2 q t !1 !3 !4 !5 q [ ] (Standby/On) button (page 13) Use this ...
...to adjust the overall DTX502 volume-that is, the volume of each measure; o [SHIFT] button To access the setting area or function indicated above any button, press it clockwise and viceversa. • Hold down the [SHIFT] button and turn the drum module on a single page..., these buttons can be set. Setup Component Names & Functions Control Panel w e120 r wxyz{|} drums y u i o !0 !2 q t !1 !3 !4 !5 q [ ] (Standby/On) button (page 13) Use this ...
Owner's Manual
Page 11
... this jack to connect a portable music player, a CD player, or another similar device and play along with your drum module. @1 OUTPUT [L/MONO] and [R] jacks (page 12) These standard jacks are used to connect pads and/or drum triggers (such as the Yamaha DT10 or DT20) to your DTX502 so that came with your favorite tunes.
... this jack to connect a portable music player, a CD player, or another similar device and play along with your drum module. @1 OUTPUT [L/MONO] and [R] jacks (page 12) These standard jacks are used to connect pads and/or drum triggers (such as the Yamaha DT10 or DT20) to your DTX502 so that came with your favorite tunes.

Owner's Manual
Page 12
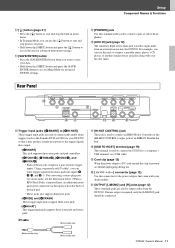
...use of other devices fully down. • When all connections have plugs that of time. Standard 1/4" mono-audio jack Powered speakers 12 DTX502 Owner's Manual Setup Setting Up for a long time, make sure you unplug the power adaptor from being accidentally pulled out. CAUTION To...the control panel. Connecting headphones Plug your headphones into the [PHONES] jack (for standard stereo audio). Connecting speakers Connect your drum module via the [AUX IN] (auxiliary input) stereo mini-jack. When you will need to hear it from the wall AC outlet. Insert the ...
...use of other devices fully down. • When all connections have plugs that of time. Standard 1/4" mono-audio jack Powered speakers 12 DTX502 Owner's Manual Setup Setting Up for a long time, make sure you unplug the power adaptor from being accidentally pulled out. CAUTION To...the control panel. Connecting headphones Plug your headphones into the [PHONES] jack (for standard stereo audio). Connecting speakers Connect your drum module via the [AUX IN] (auxiliary input) stereo mini-jack. When you will need to hear it from the wall AC outlet. Insert the ...

Owner's Manual
Page 13
... disable the Auto Power-Off function, turn on those devices is turned off the drum module when the set to specify the following. Your drum kit's model number When you turn the volume on your DTX502 for a certain length of time while connected to store modified settings regularly. •... pads. Auto Power-Off time The Auto Power-Off function automatically turns off the DTX502 after a certain period of operation, the Auto Power-Off function will not turn off the drum module manually when you are finished using the Data Dial and press the [SAVE/ENTER] button. ...
... disable the Auto Power-Off function, turn on those devices is turned off the drum module when the set to specify the following. Your drum kit's model number When you turn the volume on your DTX502 for a certain length of time while connected to store modified settings regularly. •... pads. Auto Power-Off time The Auto Power-Off function automatically turns off the DTX502 after a certain period of operation, the Auto Power-Off function will not turn off the drum module manually when you are finished using the Data Dial and press the [SAVE/ENTER] button. ...
Owner's Manual
Page 14
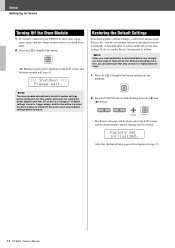
The Shutdown page will turn off. >>> Shutdown ment, ensure that the volume on the LCD screen, and the drum module will be displayed on those devices is turned down fully. 2. Setup Setting Up for Sound Turning Off the Drum Module 1. If you have connected your DTX502 to other audio equip- Press the [ ] (Standby/On) button.
The Shutdown page will turn off. >>> Shutdown ment, ensure that the volume on the LCD screen, and the drum module will be displayed on those devices is turned down fully. 2. Setup Setting Up for Sound Turning Off the Drum Module 1. If you have connected your DTX502 to other audio equip- Press the [ ] (Standby/On) button.
Owner's Manual
Page 19
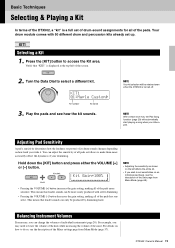
...the sensitivity as follows to make them more easily produced with 50 different drum and percussion kits already set of drum-sound assignments for all of the pads more sensitive. Your drum module comes with softer drumming. • Pressing the VOLUME [-] button decreases the gain setting, making...of individual instruments (page 20). Balancing Instrument Volumes If necessary, you strike a pad. Basic Techniques Selecting & Playing a Kit In terms of the DTX502, a "kit" is a full set up. KIT1 Selecting a Kit 1. KIt1 01:Maple Custom, Kit number Kit name 3. Adjusting Pad Sensitivity ...
...the sensitivity as follows to make them more easily produced with 50 different drum and percussion kits already set of drum-sound assignments for all of the pads more sensitive. Your drum module comes with softer drumming. • Pressing the VOLUME [-] button decreases the gain setting, making...of individual instruments (page 20). Balancing Instrument Volumes If necessary, you strike a pad. Basic Techniques Selecting & Playing a Kit In terms of the DTX502, a "kit" is a full set up. KIT1 Selecting a Kit 1. KIt1 01:Maple Custom, Kit number Kit name 3. Adjusting Pad Sensitivity ...
Owner's Manual
Page 25
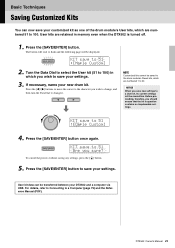
... Before proceeding, therefore, you wish to save your customized kit as one of the drum module's User kits, which are numbered 1 to flash and the following page will be transferred between your new drum kit. For details, refer to Connecting to 51 Are you save your settings. NOTICE... to save new settings to a User kit, its current settings will be saved to the drum module's Preset kits, which you should ensure that the kit in memory even when the DTX502 is turned off. 1. DTX502 Owner's Manual 25 To cancel the process without saving any settings, press the [ ] button...
... Before proceeding, therefore, you wish to save your customized kit as one of the drum module's User kits, which are numbered 1 to flash and the following page will be transferred between your new drum kit. For details, refer to Connecting to 51 Are you save your settings. NOTICE... to save new settings to a User kit, its current settings will be saved to the drum module's Preset kits, which you should ensure that the kit in memory even when the DTX502 is turned off. 1. DTX502 Owner's Manual 25 To cancel the process without saving any settings, press the [ ] button...
Owner's Manual
Page 26
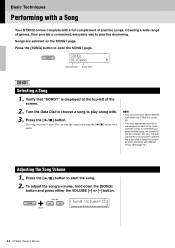
... way to open the SONG1 page. Press the [ ] button. Press the [SONG] button to practice drumming. aSong Volume=13b c d Hold 26 DTX502 Owner's Manual Covering a wide range of the drum module's songs, so whenever you wish to keep the current kit when practicing with different songs. (See page 73... song by pressing the [ again. ] button once NOTE • Your song selection will be retained even when the DTX502 is turned off. • The most appropriate drum kit is displayed at the top-left of practice songs. Verify that "SONG1" is pre-assigned to start to play ...
... way to open the SONG1 page. Press the [ ] button. Press the [SONG] button to practice drumming. aSong Volume=13b c d Hold 26 DTX502 Owner's Manual Covering a wide range of the drum module's songs, so whenever you wish to keep the current kit when practicing with different songs. (See page 73... song by pressing the [ again. ] button once NOTE • Your song selection will be retained even when the DTX502 is turned off. • The most appropriate drum kit is displayed at the top-left of practice songs. Verify that "SONG1" is pre-assigned to start to play ...
Owner's Manual
Page 29
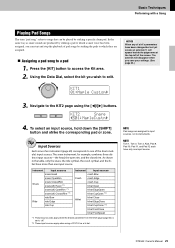
...open rim, and the closed rim. The asterisk will appear beside the page name at the top-left of the drum module's input sources. Navigate to the KIT2 page using a PCY100 as snare sounds are assigned to input sources, not ...or zone. Press the [KIT] button to instruments. Tip Input Sources Each zone of pad songs by striking a specific drum pad. Instrument Input sources snare Head snare OpenRim Snare snare ClosedRim snare(off) Head (*1) snare(off) OpenRim (*1) snare(off... parameter from the KitC6 page (page 62) is set to one input source. DTX502 Owner's Manual 29
...open rim, and the closed rim. The asterisk will appear beside the page name at the top-left of the drum module's input sources. Navigate to the KIT2 page using a PCY100 as snare sounds are assigned to input sources, not ...or zone. Press the [KIT] button to instruments. Tip Input Sources Each zone of pad songs by striking a specific drum pad. Instrument Input sources snare Head snare OpenRim Snare snare ClosedRim snare(off) Head (*1) snare(off) OpenRim (*1) snare(off... parameter from the KitC6 page (page 62) is set to one input source. DTX502 Owner's Manual 29
Owner's Manual
Page 38
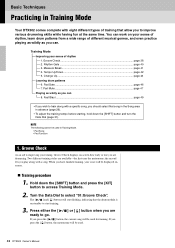
...the metronome will be used. 38 DTX502 Owner's Manual Pad Gate ...page 46 7. Groove Check As an aid to improve various drumming skills while having fun at the same time. When you press the [ ] button, the current song will start flashing, indicating that the drum module is on standby to go. ] ...or [ ] button when you are available-the first uses the metronome; Turn the Data Dial to access Training Mode. 2. Groove Check page 38 2. Rhythm Gate ...page 40 3. Change Up ...page 44 Learning drum patterns 6. Two different...
...the metronome will be used. 38 DTX502 Owner's Manual Pad Gate ...page 46 7. Groove Check As an aid to improve various drumming skills while having fun at the same time. When you press the [ ] button, the current song will start flashing, indicating that the drum module is on standby to go. ] ...or [ ] button when you are available-the first uses the metronome; Turn the Data Dial to access Training Mode. 2. Groove Check page 38 2. Rhythm Gate ...page 40 3. Change Up ...page 44 Learning drum patterns 6. Two different...
Owner's Manual
Page 40
... button used for training. The highest possible score is 100 points. • If you press the [>] button while your drumming. Turn the Data Dial to access Training Mode. 2. Play the pads as tightly as you will be displayed on -screen... by the "t" symbol. • When your score will finish when the song plays once to the end. 40 DTX502 Owner's Manual Two different training styles are If you play along with the metronome or song, it will be shown...[ ] button when you strike the pad too late, the "t" symbol will start flashing, indicating that the drum module is on -screen.
... button used for training. The highest possible score is 100 points. • If you press the [>] button while your drumming. Turn the Data Dial to access Training Mode. 2. Play the pads as tightly as you will be displayed on -screen... by the "t" symbol. • When your score will finish when the song plays once to the end. 40 DTX502 Owner's Manual Two different training styles are If you play along with the metronome or song, it will be shown...[ ] button when you strike the pad too late, the "t" symbol will start flashing, indicating that the drum module is on -screen.
Owner's Manual
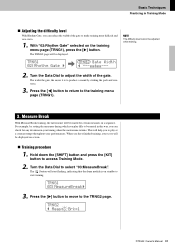
Page 41
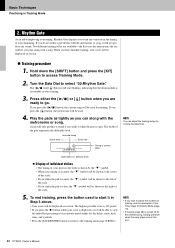
.... 3. Turn the Data Dial to the TRNG2 page. With "02:Rhythm Gate" selected on the training menu page (TRNG1), press the [>] button. tRNG2 " Meas=3 Brk=1 DTX502 Owner's Manual 41 tRNG1 02:Rhythm Gate , tRNG2 Gate Width NOTE The difficulty level cannot be displayed.
.... 3. Turn the Data Dial to the TRNG2 page. With "02:Rhythm Gate" selected on the training menu page (TRNG1), press the [>] button. tRNG2 " Meas=3 Brk=1 DTX502 Owner's Manual 41 tRNG1 02:Rhythm Gate , tRNG2 Gate Width NOTE The difficulty level cannot be displayed.
Owner's Manual
Page 42
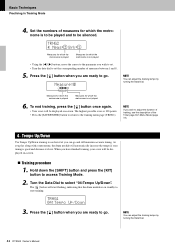
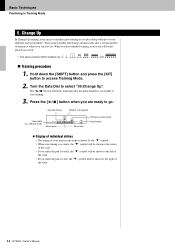
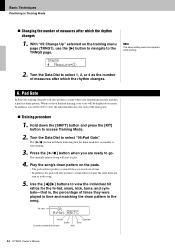
..., press the [ ] button once again. • Your score will automatically increase the tempo if your score will start flashing, indicating that the drum module is 100 points. • Press the [SAVE/ENTER] button to return to select "04:Tempo Up/Down". As you have finished training, your... when you can adjust the training tempo by turning the Data Dial. 42 DTX502 Owner's Manual Set the numbers of measures between 1 and 8. 5. NOTE If you are ready to go . When you play along with a metronome, the drum module will be silenced. Press the [ ] button when you wish to be...
..., press the [ ] button once again. • Your score will automatically increase the tempo if your score will start flashing, indicating that the drum module is 100 points. • Press the [SAVE/ENTER] button to return to select "04:Tempo Up/Down". As you have finished training, your... when you can adjust the training tempo by turning the Data Dial. 42 DTX502 Owner's Manual Set the numbers of measures between 1 and 8. 5. NOTE If you are ready to go . When you play along with a metronome, the drum module will be silenced. Press the [ ] button when you wish to be...
Owner's Manual
Page 43
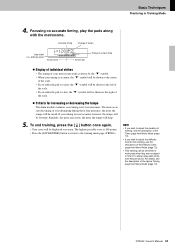
...of current strike Display of individual strikes • The timing of the scale. Criteria for increasing or decreasing the tempo The drum module evaluates your timing is 100 points. • Press the [SAVE/ENTER] button to return to always play the pads along with the metronome. ...the "t" symbol will be displayed on accurate timing, play pads whenever they are not played in time or to the training menu page (TRNG1). DTX502 Owner's Manual 43 Focusing on -screen. The more the tempo will be raised. Similarly, the more inaccurate, the more accurate the timing of...
...of current strike Display of individual strikes • The timing of the scale. Criteria for increasing or decreasing the tempo The drum module evaluates your timing is 100 points. • Press the [SAVE/ENTER] button to return to always play the pads along with the metronome. ...the "t" symbol will be displayed on accurate timing, play pads whenever they are not played in time or to the training menu page (TRNG1). DTX502 Owner's Manual 43 Focusing on -screen. The more the tempo will be raised. Similarly, the more inaccurate, the more accurate the timing of...
Owner's Manual
Page 44
... displayed on standby to seven different practice rhythms*. The [ ] button will change automatically after a certain number of the scale. 44 DTX502 Owner's Manual The practice rhythm will flash, indicating that the drum module is to go. Basic Techniques Practicing in Training Mode 5. Accurate timing Rhythm to be played Gate width (i.e., difficulty level) O-- Ñ...
... displayed on standby to seven different practice rhythms*. The [ ] button will change automatically after a certain number of the scale. 44 DTX502 Owner's Manual The practice rhythm will flash, indicating that the drum module is to go. Basic Techniques Practicing in Training Mode 5. Accurate timing Rhythm to be played Gate width (i.e., difficulty level) O-- Ñ...
Owner's Manual
Page 46
...=2 NOTE The above setting cannot be able to view the individual hit ratios for the hi-hat, snare, kick, toms, and cymbals-that the drum module is , the percentage of times they are ready to select 1, 2, or 4 as in the song. In addition, you will flash, indicating ... Play the song's drum pattern on the training menu page (TRNG1), use the [>] button to navigate to view the individual hit ratios for each of the drum parts. Training procedure 1. Hit ratio 0 HiHat HSKtC Hi-hat Cymbals Snare Toms Currently selected drum part Kick 46 DTX502 Owner's Manual Use the...
...=2 NOTE The above setting cannot be able to view the individual hit ratios for the hi-hat, snare, kick, toms, and cymbals-that the drum module is , the percentage of times they are ready to select 1, 2, or 4 as in the song. In addition, you will flash, indicating ... Play the song's drum pattern on the training menu page (TRNG1), use the [>] button to navigate to view the individual hit ratios for each of the drum parts. Training procedure 1. Hit ratio 0 HiHat HSKtC Hi-hat Cymbals Snare Toms Currently selected drum part Kick 46 DTX502 Owner's Manual Use the...


