
DTX482K Owners Manual
Page 1
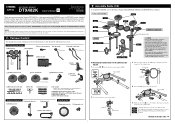
...large rack over and continue with the assembly by following the instructions on your electronic drum kit, please verify that you for purchasing the Yamaha DTX482K! NOTICE Some objects made of rubber and similar materials can fully take advantage of the advanced and convenient functions of the snare pad.... module KP65 Kick pad Cymbal/hi-hat pads (×2) Crash cymbal pad HH65 Hi-hat controller FP6110A Foot pedal 2. ELECTRONIC DRUM KIT DTX482K Owner's Manual EN Manual Development Group © 2018 Yamaha Corporation Published 08/2014 POMA*.*-**A0 VAU5550 Thank you keep this...
...large rack over and continue with the assembly by following the instructions on your electronic drum kit, please verify that you for purchasing the Yamaha DTX482K! NOTICE Some objects made of rubber and similar materials can fully take advantage of the advanced and convenient functions of the snare pad.... module KP65 Kick pad Cymbal/hi-hat pads (×2) Crash cymbal pad HH65 Hi-hat controller FP6110A Foot pedal 2. ELECTRONIC DRUM KIT DTX482K Owner's Manual EN Manual Development Group © 2018 Yamaha Corporation Published 08/2014 POMA*.*-**A0 VAU5550 Thank you keep this...
DTX482K Owners Manual
Page 2
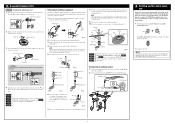
... on pages 15 to secure the rod. Hold The number button [8] flashes while the settings on the DTX402K, DTX432K, and DTX452K Owner's Manual. Rod for the DTX482K. Rotate the cymbal holder upward and tighten the clamp bolt, and then bring the cymbal tilter upward (fig. 1). Stopper Key bolt Tuning ...[8]. This completes the setup. After initializing the drum module, make full con- 2. Lightly screw the clamp bolt into position (fig. 4). Rod for the DTX482K is complete, there is no need to secure the stopper (fig. 5). If this occurs, loosen the key bolt as much as shown in the cymbal...
... on pages 15 to secure the rod. Hold The number button [8] flashes while the settings on the DTX402K, DTX432K, and DTX452K Owner's Manual. Rod for the DTX482K. Rotate the cymbal holder upward and tighten the clamp bolt, and then bring the cymbal tilter upward (fig. 1). Stopper Key bolt Tuning ...[8]. This completes the setup. After initializing the drum module, make full con- 2. Lightly screw the clamp bolt into position (fig. 4). Rod for the DTX482K is complete, there is no need to secure the stopper (fig. 5). If this occurs, loosen the key bolt as much as shown in the cymbal...

