

Midi Reference
Page 1
...box in the toolbar to quickly and conveniently search for your DTX400K, DTX430K, or DTX450K Owner's Manual. Keyword Searching If viewing this manual are the trademarks or registered trademarks of their respective companies. 1 DTX400K/DTX430K/DTX450K MIDI Reference EN http://www.adobe.com/products/reader Illustrations and...a Computer section of Adobe® Reader® from the following web page. ELECTRONIC DRUM KIT DTX400K DTX430K DTX450K MIDI Reference How to Use This Manual This MIDI Reference will prove useful when transferring MIDI data between the drum module that came with ...
...box in the toolbar to quickly and conveniently search for your DTX400K, DTX430K, or DTX450K Owner's Manual. Keyword Searching If viewing this manual are the trademarks or registered trademarks of their respective companies. 1 DTX400K/DTX430K/DTX450K MIDI Reference EN http://www.adobe.com/products/reader Illustrations and...a Computer section of Adobe® Reader® from the following web page. ELECTRONIC DRUM KIT DTX400K DTX430K DTX450K MIDI Reference How to Use This Manual This MIDI Reference will prove useful when transferring MIDI data between the drum module that came with ...

Midi Reference
Page 5
... 8. You will be operated at this window will end the process without transferring any files. 9. ule. Confirm that song data has been correctly transferred. 5 DTX400K/DTX430K/DTX450K MIDI Reference Clicking the Cancel button in certain cases, could also lead to the entire drum-module memory being deleted. 10. In addition, the drum... can be transferred from the temporary storage area to be found in the top half of your drum mod- Select the song files to your DTX400K, DTX430K, or DTX450K Owner's Manual.
... 8. You will be operated at this window will end the process without transferring any files. 9. ule. Confirm that song data has been correctly transferred. 5 DTX400K/DTX430K/DTX450K MIDI Reference Clicking the Cancel button in certain cases, could also lead to the entire drum-module memory being deleted. 10. In addition, the drum... can be transferred from the temporary storage area to be found in the top half of your drum mod- Select the song files to your DTX400K, DTX430K, or DTX450K Owner's Manual.

Midi Reference
Page 8
... the note number assignments shown above. MIDI Note Numbers Assigned to Pads The following table shows the default note numbers used by your DTX400K, DTX430K, or DTX450K Owner's Manual. 8 DTX400K/DTX430K/DTX450K MIDI Reference Details on a KP65 Kick Pad is struck. Note assignment Name Number (decimal) Snare *1 Head shots Open rim shots (Rim 1) Closed rim...
... the note number assignments shown above. MIDI Note Numbers Assigned to Pads The following table shows the default note numbers used by your DTX400K, DTX430K, or DTX450K Owner's Manual. 8 DTX400K/DTX430K/DTX450K MIDI Reference Details on a KP65 Kick Pad is struck. Note assignment Name Number (decimal) Snare *1 Head shots Open rim shots (Rim 1) Closed rim...

Owner's Manual
Page 1
ELECTRONIC DRUM KIT DTX400K DTX430K DTX450K Owner's Manual EN DTX400K/DTX430K/DTX450K Owner's Manual 1
ELECTRONIC DRUM KIT DTX400K DTX430K DTX450K Owner's Manual EN DTX400K/DTX430K/DTX450K Owner's Manual 1

Owner's Manual
Page 2
... Settings 49 m Other Settings 53 Integrating Separately Sold Accessories .. 56 For DTX400K Owners 56 For DTX430K & DTX450K Owners 56 Connecting to a Computer 57 Making Connections 57 MIDI Reference Manual 57 Reference Troubleshooting 58 Data List 60 Specifications 64 Index 65 2 DTX400K/DTX430K/DTX450K Owner's Manual Measure Break 32 4. Change Up 34 6. Part Mute 38 10. Rhythm...
... Settings 49 m Other Settings 53 Integrating Separately Sold Accessories .. 56 For DTX400K Owners 56 For DTX430K & DTX450K Owners 56 Connecting to a Computer 57 Making Connections 57 MIDI Reference Manual 57 Reference Troubleshooting 58 Data List 60 Specifications 64 Index 65 2 DTX400K/DTX430K/DTX450K Owner's Manual Measure Break 32 4. Change Up 34 6. Part Mute 38 10. Rhythm...

Owner's Manual
Page 3
... results, please contact the local retailer authorized to distribute this product become damaged beyond repair, or for the battery being affected by YAMAHA CORPORATION OF AMERICA. (FCC DoC) DTX400K/DTX430K/DTX450K Owner's Manual 3 ence that our products and the production methods used , please observe all installations. When replacement becomes necessary, contact a qualified service representative...
... results, please contact the local retailer authorized to distribute this product become damaged beyond repair, or for the battery being affected by YAMAHA CORPORATION OF AMERICA. (FCC DoC) DTX400K/DTX430K/DTX450K Owner's Manual 3 ence that our products and the production methods used , please observe all installations. When replacement becomes necessary, contact a qualified service representative...
Owner's Manual
Page 4
...excessively bend or otherwise damage the cord, or place heavy objects on the unit. If anyone who might accidentally fall over them. 4 DTX400K/DTX430K/DTX450K Owner's Manual DMI-5 1/2 Fire warning • Do not put burning items, such as candles, on it might trip over and cause a fire... not connect the instrument to hold the plug itself and not the cord. If this product be taken apart or customized. Pulling by Yamaha service personnel. - Assembly • Under no circumstances should take special care whenever handling these components. • Be careful with the ...
...excessively bend or otherwise damage the cord, or place heavy objects on the unit. If anyone who might accidentally fall over them. 4 DTX400K/DTX430K/DTX450K Owner's Manual DMI-5 1/2 Fire warning • Do not put burning items, such as candles, on it might trip over and cause a fire... not connect the instrument to hold the plug itself and not the cord. If this product be taken apart or customized. Pulling by Yamaha service personnel. - Assembly • Under no circumstances should take special care whenever handling these components. • Be careful with the ...
Owner's Manual
Page 5
... at their respective companies. Optional Pads Within this Owner's Manual, the optional external pads that is easily accessible. When you or others ' copyrights. http://www.yamaha.com/ DMI-5 2/2 DTX400K/DTX430K/DTX450K Owner's Manual 5 • When setting up the product, make sure that these... model names were up-to-date as of printing of this manual. Always turn the power off the power switch...
... at their respective companies. Optional Pads Within this Owner's Manual, the optional external pads that is easily accessible. When you or others ' copyrights. http://www.yamaha.com/ DMI-5 2/2 DTX400K/DTX430K/DTX450K Owner's Manual 5 • When setting up the product, make sure that these... model names were up-to-date as of printing of this manual. Always turn the power off the power switch...

Owner's Manual
Page 6
...so that will be downloaded from the following web page. http://www.adobe.com/products/reader/ 6 DTX400K/DTX430K/DTX450K Owner's Manual Product Manuals The DTX400K, DTX430K, and DTX450K are extremely useful functions available only with this purpose as it again as a PDF document. We recommend...print out specific sections, and to conveniently jump from your DTX400K, DTX430K, or DTX450K is made available in order to the drum module Using PDF Manuals The Reference Manual for purchasing a Yamaha DTX400K, DTX430K, or DTX450K Electronic Drum Kit. In order to get it . ...
...so that will be downloaded from the following web page. http://www.adobe.com/products/reader/ 6 DTX400K/DTX430K/DTX450K Owner's Manual Product Manuals The DTX400K, DTX430K, and DTX450K are extremely useful functions available only with this purpose as it again as a PDF document. We recommend...print out specific sections, and to conveniently jump from your DTX400K, DTX430K, or DTX450K is made available in order to the drum module Using PDF Manuals The Reference Manual for purchasing a Yamaha DTX400K, DTX430K, or DTX450K Electronic Drum Kit. In order to get it . ...

Owner's Manual
Page 7
... described in the Basic Techniques section (pages 23 to 39). • More complex methods are described in the Advanced Techniques section (pages 40 to 55). DTX400K/DTX430K/DTX450K Owner's Manual 7
... described in the Basic Techniques section (pages 23 to 39). • More complex methods are described in the Advanced Techniques section (pages 40 to 55). DTX400K/DTX430K/DTX450K Owner's Manual 7

Owner's Manual
Page 8
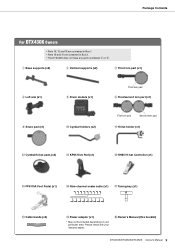
... • Parts !6, !,7 and !8 are contained in Box 1. • Parts !0 and !1 are contained in Box 2. • The DTX400K does not have any parts numbered u, o, or !3. • Parts !4 and !5 are almost identical in appearance but are actually different. tion. •... key (x1) !8 Cable bands (x3) !9 Power adaptor (x1) * May not be told apart by the sticker on your Yamaha dealer. @0 Owner's Manual (this booklet) 8 DTX400K/DTX430K/DTX450K Owner's Manual Part i has a wing bolt, but are present. They can be included depending on the base sec- Please check with your particular...
... • Parts !6, !,7 and !8 are contained in Box 1. • Parts !0 and !1 are contained in Box 2. • The DTX400K does not have any parts numbered u, o, or !3. • Parts !4 and !5 are almost identical in appearance but are actually different. tion. •... key (x1) !8 Cable bands (x3) !9 Power adaptor (x1) * May not be told apart by the sticker on your Yamaha dealer. @0 Owner's Manual (this booklet) 8 DTX400K/DTX430K/DTX450K Owner's Manual Part i has a wing bolt, but are present. They can be included depending on the base sec- Please check with your particular...
Owner's Manual
Page 9
...) !5 FP6110A Foot Pedal (x1) !6 Nine-channel snake cable (x1) !7 Tuning key (x1) !8 Cable bands (x3) !9 Power adaptor (x1) * May not be included depending on your Yamaha dealer. @0 Owner's Manual (this booklet) DTX400K/DTX430K/DTX450K Owner's Manual 9
...) !5 FP6110A Foot Pedal (x1) !6 Nine-channel snake cable (x1) !7 Tuning key (x1) !8 Cable bands (x3) !9 Power adaptor (x1) * May not be included depending on your Yamaha dealer. @0 Owner's Manual (this booklet) DTX400K/DTX430K/DTX450K Owner's Manual 9
Owner's Manual
Page 10
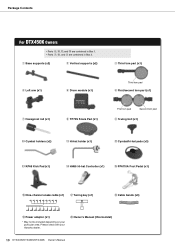
... snake cable (x1) !7 Tuning key (x1) !8 Cable bands (x3) !9 Power adaptor (x1) * May not be included depending on your Yamaha dealer. @0 Owner's Manual (this booklet) 10 DTX400K/DTX430K/DTX450K Owner's Manual Please check with your particular area. Package Contents For DTX450K Owners • Parts o, !6, !,7 and !8 are contained in Box 1. • Parts u, !0, and !1 are contained in Box 2.
... snake cable (x1) !7 Tuning key (x1) !8 Cable bands (x3) !9 Power adaptor (x1) * May not be included depending on your Yamaha dealer. @0 Owner's Manual (this booklet) 10 DTX400K/DTX430K/DTX450K Owner's Manual Please check with your particular area. Package Contents For DTX450K Owners • Parts o, !6, !,7 and !8 are contained in Box 1. • Parts u, !0, and !1 are contained in Box 2.

Owner's Manual
Page 11
... support (w) from the package, and using the tuning key, securely tighten the s key bolts (i.e., the key bolts labeled s in reverse. DTX400K/DTX430K/DTX450K Owner's Manual 11 Setup Assembly Guide Fully assembled drum kit (DTX450K shown) Step 5 Step 10 Step 6 Step 8 Step 4 Step 7 Step 11 Step 9 Step 3 Step 2 CAUTION • Choose a flat, hard surface on...
... support (w) from the package, and using the tuning key, securely tighten the s key bolts (i.e., the key bolts labeled s in reverse. DTX400K/DTX430K/DTX450K Owner's Manual 11 Setup Assembly Guide Fully assembled drum kit (DTX450K shown) Step 5 Step 10 Step 6 Step 8 Step 4 Step 7 Step 11 Step 9 Step 3 Step 2 CAUTION • Choose a flat, hard surface on...

Owner's Manual
Page 12
...Tighten the key bolt to secure the left arm (r) in the figure is not part of the DTX400K. 1. Step 5 Attaching the drum module t 10 cm Left vertical support 12 DTX400K/DTX430K/DTX450K Owner's Manual 1. Slide the drum module (t) onto the left vertical sup- Tighten the key bolt to secure ...e Rear of third tom pad Right vertical support Joint Left vertical support IMPORTANT The third tom part (e) and the snare part (i) from the DTX400K are almost identical in appearance, and special care should be taken to avoid mixing them apart, look for the wing bolt, which the module ...
...Tighten the key bolt to secure the left arm (r) in the figure is not part of the DTX400K. 1. Step 5 Attaching the drum module t 10 cm Left vertical support 12 DTX400K/DTX430K/DTX450K Owner's Manual 1. Slide the drum module (t) onto the left vertical sup- Tighten the key bolt to secure ...e Rear of third tom pad Right vertical support Joint Left vertical support IMPORTANT The third tom part (e) and the snare part (i) from the DTX400K are almost identical in appearance, and special care should be taken to avoid mixing them apart, look for the wing bolt, which the module ...

Owner's Manual
Page 13
... to secure the snare pad (i) in Step 12 . The details of the snare pad (i), and rotate the pad 180°, turning it over. i DTX400K/DTX430K/DTX450K Owner's Manual 13 NOTE This part has two key bolts, one each on the back of Step 7 are flush with the joint. 3. Take the snare... or back-to avoid assembling the first and second tom pads upside-down until the front end of the supports are different for the DTX400K, DTX430K, and DTX450K. Ensure that the tom part is flush with the tops of second tom pad y Vertical supports 1. Assembly Guide Step 6 Attaching the first/...
... to secure the snare pad (i) in Step 12 . The details of the snare pad (i), and rotate the pad 180°, turning it over. i DTX400K/DTX430K/DTX450K Owner's Manual 13 NOTE This part has two key bolts, one each on the back of Step 7 are flush with the joint. 3. Take the snare... or back-to avoid assembling the first and second tom pads upside-down until the front end of the supports are different for the DTX400K, DTX430K, and DTX450K. Ensure that the tom part is flush with the tops of second tom pad y Vertical supports 1. Assembly Guide Step 6 Attaching the first/...

Owner's Manual
Page 14
Left arm For DTX450K Owners Step 7 Attaching the snare pad 1. Rotate the joint 90° counter-clockwise, making the joint ... it fully into the joint. 6. Loosen the key bolt and adjust the angle of Step 7 are different for the DTX400K, DTX430K, and DTX450K. Wing bolt 90° Joint 2. Tighten the key bolt to secure the hexagonal rod (u) in place. 7. Tighten... from the package and lightly tighten the S wing bolt (o). (Five or six turns is sufficient.) o i i 14 DTX400K/DTX430K/DTX450K Owner's Manual 8. For DTX430K Owners Step 7 Attaching the snare pad 1.
Left arm For DTX450K Owners Step 7 Attaching the snare pad 1. Rotate the joint 90° counter-clockwise, making the joint ... it fully into the joint. 6. Loosen the key bolt and adjust the angle of Step 7 are different for the DTX400K, DTX430K, and DTX450K. Wing bolt 90° Joint 2. Tighten the key bolt to secure the hexagonal rod (u) in place. 7. Tighten... from the package and lightly tighten the S wing bolt (o). (Five or six turns is sufficient.) o i i 14 DTX400K/DTX430K/DTX450K Owner's Manual 8. For DTX430K Owners Step 7 Attaching the snare pad 1.

Owner's Manual
Page 15
...pad !1 Joint Joint 1. Tighten the two key bolts to secure the cymbal hold - NOTE The two cymbal holders are different for the DTX400K, DTX430K, and DTX450K. Take the hi-hat holder (!1) from the package and slide it into the joint from the rear as shown in Step 6 . 2. Tighten ... protrude slightly from the rear of the joint. • When correctly oriented, the metal rod section at the ends of the first/sec- DTX400K/DTX430K/DTX450K Owner's Manual 15 Then adjust the angle of the hi-hat holder. • When correctly inserted, the tip of the hi-hat holder (!1) will be...
...pad !1 Joint Joint 1. Tighten the two key bolts to secure the cymbal hold - NOTE The two cymbal holders are different for the DTX400K, DTX430K, and DTX450K. Take the hi-hat holder (!1) from the package and slide it into the joint from the rear as shown in Step 6 . 2. Tighten ... protrude slightly from the rear of the joint. • When correctly oriented, the metal rod section at the ends of the first/sec- DTX400K/DTX430K/DTX450K Owner's Manual 15 Then adjust the angle of the hi-hat holder. • When correctly inserted, the tip of the hi-hat holder (!1) will be...

Owner's Manual
Page 16
... in place. one of these is inserted from the front-rear direction of the three tom pads. Replace the washer removed in place. 16 DTX400K/DTX430K/DTX450K Owner's Manual Remove the wing nut and the upper felt pad from the hi-hat holder. (Do not remove the lower felt pad.) 2. Adjust the position... the cymbal/hi-hat pads (!2) are identical. Tighten the key bolt to secure the tom pad in 1. Replace the felt pad removed in the DTX450K. ingly, 1.
... in place. one of these is inserted from the front-rear direction of the three tom pads. Replace the washer removed in place. 16 DTX400K/DTX430K/DTX450K Owner's Manual Remove the wing nut and the upper felt pad from the hi-hat holder. (Do not remove the lower felt pad.) 2. Adjust the position... the cymbal/hi-hat pads (!2) are identical. Tighten the key bolt to secure the tom pad in 1. Replace the felt pad removed in the DTX450K. ingly, 1.

Owner's Manual
Page 17
... the center. Take the foot pedal (!5) from the package and insert the beater into the hole in the holder as shown below . 4. DTX400K DTX430K/DTX450K DTX400K/DTX430K/DTX450K Owner's Manual 17 Take the kick pad (!3) from the kick pad holder, and arrange each set nearby in 1. age, remove the four wing bolts, ...it . If not, adjust the length of the kick pad holder into the hole until the tip protrudes approximately 15 mm from the DTX400K are almost identical in the figure on the base section. Slide the beater rod into the foot-pedal's assembly bracket. 7. Owners of the...
... the center. Take the foot pedal (!5) from the package and insert the beater into the hole in the holder as shown below . 4. DTX400K DTX430K/DTX450K DTX400K/DTX430K/DTX450K Owner's Manual 17 Take the kick pad (!3) from the kick pad holder, and arrange each set nearby in 1. age, remove the four wing bolts, ...it . If not, adjust the length of the kick pad holder into the hole until the tip protrudes approximately 15 mm from the DTX400K are almost identical in the figure on the base section. Slide the beater rod into the foot-pedal's assembly bracket. 7. Owners of the...

