

Midi Reference
Page 1
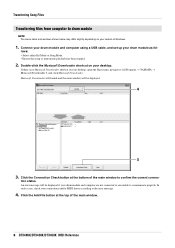
... Reference How to Use This Manual This MIDI Reference will prove useful when transferring MIDI data between the drum module that came with your DTX400K, DTX430K, or DTX450K electronic drum set and a computer after they have been connected with a USB cable can be found in this manual are for ...instructional purposes only and may differ somewhat for them within the text. Details on how to connect your drum module and computer with a ...
... Reference How to Use This Manual This MIDI Reference will prove useful when transferring MIDI data between the drum module that came with your DTX400K, DTX430K, or DTX450K electronic drum set and a computer after they have been connected with a USB cable can be found in this manual are for ...instructional purposes only and may differ somewhat for them within the text. Details on how to connect your drum module and computer with a ...

Midi Reference
Page 2
... download page. 2. Make sure your computer is connected to your drum module, a two-digit number (between your drum module. 2 DTX400K/DTX430K/DTX450K MIDI Reference When installed, Musicsoft Downloader will be transferred Before transferring a ...song file to the Internet and then download Musicsoft Downloader from the following web site. Follow the instructions displayed and install Musicsoft Downloader. Yamaha Download Site: http://download.yamaha...
... download page. 2. Make sure your computer is connected to your drum module, a two-digit number (between your drum module. 2 DTX400K/DTX430K/DTX450K MIDI Reference When installed, Musicsoft Downloader will be transferred Before transferring a ...song file to the Internet and then download Musicsoft Downloader from the following web site. Follow the instructions displayed and install Musicsoft Downloader. Yamaha Download Site: http://download.yamaha...
Midi Reference
Page 3
...-click the Musicsoft Downloader shortcut on your drum module as fol- An error message will be displayed if your version of Windows. 1. Click the Add File button at the bottom of the main window. 3 DTX400K/DTX430K/DTX450K MIDI Reference If there is no Musicsoft Downloader ...shortcut on your drum module and computer are not connected or are unable to All Programs YAMAHA Musicsoft Downloader 5, and click Musicsoft Downloader. tion status....
...-click the Musicsoft Downloader shortcut on your drum module as fol- An error message will be displayed if your version of Windows. 1. Click the Add File button at the bottom of the main window. 3 DTX400K/DTX430K/DTX450K MIDI Reference If there is no Musicsoft Downloader ...shortcut on your drum module and computer are not connected or are unable to All Programs YAMAHA Musicsoft Downloader 5, and click Musicsoft Downloader. tion status....
Midi Reference
Page 4
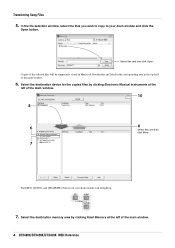
... Musical Instruments at the left of the main window. 6. In the file selection window, select the files you wish to copy to your drum module will be temporarily stored in Musicsoft Downloader and listed in the corresponding area in the top half of the main window. 10 8 6 8 Select... files and then click Move. 7 The [KIT], [SONG], and [TRAINING] buttons on your drum module and click the Open button. Copies of the main window. 4 DTX400K/DTX430K/DTX450K MIDI Reference Select the destination device for the copied files by clicking Flash Memory at the left of the...
... Musical Instruments at the left of the main window. 6. In the file selection window, select the files you wish to copy to your drum module will be temporarily stored in Musicsoft Downloader and listed in the corresponding area in the top half of the main window. 10 8 6 8 Select... files and then click Move. 7 The [KIT], [SONG], and [TRAINING] buttons on your drum module and click the Open button. Copies of the main window. 4 DTX400K/DTX430K/DTX450K MIDI Reference Select the destination device for the copied files by clicking Flash Memory at the left of the...

Midi Reference
Page 5
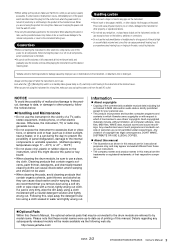
... of the main window, and then click the Move button. Close the main window to your DTX400K, DTX430K, or DTX450K Owner's Manual. Details on your drum module. NOTICE Do not disconnect the USB cable while files are being saved correctly, but in this window will be operated ...has been correctly transferred to proceed. In addition, the drum module should not be asked to confirm if you wish to your drum module and start playback. Confirm that song data has been correctly transferred. 5 DTX400K/DTX430K/DTX450K MIDI Reference Transferring Song Files 8. You will end the ...
... of the main window, and then click the Move button. Close the main window to your DTX400K, DTX430K, or DTX450K Owner's Manual. Details on your drum module. NOTICE Do not disconnect the USB cable while files are being saved correctly, but in this window will be operated ...has been correctly transferred to proceed. In addition, the drum module should not be asked to confirm if you wish to your drum module and start playback. Confirm that song data has been correctly transferred. 5 DTX400K/DTX430K/DTX450K MIDI Reference Transferring Song Files 8. You will end the ...
Midi Reference
Page 6
...metronome playback has been stopped. 2. Connect your drum module and computer, and set up . 6 Select files and then click Move. 3 6 DTX400K/DTX430K/DTX450K MIDI Reference An error message will all light up your drum module as follows: • Select either Kit Mode or...and [TRAINING] buttons on your connections and/or MIDI driver according to All Programs YAMAHA Musicsoft Downloader 5, and click Musicsoft Downloader. 3. tion status. In such a case, check your drum module (i.e., preset songs) cannot be displayed if your desktop, open the Start menu, navigate to ...
...metronome playback has been stopped. 2. Connect your drum module and computer, and set up . 6 Select files and then click Move. 3 6 DTX400K/DTX430K/DTX450K MIDI Reference An error message will all light up your drum module as follows: • Select either Kit Mode or...and [TRAINING] buttons on your connections and/or MIDI driver according to All Programs YAMAHA Musicsoft Downloader 5, and click Musicsoft Downloader. 3. tion status. In such a case, check your drum module (i.e., preset songs) cannot be displayed if your desktop, open the Start menu, navigate to ...

Midi Reference
Page 7
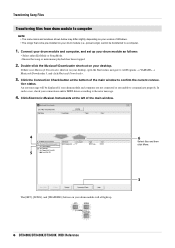
... been correctly transferred to your computer, it will end the process without transferring any files. 11. You will be deleted from the drum module's memory. NOTICE Do not disconnect the USB cable while files are being saved correctly, but in this window will end the process without ... main window, choose a destination for the files, and click the Move button. Click the OK button to shut down Musicsoft Downloader. 7 DTX400K/DTX430K/DTX450K MIDI Reference When files have been successfully transferred, they will be operated at the left of the main window. 13 8,9 10 10 9. Failure to...
... been correctly transferred to your computer, it will end the process without transferring any files. 11. You will be deleted from the drum module's memory. NOTICE Do not disconnect the USB cable while files are being saved correctly, but in this window will end the process without ... main window, choose a destination for the files, and click the Move button. Click the OK button to shut down Musicsoft Downloader. 7 DTX400K/DTX430K/DTX450K MIDI Reference When files have been successfully transferred, they will be operated at the left of the main window. 13 8,9 10 10 9. Failure to...

Midi Reference
Page 8
You can be found in the Note Number section of your drum module to output MIDI notes when the various pads are output only when a pad connected via the [PADsIN] jack on a KP65 Kick Pad is struck. Details .... *2 These MIDI notes are struck. MIDI Note Numbers Assigned to Pads The following table shows the default note numbers used by your DTX400K, DTX430K, or DTX450K Owner's Manual. 8 DTX400K/DTX430K...
You can be found in the Note Number section of your drum module to output MIDI notes when the various pads are output only when a pad connected via the [PADsIN] jack on a KP65 Kick Pad is struck. Details .... *2 These MIDI notes are struck. MIDI Note Numbers Assigned to Pads The following table shows the default note numbers used by your DTX400K, DTX430K, or DTX450K Owner's Manual. 8 DTX400K/DTX430K...

Midi Reference
Page 9
...an All Notes Off message had been received. 9 DTX400K/DTX430K/DTX450K MIDI Reference If Hold 1 or Sostenuto is turned on, however, muting will have no effect on drum kits selected via MIDI. 2.2.2 Modulation (1) Modulation messages are received but not transmitted. 2.2.3 Foot Controller (4) ... General 1.1 Scope The specifications described herein apply to transmission and reception of MIDI data by a DTX400K, DTX430K, or DTX450K drum module. 1.2 Compliance • The specifications described herein comply with the MIDI 1.0 standard. 1.3 Legend The following controllers to their initial values:...
...an All Notes Off message had been received. 9 DTX400K/DTX430K/DTX450K MIDI Reference If Hold 1 or Sostenuto is turned on, however, muting will have no effect on drum kits selected via MIDI. 2.2.2 Modulation (1) Modulation messages are received but not transmitted. 2.2.3 Foot Controller (4) ... General 1.1 Scope The specifications described herein apply to transmission and reception of MIDI data by a DTX400K, DTX430K, or DTX450K drum module. 1.2 Compliance • The specifications described herein comply with the MIDI 1.0 standard. 1.3 Legend The following controllers to their initial values:...

Midi Reference
Page 10
...received but does not receive them . Transmission: The drum module constantly transmits Active Sensing messages at intervals within approximately 300 milliseconds. 10 DTX400K/DTX430K/DTX450K MIDI Reference The drum module's tone generator receives Pitch Bend messages, but does not ...transmit them. 2.6 Channel Aftertouch The drum module's sequencer transmits Channel Aftertouch messages, but not transmitted. 3.3 ...
...received but does not receive them . Transmission: The drum module constantly transmits Active Sensing messages at intervals within approximately 300 milliseconds. 10 DTX400K/DTX430K/DTX450K MIDI Reference The drum module's tone generator receives Pitch Bend messages, but does not ...transmit them. 2.6 Channel Aftertouch The drum module's sequencer transmits Channel Aftertouch messages, but not transmitted. 3.3 ...

Owner's Manual
Page 2
...b Trigger Settings 46 n Training Settings 49 m Other Settings 53 Integrating Separately Sold Accessories .. 56 For DTX400K Owners 56 For DTX430K & DTX450K Owners 56 Connecting to a Computer 57 Making Connections 57 MIDI Reference Manual 57 Reference Troubleshooting 58 Data List 60 Specifications 64 Index 65 2... Sound 19 Connecting the Power 19 Connecting Headphones or Speakers 19 Connecting a Music Player 19 Turning On the Drum Module 20 Turning Off the Drum Module 20 Auto Power-Off 20 Restoring the Default Settings (Factory Set) ... 20 Component Names & Functions 21 Control...
...b Trigger Settings 46 n Training Settings 49 m Other Settings 53 Integrating Separately Sold Accessories .. 56 For DTX400K Owners 56 For DTX430K & DTX450K Owners 56 Connecting to a Computer 57 Making Connections 57 MIDI Reference Manual 57 Reference Troubleshooting 58 Data List 60 Specifications 64 Index 65 2... Sound 19 Connecting the Power 19 Connecting Headphones or Speakers 19 Connecting a Music Player 19 Turning On the Drum Module 20 Turning Off the Drum Module 20 Auto Power-Off 20 Restoring the Default Settings (Factory Set) ... 20 Component Names & Functions 21 Control...
Owner's Manual
Page 5
...; Do not place vinyl, plastic or rubber objects on the instrument, since this might discolor the panel or keyboard. • When cleaning the drum module, be sure to use a clean, dry cloth. If you are for the instrument. Even when the [ ] (Standby/On) switch is in standby... status (power lamp is off , electricity is not in water and tightly wrung out. http://www.yamaha.com/ DMI-5 2/2 DTX400K/DTX430K/DTX450K Owner's Manual 5 When you experience any hearing loss or ringing in the vicinity of personal use the provided screws only. Any violation...
...; Do not place vinyl, plastic or rubber objects on the instrument, since this might discolor the panel or keyboard. • When cleaning the drum module, be sure to use a clean, dry cloth. If you are for the instrument. Even when the [ ] (Standby/On) switch is in standby... status (power lamp is off , electricity is not in water and tightly wrung out. http://www.yamaha.com/ DMI-5 2/2 DTX400K/DTX430K/DTX450K Owner's Manual 5 When you experience any hearing loss or ringing in the vicinity of personal use the provided screws only. Any violation...

Owner's Manual
Page 6
In order to get it in order to assemble your computer to read it again as it allows you for purchasing a Yamaha DTX400K, DTX430K, or DTX450K Electronic Drum Kit. See page 57 for more advanced modes of use. As such, a computer and suitable software will prove useful when making ... that Adobe® Reader® be required in a safe place so that you can be sure to store it set up for playing. The drum module's MIDI Reference Manual contains the following two manuals. Owner's Manual (this owner's manual carefully. The most out of your new instrument, please...
In order to get it in order to assemble your computer to read it again as it allows you for purchasing a Yamaha DTX400K, DTX430K, or DTX450K Electronic Drum Kit. See page 57 for more advanced modes of use. As such, a computer and suitable software will prove useful when making ... that Adobe® Reader® be required in a safe place so that you can be sure to store it set up for playing. The drum module's MIDI Reference Manual contains the following two manuals. Owner's Manual (this owner's manual carefully. The most out of your new instrument, please...

Owner's Manual
Page 7
...18. 3 Make the necessary connections. • Connect the pads to the drum module using the cables provided. See page 18. • Connect the power adaptor to the drum module and turn on the module. See page 19. 4 Play your electronic drum kit. • ...Basic techniques used when operating and playing the electronic drum kit are described in the Basic Techniques section (pages 23 to 39). • More complex methods are described in the Advanced Techniques section (pages 40 to 55). DTX400K/DTX430K/DTX450K...
...18. 3 Make the necessary connections. • Connect the pads to the drum module using the cables provided. See page 18. • Connect the power adaptor to the drum module and turn on the module. See page 19. 4 Play your electronic drum kit. • ...Basic techniques used when operating and playing the electronic drum kit are described in the Basic Techniques section (pages 23 to 39). • More complex methods are described in the Advanced Techniques section (pages 40 to 55). DTX400K/DTX430K/DTX450K...

Owner's Manual
Page 8
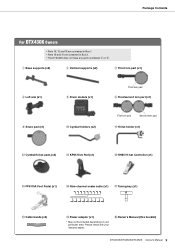
Please check with your Yamaha dealer. @0 Owner's Manual (this booklet) 8 DTX400K/DTX430K/DTX450K Owner's Manual They can be included depending on the base sec- tion. • Parts e and i are almost identical in appearance but part e does not. Part i ..., please verify that all of the following parts are actually different. q Base supports (x2) w Vertical supports (x2) e Third tom part (x1) r Left arm (x1) t Drum module (x1) i Snare pad (x1) !0 Cymbal holders (x2) Rear side Wing bolt !2 Cymbal/hi-hat pads (x3) !4 Hi-hat controller (x1) Third tom pad y First/second...
Please check with your Yamaha dealer. @0 Owner's Manual (this booklet) 8 DTX400K/DTX430K/DTX450K Owner's Manual They can be included depending on the base sec- tion. • Parts e and i are almost identical in appearance but part e does not. Part i ..., please verify that all of the following parts are actually different. q Base supports (x2) w Vertical supports (x2) e Third tom part (x1) r Left arm (x1) t Drum module (x1) i Snare pad (x1) !0 Cymbal holders (x2) Rear side Wing bolt !2 Cymbal/hi-hat pads (x3) !4 Hi-hat controller (x1) Third tom pad y First/second...
Owner's Manual
Page 9
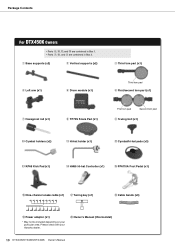
q Base supports (x2) w Vertical supports (x2) e Third tom part (x1) r Left arm (x1) t Drum module (x1) Third tom pad y First/second tom part (x1) i Snare pad (x1) !0 Cymbal holders (x2) First tom pad Second tom pad !1 Hi-hat ... Nine-channel snake cable (x1) !7 Tuning key (x1) !8 Cable bands (x3) !9 Power adaptor (x1) * May not be included depending on your Yamaha dealer. @0 Owner's Manual (this booklet) DTX400K/DTX430K/DTX450K Owner's Manual 9 Package Contents For DTX430K Owners • Parts !6, !,7 and !8 are contained in Box 1. • Parts !0 and !1 are contained in ...
q Base supports (x2) w Vertical supports (x2) e Third tom part (x1) r Left arm (x1) t Drum module (x1) Third tom pad y First/second tom part (x1) i Snare pad (x1) !0 Cymbal holders (x2) First tom pad Second tom pad !1 Hi-hat ... Nine-channel snake cable (x1) !7 Tuning key (x1) !8 Cable bands (x3) !9 Power adaptor (x1) * May not be included depending on your Yamaha dealer. @0 Owner's Manual (this booklet) DTX400K/DTX430K/DTX450K Owner's Manual 9 Package Contents For DTX430K Owners • Parts !6, !,7 and !8 are contained in Box 1. • Parts !0 and !1 are contained in ...
Owner's Manual
Page 10
Package Contents For DTX450K Owners • Parts o, !6, !,7 and !8 are contained in Box 1. • Parts u, !0, and !1 are contained in Box 2. Please check with your particular area. q Base supports (x2) w Vertical supports (x2) e Third tom part (x1) r Left arm (x1) t Drum module (x1) Third tom pad y First/second tom part (x1) u Hexagonal rod...Pedal (x1) !6 Nine-channel snake cable (x1) !7 Tuning key (x1) !8 Cable bands (x3) !9 Power adaptor (x1) * May not be included depending on your Yamaha dealer. @0 Owner's Manual (this booklet) 10 DTX400K/DTX430K/DTX450K Owner's Manual
Package Contents For DTX450K Owners • Parts o, !6, !,7 and !8 are contained in Box 1. • Parts u, !0, and !1 are contained in Box 2. Please check with your particular area. q Base supports (x2) w Vertical supports (x2) e Third tom part (x1) r Left arm (x1) t Drum module (x1) Third tom pad y First/second tom part (x1) u Hexagonal rod...Pedal (x1) !6 Nine-channel snake cable (x1) !7 Tuning key (x1) !8 Cable bands (x3) !9 Power adaptor (x1) * May not be included depending on your Yamaha dealer. @0 Owner's Manual (this booklet) 10 DTX400K/DTX430K/DTX450K Owner's Manual

Owner's Manual
Page 12
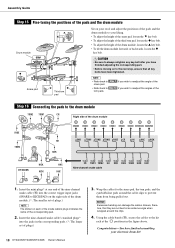
...bolt to secure the third tom part (e) in Step 12 . CAUTION After completing this time. 4. Tighten the key bolt to secure the drum module (t) in place. Assembly Guide Step 3 Attaching the third tom part Step 4 Attaching the left arm r e Rear of third tom pad Right vertical support ..., and special care should be taken to avoid mixing them apart, look for more details. 1. Step 5 Attaching the drum module t 10 cm Left vertical support 12 DTX400K/DTX430K/DTX450K Owner's Manual 1. See the figure on part i. Tighten the key bolt to prevent it to the center of ...
...bolt to secure the third tom part (e) in Step 12 . CAUTION After completing this time. 4. Tighten the key bolt to secure the drum module (t) in place. Assembly Guide Step 3 Attaching the third tom part Step 4 Attaching the left arm r e Rear of third tom pad Right vertical support ..., and special care should be taken to avoid mixing them apart, look for more details. 1. Step 5 Attaching the drum module t 10 cm Left vertical support 12 DTX400K/DTX430K/DTX450K Owner's Manual 1. See the figure on part i. Tighten the key bolt to prevent it to the center of ...
Owner's Manual
Page 18
... corresponding pad. 2. NOTICE Excessive bending can damage the cables. Using the cable bands (!8), secure the cables to the drum module TOM2 TOM1 CR Right side of the drum module RIDE TOM3 HH SNR DTX400K KICK KICK HHC HHC SNR TOM1 TOM2 TOM3 RIDE CR HH HHC KICK CR TOM1 TOM2.... 4. CAUTION • Be sure to always retighten any key bolt after you wish to KICK/PAD) on the right side of the drum module. (*: The smaller set of plugs.) 18 DTX400K/DTX430K/DTX450K Owner's Manual 3. Ensure, therefore, that all key bolts have finished assembling your electronic drum kit!
... corresponding pad. 2. NOTICE Excessive bending can damage the cables. Using the cable bands (!8), secure the cables to the drum module TOM2 TOM1 CR Right side of the drum module RIDE TOM3 HH SNR DTX400K KICK KICK HHC HHC SNR TOM1 TOM2 TOM3 RIDE CR HH HHC KICK CR TOM1 TOM2.... 4. CAUTION • Be sure to always retighten any key bolt after you wish to KICK/PAD) on the right side of the drum module. (*: The smaller set of plugs.) 18 DTX400K/DTX430K/DTX450K Owner's Manual 3. Ensure, therefore, that all key bolts have finished assembling your electronic drum kit!

Owner's Manual
Page 19
...music player, etc. This makes it possible to prevent it , but in speakers. Setup Setting Up for extended periods of the drum module. 1/8" stereo-mini to connect headphones or monitor speakers via the [AUX IN] (auxiliary input) stereo mini-jack. Insert the power ...module. NOTE The [PHONES/OUTPUT] jack is not bent at a high volume for Sound Connecting the Power 1. Connecting a Music Player You can damage the power adaptor cord and create a fire hazard. Standard 1/4" mono-audio jack or Standard 1/4" stereo-audio jack Headphones Powered speakers DTX400K/DTX430K/DTX450K...
...music player, etc. This makes it possible to prevent it , but in speakers. Setup Setting Up for extended periods of the drum module. 1/8" stereo-mini to connect headphones or monitor speakers via the [AUX IN] (auxiliary input) stereo mini-jack. Insert the power ...module. NOTE The [PHONES/OUTPUT] jack is not bent at a high volume for Sound Connecting the Power 1. Connecting a Music Player You can damage the power adaptor cord and create a fire hazard. Standard 1/4" mono-audio jack or Standard 1/4" stereo-audio jack Headphones Powered speakers DTX400K/DTX430K/DTX450K...


