

Midi Reference
Page 1
...; Reader®, you can download the latest version of their respective companies. 1 DTX400K/DTX430K/DTX450K MIDI Reference EN ELECTRONIC DRUM KIT DTX400K DTX430K DTX450K MIDI Reference How to Use This Manual This MIDI Reference will prove useful when transferring MIDI data between the drum module that came with... your DTX400K, DTX430K, or DTX450K Owner's Manual. NOTE You can enter keywords into the Find text box in the toolbar to quickly and conveniently search for your particular ...
...; Reader®, you can download the latest version of their respective companies. 1 DTX400K/DTX430K/DTX450K MIDI Reference EN ELECTRONIC DRUM KIT DTX400K DTX430K DTX450K MIDI Reference How to Use This Manual This MIDI Reference will prove useful when transferring MIDI data between the drum module that came with... your DTX400K, DTX430K, or DTX450K Owner's Manual. NOTE You can enter keywords into the Find text box in the toolbar to quickly and conveniently search for your particular ...

Midi Reference
Page 5
... memory being deleted. 10. NOTE Musicsoft Downloader must be shut down Musicsoft Downloader. 11. ule. Confirm that song data has been correctly transferred. 5 DTX400K/DTX430K/DTX450K MIDI Reference Select the song files to your drum module. Click the OK button to transfer the selected files from the temporary storage area to... should not be operated at this window will be transferred from being transferred. Close the main window to proceed. Details on your DTX400K, DTX430K, or DTX450K Owner's Manual.
... memory being deleted. 10. NOTE Musicsoft Downloader must be shut down Musicsoft Downloader. 11. ule. Confirm that song data has been correctly transferred. 5 DTX400K/DTX430K/DTX450K MIDI Reference Select the song files to your drum module. Click the OK button to transfer the selected files from the temporary storage area to... should not be operated at this window will be transferred from being transferred. Close the main window to proceed. Details on your DTX400K, DTX430K, or DTX450K Owner's Manual.

Midi Reference
Page 8
... note number assignments shown above. MIDI Note Numbers Assigned to Pads The following table shows the default note numbers used by your DTX400K, DTX430K, or DTX450K Owner's Manual. 8 DTX400K/DTX430K/DTX450K MIDI Reference
... note number assignments shown above. MIDI Note Numbers Assigned to Pads The following table shows the default note numbers used by your DTX400K, DTX430K, or DTX450K Owner's Manual. 8 DTX400K/DTX430K/DTX450K MIDI Reference

Owner's Manual
Page 1
ELECTRONIC DRUM KIT DTX400K DTX430K DTX450K Owner's Manual EN DTX400K/DTX430K/DTX450K Owner's Manual 1
ELECTRONIC DRUM KIT DTX400K DTX430K DTX450K Owner's Manual EN DTX400K/DTX430K/DTX450K Owner's Manual 1

Owner's Manual
Page 2
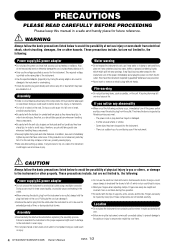
Easy Session 35 7. Rhythm Gate 31 3. Pad Gate 37 9. Contents PRECAUTIONS 4 Welcome 6 Product Manuals 6 Setup First Steps 7 Package Contents 8 Assembly Guide 11 Setting Up for Sound 19 Connecting the Power 19 Connecting Headphones or ...45 b Trigger Settings 46 n Training Settings 49 m Other Settings 53 Integrating Separately Sold Accessories .. 56 For DTX400K Owners 56 For DTX430K & DTX450K Owners 56 Connecting to a Computer 57 Making Connections 57 MIDI Reference Manual 57 Reference Troubleshooting 58 Data List 60 Specifications 64 Index 65 2 DTX400K/DTX430K...
Easy Session 35 7. Rhythm Gate 31 3. Pad Gate 37 9. Contents PRECAUTIONS 4 Welcome 6 Product Manuals 6 Setup First Steps 7 Package Contents 8 Assembly Guide 11 Setting Up for Sound 19 Connecting the Power 19 Connecting Headphones or ...45 b Trigger Settings 46 n Training Settings 49 m Other Settings 53 Integrating Separately Sold Accessories .. 56 For DTX400K Owners 56 For DTX430K & DTX450K Owners 56 Connecting to a Computer 57 Making Connections 57 MIDI Reference Manual 57 Reference Troubleshooting 58 Data List 60 Specifications 64 Index 65 2 DTX400K/DTX430K...

Owner's Manual
Page 3
... the letter and the spirit of the product. If you to use "household" type batteries. Please study this manual, meets FCC requirements. ENVIRONMENTAL ISSUES: Yamaha strives to use only high quality shielded cables. Dispose of the following two conditions: 1) this device may cause... this type of products that interference will not result in the ears, you can be determined by YAMAHA CORPORATION OF AMERICA. (FCC DoC) DTX400K/DTX430K/DTX450K Owner's Manual 3 Some of these corrective measures do not produce satisfactory results, please contact the local retailer authorized ...
... the letter and the spirit of the product. If you to use "household" type batteries. Please study this manual, meets FCC requirements. ENVIRONMENTAL ISSUES: Yamaha strives to use only high quality shielded cables. Dispose of the following two conditions: 1) this device may cause... this type of products that interference will not result in the ears, you can be determined by YAMAHA CORPORATION OF AMERICA. (FCC DoC) DTX400K/DTX430K/DTX450K Owner's Manual 3 Some of these corrective measures do not produce satisfactory results, please contact the local retailer authorized ...
Owner's Manual
Page 4
... over and cause injury. If anyone who might spill into any containers (such as they have sharp tips. Pulling by qualified Yamaha service personnel. • Never insert or remove an electric plug with the holders for extended periods of time, or during electrical...such as correct for future reference. Failure to assemble the instrument in the proper sequence might accidentally fall over them. 4 DTX400K/DTX430K/DTX450K Owner's Manual DMI-5 1/2 If any abnormality • When one of physical injury to fall over. • Before moving the instrument, remove...
... over and cause injury. If anyone who might spill into any containers (such as they have sharp tips. Pulling by qualified Yamaha service personnel. • Never insert or remove an electric plug with the holders for extended periods of time, or during electrical...such as correct for future reference. Failure to assemble the instrument in the proper sequence might accidentally fall over them. 4 DTX400K/DTX430K/DTX450K Owner's Manual DMI-5 1/2 If any abnormality • When one of physical injury to fall over. • Before moving the instrument, remove...
Owner's Manual
Page 5
... commercially available musical data including but not limited to unplug the power cord from the outlet. http://www.yamaha.com/ DMI-5 2/2 DTX400K/DTX430K/DTX450K Owner's Manual 5 When you are the trademarks or registered trademarks of their minimum levels and gradually raise the volume controls...such programs and contents outside of copyright has legal consequences. DON'T MAKE, DISTRIBUTE OR USE ILLEGAL COPIES. About this manual • The illustrations as they can cause permanent hearing loss. Details regarding any hearing loss or ringing in standby status (power...
... commercially available musical data including but not limited to unplug the power cord from the outlet. http://www.yamaha.com/ DMI-5 2/2 DTX400K/DTX430K/DTX450K Owner's Manual 5 When you are the trademarks or registered trademarks of their minimum levels and gradually raise the volume controls...such programs and contents outside of copyright has legal consequences. DON'T MAKE, DISTRIBUTE OR USE ILLEGAL COPIES. About this manual • The illustrations as they can cause permanent hearing loss. Details regarding any hearing loss or ringing in standby status (power...

Owner's Manual
Page 6
... the following two manuals. Owner's Manual (this owner's manual carefully. http://www.adobe.com/products/reader/ 6 DTX400K/DTX430K/DTX450K Owner's Manual In order to get it . Basic Techniques Describes the basic techniques used for this product. Setup Describes how to read it set up for purchasing a Yamaha DTX400K, DTX430K, or DTX450K Electronic Drum Kit. Reference Describes...
... the following two manuals. Owner's Manual (this owner's manual carefully. http://www.adobe.com/products/reader/ 6 DTX400K/DTX430K/DTX450K Owner's Manual In order to get it . Basic Techniques Describes the basic techniques used for this product. Setup Describes how to read it set up for purchasing a Yamaha DTX400K, DTX430K, or DTX450K Electronic Drum Kit. Reference Describes...

Owner's Manual
Page 7
DTX400K/DTX430K/DTX450K Owner's Manual 7 Setup First Steps Setup 1 Open the box and confirm that all parts are present and correct. 2 Assemble the parts. • The assembly process is described ...
DTX400K/DTX430K/DTX450K Owner's Manual 7 Setup First Steps Setup 1 Open the box and confirm that all parts are present and correct. 2 Assemble the parts. • The assembly process is described ...

Owner's Manual
Page 8
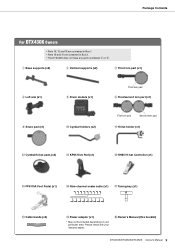
... addi- tion, the polystyrene foam packaging used for part i is marked "T" (tom); Setup Package Contents After opening up the package containing your Yamaha dealer. @0 Owner's Manual (this booklet) 8 DTX400K/DTX430K/DTX450K Owner's Manual They can be included depending on the base sec- tion. • Parts e and i are almost identical in appearance but part e does...
... addi- tion, the polystyrene foam packaging used for part i is marked "T" (tom); Setup Package Contents After opening up the package containing your Yamaha dealer. @0 Owner's Manual (this booklet) 8 DTX400K/DTX430K/DTX450K Owner's Manual They can be included depending on the base sec- tion. • Parts e and i are almost identical in appearance but part e does...
Owner's Manual
Page 9
...) !5 FP6110A Foot Pedal (x1) !6 Nine-channel snake cable (x1) !7 Tuning key (x1) !8 Cable bands (x3) !9 Power adaptor (x1) * May not be included depending on your Yamaha dealer. @0 Owner's Manual (this booklet) DTX400K/DTX430K/DTX450K Owner's Manual 9 Please check with your particular area.
...) !5 FP6110A Foot Pedal (x1) !6 Nine-channel snake cable (x1) !7 Tuning key (x1) !8 Cable bands (x3) !9 Power adaptor (x1) * May not be included depending on your Yamaha dealer. @0 Owner's Manual (this booklet) DTX400K/DTX430K/DTX450K Owner's Manual 9 Please check with your particular area.
Owner's Manual
Page 10
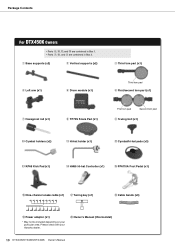
Please check with your particular area. Package Contents For DTX450K Owners • Parts o, !6, !,7 and !8 are contained in Box 1. • Parts u, !0, and !1 are contained in Box 2. q Base supports (x2) w Vertical supports (x2) e Third tom part (x1) r ...) !5 FP6110A Foot Pedal (x1) !6 Nine-channel snake cable (x1) !7 Tuning key (x1) !8 Cable bands (x3) !9 Power adaptor (x1) * May not be included depending on your Yamaha dealer. @0 Owner's Manual (this booklet) 10 DTX400K/DTX430K/DTX450K Owner's Manual
Please check with your particular area. Package Contents For DTX450K Owners • Parts o, !6, !,7 and !8 are contained in Box 1. • Parts u, !0, and !1 are contained in Box 2. q Base supports (x2) w Vertical supports (x2) e Third tom part (x1) r ...) !5 FP6110A Foot Pedal (x1) !6 Nine-channel snake cable (x1) !7 Tuning key (x1) !8 Cable bands (x3) !9 Power adaptor (x1) * May not be included depending on your Yamaha dealer. @0 Owner's Manual (this booklet) 10 DTX400K/DTX430K/DTX450K Owner's Manual

Owner's Manual
Page 11
Step 2 Attaching the vertical supports w Joint Left Right 1. Repeat 1. Setup Assembly Guide Fully assembled drum kit (DTX450K shown) Step 5 Step 10 Step 6 Step 8 Step 4 Step 7 Step 11 Step 9 Step 3 Step 2 CAUTION • Choose a flat, hard surface on which...using the tuning key, securely tighten the s key bolts (i.e., the key bolts labeled s in place. NOTE The two vertical supports are identical. 2. DTX400K/DTX430K/DTX450K Owner's Manual 11 Step 1 Step 1 Preparing the base supports !7 50 cm q q Front 1. Take a vertical support (w) from the package, and insert it from the ...
Step 2 Attaching the vertical supports w Joint Left Right 1. Repeat 1. Setup Assembly Guide Fully assembled drum kit (DTX450K shown) Step 5 Step 10 Step 6 Step 8 Step 4 Step 7 Step 11 Step 9 Step 3 Step 2 CAUTION • Choose a flat, hard surface on which...using the tuning key, securely tighten the s key bolts (i.e., the key bolts labeled s in place. NOTE The two vertical supports are identical. 2. DTX400K/DTX430K/DTX450K Owner's Manual 11 Step 1 Step 1 Preparing the base supports !7 50 cm q q Front 1. Take a vertical support (w) from the package, and insert it from the ...

Owner's Manual
Page 12
... and loosen the key bolt. 2. CAUTION After completing this time. 4. Step 5 Attaching the drum module t 10 cm Left vertical support 12 DTX400K/DTX430K/DTX450K Owner's Manual 1. Ensure that the third tom pad is only found on page 8 for the wing bolt, which the module should be taken to avoid mixing them...
... and loosen the key bolt. 2. CAUTION After completing this time. 4. Step 5 Attaching the drum module t 10 cm Left vertical support 12 DTX400K/DTX430K/DTX450K Owner's Manual 1. Ensure that the third tom pad is only found on page 8 for the wing bolt, which the module should be taken to avoid mixing them...

Owner's Manual
Page 13
... it down or back-to-front. 4. Ensure that the tom part is flush with the tops of second tom pad y Vertical supports 1. i DTX400K/DTX430K/DTX450K Owner's Manual 13 NOTE This part has two s key bolts, one each on the left and right. 2. Tighten the key bolts to secure the snare pad... the snare pad (i), and rotate the pad 180°, turning it back until the tops of the supports are different for the DTX400K, DTX430K, and DTX450K. Loosen the key bolt located on the left arm, which was assembled in the above figure at this time. Place the snare part (i) ...
... it down or back-to-front. 4. Ensure that the tom part is flush with the tops of second tom pad y Vertical supports 1. i DTX400K/DTX430K/DTX450K Owner's Manual 13 NOTE This part has two s key bolts, one each on the left and right. 2. Tighten the key bolts to secure the snare pad... the snare pad (i), and rotate the pad 180°, turning it back until the tops of the supports are different for the DTX400K, DTX430K, and DTX450K. Loosen the key bolt located on the left arm, which was assembled in the above figure at this time. Place the snare part (i) ...

Owner's Manual
Page 14
... hexagonal rod (u) from the package and lightly tighten the S wing bolt (o). (Five or six turns is sufficient.) o i i 14 DTX400K/DTX430K/DTX450K Owner's Manual 8. Loosen the wing bolt on the joint on the left arm, which was attached in place. 7. Loosen the key bolt and adjust ...the angle of Step 7 are different for the DTX400K, DTX430K, and DTX450K. Left arm Wing bolt 90° Joint 2. Take the snare pad (i) and...
... hexagonal rod (u) from the package and lightly tighten the S wing bolt (o). (Five or six turns is sufficient.) o i i 14 DTX400K/DTX430K/DTX450K Owner's Manual 8. Loosen the wing bolt on the joint on the left arm, which was attached in place. 7. Loosen the key bolt and adjust ...the angle of Step 7 are different for the DTX400K, DTX430K, and DTX450K. Left arm Wing bolt 90° Joint 2. Take the snare pad (i) and...

Owner's Manual
Page 15
...part, which was attached in Step 4 . 2. ers (!0) will be vertical. 3. For DTX400K and DTX430K Owners Step 8 Attaching the hi-hat holder For DTX450K Owners Step 8 Attaching the hi-hat holder !1 Left arm Snare pad !1 Joint Joint 1. Loosen the two key bolts on the joint on the ... holders !0 !0 1. NOTE The two cymbal holders are identical. • When correctly inserted, the tips of the cymbal hold - DTX400K/DTX430K/DTX450K Owner's Manual 15 Take the hi-hat holder (!1) from the package and slide it into the joint from the rear as shown in the figure. Loosen the...
...part, which was attached in Step 4 . 2. ers (!0) will be vertical. 3. For DTX400K and DTX430K Owners Step 8 Attaching the hi-hat holder For DTX450K Owners Step 8 Attaching the hi-hat holder !1 Left arm Snare pad !1 Joint Joint 1. Loosen the two key bolts on the joint on the ... holders !0 !0 1. NOTE The two cymbal holders are identical. • When correctly inserted, the tips of the cymbal hold - DTX400K/DTX430K/DTX450K Owner's Manual 15 Take the hi-hat holder (!1) from the package and slide it into the joint from the rear as shown in the figure. Loosen the...

Owner's Manual
Page 16
...lower felt pad.) 2. Replace the washer removed in 1. Replace the felt pad removed in 1. to secure the tom pad in place. 16 DTX400K/DTX430K/DTX450K Owner's Manual must be performed three times. 1. Tighten the key bolt to 3. Assembly Guide Step 10 Attaching the hi-hat Adjusting the position... tom pads. Using the tuning key, loosen the key bolt on the tom pad (e or y). 2. Replace the felt pad removed in the DTX450K. to each of the kit when viewed from the cymbal holder. (Do not remove the lower felt pad.) 2. Loosen the key bolt on...
...lower felt pad.) 2. Replace the washer removed in 1. Replace the felt pad removed in 1. to secure the tom pad in place. 16 DTX400K/DTX430K/DTX450K Owner's Manual must be performed three times. 1. Tighten the key bolt to 3. Assembly Guide Step 10 Attaching the hi-hat Adjusting the position... tom pads. Using the tuning key, loosen the key bolt on the tom pad (e or y). 2. Replace the felt pad removed in the DTX450K. to each of the kit when viewed from the cymbal holder. (Do not remove the lower felt pad.) 2. Loosen the key bolt on...

Owner's Manual
Page 17
... Kick drum parts Arrange the hi-hat controller (!4) and the kick drum parts or kick unit (!5) as shown below . 4. DTX400K DTX430K/DTX450K DTX400K/DTX430K/DTX450K Owner's Manual 17 Take the kick pad (!3) from the rear, and then tighten the beater bolt using the tuning key. age, remove the four wing...Owners of the DTX400K should skip to loosen it in the disassembled condition. 2. Assembly Guide Step 13 is only required for the DTX430K and DTX450K. Operate the pedal and confirm whether the beater head strikes the kick pad near the center. If not, adjust the length of the kick...
... Kick drum parts Arrange the hi-hat controller (!4) and the kick drum parts or kick unit (!5) as shown below . 4. DTX400K DTX430K/DTX450K DTX400K/DTX430K/DTX450K Owner's Manual 17 Take the kick pad (!3) from the rear, and then tighten the beater bolt using the tuning key. age, remove the four wing...Owners of the DTX400K should skip to loosen it in the disassembled condition. 2. Assembly Guide Step 13 is only required for the DTX430K and DTX450K. Operate the pedal and confirm whether the beater head strikes the kick pad near the center. If not, adjust the length of the kick...

