Owner's Manual
Page 4
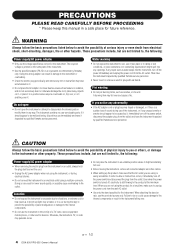
...over and cause a fire. Failure to avoid the possibility of a TV, radio, stereo equipment, mobile phone, or other cables. • When setting up the product, make sure to disassemble the internal parts or modify them in damage to , the following : Power supply/AC power adaptor • ... TV, or radio may fall over it inspected by qualified Yamaha service personnel. • Never insert or remove an electric plug with wet hands. When you notice any dirt or dust which might accidentally fall over . 4 DGX-630/YPG-635 Owner's Manual (3)-11 1/2 Do not open • Do...
...over and cause a fire. Failure to avoid the possibility of a TV, radio, stereo equipment, mobile phone, or other cables. • When setting up the product, make sure to disassemble the internal parts or modify them in damage to , the following : Power supply/AC power adaptor • ... TV, or radio may fall over it inspected by qualified Yamaha service personnel. • Never insert or remove an electric plug with wet hands. When you notice any dirt or dust which might accidentally fall over . 4 DGX-630/YPG-635 Owner's Manual (3)-11 1/2 Do not open • Do...
Owner's Manual
Page 5
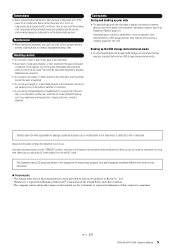
...from those on your instrument. ● Trademarks • The bitmap fonts used in this instrument have the instrument inspected by qualified Yamaha service personnel. • Do not place vinyl, plastic or rubber objects on the instrument, since this can cause permanent hearing loss. Also,... Backing up your data • The panel settings and some other objects into the gaps on the panel or keyboard. Always turn the power off when the instrument is still flowing to the instrument at their respective companies. (3)-11 2/2 DGX-630/YPG-635 Owner's Manual 5 Even when the...
...from those on your instrument. ● Trademarks • The bitmap fonts used in this instrument have the instrument inspected by qualified Yamaha service personnel. • Do not place vinyl, plastic or rubber objects on the instrument, since this can cause permanent hearing loss. Also,... Backing up your data • The panel settings and some other objects into the gaps on the panel or keyboard. Always turn the power off when the instrument is still flowing to the instrument at their respective companies. (3)-11 2/2 DGX-630/YPG-635 Owner's Manual 5 Even when the...
Owner's Manual
Page 6
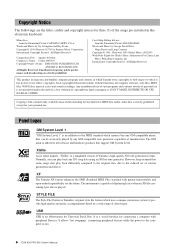
..., U.S.A. Panel Logos GM System Level 1 "GM System Level 1" is affixed to provide high-quality automatic accompaniment based on ). 6 DGX-630/YPG-635 Owner's Manual STYLE FILE The Style File Format is a serial interface for connecting a computer with greater functionality and open-ended expandability for... of the commercially available musical data including but not limited to the reduced set of copyright has legal consequences. USB USB is on a wide range of the songs pre-installed in which Yamaha owns copyrights or with respect to which it has license to the computer...
..., U.S.A. Panel Logos GM System Level 1 "GM System Level 1" is affixed to provide high-quality automatic accompaniment based on ). 6 DGX-630/YPG-635 Owner's Manual STYLE FILE The Style File Format is a serial interface for connecting a computer with greater functionality and open-ended expandability for... of the commercially available musical data including but not limited to the reduced set of copyright has legal consequences. USB USB is on a wide range of the songs pre-installed in which Yamaha owns copyrights or with respect to which it has license to the computer...
Owner's Manual
Page 9
...Type-Play with Both Hands 40 CHORD/FREE Type- Contents Copyright Notice 6 Panel Logos 6 Included Accessories 7 Special Features of the DGX-630/YPG-635 8 Setting Up 10 Keyboard Stand Assembly 10 Power Requirements 13 Connecting Headphones (PHONES/OUTPUT Jack 13 Connecting a Footswitch (SUSTAIN Jack 13 Connecting ...Supplied CD-ROM 136 Harmony Type List 137 Effect Type List 138 MIDI Implementation Chart 144 MIDI Data Format 146 Specifications 149 Index 150 DGX-630/YPG-635 Owner's Manual 9 Chord Type with the Left Hand, Melody with the Right ..... 46 Select a Song For a ...
...Type-Play with Both Hands 40 CHORD/FREE Type- Contents Copyright Notice 6 Panel Logos 6 Included Accessories 7 Special Features of the DGX-630/YPG-635 8 Setting Up 10 Keyboard Stand Assembly 10 Power Requirements 13 Connecting Headphones (PHONES/OUTPUT Jack 13 Connecting a Footswitch (SUSTAIN Jack 13 Connecting ...Supplied CD-ROM 136 Harmony Type List 137 Effect Type List 138 MIDI Implementation Chart 144 MIDI Data Format 146 Specifications 149 Index 150 DGX-630/YPG-635 Owner's Manual 9 Chord Type with the Left Hand, Melody with the Right ..... 46 Select a Song For a ...
Owner's Manual
Page 10
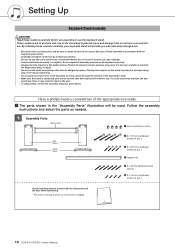
...keyboard to install all screws have been tight and firm before you and others. Please assemble in which the instrument is wrapped. 10 DGX-630/YPG-635 Owner's Manual board may drop, or may result in injury to protect both the instrument and the floor when assembling.... are to promote safe use of the appropriate size ready. Placing other than its designed purpose. By following these cautions carefully before use. Setting Up Keyboard Stand Assembly CAUTION Read these cautions carefully, your keyboard stand will be sure to drop, or injury. • Do not ...
...keyboard to install all screws have been tight and firm before you and others. Please assemble in which the instrument is wrapped. 10 DGX-630/YPG-635 Owner's Manual board may drop, or may result in injury to protect both the instrument and the floor when assembling.... are to promote safe use of the appropriate size ready. Placing other than its designed purpose. By following these cautions carefully before use. Setting Up Keyboard Stand Assembly CAUTION Read these cautions carefully, your keyboard stand will be sure to drop, or injury. • Do not ...
Owner's Manual
Page 11
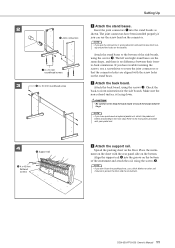
... rail r into the stand boards as shown. Setting Up x Attach the stand bases. 2 Insert the joint connectors q into the groove on the bottom. Attach the back board, using the screws t. Check the back-to drop the back board or touch the sharp metal fit- DGX-630/YPG-635 Owner's Manual 11 c Attach the...
... rail r into the stand boards as shown. Setting Up x Attach the stand bases. 2 Insert the joint connectors q into the groove on the bottom. Attach the back board, using the screws t. Check the back-to drop the back board or touch the sharp metal fit- DGX-630/YPG-635 Owner's Manual 11 c Attach the...
Owner's Manual
Page 12
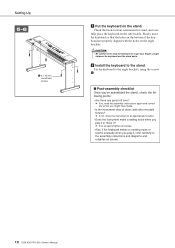
... play it or move the keyboard so that the holes on the bottom of the keyboard are properly aligned with the holes on the stand. Setting Up 5-6 y 5 x 16 mm roundhead screws b Put the keyboard on the angle brackets. Check the back-to the assembly instructions and diagrams and retighten all screws...
... play it or move the keyboard so that the holes on the bottom of the keyboard are properly aligned with the holes on the stand. Setting Up 5-6 y 5 x 16 mm roundhead screws b Put the keyboard on the angle brackets. Check the back-to the assembly instructions and diagrams and retighten all screws...

Owner's Manual
Page 13
... into an AC outlet. Connecting a Footswitch (SUSTAIN Jack) The sustain function lets you play by Yamaha) only. Connecting Headphones (PHONES/OUTPUT Jack) The instrument speakers are automatically shut off . DGX-630/YPG-635 Owner's Manual 13 mended by pressing a footswitch. The PHONES/ OUTPUT jack also functions as... amplifier, stereo system, mixer, tape recorder, or other adaptors may be sure to set to the SUS- ods of the footswitch, resulting in irreparable damage to set the volume of other line-level audio device to send the instrument's output signal to do the...
... into an AC outlet. Connecting a Footswitch (SUSTAIN Jack) The sustain function lets you play by Yamaha) only. Connecting Headphones (PHONES/OUTPUT Jack) The instrument speakers are automatically shut off . DGX-630/YPG-635 Owner's Manual 13 mended by pressing a footswitch. The PHONES/ OUTPUT jack also functions as... amplifier, stereo system, mixer, tape recorder, or other adaptors may be sure to set to the SUS- ods of the footswitch, resulting in irreparable damage to set the volume of other line-level audio device to send the instrument's output signal to do the...
Owner's Manual
Page 14
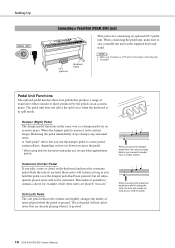
... as long as a damper pedal on an acoustic piano. When you press the damper pedal here, the notes you hold the pedal. 14 DGX-630/YPG-635 Owner's Manual Setting Up Connecting a Pedal Unit (PEDAL UNIT jack) LP-7 (optional) Keyboard Stand This jack is for example, while other notes are played "staccato." When...
... as long as a damper pedal on an acoustic piano. When you press the damper pedal here, the notes you hold the pedal. 14 DGX-630/YPG-635 Owner's Manual Setting Up Connecting a Pedal Unit (PEDAL UNIT jack) LP-7 (optional) Keyboard Stand This jack is for example, while other notes are played "staccato." When...
Owner's Manual
Page 15
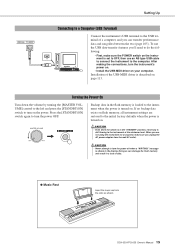
...and press the [STANDBY/ON] switch to turn on the power. DGX-630/YPG-635 Owner's Manual 15 Installation of the USB-MIDI driver is set to OFF, then use the USB data-transfer features you are ...as shown. If no backup data exists on flash memory, all instrument settings are not using the instrument for a long time, make sure the POWER switch on the instrument is described... on your computer. Setting Up Connecting to a Computer (USB Terminal) Connect the instrument's USB terminal to the USB terminal...
...and press the [STANDBY/ON] switch to turn on the power. DGX-630/YPG-635 Owner's Manual 15 Installation of the USB-MIDI driver is set to OFF, then use the USB data-transfer features you are ...as shown. If no backup data exists on flash memory, all instrument settings are not using the instrument for a long time, make sure the POWER switch on the instrument is described... on your computer. Setting Up Connecting to a Computer (USB Terminal) Connect the instrument's USB terminal to the USB terminal...
Owner's Manual
Page 21
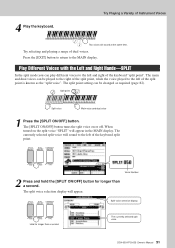
... button. The currently selected split voice will sound to the left of Instrument Voices Two voices will sound at the same time. The split point setting can be played to the right of the split point, while the voice played to the MAIN display. Press the [EXIT] button to return to... right of the keyboard "split point". When turned on or off. Split voice selection display Hold for longer than a second The currently selected split voice DGX-630/YPG-635 Owner's Manual 21 Try selecting and playing a range of the split point is known as required (page 82). The [SPLIT ON/OFF] ...
... button. The currently selected split voice will sound to the left of Instrument Voices Two voices will sound at the same time. The split point setting can be played to the right of the split point, while the voice played to the MAIN display. Press the [EXIT] button to return to... right of the keyboard "split point". When turned on or off. Split voice selection display Hold for longer than a second The currently selected split voice DGX-630/YPG-635 Owner's Manual 21 Try selecting and playing a range of the split point is known as required (page 82). The [SPLIT ON/OFF] ...
Owner's Manual
Page 22
.... Try Playing a Variety of split voices. NOTE • When you want to play piano, all settings other than touch sensitivity are turned off , so only the Grand Piano voice will play over the entire keyboard. 22 DGX-630/YPG-635 Owner's Manual Watch the highlighted split voice and rotate the dial until the...
.... Try Playing a Variety of split voices. NOTE • When you want to play piano, all settings other than touch sensitivity are turned off , so only the Grand Piano voice will play over the entire keyboard. 22 DGX-630/YPG-635 Owner's Manual Watch the highlighted split voice and rotate the dial until the...
Owner's Manual
Page 24
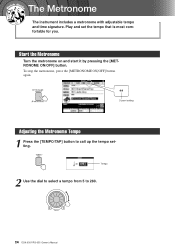
To stop the metronome, press the [METRONOME ON/OFF] button again. 4/4 Current setting Adjusting the Metronome Tempo 1 Press the [TEMPO/TAP] button to 280. 24 DGX-630/YPG-635 Owner's Manual Start the Metronome Turn the metronome on and start it by pressing the [METRONOME ON/OFF] button. Q e uick Guid The Metronome The instrument includes a metronome with adjustable tempo and time signature. Tempo 2 Use the dial to select a tempo from 5 to call up the tempo setting. Play and set the tempo that is most comfortable for you.
To stop the metronome, press the [METRONOME ON/OFF] button again. 4/4 Current setting Adjusting the Metronome Tempo 1 Press the [TEMPO/TAP] button to 280. 24 DGX-630/YPG-635 Owner's Manual Start the Metronome Turn the metronome on and start it by pressing the [METRONOME ON/OFF] button. Q e uick Guid The Metronome The instrument includes a metronome with adjustable tempo and time signature. Tempo 2 Use the dial to select a tempo from 5 to call up the tempo setting. Play and set the tempo that is most comfortable for you.
Owner's Manual
Page 25
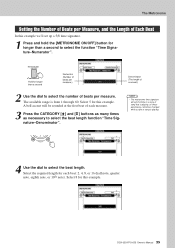
...measure. NOTE • The metronome time signature will be changed while a style or song is from 1 through 60. Select 8 for this example. DGX-630/YPG-635 Owner's Manual 25 The available range is playing. 4 Use the dial to select the beat length. Select the required length for each ...longer than a second to select the function "Time Signature-Numerator". Select 5 for this example. The Metronome Setting the Number of Beats per Measure, and the Length of Each Beat In this example we'll set up a 5/8 time signature. 1 Press and hold the [METRONOME ON/OFF] button for longer than ...
...measure. NOTE • The metronome time signature will be changed while a style or song is from 1 through 60. Select 8 for this example. DGX-630/YPG-635 Owner's Manual 25 The available range is playing. 4 Use the dial to select the beat length. Select the required length for each ...longer than a second to select the function "Time Signature-Numerator". Select 5 for this example. The Metronome Setting the Number of Beats per Measure, and the Length of Each Beat In this example we'll set up a 5/8 time signature. 1 Press and hold the [METRONOME ON/OFF] button for longer than ...

Owner's Manual
Page 26
The Metronome Setting the Click bell sound This allows you to select whether the click sound has a bell accent, or plays only a click sound. 1 Press the [FUNCTION] button. 2 Use the CATEGORY [ ] and [ ] buttons to set the metronome volume as required. 26 DGX-630/YPG-635 Owner's Manual Metronome volume r f 3 Use the dial to select the Bell item. r f 3 You can then use the [+] and [-] buttons to select the Metronome Volume item. Adjusting the Metronome Volume 1 Press the [FUNCTION] button. 2 Use the CATEGORY [ ] and [ ] buttons to turn the bell sound on or off.
The Metronome Setting the Click bell sound This allows you to select whether the click sound has a bell accent, or plays only a click sound. 1 Press the [FUNCTION] button. 2 Use the CATEGORY [ ] and [ ] buttons to set the metronome volume as required. 26 DGX-630/YPG-635 Owner's Manual Metronome volume r f 3 Use the dial to select the Bell item. r f 3 You can then use the [+] and [-] buttons to select the Metronome Volume item. Adjusting the Metronome Volume 1 Press the [FUNCTION] button. 2 Use the CATEGORY [ ] and [ ] buttons to turn the bell sound on or off.
Owner's Manual
Page 34
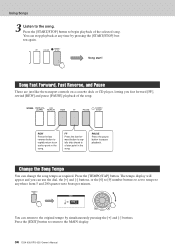
... can change the song tempo as required. Change the Song Tempo You can use the dial, the [+] and [-] buttons, or the [0] to [9] number buttons to set to tempo to the original tempo by pressing the [START/STOP] button again. FF Press the fast forward button to rapidly skip ahead to pause... pause button to a later point in the song. Press the [EXIT] button to return to the song. Using Songs 3 Listen to the MAIN display. 34 DGX-630/YPG-635 Owner's Manual REW Press the fast reverse button to rapidly return to begin playback of the song. You can stop playback at any...
... can change the song tempo as required. Change the Song Tempo You can use the dial, the [+] and [-] buttons, or the [0] to [9] number buttons to set to tempo to the original tempo by pressing the [START/STOP] button again. FF Press the fast forward button to rapidly skip ahead to pause... pause button to a later point in the song. Press the [EXIT] button to return to the song. Using Songs 3 Listen to the MAIN display. 34 DGX-630/YPG-635 Owner's Manual REW Press the fast reverse button to rapidly return to begin playback of the song. You can stop playback at any...
Owner's Manual
Page 57
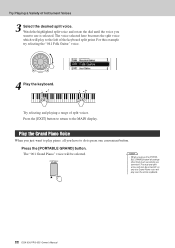
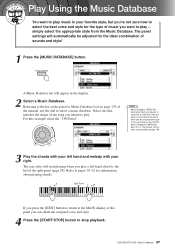
... 4 Press the [START/STOP] button to stop playback. NOTE • Music Database (MDB) files transferred from the Music Database. The panel settings will automatically be selected and used in the display. 2 Select a Music Database. Refer to pages 30-32 for the ideal combination of sounds and style...Music Database List on page 108. 3 Play the chords with your left of music you can be adjusted for information about playing chords. DGX-630/YPG-635 Owner's Manual 57 Split Point If you intend to play a left-hand chord to the left hand and melody with your favorite...
... 4 Press the [START/STOP] button to stop playback. NOTE • Music Database (MDB) files transferred from the Music Database. The panel settings will automatically be selected and used in the display. 2 Select a Music Database. Refer to pages 30-32 for the ideal combination of sounds and style...Music Database List on page 108. 3 Play the chords with your left of music you can be adjusted for information about playing chords. DGX-630/YPG-635 Owner's Manual 57 Split Point If you intend to play a left-hand chord to the left hand and melody with your favorite...
Owner's Manual
Page 65
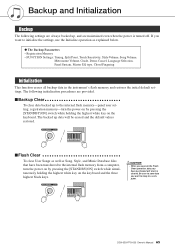
...clear data backed up to the internal flash memory-panel user setting, registration memory-turn the power on by pressing the [STANDBY/ON] switch while holding the highest white key on the keyboard. DGX-630/YPG-635 Owner's Manual 65 CAUTION • When you execute ... restored. ■Flash Clear To clear User Songs as well as explained below. ● The Backup Parameters • Registration Memory • FUNCTION Settings: Tuning, Split Point, Touch Sensitivity, Style Volume, Song Volume, Metronome Volume, Grade, Demo Cancel, Language Selection, Panel Sustain, Master EQ type,...
...clear data backed up to the internal flash memory-panel user setting, registration memory-turn the power on by pressing the [STANDBY/ON] switch while holding the highest white key on the keyboard. DGX-630/YPG-635 Owner's Manual 65 CAUTION • When you execute ... restored. ■Flash Clear To clear User Songs as well as explained below. ● The Backup Parameters • Registration Memory • FUNCTION Settings: Tuning, Split Point, Touch Sensitivity, Style Volume, Song Volume, Metronome Volume, Grade, Demo Cancel, Language Selection, Panel Sustain, Master EQ type,...
Owner's Manual
Page 69
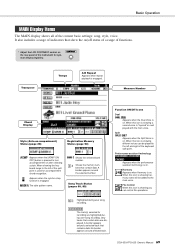
...show the on/off status of a range of functions. * Adjust the LCD CONTRAST control on . No border appears around the selected number. DGX-630/YPG-635 Owner's Manual 69 It also includes a range of indicators that contains data. When this icon is used for recording are displayed. ...function is on the rear panel of the split point is showing you can be added to the left and right of the current basic settings: song, style, voice. Highlighted during user-song recording. Measure Number Chord Display Style (Auto-accompaniment) Status (page 28) Registration Memory ...
...show the on/off status of a range of functions. * Adjust the LCD CONTRAST control on . No border appears around the selected number. DGX-630/YPG-635 Owner's Manual 69 It also includes a range of indicators that contains data. When this icon is used for recording are displayed. ...function is on the rear panel of the split point is showing you can be added to the left and right of the current basic settings: song, style, voice. Highlighted during user-song recording. Measure Number Chord Display Style (Auto-accompaniment) Status (page 28) Registration Memory ...
Owner's Manual
Page 70
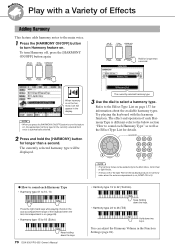
...on . Hold down the keys. To turn Harmony feature on (page 28). • Harmony type 15 to 18 (Echo) Keep holding down the keys. 70 DGX-630/YPG-635 Owner's Manual • Harmony type 19 to 22 (Tremolo) • Harmony type 23 to 26 (Trill) Keep holding down two keys. NOTE ...turn Harmony off, press the [HARMONY ON/OFF] button again. You can be displayed. The currently selected harmony type will appear in the Function Settings (page 94). Try playing the keyboard with a Variety of the keyboard produce no harmony notes when the auto accompaniment is on page 137 for ...
...on . Hold down the keys. To turn Harmony feature on (page 28). • Harmony type 15 to 18 (Echo) Keep holding down the keys. 70 DGX-630/YPG-635 Owner's Manual • Harmony type 19 to 22 (Tremolo) • Harmony type 23 to 26 (Trill) Keep holding down two keys. NOTE ...turn Harmony off, press the [HARMONY ON/OFF] button again. You can be displayed. The currently selected harmony type will appear in the Function Settings (page 94). Try playing the keyboard with a Variety of the keyboard produce no harmony notes when the auto accompaniment is on page 137 for ...

