Owner's Manual
Page 3
... radio frequencies and, if not installed and used . If you can be used according to the instructions found to products distributed by Yamaha Corporation of radio or TV interference, relocate/reorient the antenna. ADVARSEL: Netspæendingen til dette apparat er IKKE afbrudt, sál&#...by the FCC, to distribute this product in den Hausmüll. Utilize power outlets that interference will not result in FCC Regulations, Part 15 for Class "B" digital devices. If these requirements provides a reasonable level of this product in a residential environment will not occur in ...
... radio frequencies and, if not installed and used . If you can be used according to the instructions found to products distributed by Yamaha Corporation of radio or TV interference, relocate/reorient the antenna. ADVARSEL: Netspæendingen til dette apparat er IKKE afbrudt, sál&#...by the FCC, to distribute this product in den Hausmüll. Utilize power outlets that interference will not result in FCC Regulations, Part 15 for Class "B" digital devices. If these requirements provides a reasonable level of this product in a residential environment will not occur in ...
Owner's Manual
Page 4
... • If the AC adaptor cord or plug becomes frayed or damaged, or if there is not to be caused by qualified Yamaha service personnel. polarity markings. These precautions include, but are inserted in conformity with old ones. Fire warning • Do not put burning items..., such as candles, on the name plate of sight or chemical burns. The instrument contains no user-serviceable parts. Do not use the voltage specified as correct for the instrument. The required voltage is corrosive and may generate noise. • ...
... • If the AC adaptor cord or plug becomes frayed or damaged, or if there is not to be caused by qualified Yamaha service personnel. polarity markings. These precautions include, but are inserted in conformity with old ones. Fire warning • Do not put burning items..., such as candles, on the name plate of sight or chemical burns. The instrument contains no user-serviceable parts. Do not use the voltage specified as correct for the instrument. The required voltage is corrosive and may generate noise. • ...
Owner's Manual
Page 6
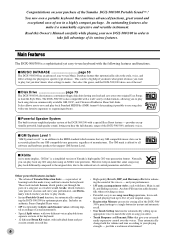
... also features a convenient floppy disk drive letting you hear the full dynamic range of the DGX-500/300's authentic voices. These tools include Lesson, which guides you through the parts of a song just as a teacher would, Grade, which evaluates your practice sessions and rates your...and percussion sounds on each with Intro, Main A and B, and Ending sections. and your purchase of the Yamaha DGX-500/300 Portable Grand™ ! I MUSIC DATABASE page 53 The DGX-500/300 has an advanced, easy-to-use Music Database feature that automatically selects the style, voice, and effect ...
... also features a convenient floppy disk drive letting you hear the full dynamic range of the DGX-500/300's authentic voices. These tools include Lesson, which guides you through the parts of a song just as a teacher would, Grade, which evaluates your practice sessions and rates your...and percussion sounds on each with Intro, Main A and B, and Ending sections. and your purchase of the Yamaha DGX-500/300 Portable Grand™ ! I MUSIC DATABASE page 53 The DGX-500/300 has an advanced, easy-to-use Music Database feature that automatically selects the style, voice, and effect ...

Owner's Manual
Page 18
... 2 - Lesson 3 - r1 Timing • Each press of each song individually: simply press the appropriate button, [L] (left - Waiting In this lesson step, the DGX-500/300 waits for use with one part muted - letting you to play and master both buttons simultaneously calls up Lesson 4, Both Hands. • You can practice the left ) or...
... 2 - Lesson 3 - r1 Timing • Each press of each song individually: simply press the appropriate button, [L] (left - Waiting In this lesson step, the DGX-500/300 waits for use with one part muted - letting you to play and master both buttons simultaneously calls up Lesson 4, Both Hands. • You can practice the left ) or...

Owner's Manual
Page 19
Four grades are muted, letting you practice the missing parts in time with the rhythm. See page 69. Lesson 4 - See page 71. 19 r1 Timing Grade The DGX-500/300 has a built-in the display notation. Want to find out more? Lesson 2 - r2 Waiting Changing the Tempo Naturally, you... TEMPO Want to find out more ? Lr4 BothHand • The DGX-500/300 also has a convenient Tap Tempo function that allows you practice playing the notes correctly as they appear in evaluation function that the parts for you master them at normal speed. tells you how well you work ...
Four grades are muted, letting you practice the missing parts in time with the rhythm. See page 69. Lesson 4 - See page 71. 19 r1 Timing Grade The DGX-500/300 has a built-in the display notation. Want to find out more? Lesson 2 - r2 Waiting Changing the Tempo Naturally, you... TEMPO Want to find out more ? Lr4 BothHand • The DGX-500/300 also has a convenient Tap Tempo function that allows you practice playing the notes correctly as they appear in evaluation function that the parts for you master them at normal speed. tells you how well you work ...
Owner's Manual
Page 35
... Types, see page 37.) Restoring the Default Harmony Type If you've changed the Harmony Type, you play when using the accompaniment styles of the DGX-500/300. Current Harmony Type name and number. 03 Block 001 • For the first five Harmony Types (Duet, Trio, Block... buttons simultaneously (when Harmony is selected • Each voice of twenty-six Harmony types are five different Harmony Types that automatically create harmony parts (for notes played in the Accompaniment area of the keyboard. • The speed of the Trill, Tremolo, and Echo effects depends on the ...
... Types, see page 37.) Restoring the Default Harmony Type If you've changed the Harmony Type, you play when using the accompaniment styles of the DGX-500/300. Current Harmony Type name and number. 03 Block 001 • For the first five Harmony Types (Duet, Trio, Block... buttons simultaneously (when Harmony is selected • Each voice of twenty-six Harmony types are five different Harmony Types that automatically create harmony parts (for notes played in the Accompaniment area of the keyboard. • The speed of the Trill, Tremolo, and Echo effects depends on the ...

Owner's Manual
Page 58
... display. • You can also set point A (the start playback. 58 while you to accurately set the points. • You can play and master the part. Simply call up the Voice mode while the song is stopped. Selecting and Playing Songs 3 Start the selected song. this makes it . 1 While playing a song...
... display. • You can also set point A (the start playback. 58 while you to accurately set the points. • You can play and master the part. Simply call up the Voice mode while the song is stopped. Selecting and Playing Songs 3 Start the selected song. this makes it . 1 While playing a song...

Owner's Manual
Page 62
... When using a Split Voice for recording, the voice assigned to -use the Metronome instead of a style if desired. such as you record subsequent parts to five User songs. You can record and save up to the Accompaniment track: • Style number* • Chord changes and timing... Maximum number of notes : approximately 10,000 (when only "melody" tracks are recorded) • Maximum number of a song. 1 Make all desired DGX-500/300 settings. using a tape recorder; After the song is recorded) Recording a User Song Data that let you can be recorded to the normal (melody...
... When using a Split Voice for recording, the voice assigned to -use the Metronome instead of a style if desired. such as you record subsequent parts to five User songs. You can record and save up to the Accompaniment track: • Style number* • Chord changes and timing... Maximum number of notes : approximately 10,000 (when only "melody" tracks are recorded) • Maximum number of a song. 1 Make all desired DGX-500/300 settings. using a tape recorder; After the song is recorded) Recording a User Song Data that let you can be recorded to the normal (melody...

Owner's Manual
Page 64
...button is pressed again. 64 rEC User 2 001 Indicates the current measure If you want to record these after you 'll want to rehearse your part before recording, press the [SYNC START] button to turn Sync Start off. To play the first chord of the song in the auto ... with the accompaniment. 5 Stop recording. To do this, simply repeat steps #3 - #5 above condition. Make sure that when you 've finished playing the part, press the [START/STOP] or [REC] button. 6 Record to a Melody Track (1 - 5) Five independent Melody tracks are provided for recording your new recording.
...button is pressed again. 64 rEC User 2 001 Indicates the current measure If you want to record these after you 'll want to rehearse your part before recording, press the [SYNC START] button to turn Sync Start off. To play the first chord of the song in the auto ... with the accompaniment. 5 Stop recording. To do this, simply repeat steps #3 - #5 above condition. Make sure that when you 've finished playing the part, press the [START/STOP] or [REC] button. 6 Record to a Melody Track (1 - 5) Five independent Melody tracks are provided for recording your new recording.
Owner's Manual
Page 67
...the correct notes before continuing playback of the song. Waiting In this lesson step, the DGX-500/300 waits for practice. letting you practice just the timing of each hand; Using the Lesson Feature 1 Select one part muted, letting you play in rhythm and at the same time. Naturally, you can... be used, as long as you play the keyboard. press the appropriate button, [L] (left - I Lesson 4 - and right-hand parts are a total of the Lesson songs. Press the [SONG] button, then use Song data you've loaded from disk with one of 100 songs (Songs...
...the correct notes before continuing playback of the song. Waiting In this lesson step, the DGX-500/300 waits for practice. letting you practice just the timing of each hand; Using the Lesson Feature 1 Select one part muted, letting you play in rhythm and at the same time. Naturally, you can... be used, as long as you play the keyboard. press the appropriate button, [L] (left - I Lesson 4 - and right-hand parts are a total of the Lesson songs. Press the [SONG] button, then use Song data you've loaded from disk with one of 100 songs (Songs...

Owner's Manual
Page 68
... Lesson is finished, your performance "grade" is selected. Song Lesson 2 Select the part you wish to work on the right-hand part, press the [R] button; Lr4 BothHand 3 Start the Lesson. If you should play the notes. cally. The DGX-500/300 exits from the Lesson feature automatically when the [START/STOP] button is...
... Lesson is finished, your performance "grade" is selected. Song Lesson 2 Select the part you wish to work on the right-hand part, press the [R] button; Lr4 BothHand 3 Start the Lesson. If you should play the notes. cally. The DGX-500/300 exits from the Lesson feature automatically when the [START/STOP] button is...

Owner's Manual
Page 70
... you practice one of the song in the display as you can master playing them correctly. 1 Select one part of the Lesson songs. 2 Select Lesson 2. In Lesson 2, play them in the display. The DGX-500/300 plays back the song accompaniment with the song. Press the [L] or [R] button (repeatedly, if necessary) until Lesson...
... you practice one of the song in the display as you can master playing them correctly. 1 Select one part of the Lesson songs. 2 Select Lesson 2. In Lesson 2, play them in the display. The DGX-500/300 plays back the song accompaniment with the song. Press the [L] or [R] button (repeatedly, if necessary) until Lesson...

Owner's Manual
Page 71
...both the left- In Lesson 4, both hands in time with the rhythm along with the notation in the previous three lesson steps. 3 Play the appropriate part with the song. letting you play and master both the left and right) are muted - Song Lesson 71 In Lesson 3, listen carefully to this ...lesson step after you play the muted part yourself. Go on to the un-muted part, and play the entire song by yourself. After the lead-in, the song starts automatically, and the appropriate notes appear in ...
...both the left- In Lesson 4, both hands in time with the rhythm along with the notation in the previous three lesson steps. 3 Play the appropriate part with the song. letting you play and master both the left and right) are muted - Song Lesson 71 In Lesson 3, listen carefully to this ...lesson step after you play the muted part yourself. Go on to the un-muted part, and play the entire song by yourself. After the lead-in, the song starts automatically, and the appropriate notes appear in ...
Owner's Manual
Page 84
...manufacturer and Realtime Messages that can play the voices specified for the various parts. The DGX-500/300 can cause data errors. 84 Message Name Exclusive Message Realtime Messages DGX-500/300 Operation/Panel Setting Reverb/chorus/DSP settings, etc. G System Messages This is ...Interface, which allows electronic musical instruments to communicate with corresponding bank select MSB/LSB settings, if necessary). G Channel Messages The DGX-500/300 is an electronic instrument that control the MIDI device. This is an explanation of the various types of controller data....
...manufacturer and Realtime Messages that can play the voices specified for the various parts. The DGX-500/300 can cause data errors. 84 Message Name Exclusive Message Realtime Messages DGX-500/300 Operation/Panel Setting Reverb/chorus/DSP settings, etc. G System Messages This is ...Interface, which allows electronic musical instruments to communicate with corresponding bank select MSB/LSB settings, if necessary). G Channel Messages The DGX-500/300 is an electronic instrument that control the MIDI device. This is an explanation of the various types of controller data....
Owner's Manual
Page 102
x x Common : Song Sel. MIDI Implementation Chart YAMAHA [ Portable Grand™ ] Model DGX-500,DGX-300 MIDI Implementation Chart Date:12-MAR-2002 Version : 1.0 Function... x x : Tune x x System : Clock o Real Time: ...o 96,97 x 100,101 x o *2 o o *2 o o o *2 o o *2 o *2 o *2 o *2 o *2 o o o *2 o Prog Change : True # o 0 - 127 o 0 - 127 Bank Select Modulation wheel Data Entry Data Entry Part Volume Pan Expression Sustain Harmonic Content Release Time Attack Time Brightness Portamento Cntrl Effect Depth RPN Inc,Dec RPN LSB,MSB System Exclusive o *3 o *3 : Song Pos.
x x Common : Song Sel. MIDI Implementation Chart YAMAHA [ Portable Grand™ ] Model DGX-500,DGX-300 MIDI Implementation Chart Date:12-MAR-2002 Version : 1.0 Function... x x : Tune x x System : Clock o Real Time: ...o 96,97 x 100,101 x o *2 o o *2 o o o *2 o o *2 o *2 o *2 o *2 o *2 o o o *2 o Prog Change : True # o 0 - 127 o 0 - 127 Bank Select Modulation wheel Data Entry Data Entry Part Volume Pan Expression Sustain Harmonic Content Release Time Attack Time Brightness Portamento Cntrl Effect Depth RPN Inc,Dec RPN LSB,MSB System Exclusive o *3 o *3 : Song Pos.
Owner's Manual
Page 105
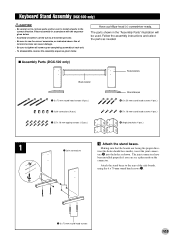
... as needed. q 6 x 70 mm round head screws 105 Have a phillips-head (+) screwdriver ready. Keyboard Stand Assembly (DGX-500 only) • Be careful not to confuse parts, and be sure to the rear of the side boards, using the 6 x 70 mm round head screws q. Attach the... stand bases to install all screws upon completing assembly of each unit. • To disassemble, reverse the assembly sequence given below. I Assembly Parts (DGX-500 only) Side boards Back board q 6 x 70 mm round head screws (4 pcs.) Stand bases r 6 x 30 mm round head screws (4 pcs.) w Joint...
... as needed. q 6 x 70 mm round head screws 105 Have a phillips-head (+) screwdriver ready. Keyboard Stand Assembly (DGX-500 only) • Be careful not to confuse parts, and be sure to the rear of the side boards, using the 6 x 70 mm round head screws q. Attach the... stand bases to install all screws upon completing assembly of each unit. • To disassemble, reverse the assembly sequence given below. I Assembly Parts (DGX-500 only) Side boards Back board q 6 x 70 mm round head screws (4 pcs.) Stand bases r 6 x 30 mm round head screws (4 pcs.) w Joint...
Owner's Manual
Page 107
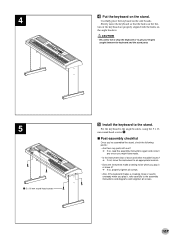
...play it , refer carefully to the stand. I Post-assembly checklist Once you've assembled the stand, check the following points: • Are there any parts left over? ➔ If so, read the assembly instructions again and correct any errors you play it or move the keyboard so that the holes... on the angle brackets. • Be careful not to drop the keyboard or to get your fingers caught between the keyboard and the stand parts. 5 t 5 x 16 mm round head screws B Install the keyboard to the assembly instructions and diagrams and retighten all screws. 107 tom of doors and other...
...play it , refer carefully to the stand. I Post-assembly checklist Once you've assembled the stand, check the following points: • Are there any parts left over? ➔ If so, read the assembly instructions again and correct any errors you play it or move the keyboard so that the holes... on the angle brackets. • Be careful not to drop the keyboard or to get your fingers caught between the keyboard and the stand parts. 5 t 5 x 16 mm round head screws B Install the keyboard to the assembly instructions and diagrams and retighten all screws. 107 tom of doors and other...
Owner's Manual
Page 110
...the product you . This warranty is applicable to all safety precautions. Yamaha reserves the right to utilize reconditioned parts in repairing these products in the U.S.A., the District of Columbia, and Puerto Rico. YAMAHA EXCLUDES AND SHALL NOT BE LIABLE IN ANY EVENT FOR INCIDENTAL OR ...IMPORTANT: Do NOT ship anything to ANY location without charge for assistance. 90 DAYS LABOR Limited Warranty 1 YEAR PARTS Yamaha Corporation of America, hereafter referred to as Yamaha, warrants to the original consumer of a product included in the categories listed below, that the product will be...
...the product you . This warranty is applicable to all safety precautions. Yamaha reserves the right to utilize reconditioned parts in repairing these products in the U.S.A., the District of Columbia, and Puerto Rico. YAMAHA EXCLUDES AND SHALL NOT BE LIABLE IN ANY EVENT FOR INCIDENTAL OR ...IMPORTANT: Do NOT ship anything to ANY location without charge for assistance. 90 DAYS LABOR Limited Warranty 1 YEAR PARTS Yamaha Corporation of America, hereafter referred to as Yamaha, warrants to the original consumer of a product included in the categories listed below, that the product will be...


