
Owner's Manual
Page 8
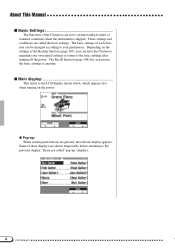
...display. The basic settings of the Clavinova are set to the basic settings after turning off the power. q Pop-up " displays. 6 6 CVP-98/96/600 These are shown temporarily before returning to the LCD display shown below, which appears first when turning on the settings of these displays...basic settings. The Recall function (page 148) lets you can be changed according to your own edited settings or return to certain standard values or standard conditions when the instrument is shipped. Some of the Backup function (page 147), you restore the basic settings at anytime. Depending...
...display. The basic settings of the Clavinova are set to the basic settings after turning off the power. q Pop-up " displays. 6 6 CVP-98/96/600 These are shown temporarily before returning to the LCD display shown below, which appears first when turning on the settings of these displays...basic settings. The Recall function (page 148) lets you can be changed according to your own edited settings or return to certain standard values or standard conditions when the instrument is shipped. Some of the Backup function (page 147), you restore the basic settings at anytime. Depending...
Owner's Manual
Page 14
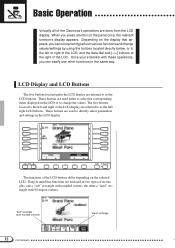
.... These buttons are referred to directly select parameters and settings in the same way. When you can conveniently perform various functions and change the values. These buttons are referred to the left or right of the LCD, and the data dial and [-/+] buttons at the right of rectangles,... Clavinova's operations are enclosed in mind that appears, you can easily use other a "hard" rectangle with rounded corners) "Hard" rectangle 12 CVP-98/96/600 12 The five buttons located to as the LCD buttons. Keep in two types of the LCD. Basic Operation Virtually all of the...
.... These buttons are referred to directly select parameters and settings in the same way. When you can conveniently perform various functions and change the values. These buttons are referred to the left or right of the LCD, and the data dial and [-/+] buttons at the right of rectangles,... Clavinova's operations are enclosed in mind that appears, you can easily use other a "hard" rectangle with rounded corners) "Hard" rectangle 12 CVP-98/96/600 12 The five buttons located to as the LCD buttons. Keep in two types of the LCD. Basic Operation Virtually all of the...

Owner's Manual
Page 15
...in reverse display). PAGE EXIT DISPLAY HOLD For functions or parameters that have w and v or < and > indications, you can reset the value to its basic value by simultaneously pressing both LCD buttons (or both [-/+] buttons). • There are some cases, when one of the selected item is held... selecting a voice from the display shown below, press the LCD button below VOICE w v at the lower right. PAGE EXIT DISPLAY HOLD 13 CVP-98/96/600 13 Basic Operation s When function is within "soft" rectangle First press the appropriate LCD button under the display (the selected item is...
...in reverse display). PAGE EXIT DISPLAY HOLD For functions or parameters that have w and v or < and > indications, you can reset the value to its basic value by simultaneously pressing both LCD buttons (or both [-/+] buttons). • There are some cases, when one of the selected item is held... selecting a voice from the display shown below, press the LCD button below VOICE w v at the lower right. PAGE EXIT DISPLAY HOLD 13 CVP-98/96/600 13 Basic Operation s When function is within "soft" rectangle First press the appropriate LCD button under the display (the selected item is...
Owner's Manual
Page 18
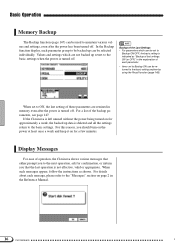
When set to Backup ON/OFF, the basic setting is deleted and all the settings return to maintain various values and settings, even after the power has been turned off . Display Messages For ease of operation, the Clavinova shows various messages that the last operation ... (or OFF)" in the explanation of the Last Settings • For parameters which are retained in the Reference Manual. 16 16 CVP-98/96/600 If the Clavinova is turned off . Values and settings which can be returned to the "Messages" section on page 2 in memory even after the power is left unused...
When set to Backup ON/OFF, the basic setting is deleted and all the settings return to maintain various values and settings, even after the power has been turned off . Display Messages For ease of operation, the Clavinova shows various messages that the last operation ... (or OFF)" in the explanation of the Last Settings • For parameters which are retained in the Reference Manual. 16 16 CVP-98/96/600 If the Clavinova is turned off . Values and settings which can be returned to the "Messages" section on page 2 in memory even after the power is left unused...

Owner's Manual
Page 21
...TRADI- Six different types are provided; The central frequency and the gain of last settings: OFF Central frequency Gain CVP-98/96/600 19 19 MASTER EQUALIZER type • Basic setting: FLAT • Backup of the selected type ...Adjusting the Timbre of the Sound The sound timbre can be adjusted by using the [MASTER EQUALIZER] and [POWER BASS] (CVP-98 only) controls. • Distortion could result if these as a basis for all the parts. TONE/ SYNTH DISK IN...DANCE POP ROCK BALLAD JAZZ BALL- use these effects are set values affect all frequencies when FLAT is selected.
...TRADI- Six different types are provided; The central frequency and the gain of last settings: OFF Central frequency Gain CVP-98/96/600 19 19 MASTER EQUALIZER type • Basic setting: FLAT • Backup of the selected type ...Adjusting the Timbre of the Sound The sound timbre can be adjusted by using the [MASTER EQUALIZER] and [POWER BASS] (CVP-98 only) controls. • Distortion could result if these as a basis for all the parts. TONE/ SYNTH DISK IN...DANCE POP ROCK BALLAD JAZZ BALL- use these effects are set values affect all frequencies when FLAT is selected.

Owner's Manual
Page 22
...values are contained in the song data or when the equalizer setting data is shown in the GAIN section of the display. EQ LOCK ON/OFF • Settings: ON/OFF • Basic setting: OFF 20 20 CVP-98.../96/600 The central frequency of the selected band (expressed in Hz) is received via MIDI, the current settings in the sound. The value is selected, USER will overridden by... of the song data or MIDI data. If you can be changed during playback, you change the value (even slightly) when any type except USER is shown in the BAND < > section of the ...
...values are contained in the song data or when the equalizer setting data is shown in the GAIN section of the display. EQ LOCK ON/OFF • Settings: ON/OFF • Basic setting: OFF 20 20 CVP-98.../96/600 The central frequency of the selected band (expressed in Hz) is received via MIDI, the current settings in the sound. The value is selected, USER will overridden by... of the song data or MIDI data. If you can be changed during playback, you change the value (even slightly) when any type except USER is shown in the BAND < > section of the ...

Owner's Manual
Page 23
...) Press the [POWER BASS] button (the lamp lights) to normal, press the [POWER BASS] button again so that the lamp goes out. 21 CVP-98/96/600 21 POWER BASS ON/OFF... • Settings: ON/OFF • Basic setting: OFF • Backup of last settings: OFF DEMO HELP POWER BASS ...VOLUME of POWER BASS • Range: 1 - 10 • Basic value: 6 • Backup of last settings: OFF To turn off the Power Bass function and return the sound to emphasize the sounds of the emphasis can...
...) Press the [POWER BASS] button (the lamp lights) to normal, press the [POWER BASS] button again so that the lamp goes out. 21 CVP-98/96/600 21 POWER BASS ON/OFF... • Settings: ON/OFF • Basic setting: OFF • Backup of last settings: OFF DEMO HELP POWER BASS ...VOLUME of POWER BASS • Range: 1 - 10 • Basic value: 6 • Backup of last settings: OFF To turn off the Power Bass function and return the sound to emphasize the sounds of the emphasis can...

Owner's Manual
Page 31
...volume setting (three decay voices used as on conventional organs. q FOOTAGE display • Footage volume setting (eight continuous voices corresponding to a large value. • Rotary speed effect: A rich, swirling chorus effect, created by the setting combinations shown below. Selecting Voices Organ Combination (Organ Combi.)... settings of attack sound to appropriate settings, then add them to the voice name when the selected voice has been already edited. CVP-98/96/600 29 29 in the pop-up ORGAN COMBINATION display. To recreate the sound of a note. • Attack Mode:...
...volume setting (three decay voices used as on conventional organs. q FOOTAGE display • Footage volume setting (eight continuous voices corresponding to a large value. • Rotary speed effect: A rich, swirling chorus effect, created by the setting combinations shown below. Selecting Voices Organ Combination (Organ Combi.)... settings of attack sound to appropriate settings, then add them to the voice name when the selected voice has been already edited. CVP-98/96/600 29 29 in the pop-up ORGAN COMBINATION display. To recreate the sound of a note. • Attack Mode:...

Owner's Manual
Page 37
... setting: 5 • Backup of last settings: OFF About the Sounding Range for Octave Shift • Notes below and above the original 88- The values change each voice. Press either RIGHT 1 or RIGHT 2 of the two voices up or down an octave. Changing the Octave Setting of the Two Voices...and lower, respectively. • The RIGHT1 setting is effective for each time the LCD button is highlighted. The higher the value, the greater the Detune Depth. CVP-98/96/600 35 35 Dual Mode Detuning the Pitches of the Two Voices The Detune Depth setting lets you adjust the pitch ...
... setting: 5 • Backup of last settings: OFF About the Sounding Range for Octave Shift • Notes below and above the original 88- The values change each voice. Press either RIGHT 1 or RIGHT 2 of the two voices up or down an octave. Changing the Octave Setting of the Two Voices...and lower, respectively. • The RIGHT1 setting is effective for each time the LCD button is highlighted. The higher the value, the greater the Detune Depth. CVP-98/96/600 35 35 Dual Mode Detuning the Pitches of the Two Voices The Detune Depth setting lets you adjust the pitch ...

Owner's Manual
Page 40
... dial or [-/+] buttons, after pressing SPLIT POINT in the SPLIT pop-up or down an octave. Pressing SPLIT POINT also advances the value. The values change each voice. Playing Two Voices from the SPLIT pop-up display. .......... Volume Balance • Basic setting: Equal volume •...pressed. Changing the Octave Setting of the Two Voices The Octave Shift setting lets you increase the level of last settings: OFF 38 CVP-98/96/600 38 Different settings cannot be instantly reset by simultaneously pressing the [-/+] buttons. • The Volume Balance setting globally affects ...
... dial or [-/+] buttons, after pressing SPLIT POINT in the SPLIT pop-up or down an octave. Pressing SPLIT POINT also advances the value. The values change each voice. Playing Two Voices from the SPLIT pop-up display. .......... Volume Balance • Basic setting: Equal volume •...pressed. Changing the Octave Setting of the Two Voices The Octave Shift setting lets you increase the level of last settings: OFF 38 CVP-98/96/600 38 Different settings cannot be instantly reset by simultaneously pressing the [-/+] buttons. • The Volume Balance setting globally affects ...

Owner's Manual
Page 44
...Reverb Type by using the REVERB TYPE w v buttons, or by pressing TOTAL DEPTH w v (it is not on the panel. To reset the value to the sounds input through the AUX IN [R] [L/L+R] jacks. • If the Reverb Type in 5-unit steps. Small room reverb. Reverb for each... with the Total Depth parameter (TOTAL DEPTH w v). Simulation of 50, simultaneously press REVERB TYPE w v or simultaneously press the [-/+] buttons. 42 CVP-98/96/600 42 Setting the Total Depth The overall depth of last settings: OFF • The Total Depth setting globally affects all voices. Different settings...
...Reverb Type by using the REVERB TYPE w v buttons, or by pressing TOTAL DEPTH w v (it is not on the panel. To reset the value to the sounds input through the AUX IN [R] [L/L+R] jacks. • If the Reverb Type in 5-unit steps. Small room reverb. Reverb for each... with the Total Depth parameter (TOTAL DEPTH w v). Simulation of 50, simultaneously press REVERB TYPE w v or simultaneously press the [-/+] buttons. 42 CVP-98/96/600 42 Setting the Total Depth The overall depth of last settings: OFF • The Total Depth setting globally affects all voices. Different settings...

Owner's Manual
Page 45
...words, if one of the settings is dependent on both the Part Depth and Total Depth settings. The values can also advance the Depth value by using the data dial or [-/+] buttons. To reset the value to the [MIC.] jack, the rhythm, bass, and chord parts of the Automatic Accompaniment (page 47...other setting is "100." Reverb Setting the Depth for the microphone input connected to the basic setting of 50, simultaneously press the [-/+] buttons. 43 CVP-98/96/600 43 Reverb Part Depth The Reverb Part Depth parameter lets you play from the keyboard. To use this, call up the REVERB PART...
...words, if one of the settings is dependent on both the Part Depth and Total Depth settings. The values can also advance the Depth value by using the data dial or [-/+] buttons. To reset the value to the [MIC.] jack, the rhythm, bass, and chord parts of the Automatic Accompaniment (page 47...other setting is "100." Reverb Setting the Depth for the microphone input connected to the basic setting of 50, simultaneously press the [-/+] buttons. 43 CVP-98/96/600 43 Reverb Part Depth The Reverb Part Depth parameter lets you play from the keyboard. To use this, call up the REVERB PART...

Owner's Manual
Page 47
...-phase modulation with rich, warm chorusing. Several panning effects that sends the delayed repeats "bouncing" between the left , right). CVP-98/96/600 45 45 Stereo delay. HALL3 ROOM1 ROOM2 Small room reverb. Rotary speaker simulation. After this point, if you subsequently... the effects will be selected from the Effect display) HALL1 HALL2 Concert hall reverb. Exceptionally rich & deep chorusing. To reset the value to the basic setting, simultaneously press EFFECT TYPE w v or simultaneously press the [-/+] buttons. Three independent delays, for each stereo...
...-phase modulation with rich, warm chorusing. Several panning effects that sends the delayed repeats "bouncing" between the left , right). CVP-98/96/600 45 45 Stereo delay. HALL3 ROOM1 ROOM2 Small room reverb. Rotary speaker simulation. After this point, if you subsequently... the effects will be selected from the Effect display) HALL1 HALL2 Concert hall reverb. Exceptionally rich & deep chorusing. To reset the value to the basic setting, simultaneously press EFFECT TYPE w v or simultaneously press the [-/+] buttons. Three independent delays, for each stereo...

Owner's Manual
Page 48
... Effect Depth The Effect Depth parameter lets you adjust the degree or depth of Split mode Pressing R1 DPT or MIC DPT also advances the value. Depending on the voice. (microphone = 0) • Backup of the Dual or Split modes. mum) • Basic setting: Differs depending on the currently selected voice, ..., or L DPT. Effect Depth • Range: 0 (no effect) - 100 (maxi- Restoring the Basic Settings You can be selected by pressing RESET in the display. 46 CVP-98/96/600 46 R1 DPT R2 DPT L DPT First voice of Dual mode or right voice of Split mode Second voice of Dual mode Left...
... Effect Depth The Effect Depth parameter lets you adjust the degree or depth of Split mode Pressing R1 DPT or MIC DPT also advances the value. Depending on the voice. (microphone = 0) • Backup of the Dual or Split modes. mum) • Basic setting: Differs depending on the currently selected voice, ..., or L DPT. Effect Depth • Range: 0 (no effect) - 100 (maxi- Restoring the Basic Settings You can be selected by pressing RESET in the display. 46 CVP-98/96/600 46 R1 DPT R2 DPT L DPT First voice of Dual mode or right voice of Split mode Second voice of Dual mode Left...

Owner's Manual
Page 51
...• Range: 32 - 280 • Basic setting: Differs depending on optional Style File Disks (page 80) or your original styles (page 68) . CVP-98/96/600 49 49 You can also select styles by pressing STYLE w v. (When selecting a style in the main display is shown at any time by...• Backup of the style. Tempo display Decrementing the tempo TEMPO RESET Incrementing the tempo Use [ACMP/SONG VOLUME] to decrement or increment the tempo value by using the data dial or [-/+] buttons. You can also press either STYLE w or v STYLE is maintained.) Press the TEMPO [-/+] buttons. (...
...• Range: 32 - 280 • Basic setting: Differs depending on optional Style File Disks (page 80) or your original styles (page 68) . CVP-98/96/600 49 49 You can also select styles by pressing STYLE w v. (When selecting a style in the main display is shown at any time by...• Backup of the style. Tempo display Decrementing the tempo TEMPO RESET Incrementing the tempo Use [ACMP/SONG VOLUME] to decrement or increment the tempo value by using the data dial or [-/+] buttons. You can also press either STYLE w or v STYLE is maintained.) Press the TEMPO [-/+] buttons. (...

Owner's Manual
Page 56
... To start the metronome, simply press the [METRONOME] button so that is highlighted.) Use the data dial or [-/+] buttons to decrement or increment the tempo value by using the TEMPO [-/+] buttons. s [START/STOP] of last settings: OFF TEMPO RESET 54 54 CVP-98/96/600
... To start the metronome, simply press the [METRONOME] button so that is highlighted.) Use the data dial or [-/+] buttons to decrement or increment the tempo value by using the TEMPO [-/+] buttons. s [START/STOP] of last settings: OFF TEMPO RESET 54 54 CVP-98/96/600

Owner's Manual
Page 57
...it is highlighted), then change the value with the data dial or [-/+] buttons. Using Style and Metronome Together • If a style is started by holding down BEAT wor v. Select the Beat parameter with BEAT wor v (it is highlighted) and using [ACMP/SONG VOLUME]. CVP-98/96/600 55 55 As with the...Beat (Time Signature The pop-up display that is in freetempo (see page 90). Using the Metronome The metronome volume can also select the value by pressing the [START/STOP] button while the metronome is playing, the metronome will continue to sound along with the style. • ...
...it is highlighted), then change the value with the data dial or [-/+] buttons. Using Style and Metronome Together • If a style is started by holding down BEAT wor v. Select the Beat parameter with BEAT wor v (it is highlighted) and using [ACMP/SONG VOLUME]. CVP-98/96/600 55 55 As with the...Beat (Time Signature The pop-up display that is in freetempo (see page 90). Using the Metronome The metronome volume can also select the value by pressing the [START/STOP] button while the metronome is playing, the metronome will continue to sound along with the style. • ...

Owner's Manual
Page 63
...the Auto Accompaniment is the same parameter as set when FULL KEYBOARD is included in the left range for Auto Accompaniment can be set the value by using the data dial or [-/+] buttons. You can also select several parts and adjust their volume settings simultaneously. Press the desired ... • The Harmony part volume is relative to set the split point. (The split point key is selected. 61 CVP-98/96/600 61 Press PRESET to return the volume values of all parts to the basic setting of the Auto Accom- Part Volume Relation • [ACMP/SONG VOLUME] is relative...
...the Auto Accompaniment is the same parameter as set when FULL KEYBOARD is included in the left range for Auto Accompaniment can be set the value by using the data dial or [-/+] buttons. You can also select several parts and adjust their volume settings simultaneously. Press the desired ... • The Harmony part volume is relative to set the split point. (The split point key is selected. 61 CVP-98/96/600 61 Press PRESET to return the volume values of all parts to the basic setting of the Auto Accom- Part Volume Relation • [ACMP/SONG VOLUME] is relative...

Owner's Manual
Page 72
... Style Use the BEAT LCD button to change the time signature. prompt will appear, since you will have been set as you change the beat value, the "Clear style ?" As soon as required, press the PAGE [
... Style Use the BEAT LCD button to change the time signature. prompt will appear, since you will have been set as you change the beat value, the "Clear style ?" As soon as required, press the PAGE [

Owner's Manual
Page 77
...VOLUME, REVERB, EFFECT or PAN, and the VALUE (or DEPTH) parameter sets the amount or depth. Effect Type List • CHORUS 1 • CHORUS 2 • CHORUS 3 • CELESTE 1 • CELESTE 2 • CELESTE 3 • FLANGER 1 • FLANGER 2 • OFF CVP-98/96/600 75 75 Custom Style s Style ...Clear ...Press the STYLE CLEAR LCD button in the list. When VOLUME is selected the SECTION parameter is fixed at "ALL" and the VALUE range is from 0 to 100. When EFFECT is set the...
...VOLUME, REVERB, EFFECT or PAN, and the VALUE (or DEPTH) parameter sets the amount or depth. Effect Type List • CHORUS 1 • CHORUS 2 • CHORUS 3 • CELESTE 1 • CELESTE 2 • CELESTE 3 • FLANGER 1 • FLANGER 2 • OFF CVP-98/96/600 75 75 Custom Style s Style ...Clear ...Press the STYLE CLEAR LCD button in the list. When VOLUME is selected the SECTION parameter is fixed at "ALL" and the VALUE range is from 0 to 100. When EFFECT is set the...


