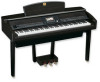
Owner's Manual
Page 207
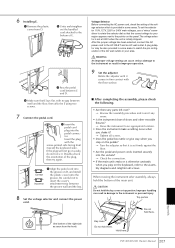
... been selected, connect the AC power cord to the instrument or personal injury. When moving the instrument after assembly, always hold here. CVP-405/403/401 Owner's Manual 207 Appendix 110 6 Installing E. 1 Remove the plastic cover from the front) Voltage Selector Before connecting the AC... floor surface. ■ After completing the assembly, please check the following. • Are there any parts left over? → Review the assembly procedure and correct any errors. • Is the instrument clear of doors and other movable fixtures? → Move the ...
... been selected, connect the AC power cord to the instrument or personal injury. When moving the instrument after assembly, always hold here. CVP-405/403/401 Owner's Manual 207 Appendix 110 6 Installing E. 1 Remove the plastic cover from the front) Voltage Selector Before connecting the AC... floor surface. ■ After completing the assembly, please check the following. • Are there any parts left over? → Review the assembly procedure and correct any errors. • Is the instrument clear of doors and other movable fixtures? → Move the ...

Owner's Manual
Page 209
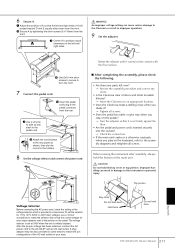
5 Fix A. 1 Center A to produce equal clearance on the left over? → Review the assembly procedure and correct any slack in damage to the instrument or personal injury. A A WARNING An improper voltage setting can result in the pedal ... take up any errors. • Is the Clavinova clear of the main unit. A plug adaptor may be also provided in some areas. Hold here. Appendix CVP-405/403/401 Owner's Manual 209 Improper handling can cause serious damage to the Clavinova or result in improper operation. 8 Set the adjuster. 6 Connect the pedal...
5 Fix A. 1 Center A to produce equal clearance on the left over? → Review the assembly procedure and correct any slack in damage to the instrument or personal injury. A A WARNING An improper voltage setting can result in the pedal ... take up any errors. • Is the Clavinova clear of the main unit. A plug adaptor may be also provided in some areas. Hold here. Appendix CVP-405/403/401 Owner's Manual 209 Improper handling can cause serious damage to the Clavinova or result in improper operation. 8 Set the adjuster. 6 Connect the pedal...
Owner's Manual
Page 211
... the voltage selector and connect the power cord. ■ After completing the assembly, please check the following. • Are there any parts left over? → Review the assembly procedure and correct any slack in the pedal cord. 2 Attach the cord holders to an appropriate location. • Does the Clavinova make a rattling... here. To set the selector for 110V, 127V, 220V or 240V main voltages, use a "minus" screwdriver to the AC INLET and an AC wall outlet. CVP-405/403/401 Owner's Manual 211 Appendix 220
... the voltage selector and connect the power cord. ■ After completing the assembly, please check the following. • Are there any parts left over? → Review the assembly procedure and correct any slack in the pedal cord. 2 Attach the cord holders to an appropriate location. • Does the Clavinova make a rattling... here. To set the selector for 110V, 127V, 220V or 240V main voltages, use a "minus" screwdriver to the AC INLET and an AC wall outlet. CVP-405/403/401 Owner's Manual 211 Appendix 220
