Owner's Manual
Page 207
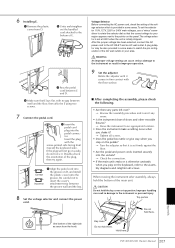
...with the floor surface. ■ After completing the assembly, please check the following. • Are there any parts left over? → Review the assembly procedure and correct any errors. • Is the instrument clear of doors and other movable fixtures? → Move the instrument to ...The voltage selector is set the selector for your area. When moving the instrument after assembly, always hold here. CAUTION Do not hold here. CVP-405/403/401 Owner's Manual 207 Do not hold the key cover or top portion. Correct Incorrect 2 Align the pedal cord into the pedal ...
...with the floor surface. ■ After completing the assembly, please check the following. • Are there any parts left over? → Review the assembly procedure and correct any errors. • Is the instrument clear of doors and other movable fixtures? → Move the instrument to ...The voltage selector is set the selector for your area. When moving the instrument after assembly, always hold here. CAUTION Do not hold here. CVP-405/403/401 Owner's Manual 207 Do not hold the key cover or top portion. Correct Incorrect 2 Align the pedal cord into the pedal ...

Owner's Manual
Page 209
... A to produce equal clearance on the left over? → Review the assembly procedure and correct any slack in some areas to match the pin configuration of the AC wall outlets in damage to the instrument or personal injury. Appendix CVP-405/403/401 Owner's Manual 209 When moving the instrument after...
... A to produce equal clearance on the left over? → Review the assembly procedure and correct any slack in some areas to match the pin configuration of the AC wall outlets in damage to the instrument or personal injury. Appendix CVP-405/403/401 Owner's Manual 209 When moving the instrument after...
Owner's Manual
Page 211
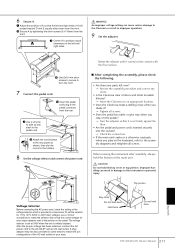
... the voltage selector and connect the power cord. ■ After completing the assembly, please check the following. • Are there any parts left over? → Review the assembly procedure and correct any errors. • Is the Clavinova clear of doors and other movable fixtures? → Move the Clavinova to an... voltage for your area. Key cover Do not hold the key cover or top portion. To set at 240V when the unit is initially shipped. CVP-405/403/401 Owner's Manual 211 Appendix 220
... the voltage selector and connect the power cord. ■ After completing the assembly, please check the following. • Are there any parts left over? → Review the assembly procedure and correct any errors. • Is the Clavinova clear of doors and other movable fixtures? → Move the Clavinova to an... voltage for your area. Key cover Do not hold the key cover or top portion. To set at 240V when the unit is initially shipped. CVP-405/403/401 Owner's Manual 211 Appendix 220
