Owner's Manual
Page 207
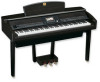
... with the floor surface. ■ After completing the assembly, please check the following. • Are there any parts left over? → Review the assembly procedure and correct any errors. • Is the instrument clear of doors and other movable fixtures? → Move the instrument to an...the instrument after assembly, always hold the key cover or top portion. Do not hold here. Top portion Key cover Do not hold here. CVP-405/403/401 Owner's Manual 207 To set at , with the arrow-printed side facing front (toward the keyboard side). CAUTION Do not hold ...
... with the floor surface. ■ After completing the assembly, please check the following. • Are there any parts left over? → Review the assembly procedure and correct any errors. • Is the instrument clear of doors and other movable fixtures? → Move the instrument to an...the instrument after assembly, always hold the key cover or top portion. Do not hold here. Top portion Key cover Do not hold here. CVP-405/403/401 Owner's Manual 207 To set at , with the arrow-printed side facing front (toward the keyboard side). CAUTION Do not hold ...

Owner's Manual
Page 209
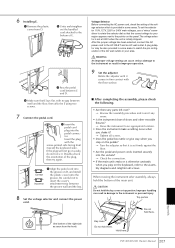
...in improper operation. 8 Set the adjuster. 6 Connect the pedal cord. 1 Insert the pedal cord plug to the pedal connector from the front. Appendix CVP-405/403/401 Owner's Manual 209 To set at 240V when the unit is initially shipped. Key cover Do not hold the key cover or top... the holders. 7 Set the voltage selector and connect the power cord. 5 Fix A. 1 Center A to produce equal clearance on the left over? → Review the assembly procedure and correct any slack in the pedal cord. 2 Attach the cord holders to D as shown, then clip D the cord into the sockets...
...in improper operation. 8 Set the adjuster. 6 Connect the pedal cord. 1 Insert the pedal cord plug to the pedal connector from the front. Appendix CVP-405/403/401 Owner's Manual 209 To set at 240V when the unit is initially shipped. Key cover Do not hold the key cover or top... the holders. 7 Set the voltage selector and connect the power cord. 5 Fix A. 1 Center A to produce equal clearance on the left over? → Review the assembly procedure and correct any slack in the pedal cord. 2 Attach the cord holders to D as shown, then clip D the cord into the sockets...
Owner's Manual
Page 211
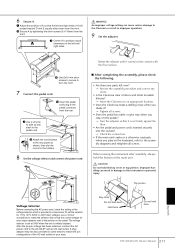
... Insert the pedal cord plug to the pedal connector from the front. 1 Center A to produce equal A clearance on the left over? → Review the assembly procedure and correct any parts left and right sides. Improper handling can cause serious damage to the instrument or personal injury. To set...? → Move the Clavinova to an appropriate location. • Does the Clavinova make a rattling noise when you play on the panel. CVP-405/403/401 Owner's Manual 211 Appendix 220 Top portion 127 110 240 Voltage Selector Before connecting the AC power cord, check the setting of the...
... Insert the pedal cord plug to the pedal connector from the front. 1 Center A to produce equal A clearance on the left over? → Review the assembly procedure and correct any parts left and right sides. Improper handling can cause serious damage to the instrument or personal injury. To set...? → Move the Clavinova to an appropriate location. • Does the Clavinova make a rattling noise when you play on the panel. CVP-405/403/401 Owner's Manual 211 Appendix 220 Top portion 127 110 240 Voltage Selector Before connecting the AC power cord, check the setting of the...
