
Data List
Page 30
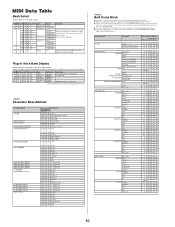
... q "Byte Count" indicates the data size contained in each block designated by Plug-in the following list, refer to the 9 09 0 - 127 User(External) Owner's Manual. 24 18 0 - 63 Plug-in Voice User(Plug-in 1) Ignored in Phrase Clip Mode. 25 19 0 - 63 User(Plug-in 2) 32 20 0 - 7 Drum Voice Preset...
... q "Byte Count" indicates the data size contained in each block designated by Plug-in the following list, refer to the 9 09 0 - 127 User(External) Owner's Manual. 24 18 0 - 63 Plug-in Voice User(Plug-in 1) Ignored in Phrase Clip Mode. 25 19 0 - 63 User(Plug-in 2) 32 20 0 - 7 Drum Voice Preset...

Owner's Manual
Page 2
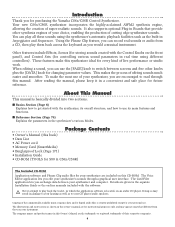
... warranties may be at the time of products that may be affected. CS6R AC INLET MIDI THRU OUT IN HOST SELECT TO HOST INDIVIDUAL OUTPUT 2 1 OUTPUT R L MONO PC-2 PC-1 MIDI Mac ENVIRONMENTAL ISSUES: Yamaha strives to do have the option of having the servicer dispose of the...CAUTION: TO REDUCE THE RISK OF ELECTRIC SHOCK, DO NOT REMOVE COVER (OR BACK). However, Yamaha reserves the right to change or modify any of these graphics appears on this manual carefully and consult your purchase. We sincerely believe that are located on this unit or commission ...
... warranties may be at the time of products that may be affected. CS6R AC INLET MIDI THRU OUT IN HOST SELECT TO HOST INDIVIDUAL OUTPUT 2 1 OUTPUT R L MONO PC-2 PC-1 MIDI Mac ENVIRONMENTAL ISSUES: Yamaha strives to do have the option of having the servicer dispose of the...CAUTION: TO REDUCE THE RISK OF ELECTRIC SHOCK, DO NOT REMOVE COVER (OR BACK). However, Yamaha reserves the right to change or modify any of these graphics appears on this manual carefully and consult your purchase. We sincerely believe that are located on this unit or commission ...
Owner's Manual
Page 4
... you can use its overall structure, and how to use the [PAGE] knob to switch between your CD player/audio speakers. About This Manual This manual is basically divided into two sections: s Basics Section (Page 6) Explains how to play them back across the keyboard as shown in Arpeggiator ...of editing sounds much easier and smoother. You can record real sounds or audio from those on this synthesizer ideal for purchasing the Yamaha CS6x/CS6R Control Synthesizer. This makes the process of live performance or studio work. To make this CD-ROM. Doing so may appear ...
... you can use its overall structure, and how to use the [PAGE] knob to switch between your CD player/audio speakers. About This Manual This manual is basically divided into two sections: s Basics Section (Page 6) Explains how to play them back across the keyboard as shown in Arpeggiator ...of editing sounds much easier and smoother. You can record real sounds or audio from those on this synthesizer ideal for purchasing the Yamaha CS6x/CS6R Control Synthesizer. This makes the process of live performance or studio work. To make this CD-ROM. Doing so may appear ...
Owner's Manual
Page 23
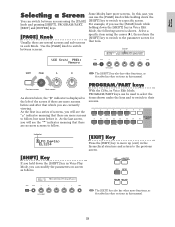
... Some Modes have more functions, as described in other functions, as follows. [EXIT] Key Press the [EXIT] key to move up (exit) in this manual. At the last screen, you can use the [PAGE] knob while holding down the [SHIFT] key in this case, you will see the "µ" ...indicator meaning that there are more screens before it. At the first in each Mode. In this manual. 23 PROGRAM/PART keys Previous screen Next screen As shown below, the "¥" indicator is shown. Basics Section Selecting a Screen You can switch ...
... Some Modes have more functions, as described in other functions, as follows. [EXIT] Key Press the [EXIT] key to move up (exit) in this manual. At the last screen, you can use the [PAGE] knob while holding down the [SHIFT] key in this case, you will see the "µ" ...indicator meaning that there are more screens before it. At the first in each Mode. In this manual. 23 PROGRAM/PART keys Previous screen Next screen As shown below, the "¥" indicator is shown. Basics Section Selecting a Screen You can switch ...

Owner's Manual
Page 24
... Knob [B] at the following screen appears prompting you to answer "YES" or "NO" when a confirmation message is continuously changed. Knobs [A], [B], [C], [1] and [2] Each parameter in this manual. Entering Data You can also use these knobs, the cursor (≥) moves to its value using a knob ([A], [B], [C], [1] or [2]) while holding down either key, the value...
... Knob [B] at the following screen appears prompting you to answer "YES" or "NO" when a confirmation message is continuously changed. Knobs [A], [B], [C], [1] and [2] Each parameter in this manual. Entering Data You can also use these knobs, the cursor (≥) moves to its value using a knob ([A], [B], [C], [1] or [2]) while holding down either key, the value...
Owner's Manual
Page 25
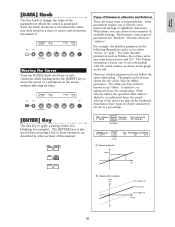
... 127. The Volume setting has a linear, one-to , or subtracted from , the actual value. The graph on the keyboard. Basics Section [DATA] Knob Use this manual. However, relative parameters do not follow the same relationship. The [ENTER] key is positioned. For example, the absolute parameter in the screen without affecting its...
... 127. The Volume setting has a linear, one-to , or subtracted from , the actual value. The graph on the keyboard. Basics Section [DATA] Knob Use this manual. However, relative parameters do not follow the same relationship. The [ENTER] key is positioned. For example, the absolute parameter in the screen without affecting its...

Owner's Manual
Page 44
... Kit. Following the example in step 3 (earlier). When switched on the keyboard. Use the PORTAMENTO knob and [ON/OFF] keys to the parameter for this manual, if you have already set the note. G 8 SHIFT PAGE A B C 1 2 DATA PART/ELEMENT 2Use Knob [2] to jump to change the portamento time and switch portamento on...
... Kit. Following the example in step 3 (earlier). When switched on the keyboard. Use the PORTAMENTO knob and [ON/OFF] keys to the parameter for this manual, if you have already set the note. G 8 SHIFT PAGE A B C 1 2 DATA PART/ELEMENT 2Use Knob [2] to jump to change the portamento time and switch portamento on...
Owner's Manual
Page 60
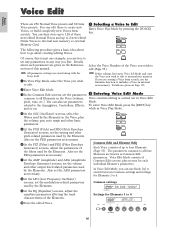
...) and FEG (Filter Envelope Generator) screens, adjust the parameters of the filters used by the Elements. You can also set parameters Mode. Of course, this manual. related to the Arpeggiator, Controllers, Effects, To enter Voice Edit Mode, press the [EDIT] key and so on Page 115. 2Enter Voice Edit Mode. 3In...
...) and FEG (Filter Envelope Generator) screens, adjust the parameters of the filters used by the Elements. You can also set parameters Mode. Of course, this manual. related to the Arpeggiator, Controllers, Effects, To enter Voice Edit Mode, press the [EDIT] key and so on Page 115. 2Enter Voice Edit Mode. 3In...

Owner's Manual
Page 67
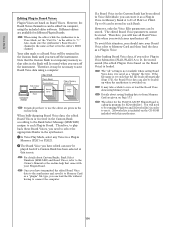
...that divide the keyboard into several (up a Split (Layer Mode) screen. These settings can activate the function (enable those features to 3Select "split" for manual solo performance. Select "ch01" for "Lower" and "ch02" for "Upper" for "Arp" setting in the following steps. For this example. Then,... key note (split point). MIXíVce) Memory Number Ctgry Search Part01 PRE1:128(H16)[Pf:GrandPiano] Edit and prepare Voices for Arpeggiator and manual 8Turn the [PAGE] knob and open the MIX Vce (Mix Voice) screen to select a Voice for "RcvCh" 1Press the [PERFORM] key,...
...that divide the keyboard into several (up a Split (Layer Mode) screen. These settings can activate the function (enable those features to 3Select "split" for manual solo performance. Select "ch01" for "Lower" and "ch02" for "Upper" for "Arp" setting in the following steps. For this example. Then,... key note (split point). MIXíVce) Memory Number Ctgry Search Part01 PRE1:128(H16)[Pf:GrandPiano] Edit and prepare Voices for Arpeggiator and manual 8Turn the [PAGE] knob and open the MIX Vce (Mix Voice) screen to select a Voice for "RcvCh" 1Press the [PERFORM] key,...
Owner's Manual
Page 68
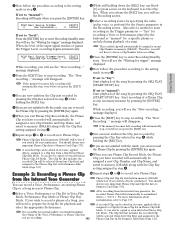
...refer to Page 141. [MASTER KEYBOARD] key to Part 1 based on Page 130. 1Press the [PERFORM] key, followed by Arpeggiator, Zone 3 for manual solo performance, and Zone 4 for Part 2 will be ignored if you set Zone 1 for playing a rhythm loop created previously in the following example ...UpOct1:Sq 120 on an external MIDI sequencer. Ch1 Phrase Clip Part Ch2 Part2 Performance with a Clip Kit Performance with Arpeggiator Ch3 Part3 Manual solo performance Ch4 An external MIDI tone generator MIDI OUT MIDI IN Ch4 Performance with the settings. Keyboard) screen using the Knob [B]. A...
...refer to Page 141. [MASTER KEYBOARD] key to Part 1 based on Page 130. 1Press the [PERFORM] key, followed by Arpeggiator, Zone 3 for manual solo performance, and Zone 4 for Part 2 will be ignored if you set Zone 1 for playing a rhythm loop created previously in the following example ...UpOct1:Sq 120 on an external MIDI sequencer. Ch1 Phrase Clip Part Ch2 Part2 Performance with a Clip Kit Performance with Arpeggiator Ch3 Part3 Manual solo performance Ch4 An external MIDI tone generator MIDI OUT MIDI IN Ch4 Performance with the settings. Keyboard) screen using the Knob [B]. A...
Owner's Manual
Page 69
..." for the lowest note and "G8" for the highest. %As in the same manner in step 7, select "C3" for the lowest note and "G8" for manual solo performance. Turn the Knob [A] and select "Part03". For detailed settings of a Zone, refer to MIDI receive channel 3 (RcvCh) when you Zone 1, Part 2 and Part...
..." for the lowest note and "G8" for the highest. %As in the same manner in step 7, select "C3" for the lowest note and "G8" for manual solo performance. Turn the Knob [A] and select "Part03". For detailed settings of a Zone, refer to MIDI receive channel 3 (RcvCh) when you Zone 1, Part 2 and Part...
Owner's Manual
Page 73
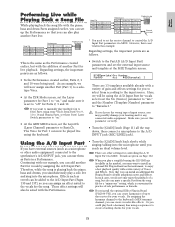
... sing into the microphone until you If you have external sources (such as follows. Here, we will practice of input source, you may want to manually play a solo live using the keyboard. • Switch to the A/D INPUT jack (MIC/LINE2 jack). As an example, we will be added to the A/D Input...
... sing into the microphone until you If you have external sources (such as follows. Here, we will practice of input source, you may want to manually play a solo live using the keyboard. • Switch to the A/D INPUT jack (MIC/LINE2 jack). As an example, we will be added to the A/D Input...
Owner's Manual
Page 85
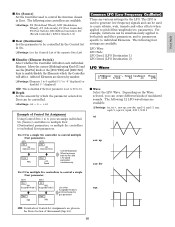
... in the Basics Section of the separate Data List) s ElemSw (Element Switch) Select whether the Controller will affect. t Settings: (see the Controls List of this manual (Page 49). 85 Affected Elements are available. t Settings: -64 ~ 0 ~ +63 Example of modulated sounds. Depending on 270 s Wave Select the LFO Wave. The LFO is...
... in the Basics Section of the separate Data List) s ElemSw (Element Switch) Select whether the Controller will affect. t Settings: (see the Controls List of this manual (Page 49). 85 Affected Elements are available. t Settings: -64 ~ 0 ~ +63 Example of modulated sounds. Depending on 270 s Wave Select the LFO Wave. The LFO is...
Owner's Manual
Page 112
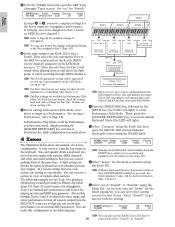
... a note on the Plug-in the illustration, a positive setting will lengthen the delay and a negative setting will shorten it is added to the Owner's Manual for the Board Voice. Use Knob [C] to select the Bank and Knob [1] to 2 octaves. t Settings: (Depends on the keyboard and the moment ... Board.) Key on the keyboard, this number. t Settings: -24 ~ 0 ~ +24 Plug-in Board. The Board Voice Name is displayed to the Owner's Manual for the Insertion and System Effects used by which the LFO waveform controls the pitch. The EFF EF1 (Insertion Effect) parameter is shifted. When you...
... a note on the Plug-in the illustration, a positive setting will lengthen the delay and a negative setting will shorten it is added to the Owner's Manual for the Board Voice. Use Knob [C] to select the Bank and Knob [1] to 2 octaves. t Settings: (Depends on the keyboard and the moment ... Board.) Key on the keyboard, this number. t Settings: -24 ~ 0 ~ +24 Plug-in Board. The Board Voice Name is displayed to the Owner's Manual for the Insertion and System Effects used by which the LFO waveform controls the pitch. The EFF EF1 (Insertion Effect) parameter is shifted. When you...
Owner's Manual
Page 113
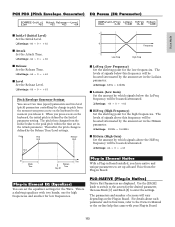
... Time Release Time Key off Plug-in Element Native With a Plug-in Board. For details about each parameter and its functions, refer to the Owner's Manual or the on the keyboard to set up a Board Voice from the InitLvl value to enter the settings. The pitch then changes from the Plug...
... Time Release Time Key off Plug-in Element Native With a Plug-in Board. For details about each parameter and its functions, refer to the Owner's Manual or the on the keyboard to set up a Board Voice from the InitLvl value to enter the settings. The pitch then changes from the Plug...
Owner's Manual
Page 114
.... Therefore, you turn off the instrument. Details about Custom Banks, Bank Select Numbers (MSB/LSB) and Board Voices, refer to each Bank. CS6x/CS6R Plug-in Board Custom Bank Bulk Dump/ Edit Board PS/V Voice IBM Save Computer (Editor) Plug-in Memory (PLG 1/2) Plug-in the Custom Bank... according to the Bank Select Message (MSB/LSB) unique to the Owner's Manual or the on Page 173. For details about saving/loading data to D of PLG1 or PLG2. However, the Board Voices themselves can be erased ...
.... Therefore, you turn off the instrument. Details about Custom Banks, Bank Select Numbers (MSB/LSB) and Board Voices, refer to each Bank. CS6x/CS6R Plug-in Board Custom Bank Bulk Dump/ Edit Board PS/V Voice IBM Save Computer (Editor) Plug-in Memory (PLG 1/2) Plug-in the Custom Bank... according to the Bank Select Message (MSB/LSB) unique to the Owner's Manual or the on Page 173. For details about saving/loading data to D of PLG1 or PLG2. However, the Board Voices themselves can be erased ...

Owner's Manual
Page 129
...64 MSB/LSB (Plug-in Bank): 1 ~ 128 There may be a delay when changing programs for Plug-in Board's Bank), and use Knob [C] to the Owner's Manual that comes with the Plug-in Board. MIXíVce) Bank Number Part17 NORM/001:001(A01)[Pf:GrandPno] s Memory (Voice Memory) t Settings: PRE1 (Preset...a Performance. The following six screens are fixed at "16" for PLG1 and "15" for PLG2. The display will vary according to the Owner's Manual that came with your Plug-in Board. • If Part17 to select the Program Number. MIXíVce) Memory Number Ctgry Search Part01 PRE1:128...
...64 MSB/LSB (Plug-in Bank): 1 ~ 128 There may be a delay when changing programs for Plug-in Board's Bank), and use Knob [C] to the Owner's Manual that comes with the Plug-in Board. MIXíVce) Bank Number Part17 NORM/001:001(A01)[Pf:GrandPno] s Memory (Voice Memory) t Settings: PRE1 (Preset...a Performance. The following six screens are fixed at "16" for PLG1 and "15" for PLG2. The display will vary according to the Owner's Manual that came with your Plug-in Board. • If Part17 to select the Program Number. MIXíVce) Memory Number Ctgry Search Part01 PRE1:128...

Owner's Manual
Page 144
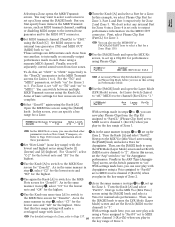
... Level parameter. 4Turn the [PAGE] knob clockwise to show the Level screen. If you set it as the Source, select either "level" or "manual." Select "voice", "perform" or "pclip" when recording a Voice, Performance, or an existing Phrase Clip used to set the Clip Key. You ... [ENTER] key. When you release the [REC] key, you are recording a microphone level device through the A/D INPUT jack. Alternatively, if you choose "manual," recording is currently selected as a Phrase Clip. t Settings: 0 ~ 127 If the input signal level is too large, The indicator is used by which...
... Level parameter. 4Turn the [PAGE] knob clockwise to show the Level screen. If you set it as the Source, select either "level" or "manual." Select "voice", "perform" or "pclip" when recording a Voice, Performance, or an existing Phrase Clip used to set the Clip Key. You ... [ENTER] key. When you release the [REC] key, you are recording a microphone level device through the A/D INPUT jack. Alternatively, if you choose "manual," recording is currently selected as a Phrase Clip. t Settings: 0 ~ 127 If the input signal level is too large, The indicator is used by which...
Owner's Manual
Page 145
...begins automatically. 2While still holding the [REC] key. 8If you are not satisfied with the result, you will disappear. If set to "manual": Recording will need to prepare the Song file for recording a Voice or Performance played by pressing the [ENTER] key. If the memory ...Song, you will see the "Waiting for a specific phrase or melody during playback of a Phrase Clip at any necessary moment by the keyboard or "manual" for trigger" message displayed. It can also be assigned a vacant Clip Number in memory (DRAM). Start recording of a song. message displayed. 6Press...
...begins automatically. 2While still holding the [REC] key. 8If you are not satisfied with the result, you will disappear. If set to "manual": Recording will need to prepare the Song file for recording a Voice or Performance played by pressing the [ENTER] key. If the memory ...Song, you will see the "Waiting for a specific phrase or melody during playback of a Phrase Clip at any necessary moment by the keyboard or "manual" for trigger" message displayed. It can also be assigned a vacant Clip Number in memory (DRAM). Start recording of a song. message displayed. 6Press...
Owner's Manual
Page 155
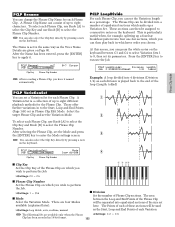
... 4 Clip Key Phrase Clip Number s Clip Key Set the Clip Key of the Phrase Clip will be used as a percentage. t Settings: loop divide, auto, realtime, manual The following Jobs are four Modes available (explained later). The area between C3 and C4 to select Variation Sets 1 to 8, then set a Variation Set for...
... 4 Clip Key Phrase Clip Number s Clip Key Set the Clip Key of the Phrase Clip will be used as a percentage. t Settings: loop divide, auto, realtime, manual The following Jobs are four Modes available (explained later). The area between C3 and C4 to select Variation Sets 1 to 8, then set a Variation Set for...

