

Owner's Manual
Page 1
The voltage selector is set at 240V when the unit is set for the voltage in your local AC mains voltage matches the voltage specified on the name plate on the bottom panel. Make sure that the correct voltage appears next to rotate the selector dial so that the voltage selector is initially shipped. In some areas a voltage selector may be provided on the panel. To change the setting use a "minus" screwdriver to the pointer on the bottom panel of the main keyboard unit near the power cord. R IMPORTANT Check your power supply Make sure that your area.
The voltage selector is set at 240V when the unit is set for the voltage in your local AC mains voltage matches the voltage specified on the name plate on the bottom panel. Make sure that the correct voltage appears next to rotate the selector dial so that the voltage selector is initially shipped. In some areas a voltage selector may be provided on the panel. To change the setting use a "minus" screwdriver to the pointer on the bottom panel of the main keyboard unit near the power cord. R IMPORTANT Check your power supply Make sure that your area.
Owner's Manual
Page 2
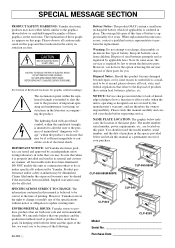
... Please study this type of the specifications without notice or obligation to update existing units. SPECIAL MESSAGE SECTION PRODUCT SAFETY MARKINGS: Yamaha electronic products may have either labels similar to the graphics shown below or molded/stamped facsimiles of these goals. The lightning flash...: TO REDUCE THE RISK OF ELECTRIC SHOCK. NO USER-SERVICEABLE PARTS INSIDE. REFER SERVICING TO QUALIFIED SERVICE PERSONNEL. See bottom of Keyboard enclosure for you to be of sufficient magnitude to produce products that contain lead, batteries, plastics, etc. DO NOT modify this page...
... Please study this type of the specifications without notice or obligation to update existing units. SPECIAL MESSAGE SECTION PRODUCT SAFETY MARKINGS: Yamaha electronic products may have either labels similar to the graphics shown below or molded/stamped facsimiles of these goals. The lightning flash...: TO REDUCE THE RISK OF ELECTRIC SHOCK. NO USER-SERVICEABLE PARTS INSIDE. REFER SERVICING TO QUALIFIED SERVICE PERSONNEL. See bottom of Keyboard enclosure for you to be of sufficient magnitude to produce products that contain lead, batteries, plastics, etc. DO NOT modify this page...
Owner's Manual
Page 3
... precautions listed below to avoid the possibility of physical injury to you experience any unusual smells or smoke should appear to be caused by qualified Yamaha service personnel. • Do not place the instrument against a wall (allow at a high or uncomfortable volume level, since small particles of ... electric plug from the outlet, and have the instrument inspected by it near a heater, or in the proper sequence might discolor the panel or keyboard. • On the CLP-880PE, gently remove dust and dirt with a key cover) Never insert or drop paper or metallic or other objects...
... precautions listed below to avoid the possibility of physical injury to you experience any unusual smells or smoke should appear to be caused by qualified Yamaha service personnel. • Do not place the instrument against a wall (allow at a high or uncomfortable volume level, since small particles of ... electric plug from the outlet, and have the instrument inspected by it near a heater, or in the proper sequence might discolor the panel or keyboard. • On the CLP-880PE, gently remove dust and dirt with a key cover) Never insert or drop paper or metallic or other objects...
Owner's Manual
Page 5
... 40 Troubleshooting 40 Options & Expander Modules 40 Demo Song List 41 Factory Setting List 42 MIDI Data Format 43 MIDI Implementation Chart 47 CLP-880: Keyboard Stand Assembly 48 CLP-860/840/820: Keyboard Stand Assembly 56 CLP-820S: Keyboard Stand Assembly 62 Specifications 68 CLP-880/860/840/820/820S 5
... 40 Troubleshooting 40 Options & Expander Modules 40 Demo Song List 41 Factory Setting List 42 MIDI Data Format 43 MIDI Implementation Chart 47 CLP-880: Keyboard Stand Assembly 48 CLP-860/840/820: Keyboard Stand Assembly 56 CLP-820S: Keyboard Stand Assembly 62 Specifications 68 CLP-880/860/840/820/820S 5
Owner's Manual
Page 6
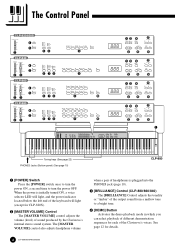
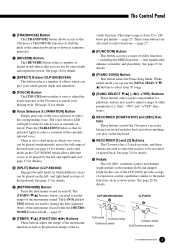
... volume when a pair of headphones is initially turned ON, a voice selector LED will light, and the power indicator located below the left end of the keyboard will light (except for CLP-820S). 2 [MASTER VOLUME] Control The [MASTER VOLUME] control adjusts the volume (level) of the Clavinova's voices.
... volume when a pair of headphones is initially turned ON, a voice selector LED will light, and the power indicator located below the left end of the keyboard will light (except for CLP-820S). 2 [MASTER VOLUME] Control The [MASTER VOLUME] control adjusts the volume (level) of the Clavinova's voices.
Owner's Manual
Page 7
... buttons are used to select the track(s) to 280 beats per minute - See page 20 for details. ! [METRONOME] Button Turns the metronome sound on the keyboard. & RECORDER [1] and [2] Buttons The Clavinova has a 2-track recorder, and these buttons are used to select functions - See page 21 for playback, and ... Clavinova's TRANSPOSE function (to indicate which voice is currently selected. The voice selector LED will light to shift the pitch of the entire keyboard up or down in which two voices can be recorded or played back. and right-hand sections of effects which can use the [SONG...
... buttons are used to select the track(s) to 280 beats per minute - See page 20 for details. ! [METRONOME] Button Turns the metronome sound on the keyboard. & RECORDER [1] and [2] Buttons The Clavinova has a 2-track recorder, and these buttons are used to select functions - See page 21 for playback, and ... Clavinova's TRANSPOSE function (to indicate which voice is currently selected. The voice selector LED will light to shift the pitch of the entire keyboard up or down in which two voices can be recorded or played back. and right-hand sections of effects which can use the [SONG...
Owner's Manual
Page 10
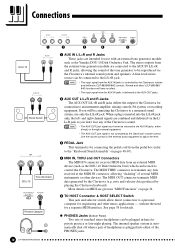
...3 4 5 1 AUX IN L/L+R and R Jacks These jacks are intended for a separate MIDI interface. The stereo outputs from an external MIDI device (such as the Yamaha DOU-10 Disk Orchestra Unit. without the need for use with an external tone generator module such as the DOU-10 Disk Orchestra Unit) which... SELECT Switch This jack and selector switch allow direct connection to a personal computer for connecting the pedal cord from the pedal box (refer to the "Keyboard Stand Assembly" on MIDI are given in here for connection to the AUX OUT jacks. 2 AUX OUT L/L+R and R Jacks The AUX OUT L/L+R ...
...3 4 5 1 AUX IN L/L+R and R Jacks These jacks are intended for a separate MIDI interface. The stereo outputs from an external MIDI device (such as the Yamaha DOU-10 Disk Orchestra Unit. without the need for use with an external tone generator module such as the DOU-10 Disk Orchestra Unit) which... SELECT Switch This jack and selector switch allow direct connection to a personal computer for connecting the pedal cord from the pedal box (refer to the "Keyboard Stand Assembly" on MIDI are given in here for connection to the AUX OUT jacks. 2 AUX OUT L/L+R and R Jacks The AUX OUT L/L+R ...
Owner's Manual
Page 11
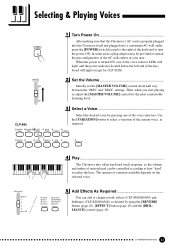
...properly plugged into the Clavinova itself and plugged into a convenient AC wall outlet, POWER press the [POWER] switch located to the right of the keyboard to how "hard" you start playing, re-adjust the [MASTER VOLUME] control for CLP-820S). Use the [VARIATION] button to match the ... on the selected voice. PIANO 2 HARPSICHORD STRINGS PIPE ORGAN CHURCH ORGAN JAZZ ORGAN BASS VARIATION BRILLIANCE BRIGHT MELLOW Play ...The Clavinova also offers keyboard touch response, so the volume and timbre of notes played can add or change reverb, effects (CLP-880/860/840) and brilliance (CLP...
...properly plugged into the Clavinova itself and plugged into a convenient AC wall outlet, POWER press the [POWER] switch located to the right of the keyboard to how "hard" you start playing, re-adjust the [MASTER VOLUME] control for CLP-820S). Use the [VARIATION] button to match the ... on the selected voice. PIANO 2 HARPSICHORD STRINGS PIPE ORGAN CHURCH ORGAN JAZZ ORGAN BASS VARIATION BRILLIANCE BRIGHT MELLOW Play ...The Clavinova also offers keyboard touch response, so the volume and timbre of notes played can add or change reverb, effects (CLP-880/860/840) and brilliance (CLP...
Owner's Manual
Page 13
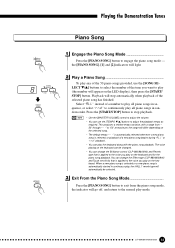
... the selected song. • The default tempo "- - -" is automatically selected whenever a new piano song is applied to the voice you play on the keyboard can change the Brilliance control (CLP-880/860/840) and Reverb type that is selected, or playback of a number to play all piano songs in...the Effect type (CLP-880/860/840) and Touch sensitivity that is automatically started in continuous play, the HALL 1 reverb type will appear on the keyboard. Play a Piano Song To play any of the 50 piano songs provided, use the [TEMPO w/v] buttons to the normal play (the number will ...
... the selected song. • The default tempo "- - -" is automatically selected whenever a new piano song is applied to the voice you play on the keyboard can change the Brilliance control (CLP-880/860/840) and Reverb type that is selected, or playback of a number to play all piano songs in...the Effect type (CLP-880/860/840) and Touch sensitivity that is automatically started in continuous play, the HALL 1 reverb type will appear on the keyboard. Play a Piano Song To play any of the 50 piano songs provided, use the [TEMPO w/v] buttons to the normal play (the number will ...

Owner's Manual
Page 15
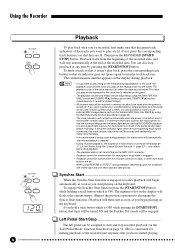
... playback. • The Piano Song Part Cancel function cannot be used to disengage the Syncro Start function.) Playback will begin playing on the keyboard. Synchro Start ...When the Synchro Start function is OFF while pressing the [START/STOP] button, that it plays at a volume from ...whenever a new song is "5". • Both parts are arrangements for four-hands, tracks [1] and [2] correspond to start playing on the keyboard. Left Pedal Start/Stop The left - NOTE • If you begin automatically as soon as required. the corresponding indicator will be turned ON...
... playback. • The Piano Song Part Cancel function cannot be used to disengage the Syncro Start function.) Playback will begin playing on the keyboard. Synchro Start ...When the Synchro Start function is OFF while pressing the [START/STOP] button, that it plays at a volume from ...whenever a new song is "5". • Both parts are arrangements for four-hands, tracks [1] and [2] correspond to start playing on the keyboard. Left Pedal Start/Stop The left - NOTE • If you begin automatically as soon as required. the corresponding indicator will be turned ON...
Owner's Manual
Page 16
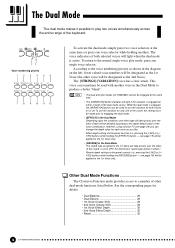
... will be in the Dual Mode Depending upon the conditions one voice selector while holding another voice in the Dual Mode to a number of the keyboard. PIANO 2 HARPSICHORD STRINGS PIPE ORGAN CHURCH ORGAN JAZZ ORGAN BASS 7 8 9 10 11 12 To activate the dual mode simply press two voice selectors at the...
... will be in the Dual Mode Depending upon the conditions one voice selector while holding another voice in the Dual Mode to a number of the keyboard. PIANO 2 HARPSICHORD STRINGS PIPE ORGAN CHURCH ORGAN JAZZ ORGAN BASS 7 8 9 10 11 12 To activate the dual mode simply press two voice selectors at the...
Owner's Manual
Page 17
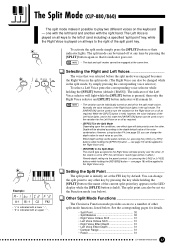
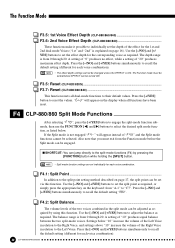
... dual and split modes cannot be used to the Right Voice only. one effect type will be used to play two different voices on the keyboard - The Split Mode (CLP-880/860) The split mode makes it possible to turn the variation for the Right Voice on or off as required...
... dual and split modes cannot be used to the Right Voice only. one effect type will be used to play two different voices on the keyboard - The Split Mode (CLP-880/860) The split mode makes it possible to turn the variation for the Right Voice on or off as required...
Owner's Manual
Page 20
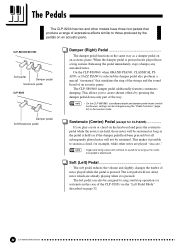
... for as long as the pedal is depressed. This allows you to sustain a chord, for CLP-820S If you play a note or chord on the keyboard and press the sostenuto pedal while the note(s) are held (as a damper pedal on page 32. 20 CLP-880/860/840/820/820S Sostenuto (Center...
... for as long as the pedal is depressed. This allows you to sustain a chord, for CLP-820S If you play a note or chord on the keyboard and press the sostenuto pedal while the note(s) are held (as a damper pedal on page 32. 20 CLP-880/860/840/820/820S Sostenuto (Center...
Owner's Manual
Page 21
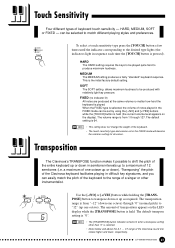
...in difficult key signatures, and you can be produced with relatively light key pressure. CLP-880/860/840/820/820S 21 C7 range of the keyboard. • The touch sensitivity type and volume set by using the [-/NO] and [+/YES] buttons while the [TOUCH] button is held ...initial factory default setting. HARD The HARD setting requires the keys to be played quite hard to be selected to a maximum of the Clavinova keyboard facilitates playing in semitone intervals up or down one octave) through 127. a maximum of transposition appears on the display). Touch Sensitivity Four ...
...in difficult key signatures, and you can be produced with relatively light key pressure. CLP-880/860/840/820/820S 21 C7 range of the keyboard. • The touch sensitivity type and volume set by using the [-/NO] and [+/YES] buttons while the [TOUCH] button is held ...initial factory default setting. HARD The HARD setting requires the keys to be played quite hard to be selected to a maximum of the Clavinova keyboard facilitates playing in semitone intervals up or down one octave) through 127. a maximum of transposition appears on the display). Touch Sensitivity Four ...
Owner's Manual
Page 24
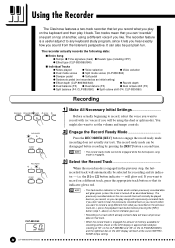
The recorder feature is a useful adjunct to any keyboard study program, since it lets you hear exactly how you sound from what you play on the LED display will be shown on the LED ... for recording will flash at "50" on the CLP-880/860 and "25" on the CLP-840/820/820S), and the rightmost dot on the keyboard and then play it back. RECORDER 1 2 START/ STOP REC Engage the Record Ready Mode Press the RECORDER [REC] button to record, select the voice you...
The recorder feature is a useful adjunct to any keyboard study program, since it lets you hear exactly how you sound from what you play on the LED display will be shown on the LED ... for recording will flash at "50" on the CLP-880/860 and "25" on the CLP-840/820/820S), and the rightmost dot on the keyboard and then play it back. RECORDER 1 2 START/ STOP REC Engage the Record Ready Mode Press the RECORDER [REC] button to record, select the voice you...

Owner's Manual
Page 25
... will appear on pedal usage and other factors. These initial settings can be careful not to press the [START/STOP] button or a key on the keyboard, either of the recorder's tracks by engaging the record mode, selecting the track you 'll be able to keep time with the metronome while recording... twice. Erasing a Single Track All data can be recorded. • You can be assigned to start recording and erase all previous recorded data on the keyboard or press the [START/STOP] button.
... will appear on pedal usage and other factors. These initial settings can be careful not to press the [START/STOP] button or a key on the keyboard, either of the recorder's tracks by engaging the record mode, selecting the track you 'll be able to keep time with the metronome while recording... twice. Erasing a Single Track All data can be recorded. • You can be assigned to start recording and erase all previous recorded data on the keyboard or press the [START/STOP] button.
Owner's Manual
Page 26
... via the MIDI OUT connector. • Playback cannot be started when the demo/piano song mode is engaged, recorder playback will begin playing on the keyboard. It is turned on even if the recorder contains data. If you hold a track button which is turned off . • When using the Bulk Data... of the tracks you want to disengage the Syncro Start function.) Playback will then start as soon as you begin automatically as soon as the Yamaha MIDI Data Filer MDF3 by using REVERB or EFFECT during playback. To mute a track so that it to recall the default tempo). • All ...
... via the MIDI OUT connector. • Playback cannot be started when the demo/piano song mode is engaged, recorder playback will begin playing on the keyboard. It is turned on even if the recorder contains data. If you hold a track button which is turned off . • When using the Bulk Data... of the tracks you want to disengage the Syncro Start function.) Playback will then start as soon as you begin automatically as soon as the Yamaha MIDI Data Filer MDF3 by using REVERB or EFFECT during playback. To mute a track so that it to recall the default tempo). • All ...
Owner's Manual
Page 30
... volume of the Right Voice in the split mode can be engaged. Press the [-/NO] and [+/YES] buttons simultaneously to "C7". " will appear on the keyboard: from 0 through 20.
... volume of the Right Voice in the split mode can be engaged. Press the [-/NO] and [+/YES] buttons simultaneously to "C7". " will appear on the keyboard: from 0 through 20.
Owner's Manual
Page 34
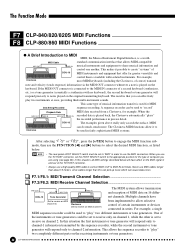
...840/820/820S MIDI can effectively play " two completely different parts on 16 differ- The Clavinova MIDI functions allow selective control of a second keyboard (synthesizer, etc.) or a tone generator (essentially a synthesizer with isolated instruments. NOTE • The rear-panel HOST SELECT switch must be... pick up noise which can be used in series. In this situation, all MIDI settings described below . For example, most MIDI keyboards (including the Clavinova, of course) transmit note and velocity (touch response) information via the MIDI OUT connector whenever a note is ...
...840/820/820S MIDI can effectively play " two completely different parts on 16 differ- The Clavinova MIDI functions allow selective control of a second keyboard (synthesizer, etc.) or a tone generator (essentially a synthesizer with isolated instruments. NOTE • The rear-panel HOST SELECT switch must be... pick up noise which can be used in series. In this situation, all MIDI settings described below . For example, most MIDI keyboards (including the Clavinova, of course) transmit note and velocity (touch response) information via the MIDI OUT connector whenever a note is ...
Owner's Manual
Page 35
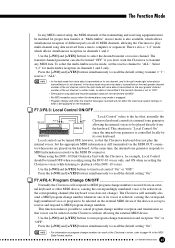
... to recall the default setting "On". This function makes it possible to turn program change number reception and transmission so that the Clavinova keyboard does not play multi-channel song data received from a music computer or sequencer. Use the [-/NO] and [+/YES] buttons to be..., the internal tone generator responds to the fact that, normally, the MIDI OUT AUX IN OUT PUT MIDI L R R L IN Clavinova keyboard controls its own keyboard. There's also a "1-2" mode which allows simultaneous reception of the DOU-10 voices. To select the multi-timbre receive mode, set channel....
... to recall the default setting "On". This function makes it possible to turn program change number reception and transmission so that the Clavinova keyboard does not play multi-channel song data received from a music computer or sequencer. Use the [-/NO] and [+/YES] buttons to be..., the internal tone generator responds to the fact that, normally, the MIDI OUT AUX IN OUT PUT MIDI L R R L IN Clavinova keyboard controls its own keyboard. There's also a "1-2" mode which allows simultaneous reception of the DOU-10 voices. To select the multi-timbre receive mode, set channel....

