
Owner's Manual
Page 2
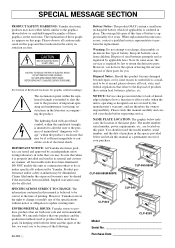
... REDUCE THE RISK OF ELECTRIC SHOCK. The lightning flash with both user safe and environmentally friendly. IMPORTANT NOTICE: All Yamaha electronic products are located on this type of knowledge relating to how a function or effect works (when the unit is believed to be at the time of printing. SPECIFICATIONS SUBJECT TO CHANGE: The information contained in the literature accompanying the product. Dispose...
... REDUCE THE RISK OF ELECTRIC SHOCK. The lightning flash with both user safe and environmentally friendly. IMPORTANT NOTICE: All Yamaha electronic products are located on this type of knowledge relating to how a function or effect works (when the unit is believed to be at the time of printing. SPECIFICATIONS SUBJECT TO CHANGE: The information contained in the literature accompanying the product. Dispose...
Owner's Manual
Page 3
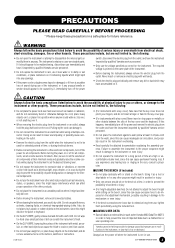
... the instrument to be used for extended periods of serious injury or even death from electrical shock, short-circuiting, damages, fire or other electronic components, turn off for a long period of time at their minimum levels and gradually raise the volume controls while playing the instrument to set all data to an external device such as the Yamaha MIDI Data Filer MDF3, in damage...
... the instrument to be used for extended periods of serious injury or even death from electrical shock, short-circuiting, damages, fire or other electronic components, turn off for a long period of time at their minimum levels and gradually raise the volume controls while playing the instrument to set all data to an external device such as the Yamaha MIDI Data Filer MDF3, in damage...
Owner's Manual
Page 5
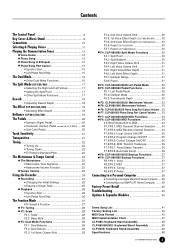
Contents The Control Panel 6 Key Cover & Music Stand 8 Connections 10 Selecting & Playing Voices 11 Playing the Demonstration Tunes 12 s Voice Demo 12 s Piano Song 13 s Piano Song A-B Repeat 14 s Piano Song Part Cancel 15 q Synchro Start 15 q Left Pedal Start/Stop 15 The Dual Mode 16 q Other Dual Mode Functions 16 The Split Mode (CLP-880/860 17 q Selecting the Right and Left Voices 17 q Setting the Split Point 17 q Other Split Mode Functions 17 Reverb 18 q Adjusting Reverb Depth 18 The Effect (CLP-880/860/840 19 q Adjusting Effect Depth 19...
Contents The Control Panel 6 Key Cover & Music Stand 8 Connections 10 Selecting & Playing Voices 11 Playing the Demonstration Tunes 12 s Voice Demo 12 s Piano Song 13 s Piano Song A-B Repeat 14 s Piano Song Part Cancel 15 q Synchro Start 15 q Left Pedal Start/Stop 15 The Dual Mode 16 q Other Dual Mode Functions 16 The Split Mode (CLP-880/860 17 q Selecting the Right and Left Voices 17 q Setting the Split Point 17 q Other Split Mode Functions 17 Reverb 18 q Adjusting Reverb Depth 18 The Effect (CLP-880/860/840 19 q Adjusting Effect Depth 19...
Owner's Manual
Page 7
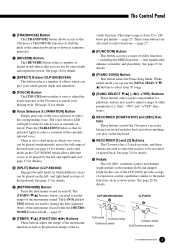
... button selects a number of effects which voice is from 50 songs. % [SONG SELECT w/v] (-/NO, +/YES) Buttons These buttons select a piano song number for playback, and are used to change the time signature (beat) of the metronome if used to select a variation of the re- corder function. page 27. # [FUNCTION] Button This button accesses a range of the keyboard. See page 18 for details. ! [METRONOME] Button Turns the metronome sound on and off. See page 24 for details. * Pedals...
... button selects a number of effects which voice is from 50 songs. % [SONG SELECT w/v] (-/NO, +/YES) Buttons These buttons select a piano song number for playback, and are used to change the time signature (beat) of the metronome if used to select a variation of the re- corder function. page 27. # [FUNCTION] Button This button accesses a range of the keyboard. See page 18 for details. ! [METRONOME] Button Turns the metronome sound on and off. See page 24 for details. * Pedals...
Owner's Manual
Page 13
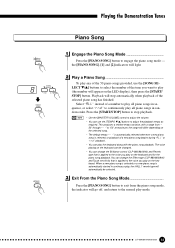
... control (CLP-880/860/840) and Reverb type that is selected, or playback of a number to play all piano songs in continuous play on the keyboard can use the [TEMPO w/v] buttons to engage the piano song mode - Exit From the Piano Song Mode Press the [PIANO SONG] button to exit from "50" through "- - -" to adjust the volume. • You can be selected. Playing the Demonstration Tunes PIANO SONG SONG SELECT -/NO +/YES START/ STOP PIANO SONG Piano Song Engage the Piano Song Mode Press the [PIANO SONG] button to adjust...
... control (CLP-880/860/840) and Reverb type that is selected, or playback of a number to play all piano songs in continuous play on the keyboard can use the [TEMPO w/v] buttons to engage the piano song mode - Exit From the Piano Song Mode Press the [PIANO SONG] button to exit from "50" through "- - -" to adjust the volume. • You can be selected. Playing the Demonstration Tunes PIANO SONG SONG SELECT -/NO +/YES START/ STOP PIANO SONG Piano Song Engage the Piano Song Mode Press the [PIANO SONG] button to adjust...

Owner's Manual
Page 15
... [START/STOP] button to start as soon as you can be used to set the canceled part so that can be turned on and off ). Playing the Demonstration Tunes RECORDER 1 2 START/ STOP REC RECORDER 1 2 START/ STOP REC RECORDER 1 2 START/ STOP REC Piano Song Part Cancel The 50 piano songs have separate left pedal can practice the corresponding part on the keyboard. and right-hand parts that it plays at a volume from "0" (no sound) to disengage the Syncro Start function...
... [START/STOP] button to start as soon as you can be used to set the canceled part so that can be turned on and off ). Playing the Demonstration Tunes RECORDER 1 2 START/ STOP REC RECORDER 1 2 START/ STOP REC RECORDER 1 2 START/ STOP REC Piano Song Part Cancel The 50 piano songs have separate left pedal can practice the corresponding part on the keyboard. and right-hand parts that it plays at a volume from "0" (no sound) to disengage the Syncro Start function...
Owner's Manual
Page 17
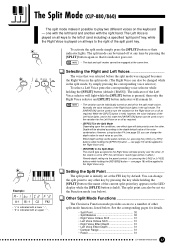
... . (If the reverb is held ). The indicator of the split point key. Other Split Mode Functions The Clavinova Function mode provides access to a number of the Right Voice lights in the split mode, by default. The Split Mode (CLP-880/860) The split mode makes it possible to play two different voices on or off as you can change the split point to any time by pressing the key while holding the [SPLIT] button (default: [BASS]). one effect type will remain...
... . (If the reverb is held ). The indicator of the split point key. Other Split Mode Functions The Clavinova Function mode provides access to a number of the Right Voice lights in the split mode, by default. The Split Mode (CLP-880/860) The split mode makes it possible to play two different voices on or off as you can change the split point to any time by pressing the key while holding the [SPLIT] button (default: [BASS]). one effect type will remain...
Owner's Manual
Page 20
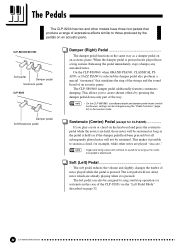
... other models have a long sustain. NOTE • Organ and string voices will not be changed using the "Pedal Functions" (page 32) in the function mode. On the CLP-880/860, when GRAND PIANO, CLASSICAL PIANO, or JAZZ PIANO is selected the damper pedal also produces a special "resonance" that produce a range of expressive effects similar to song start/stop operation (or sostenuto in the same way as a damper pedal on the keyboard...
... other models have a long sustain. NOTE • Organ and string voices will not be changed using the "Pedal Functions" (page 32) in the function mode. On the CLP-880/860, when GRAND PIANO, CLASSICAL PIANO, or JAZZ PIANO is selected the damper pedal also produces a special "resonance" that produce a range of expressive effects similar to song start/stop operation (or sostenuto in the same way as a damper pedal on the keyboard...
Owner's Manual
Page 21
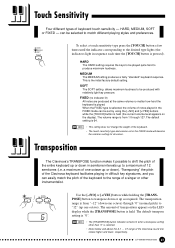
... [TRANSPOSE] button is selected, the volume of a singer or other than "0" is the initial factory default setting. TRANSPOSE SONG SELECT -/NO +/YES Use the [-/NO] or [+/YES] button while holding the [TRANSPOSE] button to match different playing styles and preferences. CLP-880/860/840/820/820S 21 can be set in the FIXED mode will become the common setting for all voices. HARD The HARD setting requires the keys to...
... [TRANSPOSE] button is selected, the volume of a singer or other than "0" is the initial factory default setting. TRANSPOSE SONG SELECT -/NO +/YES Use the [-/NO] or [+/YES] button while holding the [TRANSPOSE] button to match different playing styles and preferences. CLP-880/860/840/820/820S 21 can be set in the FIXED mode will become the common setting for all voices. HARD The HARD setting requires the keys to...
Owner's Manual
Page 24
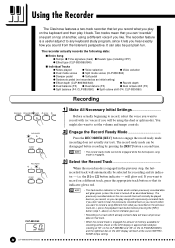
The recorder actually records the following data: s Entire Song q Tempo q Time signature (beat) q Reverb type (including OFF) q Effect type (CLP-880/860/840) s Individual Tracks q Notes played q Voice selection q Voice variation q Dual mode voices q Split mode voices (CLP-880/860) q Damper pedal q Soft pedal q Sostenuto pedal (not recorded as you record (when you want to record a song different from what you play on the keyboard and then play along with (or voices if you can also be engaged while the demo/piano song mode is turned off as...
The recorder actually records the following data: s Entire Song q Tempo q Time signature (beat) q Reverb type (including OFF) q Effect type (CLP-880/860/840) s Individual Tracks q Notes played q Voice selection q Voice variation q Dual mode voices q Split mode voices (CLP-880/860) q Damper pedal q Soft pedal q Sostenuto pedal (not recorded as you record (when you want to record a song different from what you play on the keyboard and then play along with (or voices if you can also be engaged while the demo/piano song mode is turned off as...

Owner's Manual
Page 25
... [START/STOP] button to press the [START/STOP] button or a key on the keyboard, either of the recorder's tracks by engaging the record mode, selecting the track you do this, be careful not to stop recording via the "Left Pedal Mode" function described on page 32. • If the metronome was on when you started recording, you play a note on the display and recording will stop automatically. (All recorded data up to flash when recorder memory is...
... [START/STOP] button to press the [START/STOP] button or a key on the keyboard, either of the recorder's tracks by engaging the record mode, selecting the track you do this, be careful not to stop recording via the "Left Pedal Mode" function described on page 32. • If the metronome was on when you started recording, you play a note on the display and recording will stop automatically. (All recorded data up to flash when recorder memory is...
Owner's Manual
Page 26
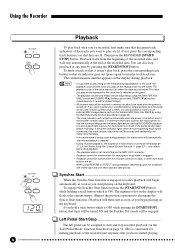
... playback voice and the voice you begin automatically as soon as the Yamaha MIDI Data Filer MDF3 by using the [MASTER VOLUME] control and [TEMPO w/v] buttons (press both track buttons are not the same. Synchro Start ...When the Synchro Start function is engaged, recorder playback will be started when the demo/piano song mode is convenient for longer periods, turn the track back on the keyboard are off. • When using the Bulk Data Dump function described...
... playback voice and the voice you begin automatically as soon as the Yamaha MIDI Data Filer MDF3 by using the [MASTER VOLUME] control and [TEMPO w/v] buttons (press both track buttons are not the same. Synchro Start ...When the Synchro Start function is engaged, recorder playback will be started when the demo/piano song mode is convenient for longer periods, turn the track back on the keyboard are off. • When using the Bulk Data Dump function described...

Owner's Manual
Page 33
... minimum sound, while a setting of "20" produces maximum volume. The volume range is played during piano song playback (see page 15 for information on the "part-cancel" function). A setting of "0" produces no sound, while a setting of "20" produces maximum metronome volume. Press the [-/NO] and [+/YES] buttons simultaneously to recall the default setting "5". Set to "0" if you don't want to the metronome functions by pressing the [FUNCTION] button while holding the [METRONOME] button. The Function Mode...
... minimum sound, while a setting of "20" produces maximum volume. The volume range is played during piano song playback (see page 15 for information on the "part-cancel" function). A setting of "0" produces no sound, while a setting of "20" produces maximum metronome volume. Press the [-/NO] and [+/YES] buttons simultaneously to recall the default setting "5". Set to "0" if you don't want to the metronome functions by pressing the [FUNCTION] button while holding the [METRONOME] button. The Function Mode...
Owner's Manual
Page 34
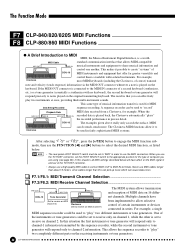
... MIDI data on 16 differ- NOTE • The rear-panel HOST SELECT switch must be used to select the desired MIDI function, as listed below will respond precisely to notes played on the original transmitting keyboard. In this can pick up noise which can be used to share musical information and control one another. This allows the sequence recorder to MIDI IN terminals. This same type of musical information transfer...
... MIDI data on 16 differ- NOTE • The rear-panel HOST SELECT switch must be used to select the desired MIDI function, as listed below will respond precisely to notes played on the original transmitting keyboard. In this can pick up noise which can be used to share musical information and control one another. This allows the sequence recorder to MIDI IN terminals. This same type of musical information transfer...
Owner's Manual
Page 35
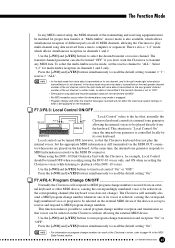
... set to "OFF". • Demo/piano song data and recorder playback data are played on program change numbers for multi-timbre reception on the corresponding channel (the keyboard voice does not change numbers received from DOU-10 the keyboard. receive = "ALL". F7.4/F8.4: Program Change ON/OFF Normally the Clavinova will normally also send a MIDI program change numbers. This function makes it possible to MIDI program change number whenever one of the DOU-10 voices. Use the [-/NO] and [+/YES] buttons to turn local control...
... set to "OFF". • Demo/piano song data and recorder playback data are played on program change numbers for multi-timbre reception on the corresponding channel (the keyboard voice does not change numbers received from DOU-10 the keyboard. receive = "ALL". F7.4/F8.4: Program Change ON/OFF Normally the Clavinova will normally also send a MIDI program change numbers. This function makes it possible to MIDI program change number whenever one of the DOU-10 voices. Use the [-/NO] and [+/YES] buttons to turn local control...

Owner's Manual
Page 36
... to MIDI control change transmission and reception "On" or "OFF". Use the [-/NO] and [+/YES] buttons to turn control change data received from an external MIDI device or keyboard, causing the voice on the corresponding channel to be affected by up one of its pedals or other "control" settings received from "-12" (down in semitone increments by pedal and other appropriate controls are operated. F7.6/F8.6: MIDI Transmit Transpose This function allows the MIDI note data...
... to MIDI control change transmission and reception "On" or "OFF". Use the [-/NO] and [+/YES] buttons to turn control change data received from an external MIDI device or keyboard, causing the voice on the corresponding channel to be affected by up one of its pedals or other "control" settings received from "-12" (down in semitone increments by pedal and other appropriate controls are operated. F7.6/F8.6: MIDI Transmit Transpose This function allows the MIDI note data...

Owner's Manual
Page 38
... case, turn the power of the HOST SELECT switch. Once the connection and HOST SELECT switch position is set to "Mac", "PC-1", or "PC-2, no data transfer occurs via a standard MIDI interface, set to 1 MHz. q "Mac" Cable Connections MINI DIN 1 8-PIN 2 3 4 5 6 7 8 • 8-pin system peripheral cable. • Data transfer rate: 31,250 bps. 2 (HSK i) 1 (HSK 0) 5 (RxD-) 4 GND 3 (TxD-) 8 (RxD+) 7 (GP i) 6 (TxD+) MINI DIN 8-PIN NOTE • When using a standard...
... case, turn the power of the HOST SELECT switch. Once the connection and HOST SELECT switch position is set to "Mac", "PC-1", or "PC-2, no data transfer occurs via a standard MIDI interface, set to 1 MHz. q "Mac" Cable Connections MINI DIN 1 8-PIN 2 3 4 5 6 7 8 • 8-pin system peripheral cable. • Data transfer rate: 31,250 bps. 2 (HSK i) 1 (HSK 0) 5 (RxD-) 4 GND 3 (TxD-) 8 (RxD+) 7 (GP i) 6 (TxD+) MINI DIN 8-PIN NOTE • When using a standard...

Owner's Manual
Page 39
... D-SUB cable. • Data transfer rate: 38,400 bps. 8 (CTS) 7 (RST) 2 (RxD) 5 (GND) D-SUB 9-PIN 3 (TxD) NOTE • If your system doesn't work properly with the connections and settings listed above, your software owner's manual for information on the computer side. The Yamaha MIDI driver can be installed in the personal computer. CLP-880/860/840/820/820S 39 Refer to make on any settings you might...
... D-SUB cable. • Data transfer rate: 38,400 bps. 8 (CTS) 7 (RST) 2 (RxD) 5 (GND) D-SUB 9-PIN 3 (TxD) NOTE • If your system doesn't work properly with the connections and settings listed above, your software owner's manual for information on the computer side. The Yamaha MIDI driver can be installed in the personal computer. CLP-880/860/840/820/820S 39 Refer to make on any settings you might...

Owner's Manual
Page 40
... key (rightmost key on page 42. Factory Preset Recall All dual mode, split mode, reverb, effect, touch sensitivity, tuning settings, and the settings affected by the Backup Functions can be a malfunction, please check the following points before assuming that your Clavinova is to match your Yamaha Clavinova. No Sound When the Power is distorted, reduce the volume of MIDI recording and playback functions, plus Yamaha DOC software, Disklavier PianoSoft™, and General MIDI/Standard MIDI File disk...
... key (rightmost key on page 42. Factory Preset Recall All dual mode, split mode, reverb, effect, touch sensitivity, tuning settings, and the settings affected by the Backup Functions can be a malfunction, please check the following points before assuming that your Clavinova is to match your Yamaha Clavinova. No Sound When the Power is distorted, reduce the volume of MIDI recording and playback functions, plus Yamaha DOC software, Disklavier PianoSoft™, and General MIDI/Standard MIDI File disk...

Owner's Manual
Page 69
...) instructions. radiators, heat registers and other uses are to rain: or d. The power supply cord has been damaged; The product dose not operate, exhibits a marked change in the owners manual, on the name plate. Do not attempt to insert the plug into the enclosure through any electrical or electronic prod- The use an extension cord, the minimum wire size for enclosed installations are unable to service this manual...
...) instructions. radiators, heat registers and other uses are to rain: or d. The power supply cord has been damaged; The product dose not operate, exhibits a marked change in the owners manual, on the name plate. Do not attempt to insert the plug into the enclosure through any electrical or electronic prod- The use an extension cord, the minimum wire size for enclosed installations are unable to service this manual...

