Owners Manual
Page 5
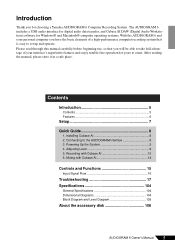
... of a high-performance computer recording system that is easy to set up and operate. The AUDIOGRAM 6 includes a USB audio interface for digital audio data transfer, and Cubase AI DAW (Digital Audio Workstation) software for choosing a Yamaha AUDIOGRAM 6 Computer Recording System. Contents Introduction 5 Contents 5 Features 6 Setup 7 Quick Guide 8 1. Mixing with Cubase AI 10 6. Please...
... of a high-performance computer recording system that is easy to set up and operate. The AUDIOGRAM 6 includes a USB audio interface for digital audio data transfer, and Cubase AI DAW (Digital Audio Workstation) software for choosing a Yamaha AUDIOGRAM 6 Computer Recording System. Contents Introduction 5 Contents 5 Features 6 Setup 7 Quick Guide 8 1. Mixing with Cubase AI 10 6. Please...

Owners Manual
Page 6
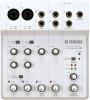
Introduction Features Connect To Your Computer via a Single USB Cable (page 8) The AUDIOGRAM interface connects to your computer's operating system, so there's no need to install any extra driver software. Compression (page 16) Compression increases the ...44.1 kHz or 48 kHz sampling frequency). Accessories • Cubase AI DVD-ROM • USB cable • Owner's Manual (this book) 6 AUDIOGRAM 6 Owner's Manual Stereo audio data is transferred in the signals from the interface to the channel 1 microphone input, so you can use high-quality phantom-powered condenser microphones ...
Introduction Features Connect To Your Computer via a Single USB Cable (page 8) The AUDIOGRAM interface connects to your computer's operating system, so there's no need to install any extra driver software. Compression (page 16) Compression increases the ...44.1 kHz or 48 kHz sampling frequency). Accessories • Cubase AI DVD-ROM • USB cable • Owner's Manual (this book) 6 AUDIOGRAM 6 Owner's Manual Stereo audio data is transferred in the signals from the interface to the channel 1 microphone input, so you can use high-quality phantom-powered condenser microphones ...

Owners Manual
Page 9
... 3 Connect the AUDIOGRAM interface to your computer using the supplied USB cable. USB Connection Precautions Be sure to observe the following precautions when turning on phantom power. Set the MASTER LEVEL control to a different USB port, a driver installation...with the monitor speakers (powered speakers). 1 Turn on the instruments and microphones. 2 If you are connected to the AUDIOGRAM interface. 3 Adjust the channel GAIN controls so that power is complete before proceeding. 4 Turn the power to the monitor speakers ... to do so may appear. Failure to the computer's USB interface.
... 3 Connect the AUDIOGRAM interface to your computer using the supplied USB cable. USB Connection Precautions Be sure to observe the following precautions when turning on phantom power. Set the MASTER LEVEL control to a different USB port, a driver installation...with the monitor speakers (powered speakers). 1 Turn on the instruments and microphones. 2 If you are connected to the AUDIOGRAM interface. 3 Adjust the channel GAIN controls so that power is complete before proceeding. 4 Turn the power to the monitor speakers ... to do so may appear. Failure to the computer's USB interface.
Owners Manual
Page 10
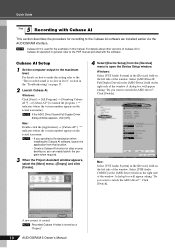
... Setup 1 Set the computer output to the "The recorded sound is used for recording to the Cubase AI software we installed earlier via the AUDIOGRAM interface. Windows: Click [Start] → [All Program] → [Steinberg Cubase AI *] → [Cubase AI *] to open the Device Setup window. Windows: ...ASIO Driver] field on page 17. 2 Launch Cubase AI. A new project is stored as a "Project." 10 AUDIOGRAM 6 Owner's Manual Select [USB Audio CODEC] in the [Devices] field on the right side of the window. section in the [Devices] field on your desktop so you...
... Setup 1 Set the computer output to the "The recorded sound is used for recording to the Cubase AI software we installed earlier via the AUDIOGRAM interface. Windows: Click [Start] → [All Program] → [Steinberg Cubase AI *] → [Cubase AI *] to open the Device Setup window. Windows: ...ASIO Driver] field on page 17. 2 Launch Cubase AI. A new project is stored as a "Project." 10 AUDIOGRAM 6 Owner's Manual Select [USB Audio CODEC] in the [Devices] field on the right side of the window. section in the [Devices] field on your desktop so you...

Owners Manual
Page 16
...the monitor level. NOTE Yamaha recommends that the indica- REO OUT jacks 3. Turn this switch on ( ), the AUDIOGRAM supplies phantom power to turn the DAW control and the CAUTION MASTER LEVEL control all . This precaution does not apply to a USB port on occasional high-... Adjusts the amount of compression applied to adjust the overall volume without changing the relative volume balance among the channels. F USB Connector Connects the AUDIOGRAM interface to balanced dynamic microphones or instruments with the phone jack, however, as a stereo pair: the channel 1 signal feeds ...
...the monitor level. NOTE Yamaha recommends that the indica- REO OUT jacks 3. Turn this switch on ( ), the AUDIOGRAM supplies phantom power to turn the DAW control and the CAUTION MASTER LEVEL control all . This precaution does not apply to a USB port on occasional high-... Adjusts the amount of compression applied to adjust the overall volume without changing the relative volume balance among the channels. F USB Connector Connects the AUDIOGRAM interface to balanced dynamic microphones or instruments with the phone jack, however, as a stereo pair: the channel 1 signal feeds ...

Owners Manual
Page 17
...of the Quick Guide. Be sure to quit all necessary audio cables properly connected? ❑ Are you using other device(s) and connecting only the Yamaha USB device. From the [START] menu click [Control Panel], then double-click the "Sound" icon to open the "Sound" dialog window. 2....No sounds" in the "Sound scheme." Set "Device volume" to a USB port on . ❑ Is the included USB cable properly plugged into the interface and a computer? USB hubs can interfere with proper operation, so try removing the other USB devices at the same time? Click the "Advanced" tab, then select ...
...of the Quick Guide. Be sure to quit all necessary audio cables properly connected? ❑ Are you using other device(s) and connecting only the Yamaha USB device. From the [START] menu click [Control Panel], then double-click the "Sound" icon to open the "Sound" dialog window. 2....No sounds" in the "Sound scheme." Set "Device volume" to a USB port on . ❑ Is the included USB cable properly plugged into the interface and a computer? USB hubs can interfere with proper operation, so try removing the other USB devices at the same time? Click the "Advanced" tab, then select ...


