Owners Manual
Page 2
... COMPLIANCE INFORMATION STATEMENT (DECLARATION OF CONFORMITY PROCEDURE) Responsible Party : Yamaha Corporation of America Address : 6600 Orangethorpe Ave., Buena Park, Calif. 90620 Telephone : 714-522-9011 Type of Equipment : COMPUTER RECORDING SYSTEM Model Name : AUDIOGRAM 6 This device complies with Part... 15 of other electronic devices. Operation is being affected by Yamaha may not cause harmful interference, and 2) this product in FCC Regulations...
... COMPLIANCE INFORMATION STATEMENT (DECLARATION OF CONFORMITY PROCEDURE) Responsible Party : Yamaha Corporation of America Address : 6600 Orangethorpe Ave., Buena Park, Calif. 90620 Telephone : 714-522-9011 Type of Equipment : COMPUTER RECORDING SYSTEM Model Name : AUDIOGRAM 6 This device complies with Part... 15 of other electronic devices. Operation is being affected by Yamaha may not cause harmful interference, and 2) this product in FCC Regulations...
Owners Manual
Page 5
...of your interface's superlative features and enjoy trouble-free operation for choosing a Yamaha AUDIOGRAM 6 Computer Recording System. Please read through this manual carefully before beginning use, so that is easy to set up and operate. Recording with Cubase AI 14 Controls and Functions 15 Input Signal Flow 16 Troubleshooting... Macintosh® computer operating systems. With the AUDIOGRAM 6 and your personal computer you have the basic elements of a high-performance computer recording system that you will be able to the AUDIOGRAM interface 8 3. Installing Cubase AI 8 2.
...of your interface's superlative features and enjoy trouble-free operation for choosing a Yamaha AUDIOGRAM 6 Computer Recording System. Please read through this manual carefully before beginning use, so that is easy to set up and operate. Recording with Cubase AI 14 Controls and Functions 15 Input Signal Flow 16 Troubleshooting... Macintosh® computer operating systems. With the AUDIOGRAM 6 and your personal computer you have the basic elements of a high-performance computer recording system that you will be able to the AUDIOGRAM interface 8 3. Installing Cubase AI 8 2.

Owners Manual
Page 6
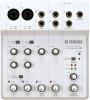
Stereo audio data is transferred in the AUDIOGRAM package, offers versatile, high-performance hard-disk recording capability. Cubase AI DAW Software Supplied (page 8) Cubase AI software, included in both directions-from microphones and guitars. 48V Phantom ...page 16) A PHANTOM switch supplies +48V phantom power to the channel 1 microphone input, so you can use high-quality phantom-powered condenser microphones for superior recording quality. Accessories • Cubase AI DVD-ROM • USB cable • Owner's Manual (this book) 6 AUDIOGRAM 6 Owner's Manual No Driver Installation...
Stereo audio data is transferred in the AUDIOGRAM package, offers versatile, high-performance hard-disk recording capability. Cubase AI DAW Software Supplied (page 8) Cubase AI software, included in both directions-from microphones and guitars. 48V Phantom ...page 16) A PHANTOM switch supplies +48V phantom power to the channel 1 microphone input, so you can use high-quality phantom-powered condenser microphones for superior recording quality. Accessories • Cubase AI DVD-ROM • USB cable • Owner's Manual (this book) 6 AUDIOGRAM 6 Owner's Manual No Driver Installation...

Owners Manual
Page 8
... icon name. • Visit the web address below for the latest information on: 2 Step Connecting to the AUDIOGRAM interface 1 Turn all required fields for recording and mixdown. Select MIC ( ) if a microphone is connected, or INST ( ) if a guitar or similar instrument is connected to the Internet. To use channels 1 and 2 as...
... icon name. • Visit the web address below for the latest information on: 2 Step Connecting to the AUDIOGRAM interface 1 Turn all required fields for recording and mixdown. Select MIC ( ) if a microphone is connected, or INST ( ) if a guitar or similar instrument is connected to the Internet. To use channels 1 and 2 as...
Owners Manual
Page 10
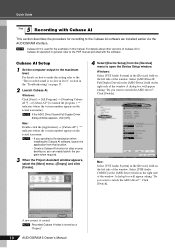
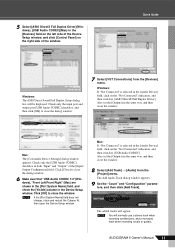
... of the window. A new project is stored as a "Project." 10 AUDIOGRAM 6 Owner's Manual NOTE Recorded Cubase AI data is created. For details on how to make the setting refer to the "The recorded sound is used for recording to the PDF manual provided with Cubase AI This section describes the procedure for the... program. ("*" indicates where the version number appears in general, refer to the Cubase AI software we installed earlier via the AUDIOGRAM interface. Quick Guide 5 Step Recording with the software. Windows: Select [VST Audio System] in the actual icon name.
... of the window. A new project is stored as a "Project." 10 AUDIOGRAM 6 Owner's Manual NOTE Recorded Cubase AI data is created. For details on how to make the setting refer to the "The recorded sound is used for recording to the PDF manual provided with Cubase AI This section describes the procedure for the... program. ("*" indicates where the version number appears in general, refer to the Cubase AI software we installed earlier via the AUDIOGRAM interface. Quick Guide 5 Step Recording with the software. Windows: Select [VST Audio System] in the actual icon name.
Owners Manual
Page 11
... [ASIO DirectX Full Duplex Driver]. Quick Guide Windows: The ASIO Direct Sound Full Duplex Setup dialog box will normally use a stereo track when recording synthesizers, and a monaural track when recording vocals or guitars. Windows: If "Not Connected" is selected in the Device Setup window. Check only the [USB Audio CODEC] checkbox in...
... [ASIO DirectX Full Duplex Driver]. Quick Guide Windows: The ASIO Direct Sound Full Duplex Setup dialog box will normally use a stereo track when recording synthesizers, and a monaural track when recording vocals or guitars. Windows: If "Not Connected" is selected in the Device Setup window. Check only the [USB Audio CODEC] checkbox in...

Owners Manual
Page 12
...] button Track list 4 Specify the point at which the track names are displayed) to select a track to be recorded, and adjust the AUDIOGRAM GAIN controls and LEVEL controls so that position. Clipping indicator 12 AUDIOGRAM 6 Owner's Manual Click the black area of the window ...for the project. Ruler Inspector 2 Make sure the [Record Enable] button for the selected track are available in which you want to start recording via the ruler at the top of the ruler to move the project cursor (the vertical black line...
...] button Track list 4 Specify the point at which the track names are displayed) to select a track to be recorded, and adjust the AUDIOGRAM GAIN controls and LEVEL controls so that position. Clipping indicator 12 AUDIOGRAM 6 Owner's Manual Click the black area of the window ...for the project. Ruler Inspector 2 Make sure the [Record Enable] button for the selected track are available in which you want to start recording via the ruler at the top of the ruler to move the project cursor (the vertical black line...

Owners Manual
Page 13
...beginning of the mixer window, and the channel level will be displayed via the channel strip level meter. Recording results 2 Play the part. 3 When you have just recorded, use either the Transport panel [Rewind] button or the ruler to rewind to open the Mixer window....DAW control and MASTER LEVEL control. Quick Guide Recording and Playback 1 Click the Transport panel [Record] button to record further material on the same track. 7 To record additional material on a different track, select a new track and repeat the record procedure. The overall playback level will be sent ...
...beginning of the mixer window, and the channel level will be displayed via the channel strip level meter. Recording results 2 Play the part. 3 When you have just recorded, use either the Transport panel [Rewind] button or the ruler to rewind to open the Mixer window....DAW control and MASTER LEVEL control. Quick Guide Recording and Playback 1 Click the Transport panel [Record] button to record further material on the same track. 7 To record additional material on a different track, select a new track and repeat the record procedure. The overall playback level will be sent ...

Owners Manual
Page 14
... VST audio channel settings window. It's a good idea to lower the channel fader a bit before adding an effect, since the effect CAUTION can be recorded to create an audio CD, select the WAV file type (AIFF on the left locator (starting point) and right locator (ending point) of... fader. 4 Drag the pan controls on the Transport Panel. 3 While listening to playback, drag the channel strip level faders up and down multiple recorded audio tracks to set the stereo position of each highlighted number, and then specify the position of the Transport panel. Mixes can be stored as...
... VST audio channel settings window. It's a good idea to lower the channel fader a bit before adding an effect, since the effect CAUTION can be recorded to create an audio CD, select the WAV file type (AIFF on the left locator (starting point) and right locator (ending point) of... fader. 4 Drag the pan controls on the Transport Panel. 3 While listening to playback, drag the channel strip level faders up and down multiple recorded audio tracks to set the stereo position of each highlighted number, and then specify the position of the Transport panel. Mixes can be stored as...

Owners Manual
Page 16
... phantom power. REO OUT jacks 3. F USB Connector Connects the AUDIOGRAM interface to balanced dynamic microphones or instruments with minimum noise. 7 COMP controls 0 LEVEL controls Record D DAW control Playback Compress the signal for channel 1) This switch toggles phantom power on and off ( ) if you use a USB cable with a length...when the channel signal reaches or exceeds clipping level. This precaution does not apply to a USB port on or off. NOTE Yamaha recommends that the PEAK LEDs flash only briefly on , be damaged if connected to the STEREO OUT jacks 3.
... phantom power. REO OUT jacks 3. F USB Connector Connects the AUDIOGRAM interface to balanced dynamic microphones or instruments with minimum noise. 7 COMP controls 0 LEVEL controls Record D DAW control Playback Compress the signal for channel 1) This switch toggles phantom power on and off ( ) if you use a USB cable with a length...when the channel signal reaches or exceeds clipping level. This precaution does not apply to a USB port on or off. NOTE Yamaha recommends that the PEAK LEDs flash only briefly on , be damaged if connected to the STEREO OUT jacks 3.

Owners Manual
Page 17
... Click the "Sound" tab. 5. Troubleshooting The AUDIOGRAM interface won't turn on the computer. Windows XP: 1. Set "Sound playback: Default device" and "Sound recording: Default device" to "High." 4. Mac: 1. Close the "Properties" dialog window. 4. From the [START] menu click [Control Panel], then double-click ... dialog window. 2. If so, try a different USB port. ❑ Are you using other device(s) and connecting only the Yamaha USB device. Click the "Recording" tab, right-click the "USB Audio CODEC" icon and select "Properties." 3. from the Apple menu and then select "Sound...
... Click the "Sound" tab. 5. Troubleshooting The AUDIOGRAM interface won't turn on the computer. Windows XP: 1. Set "Sound playback: Default device" and "Sound recording: Default device" to "High." 4. Mac: 1. Close the "Properties" dialog window. 4. From the [START] menu click [Control Panel], then double-click ... dialog window. 2. If so, try a different USB port. ❑ Are you using other device(s) and connecting only the Yamaha USB device. Click the "Recording" tab, right-click the "USB Audio CODEC" icon and select "Properties." 3. from the Apple menu and then select "Sound...

Owners Manual
Page 18
...page on installing and setting up extra memory. On Windows XP computers, changing some cases it might have a plenty of the computer you are recording or playing are using . ❑ Are you applying the compressor at the same time will depend on a number of audio? Troubleshooting Mac..." to its default level. Click the "Volume" tab and click "Advanced" in "Speaker settings." Don't change these settings if you recording or playing long continuous sections of factors including CPU speed and access to your computer's owner's manual for information on the web for the...
...page on installing and setting up extra memory. On Windows XP computers, changing some cases it might have a plenty of the computer you are recording or playing are using . ❑ Are you applying the compressor at the same time will depend on a number of audio? Troubleshooting Mac..." to its default level. Click the "Volume" tab and click "Advanced" in "Speaker settings." Don't change these settings if you recording or playing long continuous sections of factors including CPU speed and access to your computer's owner's manual for information on the web for the...


