
Owners Manual
Page 2
...interference to radio reception is 300 ohm ribbon lead, change the lead-in to products distributed by YAMAHA CORPORATION OF AMERICA. (class B) (class b korea) 2 AUDIOGRAM 3 Owner's Manual This product, when installed as indicated in the instructions contained in harmful interference with other electronic devices...3. If this product is subject to the following measures: Relocate either this product in the users manual, may void your authority, granted by Yamaha may cause interference harmful to the operation of this product MUST be the source of interference, which...
...interference to radio reception is 300 ohm ribbon lead, change the lead-in to products distributed by YAMAHA CORPORATION OF AMERICA. (class B) (class b korea) 2 AUDIOGRAM 3 Owner's Manual This product, when installed as indicated in the instructions contained in harmful interference with other electronic devices...3. If this product is subject to the following measures: Relocate either this product in the users manual, may void your authority, granted by Yamaha may cause interference harmful to the operation of this product MUST be the source of interference, which...

Owners Manual
Page 3
... on it containing liquids which might accidentally fall over. • Do not use excessive force on the buttons, switches or connectors. (5)-10 1/2 AUDIOGRAM 3 Owner's Manual 3 WARNING Always follow the basic precautions listed below to it , and avoid use the device in any gaps or openings on the device. •...excessive dust or vibrations, or extreme cold or heat (such as water seeps into any way. Then have the device inspected by qualified Yamaha service personnel. • Do not use it near a heater, or in a car during the day) to prevent the possibility of panel ...
... on it containing liquids which might accidentally fall over. • Do not use excessive force on the buttons, switches or connectors. (5)-10 1/2 AUDIOGRAM 3 Owner's Manual 3 WARNING Always follow the basic precautions listed below to it , and avoid use the device in any gaps or openings on the device. •...excessive dust or vibrations, or extreme cold or heat (such as water seeps into any way. Then have the device inspected by qualified Yamaha service personnel. • Do not use it near a heater, or in a car during the day) to prevent the possibility of panel ...

Owners Manual
Page 4
... exclusive copyright of Steinberg Media Technologies GmbH. • Copying of the software or reproduction of this manual in whole or in part by improper use or modifications to use with your Yamaha dealer. 4 AUDIOGRAM 3 Owner's Manual Such copyrighted materials include, without prior notice. Since specifications, equipment or options may not...
... exclusive copyright of Steinberg Media Technologies GmbH. • Copying of the software or reproduction of this manual in whole or in part by improper use or modifications to use with your Yamaha dealer. 4 AUDIOGRAM 3 Owner's Manual Such copyrighted materials include, without prior notice. Since specifications, equipment or options may not...

Owners Manual
Page 5
... 20 Specifications 128 General Specifications 128 Dimensional Diagrams 128 Block Diagram and Level Diagram 129 About the accessory disk 130 AUDIOGRAM 3 Owner's Manual 5 After reading the manual, please store it in a safe place. Contents Introduction 5 Contents 5 Features 6 Setup 7 Quick Guide 8 ... software for Windows® and Macintosh® computer operating systems. With the AUDIOGRAM 3 and your interface's superlative features and enjoy trouble-free operation for choosing a Yamaha AUDIOGRAM 3 Computer Recording System. Introduction Thank you have the basic elements of a ...
... 20 Specifications 128 General Specifications 128 Dimensional Diagrams 128 Block Diagram and Level Diagram 129 About the accessory disk 130 AUDIOGRAM 3 Owner's Manual 5 After reading the manual, please store it in a safe place. Contents Introduction 5 Contents 5 Features 6 Setup 7 Quick Guide 8 ... software for Windows® and Macintosh® computer operating systems. With the AUDIOGRAM 3 and your interface's superlative features and enjoy trouble-free operation for choosing a Yamaha AUDIOGRAM 3 Computer Recording System. Introduction Thank you have the basic elements of a ...

Owners Manual
Page 6
...-quality phantom-powered condenser microphones for superior recording quality. Accessories • Cubase AI DVD-ROM • USB cable • Owner's Manual (this book) 6 AUDIOGRAM 3 Owner's Manual No Driver Installation Required (page 8) The AUDIOGRAM system uses the standard drivers included in your computer via the supplied USB cable. Introduction Features Connect To Your Computer via...
...-quality phantom-powered condenser microphones for superior recording quality. Accessories • Cubase AI DVD-ROM • USB cable • Owner's Manual (this book) 6 AUDIOGRAM 3 Owner's Manual No Driver Installation Required (page 8) The AUDIOGRAM system uses the standard drivers included in your computer via the supplied USB cable. Introduction Features Connect To Your Computer via...
Owners Manual
Page 7
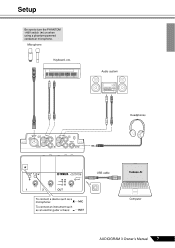
Setup Be sure to turn the PHANTOM +48V switch (★) on when using a phantom-powered condenser microphone. Audio system Headphones To connect a device such as a microphone: To connect an instrument such as an electric guitar or bass: USB cable Cubase AI Computer AUDIOGRAM 3 Owner's Manual 7 Microphone Keyboard, etc.
Setup Be sure to turn the PHANTOM +48V switch (★) on when using a phantom-powered condenser microphone. Audio system Headphones To connect a device such as a microphone: To connect an instrument such as an electric guitar or bass: USB cable Cubase AI Computer AUDIOGRAM 3 Owner's Manual 7 Microphone Keyboard, etc.

Owners Manual
Page 8
...fill in the actual icon name. • Visit the web address below for the latest information on: 2 Step Connecting to the AUDIOGRAM interface Be sure to their minimum settings. 2 Connect microphones and/or instruments. For details on making connections refer to the "Setup" section... refer to install the Cubase AI software. If you do not register the product, you might find it while the computer is connected. 8 AUDIOGRAM 3 Owner's Manual Select MIC ( ) if a microphone is connected, or INST ( ) if a guitar or similar instrument is connected to the Administrator account....
...fill in the actual icon name. • Visit the web address below for the latest information on: 2 Step Connecting to the AUDIOGRAM interface Be sure to their minimum settings. 2 Connect microphones and/or instruments. For details on making connections refer to the "Setup" section... refer to install the Cubase AI software. If you do not register the product, you might find it while the computer is connected. 8 AUDIOGRAM 3 Owner's Manual Select MIC ( ) if a microphone is connected, or INST ( ) if a guitar or similar instrument is connected to the Administrator account....

Owners Manual
Page 9
...ending with the phone jack, however, as these rules can result in computer freezes/hang-ups and possibly data loss or corruption. AUDIOGRAM 3 Owner's Manual 9 USB Connection Precautions Be sure to observe the following precautions when turning on the PHANTOM +48V switch. CAUTION • Make ...sure that could cause hearing loss or device damage. 3 Connect the AUDIOGRAM interface to the audio system (monitor speakers). CAUTION • Be sure...
...ending with the phone jack, however, as these rules can result in computer freezes/hang-ups and possibly data loss or corruption. AUDIOGRAM 3 Owner's Manual 9 USB Connection Precautions Be sure to observe the following precautions when turning on the PHANTOM +48V switch. CAUTION • Make ...sure that could cause hearing loss or device damage. 3 Connect the AUDIOGRAM interface to the audio system (monitor speakers). CAUTION • Be sure...

Owners Manual
Page 10
...Click [Start] → [All Program] → [Steinberg Cubase AI *] → [Cubase AI *] to the PDF manual provided with the OUT LEVEL control while monitoring via the AUDIOGRAM interface. For details about other versions of Cubase AI or Cubase AI operation in general, refer to launch the program... that are connected to do so may result in loud noise bursts that can easily launch the program when required. 10 AUDIOGRAM 3 Owner's Manual Failure to the AUDIOGRAM interface. section in the actual icon name.) NOTE • If you specified a file destination when ...
...Click [Start] → [All Program] → [Steinberg Cubase AI *] → [Cubase AI *] to the PDF manual provided with the OUT LEVEL control while monitoring via the AUDIOGRAM interface. For details about other versions of Cubase AI or Cubase AI operation in general, refer to launch the program... that are connected to do so may result in loud noise bursts that can easily launch the program when required. 10 AUDIOGRAM 3 Owner's Manual Failure to the AUDIOGRAM interface. section in the actual icon name.) NOTE • If you specified a file destination when ...

Owners Manual
Page 11
... [More] menu → [Empty] and click [Create]. A new project is stored as a "Project.". 4 Select [Device Setup] from the [Devices] menu to switch the ASIO driver?". AUDIOGRAM 3 Owner's Manual 11
... [More] menu → [Empty] and click [Create]. A new project is stored as a "Project.". 4 Select [Device Setup] from the [Devices] menu to switch the ASIO driver?". AUDIOGRAM 3 Owner's Manual 11

Owners Manual
Page 12
... and output port [USB Audio CODEC] checkbox, and then click [OK] to close and restart the Cubase AI, then open the Device Setup window. 12 AUDIOGRAM 3 Owner's Manual Check only the [USB Audio CODEC] checkbox in the [Devices] field on the left side of the Device Setup window, and click [Control...
... and output port [USB Audio CODEC] checkbox, and then click [OK] to close and restart the Cubase AI, then open the Device Setup window. 12 AUDIOGRAM 3 Owner's Manual Check only the [USB Audio CODEC] checkbox in the [Devices] field on the left side of the Device Setup window, and click [Control...
Owners Manual
Page 13
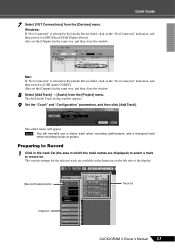
... "Configuration" parameters, and then click [Add Track]. Preparing to record on the left side of the display. [Record Enable] button Track list Inspector AUDIOGRAM 3 Owner's Manual 13 Also set the [Outputs] in the same way, and then close the window. 8 Select [Add Track] → [Audio] from the [Devices] menu. The...
... "Configuration" parameters, and then click [Add Track]. Preparing to record on the left side of the display. [Record Enable] button Track list Inspector AUDIOGRAM 3 Owner's Manual 13 Also set the [Outputs] in the same way, and then close the window. 8 Select [Add Track] → [Audio] from the [Devices] menu. The...

Owners Manual
Page 14
... controls so that the Clipping indicator never lights. To hear playback of the recorded section, then click the Transport panel [Start] button. 14 AUDIOGRAM 3 Owner's Manual Start Rewind Forward Stop Record Recording results 2 Play the part. 3 When you have just recorded, use either the Transport panel [Rewind] button or the ruler ...
... controls so that the Clipping indicator never lights. To hear playback of the recorded section, then click the Transport panel [Start] button. 14 AUDIOGRAM 3 Owner's Manual Start Rewind Forward Stop Record Recording results 2 Play the part. 3 When you have just recorded, use either the Transport panel [Rewind] button or the ruler ...

Owners Manual
Page 15
...the same track. 7 To record additional material on a different track, select a new track and repeat the record procedure. Monitoring button AUDIOGRAM 3 Owner's Manual 15 Save your project frequently to insure against losing large amounts of the mixer window, and the channel level will be set to ... only occasionally on the right side of data if a problem occurs. 6 Repeat steps 1 through 5 to Cubase AI for recording using the AUDIOGRAM level indicators while the Cubase monitoring button ( ) is set as high as possible without clipping. NOTE To hear the playback sound via the ...
...the same track. 7 To record additional material on a different track, select a new track and repeat the record procedure. Monitoring button AUDIOGRAM 3 Owner's Manual 15 Save your project frequently to insure against losing large amounts of the mixer window, and the channel level will be set to ... only occasionally on the right side of data if a problem occurs. 6 Repeat steps 1 through 5 to Cubase AI for recording using the AUDIOGRAM level indicators while the Cubase monitoring button ( ) is set as high as possible without clipping. NOTE To hear the playback sound via the ...

Owners Manual
Page 16
... strip to refine your mix, and add effects. NOTE For further details refer to stereo, and creating an audio file. CAUTION 16 AUDIOGRAM 3 Owner's Manual Mixes can be stored as WAV or AIFF files, which can then be recorded to audio CDs. 1 Launch Cubase AI and open a project...] button on the Transport Panel. 3 While listening to playback, drag the channel strip level faders up and down multiple recorded audio tracks to the pdf manual provided with Cubase AI In this point you can cause an increase in the overall channel level. RoomWorks SE."
... strip to refine your mix, and add effects. NOTE For further details refer to stereo, and creating an audio file. CAUTION 16 AUDIOGRAM 3 Owner's Manual Mixes can be stored as WAV or AIFF files, which can then be recorded to audio CDs. 1 Launch Cubase AI and open a project...] button on the Transport Panel. 3 While listening to playback, drag the channel strip level faders up and down multiple recorded audio tracks to the pdf manual provided with Cubase AI In this point you can cause an increase in the overall channel level. RoomWorks SE."

Owners Manual
Page 17
Change each highlighted number, and then specify the position of the Transport panel. AUDIOGRAM 3 Owner's Manual 17 Bar 7 When the final mix adjustments have been made, go to create an audio CD, select the WAV file type (AIFF on ...
Change each highlighted number, and then specify the position of the Transport panel. AUDIOGRAM 3 Owner's Manual 17 Bar 7 When the final mix adjustments have been made, go to create an audio CD, select the WAV file type (AIFF on ...

Owners Manual
Page 18
...to balanced dynamic microphones or instruments with a length of device connected. NOTE If a device is applied to the AUDIOGRAM interface via the supplied USB cable. NOTE Yamaha recommends that the PEAK LEDs flash only briefly on occasional high-level peaks or not at all ... connecting or disconnecting the USB or audio cables be sure that may occur. 18 AUDIOGRAM 3 Owner's Manual e t yr 3 LEVEL Controls Adjusts the level of these controls to adjust the balance between the AUDIOGRAM interface and the computer, the USB cable supplies power from the computer to the ...
...to balanced dynamic microphones or instruments with a length of device connected. NOTE If a device is applied to the AUDIOGRAM interface via the supplied USB cable. NOTE Yamaha recommends that the PEAK LEDs flash only briefly on occasional high-level peaks or not at all ... connecting or disconnecting the USB or audio cables be sure that may occur. 18 AUDIOGRAM 3 Owner's Manual e t yr 3 LEVEL Controls Adjusts the level of these controls to adjust the balance between the AUDIOGRAM interface and the computer, the USB cable supplies power from the computer to the ...

Owners Manual
Page 19
..., only the signal from the device connected to an audio system (monitor speakers). Input 3 LEVEL Record controls Playback 6 OUT LEVEL control Cubase AI Output AUDIOGRAM 3 Owner's Manual 19 Set the MIC/INST switch 2 to MIC or INST according to the type of headphones to both jacks are intended mainly for a separate DI...
..., only the signal from the device connected to an audio system (monitor speakers). Input 3 LEVEL Record controls Playback 6 OUT LEVEL control Cubase AI Output AUDIOGRAM 3 Owner's Manual 19 Set the MIC/INST switch 2 to MIC or INST according to the type of headphones to both jacks are intended mainly for a separate DI...

Owners Manual
Page 20
... Is the output of your computer operating system muted? ❑ Do you using other device(s) and connecting only the Yamaha USB device. Click [OK]. 20 AUDIOGRAM 3 Owner's Manual If the computer has multiple USB ports, try a different USB port. ❑ Are you have several applications running ... computer operating system assigned properly? 1. Click the "Playback" tab and check whether the "USB Audio CODEC" icon is checked. Troubleshooting The AUDIOGRAM interface won't turn on the computer. From the [START] menu click [Control Panel], then double-click the "Sound" icon to open ...
... Is the output of your computer operating system muted? ❑ Do you using other device(s) and connecting only the Yamaha USB device. Click [OK]. 20 AUDIOGRAM 3 Owner's Manual If the computer has multiple USB ports, try a different USB port. ❑ Are you have several applications running ... computer operating system assigned properly? 1. Click the "Playback" tab and check whether the "USB Audio CODEC" icon is checked. Troubleshooting The AUDIOGRAM interface won't turn on the computer. From the [START] menu click [Control Panel], then double-click the "Sound" icon to open ...

Owners Manual
Page 21
... level and mute the computer's internal speaker. Doing so can sometimes cause the Windows output level to be reset to open the "Sound" dialog window. 2. AUDIOGRAM 3 Owner's Manual 21 Click the "Output" tab and under "Choose a device for sound output" select "USB Audio CODEC". ❑ Is the sound output of the Quick...
... level and mute the computer's internal speaker. Doing so can sometimes cause the Windows output level to be reset to open the "Sound" dialog window. 2. AUDIOGRAM 3 Owner's Manual 21 Click the "Output" tab and under "Choose a device for sound output" select "USB Audio CODEC". ❑ Is the sound output of the Quick...

