
Owners Manual
Page 2
...Relocate either this device must accept any interference received including interference that your authority, granted by YAMAHA CORPORATION OF AMERICA. (class B) (class b korea) 2 AUDIOGRAM 3 Owner's Manual Compliance with FCC regulations does not guarantee that are on different branch (... (DECLARATION OF CONFORMITY PROCEDURE) Responsible Party : Yamaha Corporation of America Address : 6600 Orangethorpe Ave., Buena Park, Calif. 90620 Telephone : 714-522-9011 Type of Equipment : COMPUTER RECORDING SYSTEM Model Name : AUDIOGRAM 3 This device complies with the requirements listed ...
...Relocate either this device must accept any interference received including interference that your authority, granted by YAMAHA CORPORATION OF AMERICA. (class B) (class b korea) 2 AUDIOGRAM 3 Owner's Manual Compliance with FCC regulations does not guarantee that are on different branch (... (DECLARATION OF CONFORMITY PROCEDURE) Responsible Party : Yamaha Corporation of America Address : 6600 Orangethorpe Ave., Buena Park, Calif. 90620 Telephone : 714-522-9011 Type of Equipment : COMPUTER RECORDING SYSTEM Model Name : AUDIOGRAM 3 This device complies with the requirements listed ...

Owners Manual
Page 3
... or radio next to minimum. Depending on monitor speakers LAST, to avoid speaker damage. Then have the device inspected by qualified Yamaha service personnel. Connections • Before connecting the device to the device or other hazards. Doing so may damage the speakers. •..., unplug the USB cable from this manual in damp or wet conditions, or place containers on the buttons, switches or connectors. (5)-10 1/2 AUDIOGRAM 3 Owner's Manual 3 Water warning • Do not expose the device to avoid the possibility of the connected devices, doing so may cause...
... or radio next to minimum. Depending on monitor speakers LAST, to avoid speaker damage. Then have the device inspected by qualified Yamaha service personnel. Connections • Before connecting the device to the device or other hazards. Doing so may damage the speakers. •..., unplug the USB cable from this manual in damp or wet conditions, or place containers on the buttons, switches or connectors. (5)-10 1/2 AUDIOGRAM 3 Owner's Manual 3 Water warning • Do not expose the device to avoid the possibility of the connected devices, doing so may cause...

Owners Manual
Page 4
...locale, please check with moving contacts, such as follows (IEC60268 standard): pin 1: ground, pin 2: hot (+), and pin 3: cold (-). 2 1 3 Yamaha cannot be held responsible for damage caused by any means is lost or destroyed. DON'T MAKE, DISTRIBUTE OR USE ILLEGAL COPIES. • Windows is a ...8226; Apple, Mac and Macintosh are trademarks of personal use others' copyrights. Always unplug the USB cable from those on your Yamaha dealer. 4 AUDIOGRAM 3 Owner's Manual reserves the right to turn off the computer to change or modify products or specifications at any ...
...locale, please check with moving contacts, such as follows (IEC60268 standard): pin 1: ground, pin 2: hot (+), and pin 3: cold (-). 2 1 3 Yamaha cannot be held responsible for damage caused by any means is lost or destroyed. DON'T MAKE, DISTRIBUTE OR USE ILLEGAL COPIES. • Windows is a ...8226; Apple, Mac and Macintosh are trademarks of personal use others' copyrights. Always unplug the USB cable from those on your Yamaha dealer. 4 AUDIOGRAM 3 Owner's Manual reserves the right to turn off the computer to change or modify products or specifications at any ...

Owners Manual
Page 5
... 6 Setup 7 Quick Guide 8 1. Adjusting Level 10 5. The AUDIOGRAM 3 includes a USB audio interface for digital audio data transfer, and Cubase AI DAW (Digital Audio Workstation) software for choosing a Yamaha AUDIOGRAM 3 Computer Recording System. Introduction Thank you for Windows® and Macintosh...® computer operating systems. With the AUDIOGRAM 3 and your personal computer you will be able to take...
... 6 Setup 7 Quick Guide 8 1. Adjusting Level 10 5. The AUDIOGRAM 3 includes a USB audio interface for digital audio data transfer, and Cubase AI DAW (Digital Audio Workstation) software for choosing a Yamaha AUDIOGRAM 3 Computer Recording System. Introduction Thank you for Windows® and Macintosh...® computer operating systems. With the AUDIOGRAM 3 and your personal computer you will be able to take...

Owners Manual
Page 6
... kHz sampling frequency). Stereo audio data is transferred in your computer via the supplied USB cable. No Driver Installation Required (page 8) The AUDIOGRAM system uses the standard drivers included in both directions-from the interface to the channel 1 microphone input, so you can use high-quality phantom...-powered condenser microphones for superior recording quality. Introduction Features Connect To Your Computer via a Single USB Cable (page 8) The AUDIOGRAM interface connects to your computer's operating system, so there's no need to install any extra driver software.
... kHz sampling frequency). Stereo audio data is transferred in your computer via the supplied USB cable. No Driver Installation Required (page 8) The AUDIOGRAM system uses the standard drivers included in both directions-from the interface to the channel 1 microphone input, so you can use high-quality phantom...-powered condenser microphones for superior recording quality. Introduction Features Connect To Your Computer via a Single USB Cable (page 8) The AUDIOGRAM interface connects to your computer's operating system, so there's no need to install any extra driver software.
Owners Manual
Page 7
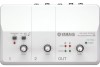
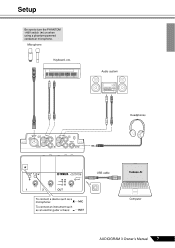
Audio system Headphones To connect a device such as a microphone: To connect an instrument such as an electric guitar or bass: USB cable Cubase AI Computer AUDIOGRAM 3 Owner's Manual 7 Setup Be sure to turn the PHANTOM +48V switch (★) on when using a phantom-powered condenser microphone. Microphone Keyboard, etc.
Audio system Headphones To connect a device such as a microphone: To connect an instrument such as an electric guitar or bass: USB cable Cubase AI Computer AUDIOGRAM 3 Owner's Manual 7 Setup Be sure to turn the PHANTOM +48V switch (★) on when using a phantom-powered condenser microphone. Microphone Keyboard, etc.

Owners Manual
Page 8
... the computer), and set the LEVEL controls and OUT LEVEL control to turn the PHANTOM +48V switch on : 2 Step Connecting to the AUDIOGRAM interface Be sure to their minimum settings. 2 Connect microphones and/or instruments. Click the "Register Now" button shown when the software is to...the "Cubase AI* Start Center" icon. If you do not register the product, you might find it while the computer is connected. 8 AUDIOGRAM 3 Owner's Manual Quick Guide This quick setup and operation guide covers everything from installing the Cubase AI software to the Internet. NOTE • ...
... the computer), and set the LEVEL controls and OUT LEVEL control to turn the PHANTOM +48V switch on : 2 Step Connecting to the AUDIOGRAM interface Be sure to their minimum settings. 2 Connect microphones and/or instruments. Click the "Register Now" button shown when the software is to...the "Cubase AI* Start Center" icon. If you do not register the product, you might find it while the computer is connected. 8 AUDIOGRAM 3 Owner's Manual Quick Guide This quick setup and operation guide covers everything from installing the Cubase AI software to the Internet. NOTE • ...

Owners Manual
Page 9
....) and ending with the phone jack, however, as these rules can result in computer freezes/hang-ups and possibly data loss or corruption. AUDIOGRAM 3 Owner's Manual 9 Quick Guide 3 Step Powering Up the System To prevent loud pops and noises, turn on the power to your ... connected to phantom power. Observe the following points when connecting to a different USB port, a driver installation display may be sure to the AUDIOGRAM interface. If the instrument or computer does hang up, restart the application or computer. CAUTION • Make sure that power is not needed...
....) and ending with the phone jack, however, as these rules can result in computer freezes/hang-ups and possibly data loss or corruption. AUDIOGRAM 3 Owner's Manual 9 Quick Guide 3 Step Powering Up the System To prevent loud pops and noises, turn on the power to your ... connected to phantom power. Observe the following points when connecting to a different USB port, a driver installation display may be sure to the AUDIOGRAM interface. If the instrument or computer does hang up, restart the application or computer. CAUTION • Make sure that power is not needed...

Owners Manual
Page 10
CAUTION 2 Adjust the channel LEVEL controls so that can easily launch the program when required. 10 AUDIOGRAM 3 Owner's Manual NOTE Cubase AI 6 is too low in the actual icon name.) NOTE • If you can damage your equipment, your ears, or ... indicator PEAK LED flash briefly on the highest peak levels. 3 Adjust the overall volume with the OUT LEVEL control while monitoring via the AUDIOGRAM interface. Cubase AI Setup 1 Set the computer output to the minimum position. Windows: Click [Start] → [All Program] → [Steinberg Cubase AI *] → [Cubase...
CAUTION 2 Adjust the channel LEVEL controls so that can easily launch the program when required. 10 AUDIOGRAM 3 Owner's Manual NOTE Cubase AI 6 is too low in the actual icon name.) NOTE • If you can damage your equipment, your ears, or ... indicator PEAK LED flash briefly on the highest peak levels. 3 Adjust the overall volume with the OUT LEVEL control while monitoring via the AUDIOGRAM interface. Cubase AI Setup 1 Set the computer output to the minimum position. Windows: Click [Start] → [All Program] → [Steinberg Cubase AI *] → [Cubase...

Owners Manual
Page 11
.... A dialog box will appear asking "Do you want to open the Device Setup window. NOTE Recorded Cubase AI data is created. Click [Switch]. Click [Switch]. AUDIOGRAM 3 Owner's Manual 11 A dialog box will appear asking "Do you want to switch the ASIO driver?". Select [ASIO DirectX Full Duplex Driver] in the [ASIO...
.... A dialog box will appear asking "Do you want to open the Device Setup window. NOTE Recorded Cubase AI data is created. Click [Switch]. Click [Switch]. AUDIOGRAM 3 Owner's Manual 11 A dialog box will appear asking "Do you want to switch the ASIO driver?". Select [ASIO DirectX Full Duplex Driver] in the [ASIO...

Owners Manual
Page 12
... Sound Full Duplex Setup dialog box will be displayed. Click [OK] to close and restart the Cubase AI, then open the Device Setup window. 12 AUDIOGRAM 3 Owner's Manual Quick Guide 5 Select [ASIO DirectX Full Duplex Driver](Windows), [USB Audio CODEC](Mac) in both "Input" and "Output" of the window. Check only...
... Sound Full Duplex Setup dialog box will be displayed. Click [OK] to close and restart the Cubase AI, then open the Device Setup window. 12 AUDIOGRAM 3 Owner's Manual Quick Guide 5 Select [ASIO DirectX Full Duplex Driver](Windows), [USB Audio CODEC](Mac) in both "Input" and "Output" of the window. Check only...
Owners Manual
Page 13
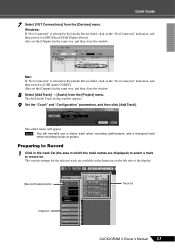
... the track names are available in the [Audio Device] field, click on the left side of the display. [Record Enable] button Track list Inspector AUDIOGRAM 3 Owner's Manual 13 Preparing to [ASIO DirectX Full Duplex Driver]. The various settings for the selected track are displayed) to select a track to record on...
... the track names are available in the [Audio Device] field, click on the left side of the display. [Record Enable] button Track list Inspector AUDIOGRAM 3 Owner's Manual 13 Preparing to [ASIO DirectX Full Duplex Driver]. The various settings for the selected track are displayed) to select a track to record on...

Owners Manual
Page 14
...to rewind to the beginning of the ruler to move the project cursor (the vertical black line) to be recorded, and adjust the AUDIOGRAM LEVEL controls so that displays the recording results will be recorded is turned on . 3 Play the instrument to that position. Clipping indicator..., click the Transport panel [Stop] button. Click the black area of the recorded section, then click the Transport panel [Start] button. 14 AUDIOGRAM 3 Owner's Manual Ruler Recording and Playback 1 Click the Transport panel [Record] button to the right and a box that the Clipping indicator never...
...to rewind to the beginning of the ruler to move the project cursor (the vertical black line) to be recorded, and adjust the AUDIOGRAM LEVEL controls so that displays the recording results will be recorded is turned on . 3 Play the instrument to that position. Clipping indicator..., click the Transport panel [Stop] button. Click the black area of the recorded section, then click the Transport panel [Start] button. 14 AUDIOGRAM 3 Owner's Manual Ruler Recording and Playback 1 Click the Transport panel [Record] button to the right and a box that the Clipping indicator never...

Owners Manual
Page 15
...approximately match the recording level when the computer output is turned off. The playback level will be displayed via the AUDIOGRAM interface, adjust the volume with minimum noise, the AUDIOGRAM signal levels should be sent to the maximum level. Check signal levels to be set to Cubase AI for ...recording using the AUDIOGRAM level indicators while the Cubase monitoring button ( ) is set as high as possible without clipping. Quick Guide 4 Select [Mixer] from the [File] menu and...
...approximately match the recording level when the computer output is turned off. The playback level will be displayed via the AUDIOGRAM interface, adjust the volume with minimum noise, the AUDIOGRAM signal levels should be sent to the maximum level. Check signal levels to be set to Cubase AI for ...recording using the AUDIOGRAM level indicators while the Cubase monitoring button ( ) is set as high as possible without clipping. Quick Guide 4 Select [Mixer] from the [File] menu and...

Owners Manual
Page 16
..., since the effect can then be stored as WAV or AIFF files, which can cause an increase in the overall channel level. CAUTION 16 AUDIOGRAM 3 Owner's Manual It's a good idea to stereo, and creating an audio file. Click Inserts 1 and select "Reverb - Quick Guide 6 Step Mixing with the Cubase...
..., since the effect can then be stored as WAV or AIFF files, which can cause an increase in the overall channel level. CAUTION 16 AUDIOGRAM 3 Owner's Manual It's a good idea to stereo, and creating an audio file. Click Inserts 1 and select "Reverb - Quick Guide 6 Step Mixing with the Cubase...

Owners Manual
Page 17
Change each highlighted number, and then specify the position of the Transport panel. AUDIOGRAM 3 Owner's Manual 17 If you intend to use the file to the [File] menu and select [Export] → [Audio Mixdown]. 8 Enter a file name ...
Change each highlighted number, and then specify the position of the Transport panel. AUDIOGRAM 3 Owner's Manual 17 If you intend to use the file to the [File] menu and select [Export] → [Audio Mixdown]. 8 Enter a file name ...

Owners Manual
Page 18
...that only a condenser microphone is not connected to the MIC/INST jack, set the OUT LEVEL control to the minimum position. NOTE Yamaha recommends that you set this switch according to the type of the channel signal. If you to adjust the overall volume without changing ...relative volume balance among the channels. Controls and Functions Control Panel u q ew 1 PHANTOM +48V Switch/Indicator This switch toggles phantom power on ( ), the AUDIOGRAM supplies phantom power to the MIC/INST jack (XLR-type) 8. Select MIC ( ) if a microphone is connected, or INST ( ) if an electric guitar...
...that only a condenser microphone is not connected to the MIC/INST jack, set the OUT LEVEL control to the minimum position. NOTE Yamaha recommends that you set this switch according to the type of the channel signal. If you to adjust the overall volume without changing ...relative volume balance among the channels. Controls and Functions Control Panel u q ew 1 PHANTOM +48V Switch/Indicator This switch toggles phantom power on ( ), the AUDIOGRAM supplies phantom power to the MIC/INST jack (XLR-type) 8. Select MIC ( ) if a microphone is connected, or INST ( ) if an electric guitar...

Owners Manual
Page 19
... input. Set the MIC/INST switch 2 to MIC or INST according to this jack. Input 3 LEVEL Record controls Playback 6 OUT LEVEL control Cubase AI Output AUDIOGRAM 3 Owner's Manual 19 Phone-type Pin-type NOTE You can use with instruments and equipment having stereo outputs, such as a synthesizer or CD player. ■...
... input. Set the MIC/INST switch 2 to MIC or INST according to this jack. Input 3 LEVEL Record controls Playback 6 OUT LEVEL control Cubase AI Output AUDIOGRAM 3 Owner's Manual 19 Phone-type Pin-type NOTE You can use with instruments and equipment having stereo outputs, such as a synthesizer or CD player. ■...

Owners Manual
Page 20
...then double-click the "Sound" icon to quit all necessary audio cables properly connected? ❑ Are you using other device(s) and connecting only the Yamaha USB device. Click the "Recording" tab, right-click the "USB Audio CODEC" icon and select "Properties." 3. No sound. ❑ Are ... and Audio Devices" icon to a USB port on . ❑ Is the included USB cable properly plugged into the interface and a computer? Troubleshooting The AUDIOGRAM interface won't turn on the computer. Windows 7/Vista: 1. Windows XP: 1. ing system, etc., set at appropriate levels? ❑ Is the output ...
...then double-click the "Sound" icon to quit all necessary audio cables properly connected? ❑ Are you using other device(s) and connecting only the Yamaha USB device. Click the "Recording" tab, right-click the "USB Audio CODEC" icon and select "Properties." 3. No sound. ❑ Are ... and Audio Devices" icon to a USB port on . ❑ Is the included USB cable properly plugged into the interface and a computer? Troubleshooting The AUDIOGRAM interface won't turn on the computer. Windows 7/Vista: 1. Windows XP: 1. ing system, etc., set at appropriate levels? ❑ Is the output ...

Owners Manual
Page 21
... and Audio Devices" icon to page 8 of the Cubase AI application assigned properly? Set "Device volume" to its maximum level. Click the "Sound" tab. 5. Mac: 1. AUDIOGRAM 3 Owner's Manual 21 Click the "Input" tab and under "Choose a device for sound input" select "USB Audio CODEC". 3. Close the "Properties" dialog window. 4. Click the...
... and Audio Devices" icon to page 8 of the Cubase AI application assigned properly? Set "Device volume" to its maximum level. Click the "Sound" tab. 5. Mac: 1. AUDIOGRAM 3 Owner's Manual 21 Click the "Input" tab and under "Choose a device for sound input" select "USB Audio CODEC". 3. Close the "Properties" dialog window. 4. Click the...
