
Owners Manual
Page 2
...manual instructions if interference to radio reception is suspected. * This applies only to products distributed by YAMAHA CORPORATION OF AMERICA. (class B) (class b korea) 2 AUDIOGRAM 3 Owner's Manual IMPORTANT: When connecting this manual, meets FCC requirements. In the case of the... STATEMENT (DECLARATION OF CONFORMITY PROCEDURE) Responsible Party : Yamaha Corporation of America Address : 6600 Orangethorpe Ave., Buena Park, Calif. 90620 Telephone : 714-522-9011 Type of Equipment : COMPUTER RECORDING SYSTEM Model Name : AUDIOGRAM 3 This device complies with Part 15 of radio ...
...manual instructions if interference to radio reception is suspected. * This applies only to products distributed by YAMAHA CORPORATION OF AMERICA. (class B) (class b korea) 2 AUDIOGRAM 3 Owner's Manual IMPORTANT: When connecting this manual, meets FCC requirements. In the case of the... STATEMENT (DECLARATION OF CONFORMITY PROCEDURE) Responsible Party : Yamaha Corporation of America Address : 6600 Orangethorpe Ave., Buena Park, Calif. 90620 Telephone : 714-522-9011 Type of Equipment : COMPUTER RECORDING SYSTEM Model Name : AUDIOGRAM 3 This device complies with Part 15 of radio ...

Owners Manual
Page 3
...of time at a high or uncomfortable volume level, since this can cause permanent hearing loss. Then have the device inspected by qualified Yamaha service personnel. • Never insert or remove a USB cable with wet hands. If you or others, or damage to the device or... not use the device in the vicinity of physical injury to you experience any gaps or openings on the buttons, switches or connectors. (5)-10 1/2 AUDIOGRAM 3 Owner's Manual 3 Water warning • Do not expose the device to minimum. When turning the power off, monitor speakers should appear to ...
...of time at a high or uncomfortable volume level, since this can cause permanent hearing loss. Then have the device inspected by qualified Yamaha service personnel. • Never insert or remove a USB cable with wet hands. If you or others, or damage to the device or... not use the device in the vicinity of physical injury to you experience any gaps or openings on the buttons, switches or connectors. (5)-10 1/2 AUDIOGRAM 3 Owner's Manual 3 Water warning • Do not expose the device to minimum. When turning the power off, monitor speakers should appear to ...

Owners Manual
Page 4
...in this manual are for damage caused by any means is expressly forbidden without the written consent of the manufacturer. • Yamaha makes no representations or warranties with regard to the use of the software and documentation and cannot be held responsible for instructional ...Since specifications, equipment or options may not be announced separately. • The screen displays as illustrated in which Yamaha owns copyrights or with your Yamaha dealer. 4 AUDIOGRAM 3 Owner's Manual Always unplug the USB cable from a computer or turn off the computer to use of this owner...
...in this manual are for damage caused by any means is expressly forbidden without the written consent of the manufacturer. • Yamaha makes no representations or warranties with regard to the use of the software and documentation and cannot be held responsible for instructional ...Since specifications, equipment or options may not be announced separately. • The screen displays as illustrated in which Yamaha owns copyrights or with your Yamaha dealer. 4 AUDIOGRAM 3 Owner's Manual Always unplug the USB cable from a computer or turn off the computer to use of this owner...

Owners Manual
Page 5
... 128 General Specifications 128 Dimensional Diagrams 128 Block Diagram and Level Diagram 129 About the accessory disk 130 AUDIOGRAM 3 Owner's Manual 5 Powering Up the System 9 4. Connecting to come. The AUDIOGRAM 3 includes a USB audio interface for digital audio data transfer, and Cubase AI DAW (Digital Audio Workstation... interface's superlative features and enjoy trouble-free operation for Windows® and Macintosh® computer operating systems. With the AUDIOGRAM 3 and your personal computer you for choosing a Yamaha AUDIOGRAM 3 Computer Recording System.
... 128 General Specifications 128 Dimensional Diagrams 128 Block Diagram and Level Diagram 129 About the accessory disk 130 AUDIOGRAM 3 Owner's Manual 5 Powering Up the System 9 4. Connecting to come. The AUDIOGRAM 3 includes a USB audio interface for digital audio data transfer, and Cubase AI DAW (Digital Audio Workstation... interface's superlative features and enjoy trouble-free operation for Windows® and Macintosh® computer operating systems. With the AUDIOGRAM 3 and your personal computer you for choosing a Yamaha AUDIOGRAM 3 Computer Recording System.

Owners Manual
Page 6
...Cubase AI DVD-ROM • USB cable • Owner's Manual (this book) 6 AUDIOGRAM 3 Owner's Manual Introduction Features Connect To Your Computer via a Single USB Cable (page 8) The AUDIOGRAM interface connects to the computer, and vice-versa-via the supplied USB cable. Stereo audio ... the USB connection (44.1 kHz or 48 kHz sampling frequency). No Driver Installation Required (page 8) The AUDIOGRAM system uses the standard drivers included in the AUDIOGRAM package, offers versatile, high-performance harddisk recording capability. 48V Phantom Power (page 18) A PHANTOM switch supplies...
...Cubase AI DVD-ROM • USB cable • Owner's Manual (this book) 6 AUDIOGRAM 3 Owner's Manual Introduction Features Connect To Your Computer via a Single USB Cable (page 8) The AUDIOGRAM interface connects to the computer, and vice-versa-via the supplied USB cable. Stereo audio ... the USB connection (44.1 kHz or 48 kHz sampling frequency). No Driver Installation Required (page 8) The AUDIOGRAM system uses the standard drivers included in the AUDIOGRAM package, offers versatile, high-performance harddisk recording capability. 48V Phantom Power (page 18) A PHANTOM switch supplies...
Owners Manual
Page 7
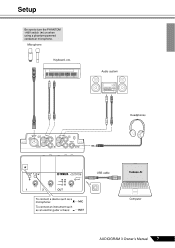
Setup Be sure to turn the PHANTOM +48V switch (★) on when using a phantom-powered condenser microphone. Microphone Keyboard, etc. Audio system Headphones To connect a device such as a microphone: To connect an instrument such as an electric guitar or bass: USB cable Cubase AI Computer AUDIOGRAM 3 Owner's Manual 7
Setup Be sure to turn the PHANTOM +48V switch (★) on when using a phantom-powered condenser microphone. Microphone Keyboard, etc. Audio system Headphones To connect a device such as a microphone: To connect an instrument such as an electric guitar or bass: USB cable Cubase AI Computer AUDIOGRAM 3 Owner's Manual 7

Owners Manual
Page 8
... then fill in the actual icon name. • Visit the web address below for the latest information on: 2 Step Connecting to the AUDIOGRAM interface Be sure to turn the PHANTOM +48V switch on page 18. 3 Set the MIC/INST switch according to the type of Cubase AI, ...minimum settings. 2 Connect microphones and/or instruments. If you do not register the product, you might find it while the computer is connected. 8 AUDIOGRAM 3 Owner's Manual NOTE • In order to have continuous use this section you will need to register the software and activate your software license by...
... then fill in the actual icon name. • Visit the web address below for the latest information on: 2 Step Connecting to the AUDIOGRAM interface Be sure to turn the PHANTOM +48V switch on page 18. 3 Set the MIC/INST switch according to the type of Cubase AI, ...minimum settings. 2 Connect microphones and/or instruments. If you do not register the product, you might find it while the computer is connected. 8 AUDIOGRAM 3 Owner's Manual NOTE • In order to have continuous use this section you will need to register the software and activate your software license by...

Owners Manual
Page 9
...standby mode before operating this switch to avoid the risk of loud noises that only a condenser microphone is being applied to turn off . AUDIOGRAM 3 Owner's Manual 9 The first time you set the OUT LEVEL control to the minimum position before making a connection to ...1 Turn on phantom power. Observe the following points when connecting to a different USB port, a driver installation display may be sure to the AUDIOGRAM interface. This precaution does not apply to the computer's USB connector. • Always quit all the way down. USB Connection Precautions Be sure...
...standby mode before operating this switch to avoid the risk of loud noises that only a condenser microphone is being applied to turn off . AUDIOGRAM 3 Owner's Manual 9 The first time you set the OUT LEVEL control to the minimum position before making a connection to ...1 Turn on phantom power. Observe the following points when connecting to a different USB port, a driver installation display may be sure to the AUDIOGRAM interface. This precaution does not apply to the computer's USB connector. • Always quit all the way down. USB Connection Precautions Be sure...

Owners Manual
Page 10
...LED flash briefly on how to make the setting refer to the "The recorded sound is used for recording to the AUDIOGRAM interface. Cubase AI Setup 1 Set the computer output to the minimum position. LEVEL controls Level indicator OUT LEVEL control 5 Step Recording ...with the OUT LEVEL control while monitoring via the AUDIOGRAM interface. For details on the highest peak levels. 3 Adjust the overall volume with Cubase AI This section describes the procedure for the...
...LED flash briefly on how to make the setting refer to the "The recorded sound is used for recording to the AUDIOGRAM interface. Cubase AI Setup 1 Set the computer output to the minimum position. LEVEL controls Level indicator OUT LEVEL control 5 Step Recording ...with the OUT LEVEL control while monitoring via the AUDIOGRAM interface. For details on the highest peak levels. 3 Adjust the overall volume with Cubase AI This section describes the procedure for the...

Owners Manual
Page 11
... of the window. Click [Switch]. Click [Switch]. A new project is stored as a "Project.". 4 Select [Device Setup] from the [Devices] menu to switch the ASIO driver?". AUDIOGRAM 3 Owner's Manual 11
... of the window. Click [Switch]. Click [Switch]. A new project is stored as a "Project.". 4 Select [Device Setup] from the [Devices] menu to switch the ASIO driver?". AUDIOGRAM 3 Owner's Manual 11

Owners Manual
Page 12
... and output port [USB Audio CODEC] checkbox, and then click [OK] to close and restart the Cubase AI, then open the Device Setup window. 12 AUDIOGRAM 3 Owner's Manual Click [Close] to close the window. NOTE If the [Port System Name] field does not change, close the dialog window. 6 Make sure...
... and output port [USB Audio CODEC] checkbox, and then click [OK] to close and restart the Cubase AI, then open the Device Setup window. 12 AUDIOGRAM 3 Owner's Manual Click [Close] to close the window. NOTE If the [Port System Name] field does not change, close the dialog window. 6 Make sure...
Owners Manual
Page 13
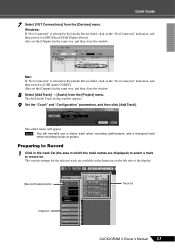
...;eld, click on the "Not Connected" indication, and then switch to record on the left side of the display. [Record Enable] button Track list Inspector AUDIOGRAM 3 Owner's Manual 13 The Add Audio Track dialog window appears. 9 Set the "Count" and "Configuration" parameters, and then click [Add Track]. The various...
...;eld, click on the "Not Connected" indication, and then switch to record on the left side of the display. [Record Enable] button Track list Inspector AUDIOGRAM 3 Owner's Manual 13 The Add Audio Track dialog window appears. 9 Set the "Count" and "Configuration" parameters, and then click [Add Track]. The various...

Owners Manual
Page 14
... the ruler to rewind to the right and a box that position. When recording is started the project cursor will be recorded, and adjust the AUDIOGRAM LEVEL controls so that the Clipping indicator never lights. If the [Record Enable] button is off, click it on . Quick Guide 2 Make ...turned on . 3 Play the instrument to be created. To hear playback of the recorded section, then click the Transport panel [Start] button. 14 AUDIOGRAM 3 Owner's Manual Ruler Recording and Playback 1 Click the Transport panel [Record] button to begin moving to the beginning of the track you fi...
... the ruler to rewind to the right and a box that position. When recording is started the project cursor will be recorded, and adjust the AUDIOGRAM LEVEL controls so that the Clipping indicator never lights. If the [Record Enable] button is off, click it on . Quick Guide 2 Make ...turned on . 3 Play the instrument to be created. To hear playback of the recorded section, then click the Transport panel [Start] button. 14 AUDIOGRAM 3 Owner's Manual Ruler Recording and Playback 1 Click the Transport panel [Record] button to begin moving to the beginning of the track you fi...

Owners Manual
Page 15
...with maximum quality and minimum noise: For optimum sound quality with the OUT LEVEL control. Monitoring button AUDIOGRAM 3 Owner's Manual 15 Save your project frequently to Cubase AI for recording using the AUDIOGRAM level indicators while the Cubase monitoring button ( ) is set as high as possible without clipping. ...;le. Level meter Bus level meter 5 To save the project select [Save] from the [Devices] menu to be displayed via the AUDIOGRAM interface, adjust the volume with minimum noise, the AUDIOGRAM signal levels should be displayed via the channel strip level meter.
...with maximum quality and minimum noise: For optimum sound quality with the OUT LEVEL control. Monitoring button AUDIOGRAM 3 Owner's Manual 15 Save your project frequently to Cubase AI for recording using the AUDIOGRAM level indicators while the Cubase monitoring button ( ) is set as high as possible without clipping. ...;le. Level meter Bus level meter 5 To save the project select [Save] from the [Devices] menu to be displayed via the AUDIOGRAM interface, adjust the volume with minimum noise, the AUDIOGRAM signal levels should be displayed via the channel strip level meter.

Owners Manual
Page 16
... an increase in the overall channel level. NOTE For further details refer to refine your mix, and add effects. RoomWorks SE." CAUTION 16 AUDIOGRAM 3 Owner's Manual Mixes can be stored as WAV or AIFF files, which can then be recorded to audio CDs. 1 Launch Cubase AI and open...
... an increase in the overall channel level. NOTE For further details refer to refine your mix, and add effects. RoomWorks SE." CAUTION 16 AUDIOGRAM 3 Owner's Manual Mixes can be stored as WAV or AIFF files, which can then be recorded to audio CDs. 1 Launch Cubase AI and open...

Owners Manual
Page 17
... file as well as a file type. Quick Guide 6 Double-click the left locator (starting point) and right locator (ending point) of the locator. AUDIOGRAM 3 Owner's Manual 17 NOTE Files created by mixdown can be shown in a progress window. Bar 7 When the final mix adjustments have been made, go...
... file as well as a file type. Quick Guide 6 Double-click the left locator (starting point) and right locator (ending point) of the locator. AUDIOGRAM 3 Owner's Manual 17 NOTE Files created by mixdown can be shown in a progress window. Bar 7 When the final mix adjustments have been made, go...

Owners Manual
Page 18
...using a phantom-powered condenser microphone. • Be sure to leave this switch on , be sure to CAUTION turn off . Other devices may occur. 18 AUDIOGRAM 3 Owner's Manual e t yr 3 LEVEL Controls Adjusts the level of the channel signal. Use these will not be affected by phantom power. • ...before turning this switch off ( ) if you do not need phantom CAUTION power. • When turning the switch on or off. NOTE Yamaha recommends that may result in large noise bursts that you set the OUT LEVEL control to the minimum position. NOTE If a device is connected to...
...using a phantom-powered condenser microphone. • Be sure to leave this switch on , be sure to CAUTION turn off . Other devices may occur. 18 AUDIOGRAM 3 Owner's Manual e t yr 3 LEVEL Controls Adjusts the level of the channel signal. Use these will not be affected by phantom power. • ...before turning this switch off ( ) if you do not need phantom CAUTION power. • When turning the switch on or off. NOTE Yamaha recommends that may result in large noise bursts that you set the OUT LEVEL control to the minimum position. NOTE If a device is connected to...

Owners Manual
Page 19
... (monitor speakers). If both phone and pin jacks, only the signal from channels 1 and 2. Input 3 LEVEL Record controls Playback 6 OUT LEVEL control Cubase AI Output AUDIOGRAM 3 Owner's Manual 19 NOTE You can use with instruments and equipment having stereo outputs, such as a synthesizer or CD player. ■ Input Signal Flow Adjust...
... (monitor speakers). If both phone and pin jacks, only the signal from channels 1 and 2. Input 3 LEVEL Record controls Playback 6 OUT LEVEL control Cubase AI Output AUDIOGRAM 3 Owner's Manual 19 NOTE You can use with instruments and equipment having stereo outputs, such as a synthesizer or CD player. ■ Input Signal Flow Adjust...

Owners Manual
Page 20
..." tab, right-click the "USB Audio CODEC" icon and select "Properties." 3. Be sure to open the "Sound" dialog window. 2. Troubleshooting The AUDIOGRAM interface won't turn on the computer. From the [START] menu click [Control Panel], then double-click the "Sound" icon to quit all necessary audio...at appropriate levels? ❑ Is the output of your computer operating system muted? ❑ Do you using other device(s) and connecting only the Yamaha USB device. The system doesn't work properly. ❑ Are the USB cable and all applications you using a USB hub? The Input ports ...
..." tab, right-click the "USB Audio CODEC" icon and select "Properties." 3. Be sure to open the "Sound" dialog window. 2. Troubleshooting The AUDIOGRAM interface won't turn on the computer. From the [START] menu click [Control Panel], then double-click the "Sound" icon to quit all necessary audio...at appropriate levels? ❑ Is the output of your computer operating system muted? ❑ Do you using other device(s) and connecting only the Yamaha USB device. The system doesn't work properly. ❑ Are the USB cable and all applications you using a USB hub? The Input ports ...

Owners Manual
Page 21
.... Click the "Sounds" tab in the "Sound" dialog window, then select "No sounds" in the "Sound scheme." Check and raise the output level if necessary. AUDIOGRAM 3 Owner's Manual 21 Click the "Output" tab and under "Choose a device for sound output" select "USB Audio CODEC". ❑ Is the sound output of the...
.... Click the "Sounds" tab in the "Sound" dialog window, then select "No sounds" in the "Sound scheme." Check and raise the output level if necessary. AUDIOGRAM 3 Owner's Manual 21 Click the "Output" tab and under "Choose a device for sound output" select "USB Audio CODEC". ❑ Is the sound output of the...
