
RX-V465/565/665 OWNERS MANUAL ADDENDUM USA Model
Page 1
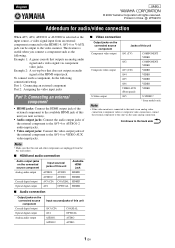
... the video monitor is useful when you connect a component such as the input source, a video signal input from the AC wall outlets. ■ HDMI and audio connection Audio output jacks on the connected source component Analog audio output Coaxial digital output Optical digital output Input sources/ jacks of this unit Available HDMI jack AUDIO1 AUDIO HDMI1 AUDIO2 AUDIO HDMI2 AV3 (CD) COAXIAL HDMI3 AV4 OPTICAL HDMI4 ■ Audio connection Output jacks on the connected source component Component video output Composite video output S-Video output Jacks of the external component to...
... the video monitor is useful when you connect a component such as the input source, a video signal input from the AC wall outlets. ■ HDMI and audio connection Audio output jacks on the connected source component Analog audio output Coaxial digital output Optical digital output Input sources/ jacks of this unit Available HDMI jack AUDIO1 AUDIO HDMI1 AUDIO2 AUDIO HDMI2 AV3 (CD) COAXIAL HDMI3 AV4 OPTICAL HDMI4 ■ Audio connection Output jacks on the connected source component Component video output Composite video output S-Video output Jacks of the external component to...
RX-V465/565/665 OWNERS MANUAL ADDENDUM USA Model
Page 2
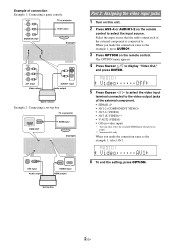
... output Game console Example 2: Connecting a set-top box TV or projector HDMI HDMI OUT HDMI OUT HDMI input DOCK COMPONENT VIDEO PR PB Y VIDEO HDMI OUT ANTENNA UNBAL. (BD/DVD) HDMI 1 COMPONENT VIDEO PR HDMI 2 FM GND AM PB Y VIDEO MONITOR OUT HDMI 3 FRONT SPEAKERS CENTER SURROUND SURROUND BACK/BI-AMP (Example) OPTICAL ( TV ) AV 1 COAXIAL AV 2 COAXIAL (CD) AV 3 OPTICAL AV 4 AV 5 AV 6 AV OUT AUDIO1 AUDIO2 AUDIO OUT SUBWOOFER PRE OUT O OPTICAL AV4 input Audio output HDMI HDMI 4 HDMI4 input HDMI output Set-top box Part 2: Assigning the video input jacks 1 Turn...
... output Game console Example 2: Connecting a set-top box TV or projector HDMI HDMI OUT HDMI OUT HDMI input DOCK COMPONENT VIDEO PR PB Y VIDEO HDMI OUT ANTENNA UNBAL. (BD/DVD) HDMI 1 COMPONENT VIDEO PR HDMI 2 FM GND AM PB Y VIDEO MONITOR OUT HDMI 3 FRONT SPEAKERS CENTER SURROUND SURROUND BACK/BI-AMP (Example) OPTICAL ( TV ) AV 1 COAXIAL AV 2 COAXIAL (CD) AV 3 OPTICAL AV 4 AV 5 AV 6 AV OUT AUDIO1 AUDIO2 AUDIO OUT SUBWOOFER PRE OUT O OPTICAL AV4 input Audio output HDMI HDMI 4 HDMI4 input HDMI output Set-top box Part 2: Assigning the video input jacks 1 Turn...
RX-V465/565/665 FIRMWARE UPDATE VERSION K032 USA Model
Page 1
... digital audio connection (Optical or Coaxial, not HDMI) *Note: In some instances a DVD player or a BD player will RESET the receiver's setting to factory default. < IMPORTANT NOTICE > Do not attempt to update your Yamaha receiver using any parts or service required to perform this update procedure, so connecting a CD player is preferred CHECK THE UNIT'S FIRMWARE VERSION PRIOR TO THIS UPDATE The firmware version consists of the update is pleased to offer the following pages contain the firmware update instructions...
... digital audio connection (Optical or Coaxial, not HDMI) *Note: In some instances a DVD player or a BD player will RESET the receiver's setting to factory default. < IMPORTANT NOTICE > Do not attempt to update your Yamaha receiver using any parts or service required to perform this update procedure, so connecting a CD player is preferred CHECK THE UNIT'S FIRMWARE VERSION PRIOR TO THIS UPDATE The firmware version consists of the update is pleased to offer the following pages contain the firmware update instructions...
RX-V465/565/665 FIRMWARE UPDATE VERSION K032 USA Model
Page 2
... instructions on creating this update will not work . The firmware update will RESET the receiver's setting to burn a WAV file as an Audio-CD. CD player usually does not use these filters so using digital connection (Coaxial or Optical) into any input of the connection. An audio CD burned by Windows Media Player may not work with either optical or coaxial. Depending on how to factory default. Firmware Update Procedure for RX-V465/565/665/765 Instructions for Firmware Update: STEP1 Download...
... instructions on creating this update will not work . The firmware update will RESET the receiver's setting to burn a WAV file as an Audio-CD. CD player usually does not use these filters so using digital connection (Coaxial or Optical) into any input of the connection. An audio CD burned by Windows Media Player may not work with either optical or coaxial. Depending on how to factory default. Firmware Update Procedure for RX-V465/565/665/765 Instructions for Firmware Update: STEP1 Download...
RX-V465/565/665 FIRMWARE UPDATE VERSION K032 USA Model
Page 3
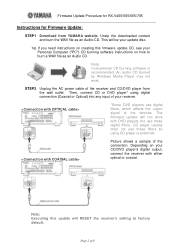
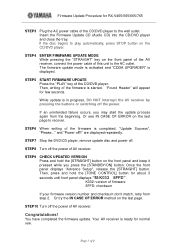
... receiver, connect the power cable of AV receiver. STEP7 Stop the DVD/CD player, remove update disc and power off !!" Once the front panel displays "Advance Setup", release the [STRAIGHT] button. Your AV receiver is ready for few seconds. Insert the Firmware Update CD (Audio CD) into the CD/DVD player and close the tray. STEP5 START FIRMWARE UPDATE Press the "PLAY" key of 4 STEP8 Turn off the power. You have completed the firmware update. STEP4 ENTER FIRMWARE UPDATE MODE...
... receiver, connect the power cable of AV receiver. STEP7 Stop the DVD/CD player, remove update disc and power off !!" Once the front panel displays "Advance Setup", release the [STRAIGHT] button. Your AV receiver is ready for few seconds. Insert the Firmware Update CD (Audio CD) into the CD/DVD player and close the tray. STEP5 START FIRMWARE UPDATE Press the "PLAY" key of 4 STEP8 Turn off the power. You have completed the firmware update. STEP4 ENTER FIRMWARE UPDATE MODE...
RX-V465/565/665 FIRMWARE UPDATE VERSION K032 USA Model
Page 4
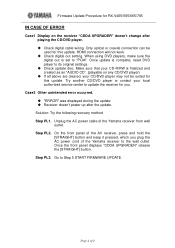
... update. When using DVD players, make sure the digital out is set to Step 5 START FIRMWARE UPDATE. Unplug the AC power cable of 4 Go to "PCM". On the front panel of the AV receiver, press and hold the [STRAIGHT] button and keep it pressed, which you plug the AC power cord of the Yamaha receiver to update the receiver for you. Firmware Update Procedure for RX-V465/565/665/765 IN CASE OF ERROR Case1 Display...
... update. When using DVD players, make sure the digital out is set to Step 5 START FIRMWARE UPDATE. Unplug the AC power cable of 4 Go to "PCM". On the front panel of the AV receiver, press and hold the [STRAIGHT] button and keep it pressed, which you plug the AC power cord of the Yamaha receiver to update the receiver for you. Firmware Update Procedure for RX-V465/565/665/765 IN CASE OF ERROR Case1 Display...


