
Owner's Manual
Page 10
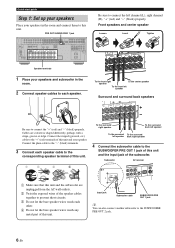
... the front left channel (L), right channel (R), "+" (red) and "-" (black) properly. TOTAL 0.8A MAX. DVD DTV/CBL IN1 IN2 SPEAKERS CENTER SURROUND R L OUT SURROUND BACK/BI-AMP R L SINGLE DOCK VIDEO VIDEO S VIDEO DVD DTV/CBL IN OUT DVR IN OUT VCR COMPONENT VIDEO PR A DVD PB Y PR B DTV/CBL PB MONITOR OUT... CD (PLAY) CD-R (REC) DVD DTV/CBL IN OUT DVR IN OUT VCR SUB SB (8CH) SURROUND WOOFER ZONE 2 HDMI OUT FRONT SURROUND SUR. Subwoofer AV receiver PRE OUSTINGLE CENTER DOCK VIDE RROUND SUR.
... the front left channel (L), right channel (R), "+" (red) and "-" (black) properly. TOTAL 0.8A MAX. DVD DTV/CBL IN1 IN2 SPEAKERS CENTER SURROUND R L OUT SURROUND BACK/BI-AMP R L SINGLE DOCK VIDEO VIDEO S VIDEO DVD DTV/CBL IN OUT DVR IN OUT VCR COMPONENT VIDEO PR A DVD PB Y PR B DTV/CBL PB MONITOR OUT... CD (PLAY) CD-R (REC) DVD DTV/CBL IN OUT DVR IN OUT VCR SUB SB (8CH) SURROUND WOOFER ZONE 2 HDMI OUT FRONT SURROUND SUR. Subwoofer AV receiver PRE OUSTINGLE CENTER DOCK VIDE RROUND SUR.
Owner's Manual
Page 11
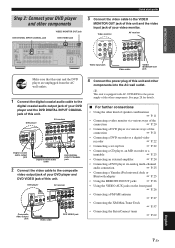
... the AC wall outlet. INTRODUCTION Quick start guide Step 2: Connect your video monitor. DVD player AV receiver AUDIO M FRONT (8CH D/ D-R OUT (REC) DVD DTV/CBL IN OUT DVR IN OUT...8226; Connecting a DVD player via analog multi-channel audio connection ☞ P. 25 • Connecting a Yamaha iPod universal dock or Bluetooth adapter ☞ P. 25 • Using the REMOTE IN/OUT jacks ☞... 0.8A MAX. DVD DTV/CBL IN1 IN2 SPEAKERS CENTER SURROUND R L OUT SURROUND BACK/BI-AMP R L SINGLE DOCK VIDEO VIDEO S VIDEO DVD DTV/CBL IN OUT DVR IN OUT VCR ...
... the AC wall outlet. INTRODUCTION Quick start guide Step 2: Connect your video monitor. DVD player AV receiver AUDIO M FRONT (8CH D/ D-R OUT (REC) DVD DTV/CBL IN OUT DVR IN OUT...8226; Connecting a DVD player via analog multi-channel audio connection ☞ P. 25 • Connecting a Yamaha iPod universal dock or Bluetooth adapter ☞ P. 25 • Using the REMOTE IN/OUT jacks ☞... 0.8A MAX. DVD DTV/CBL IN1 IN2 SPEAKERS CENTER SURROUND R L OUT SURROUND BACK/BI-AMP R L SINGLE DOCK VIDEO VIDEO S VIDEO DVD DTV/CBL IN OUT DVR IN OUT VCR ...

Owner's Manual
Page 14
REMOTE TRIGGER OUT +12V IN OUT 15mA MAX. DVD DTV/CBL IN1 IN2 SPEAKERS CENTER SURROUND R L OUT SURROUND BACK/BI-AMP R L SINGLE DOCK VIDEO VIDEO S VIDEO DVD DTV/CBL IN OUT DVR IN OUT VCR COMPONENT VIDEO PR A DVD PB Y PR B DTV/CBL PB MONITOR OUT Y ...
REMOTE TRIGGER OUT +12V IN OUT 15mA MAX. DVD DTV/CBL IN1 IN2 SPEAKERS CENTER SURROUND R L OUT SURROUND BACK/BI-AMP R L SINGLE DOCK VIDEO VIDEO S VIDEO DVD DTV/CBL IN OUT DVR IN OUT VCR COMPONENT VIDEO PR A DVD PB Y PR B DTV/CBL PB MONITOR OUT Y ...

Owner's Manual
Page 18
... the striped (grooved, etc.) cable to the EXTRA SP terminals, set "SP IMP." DVD DTV/CBL IN1 IN2 SPEAKERS CENTER SURROUND R L OUT SURROUND BACK/BI-AMP R L SINGLE DOCK VIDEO VIDEO S VIDEO DVD DTV/CBL IN OUT DVR IN OUT VCR COMPONENT VIDEO PR A DVD PB Y PR B DTV/CBL PB MONITOR OUT...
... the striped (grooved, etc.) cable to the EXTRA SP terminals, set "SP IMP." DVD DTV/CBL IN1 IN2 SPEAKERS CENTER SURROUND R L OUT SURROUND BACK/BI-AMP R L SINGLE DOCK VIDEO VIDEO S VIDEO DVD DTV/CBL IN OUT DVR IN OUT VCR COMPONENT VIDEO PR A DVD PB Y PR B DTV/CBL PB MONITOR OUT...

Owner's Manual
Page 19
... INPUT FRONT B/ZONE B/ ZONE 2/PRESENCE R EXTRA SP L CD DVD 3 4 COAXIAL FRONT A R L DVD DTV/CBL IN1 IN2 SPEAKERS CENTER SURROUND R L OUT SURROUND BACK/BI-AMP R L TRIGGER OUT 2V 5mA MAX. SINGLE Connections (optional) Subwoofers PREPARATION Right Left Front speakers (FRONT A) Right Left Surround speakers Left (SINGLE) Surround back speaker ■... INPUT FRONT B/ZONE B/ ZONE 2/PRESENCE R EXTRA SP L CD DVD 3 4 COAXIAL FRONT A R L DVD DTV/CBL IN1 IN2 SPEAKERS CENTER SURROUND R L OUT SURROUND BACK/BI-AMP R L Subwoofers TRIGGER OUT 2V mA MAX.
... INPUT FRONT B/ZONE B/ ZONE 2/PRESENCE R EXTRA SP L CD DVD 3 4 COAXIAL FRONT A R L DVD DTV/CBL IN1 IN2 SPEAKERS CENTER SURROUND R L OUT SURROUND BACK/BI-AMP R L TRIGGER OUT 2V 5mA MAX. SINGLE Connections (optional) Subwoofers PREPARATION Right Left Front speakers (FRONT A) Right Left Surround speakers Left (SINGLE) Surround back speaker ■... INPUT FRONT B/ZONE B/ ZONE 2/PRESENCE R EXTRA SP L CD DVD 3 4 COAXIAL FRONT A R L DVD DTV/CBL IN1 IN2 SPEAKERS CENTER SURROUND R L OUT SURROUND BACK/BI-AMP R L Subwoofers TRIGGER OUT 2V mA MAX.

Owner's Manual
Page 20
...) crossovers. Red: positive (+) Black: negative (-) Red: positive (+) Black: negative (-) 3 Insert one speaker system. FRONT A R L SURROUND BACK/ BI-AMP R SINGLE L 16 En This unit Note When you to make the bi-amplification connections, use the FRONT and SURROUND BACK/BI... knob to the instruction manuals of the speakers for details. Refer to secure the wire. To activate the bi-amplification connections, set "BI-AMP" to prevent short circuits. ■ Connecting the banana plug (U.S.A. Connections ■ Connecting the speaker cable 1 Remove approximately 10 mm (0.4 ...
...) crossovers. Red: positive (+) Black: negative (-) Red: positive (+) Black: negative (-) 3 Insert one speaker system. FRONT A R L SURROUND BACK/ BI-AMP R SINGLE L 16 En This unit Note When you to make the bi-amplification connections, use the FRONT and SURROUND BACK/BI... knob to the instruction manuals of the speakers for details. Refer to secure the wire. To activate the bi-amplification connections, set "BI-AMP" to prevent short circuits. ■ Connecting the banana plug (U.S.A. Connections ■ Connecting the speaker cable 1 Remove approximately 10 mm (0.4 ...

Owner's Manual
Page 24
... 1 2 OPTICAL DIGITAL INPUT FRONT B/ZONE B/ ZONE 2/PRESENCE R EXTRA SP L CD DVD 3 4 COAXIAL FRONT A R L DVD DTV/CBL IN1 IN2 SPEAKERS CENTER SURROUND R L OUT SURROUND BACK/BI-AMP R L S VIDEO DVD DTV/CBL IN OUT DVR IN OUT VCR COMPONENT VIDEO PR A DVD PB Y PR B DTV/CBL PB MONITOR OUT Y MONITOR OUT AC OUTLETS...
... 1 2 OPTICAL DIGITAL INPUT FRONT B/ZONE B/ ZONE 2/PRESENCE R EXTRA SP L CD DVD 3 4 COAXIAL FRONT A R L DVD DTV/CBL IN1 IN2 SPEAKERS CENTER SURROUND R L OUT SURROUND BACK/BI-AMP R L S VIDEO DVD DTV/CBL IN OUT DVR IN OUT VCR COMPONENT VIDEO PR A DVD PB Y PR B DTV/CBL PB MONITOR OUT Y MONITOR OUT AC OUTLETS...

Owner's Manual
Page 25
... as those made for the audio connection) English 21 En TOTAL 0.8A MAX. DVD IN1 DTV/CBL IN2 SPEAKERS CENTER SURROUND R L OUT SURROUND BACK/BI-AMP R L DOCK VIDEO VIDEO S VIDEO DVD DTV/CBL IN OUT DVR IN OUT VCR COMPONENT VIDEO PR A DVD PB Y PR B DTV/CBL PB MONITOR OUT Y MONITOR...
... as those made for the audio connection) English 21 En TOTAL 0.8A MAX. DVD IN1 DTV/CBL IN2 SPEAKERS CENTER SURROUND R L OUT SURROUND BACK/BI-AMP R L DOCK VIDEO VIDEO S VIDEO DVD DTV/CBL IN OUT DVR IN OUT VCR COMPONENT VIDEO PR A DVD PB Y PR B DTV/CBL PB MONITOR OUT Y MONITOR...

Owner's Manual
Page 26
...2 OPTICAL DIGITAL INPUT FRONT B/ZONE B/ ZONE 2/PRESENCE CD DVD 3 4 COAXIAL FRONT A DVD IN1 SPEAKERS CENTER DTV/CBL IN2 SURROUND OUT SURROUND BACK/BI-AMP DOCK VIDEO VIDEO S VIDEO DVD DTV/CBL IN OUT DVR IN OUT VCR COMPONENT VIDEO PR A DVD PB Y PR B DTV/CBL PB MONITOR OUT ...Audio out Audio in VCR S-video out S-video in Video in Component video out ■ Connecting a set-top box Optical out Audio out Satellite receiver, cable TV receiver or HDTV decoder S-video out Video out Component video out Y PB PR HDMI out O RL Y PB PR V S AUDIO L MULTI CH ...
...2 OPTICAL DIGITAL INPUT FRONT B/ZONE B/ ZONE 2/PRESENCE CD DVD 3 4 COAXIAL FRONT A DVD IN1 SPEAKERS CENTER DTV/CBL IN2 SURROUND OUT SURROUND BACK/BI-AMP DOCK VIDEO VIDEO S VIDEO DVD DTV/CBL IN OUT DVR IN OUT VCR COMPONENT VIDEO PR A DVD PB Y PR B DTV/CBL PB MONITOR OUT ...Audio out Audio in VCR S-video out S-video in Video in Component video out ■ Connecting a set-top box Optical out Audio out Satellite receiver, cable TV receiver or HDTV decoder S-video out Video out Component video out Y PB PR HDMI out O RL Y PB PR V S AUDIO L MULTI CH ...

Owner's Manual
Page 27
... an audio component, the priority is given to the DIGITAL INPUT (COAXIAL) jack. DVD DTV/CBL IN1 IN2 SPEAKERS CENTER SURROUND R L OUT SURROUND BACK/BI-AMP R L LR C Coaxial out Audio out CD player indicates recommended connections indicates alternative connections (One for "OPTICAL IN", or "COAXIAL IN" in LR LR AUDIO L MULTI...
... an audio component, the priority is given to the DIGITAL INPUT (COAXIAL) jack. DVD DTV/CBL IN1 IN2 SPEAKERS CENTER SURROUND R L OUT SURROUND BACK/BI-AMP R L LR C Coaxial out Audio out CD player indicates recommended connections indicates alternative connections (One for "OPTICAL IN", or "COAXIAL IN" in LR LR AUDIO L MULTI...

Owner's Manual
Page 28
.... • The audio signals output at the SUBWOOFER PRE OUT 1 jack. 5 CENTER PRE OUT jack Center channel output jack. 24 En Notes • When "BI-AMP" is the same as the corresponding SPEAKERS terminals. Each PRE OUT jack outputs the same channel signals as the one or two subwoofers with the...
.... • The audio signals output at the SUBWOOFER PRE OUT 1 jack. 5 CENTER PRE OUT jack Center channel output jack. 24 En Notes • When "BI-AMP" is the same as the corresponding SPEAKERS terminals. Each PRE OUT jack outputs the same channel signals as the one or two subwoofers with the...

Owner's Manual
Page 37
... "PRESENCE" to set the function of the speakers connected to create a cohesive sound field in "EXTRA SP ASSIGN". Note If you select "ON" in "BI-AMP" (see page 109), you use the alternative front speaker system (see page 85). 6 Press 8l / h to select the desired setting of "BI...-AMP" in the advanced setup (see page 109) or "EXTRA SP ASSIGN" in "BASIC MENU" (see page 43) Select "FRONT B". • When you cannot select "PRESENCE" ...
... "PRESENCE" to set the function of the speakers connected to create a cohesive sound field in "EXTRA SP ASSIGN". Note If you select "ON" in "BI-AMP" (see page 109), you use the alternative front speaker system (see page 85). 6 Press 8l / h to select the desired setting of "BI...-AMP" in the advanced setup (see page 109) or "EXTRA SP ASSIGN" in "BASIC MENU" (see page 43) Select "FRONT B". • When you cannot select "PRESENCE" ...

Owner's Manual
Page 45
... desired buttons in the * area below to operate the input source component. * POWER POWER STANDBY POWER TV AV A XM SIRIUS MUTE CD MD/CD-R TUNER DVD DTV/CBL DVR TV CH V-AUX/DOCK VCR B AMP TV INPUT TV MUTE TV VOL SCENE 1 2 3 4 BAND LEVEL TITLE SRCH MODE MENU VOLUME SCENE buttons ENTER...
... desired buttons in the * area below to operate the input source component. * POWER POWER STANDBY POWER TV AV A XM SIRIUS MUTE CD MD/CD-R TUNER DVD DTV/CBL DVR TV CH V-AUX/DOCK VCR B AMP TV INPUT TV MUTE TV VOL SCENE 1 2 3 4 BAND LEVEL TITLE SRCH MODE MENU VOLUME SCENE buttons ENTER...

Owner's Manual
Page 48
... SELECT (or FAUDIO SEL) repeatedly to switch between input jacks when more than one input jack is displayed in the OSD by using the "OSD-AMP" parameter in "OPTION MENU" (see page 98). Note The OSD signal is not output at the OPTICAL jack When no signals are input, no sound...
... SELECT (or FAUDIO SEL) repeatedly to switch between input jacks when more than one input jack is displayed in the OSD by using the "OSD-AMP" parameter in "OPTION MENU" (see page 98). Note The OSD signal is not output at the OPTICAL jack When no signals are input, no sound...
Owner's Manual
Page 86
.... Sets the SIRIUS Parental Lock code number and the channel lock configuration (see page 65) Page 93 94 94 94 94 94 Pair the connected Yamaha Bluetooth adapter (such as YBA-10, sold separately) with a 95 Bluetooth component (see page 29). C)MEMORY GUARD - Parameter I/O ASSIGNMENT INPUT RENAME VOL. You can designate... of the signal input at the MULTI CH 95 INPUT jacks. Option menu 5 OPTION MENU Menu A)DISPLAY SET Parameter DIMMER OSD SHIFT OSD-SOURCE OSD-AMP FL SCROLL B)VIDEO SET VIDEO CONV. Selects the video source played back in the front panel display.
.... Sets the SIRIUS Parental Lock code number and the channel lock configuration (see page 65) Page 93 94 94 94 94 94 Pair the connected Yamaha Bluetooth adapter (such as YBA-10, sold separately) with a 95 Bluetooth component (see page 29). C)MEMORY GUARD - Parameter I/O ASSIGNMENT INPUT RENAME VOL. You can designate... of the signal input at the MULTI CH 95 INPUT jacks. Option menu 5 OPTION MENU Menu A)DISPLAY SET Parameter DIMMER OSD SHIFT OSD-SOURCE OSD-AMP FL SCROLL B)VIDEO SET VIDEO CONV. Selects the video source played back in the front panel display.

Owner's Manual
Page 89
... • This parameter shares the value with the "EXTRA SP ASSIGN" parameter in "AUTO SETUP" (see page 33). • If you select "ON" in "BI-AMP" (see page 109), you use another room (see page 43). Customizing this unit (MANUAL SETUP) LFE/bass out LFE/BASS OUT Use this feature to...
... • This parameter shares the value with the "EXTRA SP ASSIGN" parameter in "AUTO SETUP" (see page 33). • If you select "ON" in "BI-AMP" (see page 109), you use another room (see page 43). Customizing this unit (MANUAL SETUP) LFE/bass out LFE/BASS OUT Use this feature to...

Owner's Manual
Page 100
... in a continuous manner. A)DISPLAY SET B)VIDEO SET C)MEMORY GUARD D)INIT. A)DISPLAY SET . Amplifier function OSD display time OSD-AMP Use this feature to display the operation status in the front panel display in the front panel display. Select this to set the ...a certain operation. 30S Turns off the OSD 30 seconds after you perform a certain operation. DIMMER;;;;;;;;;;;;0 OSD SHIFT;;;;;;;;+5 OSD-SOURCE;;;;;;30S OSD-AMP;;;;;;;;;30S FL SCROLL;;;;;;CONT [ ]/[ ]: Up/Down [p]/[[]: Adjust Dimmer DIMMER Use this to display the XM Satellite Radio information, SIRIUS Satellite ...
... in a continuous manner. A)DISPLAY SET B)VIDEO SET C)MEMORY GUARD D)INIT. A)DISPLAY SET . Amplifier function OSD display time OSD-AMP Use this feature to display the operation status in the front panel display in the front panel display. Select this to set the ...a certain operation. 30S Turns off the OSD 30 seconds after you perform a certain operation. DIMMER;;;;;;;;;;;;0 OSD SHIFT;;;;;;;;+5 OSD-SOURCE;;;;;;30S OSD-AMP;;;;;;;;;30S FL SCROLL;;;;;;CONT [ ]/[ ]: Up/Down [p]/[[]: Adjust Dimmer DIMMER Use this to display the XM Satellite Radio information, SIRIUS Satellite ...

Owner's Manual
Page 104
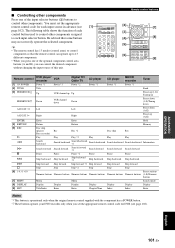
... DIRECT PARAMETER 5 6 7 8 MULTI CH IN AUDIO SEL SLEEP 9 0 10 ENT *1 DTV/CBL *2 POWER POWER STANDBY POWER TV AV A XM SIRIUS MUTE CD MD/CD-R TUNER DVD DTV/CBL DVR TV CH V-AUX/DOCK VCR B AMP TV INPUT TV MUTE TV VOL SCENE 1 2 3 4 BAND LEVEL TITLE SRCH MODE MENU VOLUME ENTER RETURN MEMORY... selector buttons other components ■ Controlling this unit Press 5AMP to control your TV regardless of this unit, a TV, or other than one TV by Yamaha and other manufacturers.
... DIRECT PARAMETER 5 6 7 8 MULTI CH IN AUDIO SEL SLEEP 9 0 10 ENT *1 DTV/CBL *2 POWER POWER STANDBY POWER TV AV A XM SIRIUS MUTE CD MD/CD-R TUNER DVD DTV/CBL DVR TV CH V-AUX/DOCK VCR B AMP TV INPUT TV MUTE TV VOL SCENE 1 2 3 4 BAND LEVEL TITLE SRCH MODE MENU VOLUME ENTER RETURN MEMORY... selector buttons other components ■ Controlling this unit Press 5AMP to control your TV regardless of this unit, a TV, or other than one TV by Yamaha and other manufacturers.
Owner's Manual
Page 105
... control the desired component without changing the input source of this unit. [1] POWER POWER STANDBY POWER TV AV A XM SIRIUS MUTE CD MD/CD-R TUNER DVD DTV/CBL DVR TV CH V-AUX/DOCK VCR B AMP TV INPUT TV MUTE TV VOL SCENE 1 2 3 4 Remote control features [2] BAND LEVEL TITLE SRCH MODE MENU VOLUME...
... control the desired component without changing the input source of this unit. [1] POWER POWER STANDBY POWER TV AV A XM SIRIUS MUTE CD MD/CD-R TUNER DVD DTV/CBL DVR TV CH V-AUX/DOCK VCR B AMP TV INPUT TV MUTE TV VOL SCENE 1 2 3 4 Remote control features [2] BAND LEVEL TITLE SRCH MODE MENU VOLUME...

Owner's Manual
Page 106
... AV Press for 3 seconds 2 Press the numeric buttons (0 to 9) (G) to enter the four-digit remote control code for the component to be able to set up, press 2AV POWER for 3 seconds AMP flashes 2 Press the numeric buttons (6) to "List of remote control codes" at the end of your Yamaha... component even if a Yamaha remote control code is canceled. Remote control code default settings Input source Component category...
... AV Press for 3 seconds 2 Press the numeric buttons (0 to 9) (G) to enter the four-digit remote control code for the component to be able to set up, press 2AV POWER for 3 seconds AMP flashes 2 Press the numeric buttons (6) to "List of remote control codes" at the end of your Yamaha... component even if a Yamaha remote control code is canceled. Remote control code default settings Input source Component category...


