
Owner's Manual
Page 83
... selector for 110V, 127V, 220V or 240V main voltages, use a "minus" screwdriver to take up any slack in some areas. CLP-370/340/330, CLP-S308/S306 Owner's Manual 83 Check the connection. • If the unit creaks or is initially shipped. CAUTION When moving the instrument after ... insert the plug into the holders. 5-3 Use a vinyl tie to rotate the selector dial so that the correct voltage for models that it ? Review the assembly procedure and correct any parts left over? Do not hold here. Turn the adjuster so that feature a voltage selector). Use the included ...
... selector for 110V, 127V, 220V or 240V main voltages, use a "minus" screwdriver to take up any slack in some areas. CLP-370/340/330, CLP-S308/S306 Owner's Manual 83 Check the connection. • If the unit creaks or is initially shipped. CAUTION When moving the instrument after ... insert the plug into the holders. 5-3 Use a vinyl tie to rotate the selector dial so that the correct voltage for models that it ? Review the assembly procedure and correct any parts left over? Do not hold here. Turn the adjuster so that feature a voltage selector). Use the included ...

Owner's Manual
Page 86
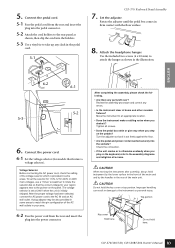
Review the assembly procedure and correct any parts left over? Top portion Key cover Hold here. ...it ? CAUTION When moving the instrument after assembly, always hold here. CAUTION Do not hold here. 86 CLP-370/340/330, CLP-S308/S306 Owner's Manual Do not hold the key cover or top portion. Rotate the adjuster until the pedal ... selector (for your area. 6-2 Pass the power cord from the rear and insert the plug into the power connector. CLP-340/330: Keyboard Stand Assembly 5. Connect the pedal cord and power cord. 5-1 Pass the pedal cord from the rear and insert the plug...
Review the assembly procedure and correct any parts left over? Top portion Key cover Hold here. ...it ? CAUTION When moving the instrument after assembly, always hold here. CAUTION Do not hold here. 86 CLP-370/340/330, CLP-S308/S306 Owner's Manual Do not hold the key cover or top portion. Rotate the adjuster until the pedal ... selector (for your area. 6-2 Pass the power cord from the rear and insert the plug into the power connector. CLP-340/330: Keyboard Stand Assembly 5. Connect the pedal cord and power cord. 5-1 Pass the pedal cord from the rear and insert the plug...

Owner's Manual
Page 90
... injury. CAUTION Do not hold the bottom of doors and other movable fixtures? Do not hold here. 90 CLP-370/340/330, CLP-S308/S306 Owner's Manual Review the assembly procedure and correct any parts left over? CAUTION When transporting the instrument, cover the entire keyboard with the protective sheet (page...
... injury. CAUTION Do not hold the bottom of doors and other movable fixtures? Do not hold here. 90 CLP-370/340/330, CLP-S308/S306 Owner's Manual Review the assembly procedure and correct any parts left over? CAUTION When transporting the instrument, cover the entire keyboard with the protective sheet (page...
