

Reference Booklet
Page 16
... RESONANCE BnH,63H,01H,62H,21H,06H,mmH EQ BASS (CVP-109/107/700) BnH,63H,01H,62H,30H,06H,mmH EQ TREBLE (CVP-109/107/700) BnH,63H,01H,62H,31H,06H,mmH EQ BASS FREQ. (CVP-109/107/700) BnH,63H,01H,62H,34H,06H,mmH... REVERB SEND LEVEL CHORUS SEND LEVEL VARIATION SEND LEVEL RPN LSB RPN MSB PITCH BEND SENS. BnH,63H,14H,62H,rrH,06H,mmH 16 CVP-109/107/105/103/700 Decimal 0 1 2 3 4 5 6 7 8 9 10 11 12 13 14 15 16 17 18 19 20 21 22 23 24 25 ...80 81 82 83 84 85 86 87 88 89 90 91 92 93 94 95 96 97 98 99 100 101 102 103 104 105 106 107 108 109 110 111 112 113 114 115 116 117 118 119 120 121 122 123 124 125 ...
... RESONANCE BnH,63H,01H,62H,21H,06H,mmH EQ BASS (CVP-109/107/700) BnH,63H,01H,62H,30H,06H,mmH EQ TREBLE (CVP-109/107/700) BnH,63H,01H,62H,31H,06H,mmH EQ BASS FREQ. (CVP-109/107/700) BnH,63H,01H,62H,34H,06H,mmH... REVERB SEND LEVEL CHORUS SEND LEVEL VARIATION SEND LEVEL RPN LSB RPN MSB PITCH BEND SENS. BnH,63H,14H,62H,rrH,06H,mmH 16 CVP-109/107/105/103/700 Decimal 0 1 2 3 4 5 6 7 8 9 10 11 12 13 14 15 16 17 18 19 20 21 22 23 24 25 ...80 81 82 83 84 85 86 87 88 89 90 91 92 93 94 95 96 97 98 99 100 101 102 103 104 105 106 107 108 109 110 111 112 113 114 115 116 117 118 119 120 121 122 123 124 125 ...

Reference Booklet
Page 17
... NUMBER 0ppppppp p = 0 - 127 * PROGRAM NUMBER: XG DRUM VOICE number correspondence P = 0 Standard Kit P = 1 Standard2 Kit P = 4 Hit Kit (CVP-109/107/700) P = 8 Room Kit P = 16 Rock Kit P = 24 Electro Kit P = 25 Analog Kit P = 27 Dance Kit P = 32... 127 *1 c = 38 DATA ENTRY LSB ; v = 0 - 127 c = 10 PANPOT ; v = 0 - 127 c = 94 VARIATION SEND LEVEL ; v = 0 - 127 *2 c= 6 DATA ENTRY MSB ; CVP-109/107/105/103/700 17 v = 0 - 127 c= 1 MODULATION ; v = 0-63:OFF , 64-127:ON *2 c = 66 SOSTENUTO ; v = 0:-64 - 64:0 - 127:+63 *2 c = 72 RELEASE TIME ; v ...
... NUMBER 0ppppppp p = 0 - 127 * PROGRAM NUMBER: XG DRUM VOICE number correspondence P = 0 Standard Kit P = 1 Standard2 Kit P = 4 Hit Kit (CVP-109/107/700) P = 8 Room Kit P = 16 Rock Kit P = 24 Electro Kit P = 25 Analog Kit P = 27 Dance Kit P = 32... 127 *1 c = 38 DATA ENTRY LSB ; v = 0 - 127 c = 10 PANPOT ; v = 0 - 127 c = 94 VARIATION SEND LEVEL ; v = 0 - 127 *2 c= 6 DATA ENTRY MSB ; CVP-109/107/105/103/700 17 v = 0 - 127 c= 1 MODULATION ; v = 0-63:OFF , 64-127:ON *2 c = 66 SOSTENUTO ; v = 0:-64 - 64:0 - 127:+63 *2 c = 72 RELEASE TIME ; v ...
Reference Booklet
Page 20
...Clock) 11110111 F7 End of Exclusive (3-6-4-2) BULK DUMP ORGAN FLUTE DATA (CVP-109/107/700) binary hexadecimal 11110000 F0 Exclusive status 01000011 43 YAMAHA 01110011 73 CLAVINOVA ID 00000001 01 Model ID (Clavinova common ID) 00000110 06 Bulk ID 00001011 0B Bulk No.(ORGAN FLUTE ...(Data Length=nnnnH bytes) 0ddddddd dd1 Bulk Data : : 0ccccccc cc don't care 11110111 F7 End of Exclusive 20 CVP-109/107/105/103/700 MIDI Data Format (3-6-3) XG STANDARD (3-6-3-1) XG PARAMETER CHANGE (3-6-3-1-1) XG SYSTEM ON binary hexadecimal 11110000 F0 01000011 43 ...
...Clock) 11110111 F7 End of Exclusive (3-6-4-2) BULK DUMP ORGAN FLUTE DATA (CVP-109/107/700) binary hexadecimal 11110000 F0 Exclusive status 01000011 43 YAMAHA 01110011 73 CLAVINOVA ID 00000001 01 Model ID (Clavinova common ID) 00000110 06 Bulk ID 00001011 0B Bulk No.(ORGAN FLUTE ...(Data Length=nnnnH bytes) 0ddddddd dd1 Bulk Data : : 0ccccccc cc don't care 11110111 F7 End of Exclusive 20 CVP-109/107/105/103/700 MIDI Data Format (3-6-3) XG STANDARD (3-6-3-1) XG PARAMETER CHANGE (3-6-3-1-1) XG SYSTEM ON binary hexadecimal 11110000 F0 01000011 43 ...

Reference Booklet
Page 21
... F0 01000011 43 01110011 73 01011010 5E 00010001 11 00000000 00 00010110 16 0mmmmmmm mm 0lllllll ll 11110111 F7 Exclusive status YAMAHA ID Clavinova ID CVP-103/105/107/109/700 ID Sub ID Channel No. (always 00) Style No. End of Exclusive If this message ... hexadecimal 11110000 F0 01000011 43 01110011 73 01000101 01 00010001 11 00000000 00 00010100 14 0ddddddd DD 11110111 F7 Exclusive status YAMAHA ID Clavinova ID Clavinova common ID Sub ID Split Point Split Key No. Control No. LSB End of Exclusive (3-6-5-3) FINGERING binary hexadecimal 11110000 ...
... F0 01000011 43 01110011 73 01011010 5E 00010001 11 00000000 00 00010110 16 0mmmmmmm mm 0lllllll ll 11110111 F7 Exclusive status YAMAHA ID Clavinova ID CVP-103/105/107/109/700 ID Sub ID Channel No. (always 00) Style No. End of Exclusive If this message ... hexadecimal 11110000 F0 01000011 43 01110011 73 01000101 01 00010001 11 00000000 00 00010100 14 0ddddddd DD 11110111 F7 Exclusive status YAMAHA ID Clavinova ID Clavinova common ID Sub ID Split Point Split Key No. Control No. LSB End of Exclusive (3-6-5-3) FINGERING binary hexadecimal 11110000 ...

Reference Booklet
Page 22
... are only valid after the reception of Exclusive (3-6-5-9) NATURAL REVERB TRACK ON/OFF (CVP-109) binary hexadecimal 11110000 F0 Exclusive status 01000011 43 YAMAHA ID 01110011 73 Clavinova ID 01011001 5D CVP-109 ID 00010001 11 Sub ID 0000nnnn 0n Channel No. (00H - 0FH) ...CVP-109 ID 00010001 11 Sub ID 00000000 00 Channel No. (always 00) 01010010 52 Natural Reverb Control No. 00000000 00 Natural Reverb Type Parameter No. 0mmmmmmm mm Natural Reverb Type MSB 0lllllll ll Natural Reverb Type LSB 11110111 F7 End of the next key on . 22 CVP-109/107/105/103...
... are only valid after the reception of Exclusive (3-6-5-9) NATURAL REVERB TRACK ON/OFF (CVP-109) binary hexadecimal 11110000 F0 Exclusive status 01000011 43 YAMAHA ID 01110011 73 Clavinova ID 01011001 5D CVP-109 ID 00010001 11 Sub ID 0000nnnn 0n Channel No. (00H - 0FH) ...CVP-109 ID 00010001 11 Sub ID 00000000 00 Channel No. (always 00) 01010010 52 Natural Reverb Control No. 00000000 00 Natural Reverb Type Parameter No. 0mmmmmmm mm Natural Reverb Type MSB 0lllllll ll Natural Reverb Type LSB 11110111 F7 End of the next key on . 22 CVP-109/107/105/103...

Reference Booklet
Page 38
... Sense o sages:Reset x Notes: o x x x o o o(120,126,127) o(121) x o(123-125) o x Mode 1 : OMNI ON, POLY Mode 3 : OMNI OFF, POLY 38 CVP-109/107/105/103/700 Mode 2 : OMNI ON, MONO Mode 4 : OMNI OFF, MONO o : Yes x : No YAMAHA [ Clavinova ] Date:01-MAR-1999 Model CVP-103/105/107/109/700 MIDI Implementation Chart Version : 1.0 Function ... x Common : Song Sel.
... Sense o sages:Reset x Notes: o x x x o o o(120,126,127) o(121) x o(123-125) o x Mode 1 : OMNI ON, POLY Mode 3 : OMNI OFF, POLY 38 CVP-109/107/105/103/700 Mode 2 : OMNI ON, MONO Mode 4 : OMNI OFF, MONO o : Yes x : No YAMAHA [ Clavinova ] Date:01-MAR-1999 Model CVP-103/105/107/109/700 MIDI Implementation Chart Version : 1.0 Function ... x Common : Song Sel.

Reference Booklet
Page 45
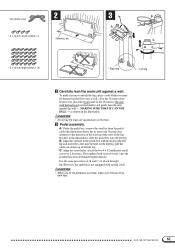
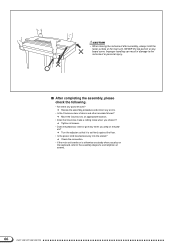
s After completing the assembly, please check the following. • Are there any errors. • Is the Clavinova clear of the main unit, NEVER the top portion or keyboard cover. Tighten all screws. • Models without keyboard cover • Models with keyboard cover ... instrument after assembly, always hold the lower surface of doors and other movable fixtures? Review the assembly procedure and correct any parts left over? CVP-109/107/105/103/700 45 Check the connection. • If the main unit creaks or is set firmly against the floor. • Are the pedal and...
s After completing the assembly, please check the following. • Are there any errors. • Is the Clavinova clear of the main unit, NEVER the top portion or keyboard cover. Tighten all screws. • Models without keyboard cover • Models with keyboard cover ... instrument after assembly, always hold the lower surface of doors and other movable fixtures? Review the assembly procedure and correct any parts left over? CVP-109/107/105/103/700 45 Check the connection. • If the main unit creaks or is set firmly against the floor. • Are the pedal and...
Reference Booklet
Page 47
CAUTION • Do not lay the main unit upside-down on the blanket and gently lean the unit against a wall. as shown in the illustration. CVP-109/107/105/103/700 47 To make it easier to install the legs, place a soft blanket or similar material on the floor near a wall, close the... Clavinova keyboard cover, place the front panel of the Clavinova (the side with the keyboard) on the floor. CAttach the front legs. Make sure that the screws...
CAUTION • Do not lay the main unit upside-down on the blanket and gently lean the unit against a wall. as shown in the illustration. CVP-109/107/105/103/700 47 To make it easier to install the legs, place a soft blanket or similar material on the floor near a wall, close the... Clavinova keyboard cover, place the front panel of the Clavinova (the side with the keyboard) on the floor. CAttach the front legs. Make sure that the screws...
Reference Booklet
Page 51
... set firmly against the floor. • Are the pedal and power cords inserted securely into the sockets? Move the Clavinova to an appropriate location. • Does the Clavinova make a rattling noise when you step on the keyboard, refer to the instrument or personal injury. Turn the adjuster... so that it ? CVP-109/107/105/103/700 51 Improper handling can result in damage to the assembly diagrams and retighten all ...
... set firmly against the floor. • Are the pedal and power cords inserted securely into the sockets? Move the Clavinova to an appropriate location. • Does the Clavinova make a rattling noise when you step on the keyboard, refer to the instrument or personal injury. Turn the adjuster... so that it ? CVP-109/107/105/103/700 51 Improper handling can result in damage to the assembly diagrams and retighten all ...
Reference Booklet
Page 59
...the main unit creaks or is set firmly against the floor. m Review the assembly procedure and correct any parts left over? m Move the Clavinova to the assembly diagrams and retighten all screws. m Tighten all screws. q Are the pedal and power cords inserted securely into the sockets? ...to the instrument or personal injury. s After completing the assembly, please check the following. m Turn the adjuster so that it ? CVP-109/107/105/103/700 59 CAUTION • When moving the instrument after assembly, always hold the lower surface of doors and other movable fixtures? q ...
...the main unit creaks or is set firmly against the floor. m Review the assembly procedure and correct any parts left over? m Move the Clavinova to the assembly diagrams and retighten all screws. m Tighten all screws. q Are the pedal and power cords inserted securely into the sockets? ...to the instrument or personal injury. s After completing the assembly, please check the following. m Turn the adjuster so that it ? CVP-109/107/105/103/700 59 CAUTION • When moving the instrument after assembly, always hold the lower surface of doors and other movable fixtures? q ...
Reference Booklet
Page 61
... on the left leg, pull the cable out of the top of the leg brackets in the illustration. Paying close the Clavinova keyboard cover, place the front panel of the Clavinova (the side with a pedal cord.) CAUTION • When you lift the pedal box assembly, make it easier to install the legs... the floor near a wall, close attention to attach the right leg.(However, the right leg is not equipped with the keyboard) on the floor. CVP-109/107/105/103/700 61 MAKING SURE THAT IT CAN NOT FALL - To make sure that you lift by both legs. A: Under the pedal box, remove...
... on the left leg, pull the cable out of the top of the leg brackets in the illustration. Paying close the Clavinova keyboard cover, place the front panel of the Clavinova (the side with a pedal cord.) CAUTION • When you lift the pedal box assembly, make it easier to install the legs... the floor near a wall, close attention to attach the right leg.(However, the right leg is not equipped with the keyboard) on the floor. CVP-109/107/105/103/700 61 MAKING SURE THAT IT CAN NOT FALL - To make sure that you lift by both legs. A: Under the pedal box, remove...
Reference Booklet
Page 66
Review the assembly procedure and correct any parts left over? Tighten all screws. 66 CVP-109/107/105/103/700 Move the Clavinova to an appropriate location. • Does the Clavinova make a rattling noise when you step on the keyboard, refer to the instrument or personal injury. Improper handling can result in damage to the... the lower surface of doors and other movable fixtures? s After completing the assembly, please check the following. • Are there any errors. • Is the Clavinova clear of the main unit, NEVER the top portion or keyboard cover.
Review the assembly procedure and correct any parts left over? Tighten all screws. 66 CVP-109/107/105/103/700 Move the Clavinova to an appropriate location. • Does the Clavinova make a rattling noise when you step on the keyboard, refer to the instrument or personal injury. Improper handling can result in damage to the... the lower surface of doors and other movable fixtures? s After completing the assembly, please check the following. • Are there any errors. • Is the Clavinova clear of the main unit, NEVER the top portion or keyboard cover.
Reference Booklet
Page 67
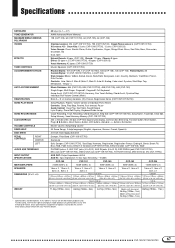
... (141lbs., 5oz.) Models with your Yamaha dealer. Yamaha Corp. C7) AWM (Advanced Wave Memory) 128 (CVP-109), 64 (CVP-107/700), 64 (CVP-105), 64 (CVP-103) Clavinova voices: 224 (CVP-109/107/700), 195 (CVP-105/103) Organ Flutes voices: 6 (CVP-109/107/700) XG voices: 480 Drum Kits: 13 sets (CVP-109/107/700), 12 sets (CVP-105/103) Voice Groups: Piano, Electric...
... (141lbs., 5oz.) Models with your Yamaha dealer. Yamaha Corp. C7) AWM (Advanced Wave Memory) 128 (CVP-109), 64 (CVP-107/700), 64 (CVP-105), 64 (CVP-103) Clavinova voices: 224 (CVP-109/107/700), 195 (CVP-105/103) Organ Flutes voices: 6 (CVP-109/107/700) XG voices: 480 Drum Kits: 13 sets (CVP-109/107/700), 12 sets (CVP-105/103) Voice Groups: Piano, Electric...


