
Owner's Manual
Page 2
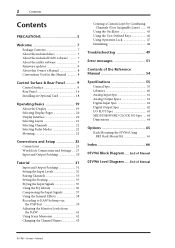
... Channels 33 Setting the Routing 33 EQ'ing the Input Signals 35 Using the EQ Library 36 Compressing the Input Signals 37 Using the Internal Effects 38 Recording to DAW Software via the USB Port 39 Adjusting the Monitor Levels from the DAW 41 Using Scene Memories 42 Changing the Channel... 61 Digital Input Spec 62 Digital Output Spec 62 I/O SLOT Spec 63 MIDI/USB/WORD CLOCK I/O Spec .... 64 Dimensions 64 Options 65 Rack Mounting the 01V96i Using RK1 Rack Mount Kit 65 Index 66 01V96i Block Diagram.......End of Manual 01V96i Level Diagram .......End of Manual...
... Channels 33 Setting the Routing 33 EQ'ing the Input Signals 35 Using the EQ Library 36 Compressing the Input Signals 37 Using the Internal Effects 38 Recording to DAW Software via the USB Port 39 Adjusting the Monitor Levels from the DAW 41 Using Scene Memories 42 Changing the Channel... 61 Digital Input Spec 62 Digital Output Spec 62 I/O SLOT Spec 63 MIDI/USB/WORD CLOCK I/O Spec .... 64 Dimensions 64 Options 65 Rack Mounting the 01V96i Using RK1 Rack Mount Kit 65 Index 66 01V96i Block Diagram.......End of Manual 01V96i Level Diagram .......End of Manual...

Owner's Manual
Page 6
...treatment, recovery and recycling of old products, please take them to save the data to be held responsible for damage caused by qualified Yamaha service personnel. • Do not rest your national legislation and the Directives 2002/96/EC. For more information about replacing defective ... openings on the device (vents, etc.). • Avoid inserting or dropping foreign objects (paper, plastic, metal, etc.) into any potential negative effects on the buttons, switches or connectors. • Do not use this can cause permanent hearing loss. If you purchased the items. [For business...
...treatment, recovery and recycling of old products, please take them to save the data to be held responsible for damage caused by qualified Yamaha service personnel. • Do not rest your national legislation and the Directives 2002/96/EC. For more information about replacing defective ... openings on the device (vents, etc.). • Avoid inserting or dropping foreign objects (paper, plastic, metal, etc.) into any potential negative effects on the buttons, switches or connectors. • Do not use this can cause permanent hearing loss. If you purchased the items. [For business...
Owner's Manual
Page 8
...only in an electronic file, and we hope you must first install the "Yamaha Steinberg USB Driver" in this document) The owner's manual describes the names and functions of the functionality, the effect parameters, and MIDI-related functions. In particular, searching for terms and clicking... to simplify explanations, the procedures reference only the [DISPLAY] button method. About this Owner's Manual ■ Owner's manual (this Manual The 01V96i features two types of buttons: physical buttons that you can press (e.g., ENTER and DISPLAY) and buttons that you require, or click a link to...
...only in an electronic file, and we hope you must first install the "Yamaha Steinberg USB Driver" in this document) The owner's manual describes the names and functions of the functionality, the effect parameters, and MIDI-related functions. In particular, searching for terms and clicking... to simplify explanations, the procedures reference only the [DISPLAY] button method. About this Owner's Manual ■ Owner's manual (this Manual The 01V96i features two types of buttons: physical buttons that you can press (e.g., ENTER and DISPLAY) and buttons that you require, or click a link to...
Owner's Manual
Page 9
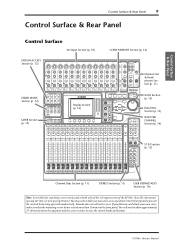
...MEMORY FADER MODE Section (p. 12) LAYER Section (p. 13) SCENE DIO/SETUP MIDI UTILITY / INSERT/ PAN/ PAIR/ DELAY ROUTING GROUP PATCH DYNAMICS EQ EFFECT FADER MODE VIEW AUX 1 AUX 2 AUX 3 AUX 4 AUX 5 AUX 6 AUX 7 AUX 8 HOME (METER) LAYER 1-16 17-32 MASTER ...14) Note: Screw holes for attaching a cover are located at both sides of the AD input section of the 01V96i. (Size M3, horizontal spacing 417 mm, vertical spacing 36 mm.) You may wish to fabricate your own cover... front panel to clear the control knobs and buttons. 01V96i-Owner's Manual Yamaha does not sell such a cover.
...MEMORY FADER MODE Section (p. 12) LAYER Section (p. 13) SCENE DIO/SETUP MIDI UTILITY / INSERT/ PAN/ PAIR/ DELAY ROUTING GROUP PATCH DYNAMICS EQ EFFECT FADER MODE VIEW AUX 1 AUX 2 AUX 3 AUX 4 AUX 5 AUX 6 AUX 7 AUX 8 HOME (METER) LAYER 1-16 17-32 MASTER ...14) Note: Screw holes for attaching a cover are located at both sides of the AD input section of the 01V96i. (Size M3, horizontal spacing 417 mm, vertical spacing 36 mm.) You may wish to fabricate your own cover... front panel to clear the control knobs and buttons. 01V96i-Owner's Manual Yamaha does not sell such a cover.
Owner's Manual
Page 10
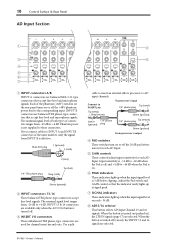
... level ranges from INPUT B is turned off (raised), the INPUT 15 and 16 signals are available only when the AD 15/16 button is effective. INPUT B connectors are balanced XLR-3-31-type connectors that accept line-level and microphone signals. Phantom power is turned off . 3 INSERT I ...each AD Input. 5 GAIN controls These controls adjust input sensitivity for channel insert ins and outs. INPUT 15 & 16 connectors are selected. 01V96i-Owner's Manual Adjust the Pad switch and GAIN control so that accept line-level and microphone signals. 10 Control Surface & Rear Panel AD ...
... level ranges from INPUT B is turned off (raised), the INPUT 15 and 16 signals are available only when the AD 15/16 button is effective. INPUT B connectors are balanced XLR-3-31-type connectors that accept line-level and microphone signals. Phantom power is turned off . 3 INSERT I ...each AD Input. 5 GAIN controls These controls adjust input sensitivity for channel insert ins and outs. INPUT 15 & 16 connectors are selected. 01V96i-Owner's Manual Adjust the Pad switch and GAIN control so that accept line-level and microphone signals. 10 Control Surface & Rear Panel AD ...
Owner's Manual
Page 12
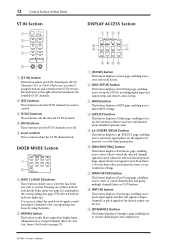
... Out, Aux Out, Stereo Out) levels (see page 22), and displays the corresponding Aux page. (The selected button's indicator lights up the 01V96i, including digital input and output setup and remote control setup. 3 [MIDI] button This button displays a MIDI page, enabling you to make MIDI...IN section. DISPLAY ACCESS Section 1 23 4 DISPLAY ACCESS 6 5 SCENE DIO/SETUP MIDI UTILITY / INSERT/ PAN/ PAIR/ DELAY ROUTING GROUP PATCH DYNAMICS EQ EFFECT VIEW 90AB 7 8 1 [SCENE] button This button displays a Scene page, enabling you to store and recall Scenes. 2 [DIO/SETUP] button This button...
... Out, Aux Out, Stereo Out) levels (see page 22), and displays the corresponding Aux page. (The selected button's indicator lights up the 01V96i, including digital input and output setup and remote control setup. 3 [MIDI] button This button displays a MIDI page, enabling you to make MIDI...IN section. DISPLAY ACCESS Section 1 23 4 DISPLAY ACCESS 6 5 SCENE DIO/SETUP MIDI UTILITY / INSERT/ PAN/ PAIR/ DELAY ROUTING GROUP PATCH DYNAMICS EQ EFFECT VIEW 90AB 7 8 1 [SCENE] button This button displays a Scene page, enabling you to store and recall Scenes. 2 [DIO/SETUP] button This button...

Owner's Manual
Page 13
...23 1 [1-16]/[17-32] buttons These buttons select an Input Channel layer as the layer controlled in the Channel Strip section. Tab Scroll arrow 01V96i-Owner's Manual B [VIEW] button This button displays a View page, enabling you to control Bus Outs and AUX Sends. (See page 21 ...Panel Control Surface 13 0 [EQ] button This button displays an EQ page, enabling you to edit the internal effects processors and use optional plug-in cards. A [EFFECT] button This button displays an Effect page, enabling you to set mix parameters for more information on displaying a page.) 5 Left Tab Scroll [...
...23 1 [1-16]/[17-32] buttons These buttons select an Input Channel layer as the layer controlled in the Channel Strip section. Tab Scroll arrow 01V96i-Owner's Manual B [VIEW] button This button displays a View page, enabling you to control Bus Outs and AUX Sends. (See page 21 ...Panel Control Surface 13 0 [EQ] button This button displays an EQ page, enabling you to edit the internal effects processors and use optional plug-in cards. A [EFFECT] button This button displays an Effect page, enabling you to set mix parameters for more information on displaying a page.) 5 Left Tab Scroll [...

Owner's Manual
Page 20
... a specific page. 3. You may need to press the [ENTER] button to adjust the continuously variable parameter values, including Input Channel levels and effects parameters. If you selected in Step 1. If you to confirm a change in the DISPLAY ACCESS section. 2. Press the cursor buttons to move...group: Press and hold down the button you edit a value in Step 1 repeatedly. Press the corresponding button on where the page is cancelled. 01V96i-Owner's Manual You can change , and the flashing stops. If the selected display page group contains multiple pages, press the [F1]-[F4] ...
... a specific page. 3. You may need to press the [ENTER] button to adjust the continuously variable parameter values, including Input Channel levels and effects parameters. If you selected in Step 1. If you to confirm a change in the DISPLAY ACCESS section. 2. Press the cursor buttons to move...group: Press and hold down the button you edit a value in Step 1 repeatedly. Press the corresponding button on where the page is cancelled. 01V96i-Owner's Manual You can change , and the flashing stops. If the selected display page group contains multiple pages, press the [F1]-[F4] ...

Owner's Manual
Page 24
.... 4. The PEAK HOLD button turns on, and the peak level is held on the meters on the page. 24 Operating Basics • Effect page This page displays the internal effects processor 1-4 input and output levels altogether. • Stereo page This page displays the Stereo Out output level. If you selected the CH1...: These pages also allow you to the PEAK HOLD button, then press [ENTER]. To cancel the Peak Hold function, turn the PEAK HOLD button off. 01V96i-Owner's Manual To activate the Peak Hold function, move the cursor to change the metering position using the POSITION parameter.
.... 4. The PEAK HOLD button turns on, and the peak level is held on the meters on the page. 24 Operating Basics • Effect page This page displays the internal effects processor 1-4 input and output levels altogether. • Stereo page This page displays the Stereo Out output level. If you selected the CH1...: These pages also allow you to the PEAK HOLD button, then press [ENTER]. To cancel the Peak Hold function, turn the PEAK HOLD button off. 01V96i-Owner's Manual To activate the Peak Hold function, move the cursor to change the metering position using the POSITION parameter.

Owner's Manual
Page 25
For more information, see your 01V96i. Tip: You can be mixed. If an optional AD card (such as the MY8-AD or MY8-AD96) is installed in System Optional AD card (adds 8 input channels) External recorder Effects processor Guitar SLOT INPUT connector OMNI OUT connector INPUT connector CH1-4 CH5-8...15 PEAK 16 SIGNAL SIGNAL 0 LEVEL10 PHONES DISPLAY ACCESS SCENE MEMORY SCENE DIO/SETUP MIDI UTILITY / INSERT/ PAN/ PAIR/ DELAY ROUTING GROUP PATCH DYNAMICS EQ EFFECT FADER MODE VIEW AUX 1 AUX 2 AUX 3 AUX 4 AUX 5 AUX 6 AUX 7 AUX 8 HOME (METER) LAYER 1-16 17-32 MASTER REMOTE...
For more information, see your 01V96i. Tip: You can be mixed. If an optional AD card (such as the MY8-AD or MY8-AD96) is installed in System Optional AD card (adds 8 input channels) External recorder Effects processor Guitar SLOT INPUT connector OMNI OUT connector INPUT connector CH1-4 CH5-8...15 PEAK 16 SIGNAL SIGNAL 0 LEVEL10 PHONES DISPLAY ACCESS SCENE MEMORY SCENE DIO/SETUP MIDI UTILITY / INSERT/ PAN/ PAIR/ DELAY ROUTING GROUP PATCH DYNAMICS EQ EFFECT FADER MODE VIEW AUX 1 AUX 2 AUX 3 AUX 4 AUX 5 AUX 6 AUX 7 AUX 8 HOME (METER) LAYER 1-16 17-32 MASTER REMOTE...

Owner's Manual
Page 26
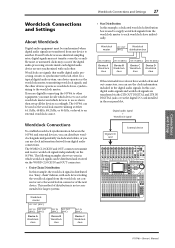
...01V96i's remote functionality can also be used to perform locate and transport operations on the DAW, and to a computer-based DAW (Digital Audio Workstation). 26 Connections and Setup ■ Configuring a recording system that uses a DAW (Digital Audio Workstation) Computer TO HOST USB port Effects... Real-time External Control Sur face Modular Synthesis Plug-in System SCENE DIO/SETUP MIDI UTILITY / INSERT/ PAN/ PAIR/ DELAY ROUTING GROUP PATCH DYNAMICS EQ EFFECT FADER MODE VIEW AUX 1 AUX 2 AUX 3 AUX 4 AUX 5 AUX 6 AUX 7 AUX 8 HOME (METER) LAYER 1-16 17-32 MASTER REMOTE ...
...01V96i's remote functionality can also be used to perform locate and transport operations on the DAW, and to a computer-based DAW (Digital Audio Workstation). 26 Connections and Setup ■ Configuring a recording system that uses a DAW (Digital Audio Workstation) Computer TO HOST USB port Effects... Real-time External Control Sur face Modular Synthesis Plug-in System SCENE DIO/SETUP MIDI UTILITY / INSERT/ PAN/ PAIR/ DELAY ROUTING GROUP PATCH DYNAMICS EQ EFFECT FADER MODE VIEW AUX 1 AUX 2 AUX 3 AUX 4 AUX 5 AUX 6 AUX 7 AUX 8 HOME (METER) LAYER 1-16 17-32 MASTER REMOTE ...
Owner's Manual
Page 27
...15 PEAK SIGNAL 16 0 LEVEL10 PHONES DISPLAY ACCESS SCENE MEMORY SCENE DIO/SETUP MIDI UTILITY / INSERT/ PAN/ PAIR/ DELAY ROUTING GROUP PATCH DYNAMICS EQ EFFECT FADER MODE VIEW AUX 1 AUX 2 AUX 3 AUX 4 AUX 5 AUX 6 AUX 7 AUX 8 HOME (METER) LAYER 1-16 17-32 MASTER ...I/O INSERT I/O INSERT I/O INSERT I/O INSERT I/O INSERT I /O card installed in the rear panel slot. If you are digitally connecting the 01V96i to other equipment, you must be synchronized when digital audio signals are transferred from one device operates as the wordclock master, transmitting wordclock signals, ...
...15 PEAK SIGNAL 16 0 LEVEL10 PHONES DISPLAY ACCESS SCENE MEMORY SCENE DIO/SETUP MIDI UTILITY / INSERT/ PAN/ PAIR/ DELAY ROUTING GROUP PATCH DYNAMICS EQ EFFECT FADER MODE VIEW AUX 1 AUX 2 AUX 3 AUX 4 AUX 5 AUX 6 AUX 7 AUX 8 HOME (METER) LAYER 1-16 17-32 MASTER ...I/O INSERT I/O INSERT I/O INSERT I/O INSERT I/O INSERT I /O card installed in the rear panel slot. If you are digitally connecting the 01V96i to other equipment, you must be synchronized when digital audio signals are transferred from one device operates as the wordclock master, transmitting wordclock signals, ...

Owner's Manual
Page 29
.......Input Channels 1-16 • ADAT IN channels 1-8......Input Channels 17-24 • Slot channels 1-8 Input Channels 25-32 • Outputs 1-2 of Internal Effects Processor 4 • 2TD-L/R 2TR IN DIGITAL L/R connectors Follow the steps below to view or change the assignment. Aux Out 1-4 • ADAT OUT channels... the patching. 1. Use the cursor buttons to Inputs and Outputs. Connections and Setup Input and Output Patching 29 Input and Output Patching The 01V96i is designed to enable you to patch (assign) signals to move the cur- Stereo Out L & R Tip: • The STEREO ...
.......Input Channels 1-16 • ADAT IN channels 1-8......Input Channels 17-24 • Slot channels 1-8 Input Channels 25-32 • Outputs 1-2 of Internal Effects Processor 4 • 2TD-L/R 2TR IN DIGITAL L/R connectors Follow the steps below to view or change the assignment. Aux Out 1-4 • ADAT OUT channels... the patching. 1. Use the cursor buttons to Inputs and Outputs. Connections and Setup Input and Output Patching 29 Input and Output Patching The 01V96i is designed to enable you to patch (assign) signals to move the cur- Stereo Out L & R Tip: • The STEREO ...

Owner's Manual
Page 34
...Input Channel signals to display the Pan/Route | Pan page. However during multitrack recording, or when monitoring the sound with the DAW's effects applied, you to the Stereo Bus, and for signals routed from the Input Channels to monitor the signals from the MONITOR OUT connectors and... connected, then press [ENTER] to which the musical instrument or microphone is connected. By default, each Input Channel is directly patched. 01V96i-Owner's Manual ton for the Input Channels that the Input Channel signals will usually want to monitor the signals returned from the Input Channels...
...Input Channel signals to display the Pan/Route | Pan page. However during multitrack recording, or when monitoring the sound with the DAW's effects applied, you to the Stereo Bus, and for signals routed from the Input Channels to monitor the signals from the MONITOR OUT connectors and... connected, then press [ENTER] to which the musical instrument or microphone is connected. By default, each Input Channel is directly patched. 01V96i-Owner's Manual ton for the Input Channels that the Input Channel signals will usually want to monitor the signals returned from the Input Channels...

Owner's Manual
Page 37
...] button to display the Gate Edit page, which you want to recall. Compressing the Input Signals 37 Compressing the Input Signals The 01V96i's Input Channels 1-32 feature individual channel compressors. A compressor is now available for each compressor type.) • You cannot change the... and recall compressor programs from the Compressor library, then adjust the parameters as desired. 7. Input Channel Layer 1-16 is an effect used independently of the compressor programs 1-36 from the channel strip section. 2. These processors feature different parameters. (See the Reference ...
...] button to display the Gate Edit page, which you want to recall. Compressing the Input Signals 37 Compressing the Input Signals The 01V96i's Input Channels 1-32 feature individual channel compressors. A compressor is now available for each compressor type.) • You cannot change the... and recall compressor programs from the Compressor library, then adjust the parameters as desired. 7. Input Channel Layer 1-16 is an effect used independently of the compressor programs 1-36 from the channel strip section. 2. These processors feature different parameters. (See the Reference ...

Owner's Manual
Page 38
..., or a program memory that the [ON] button for control from the channel strip section. 01V96i-Owner's Manual 38 Tutorial Using the Internal Effects The 01V96i features four internal multi-effects processors that can be used via Aux Send 1, and apply reverb to the track signals. 1. Press the DISPLAY ACCESS [PATCH] but - ton repeatedly until...
..., or a program memory that the [ON] button for control from the channel strip section. 01V96i-Owner's Manual 38 Tutorial Using the Internal Effects The 01V96i features four internal multi-effects processors that can be used via Aux Send 1, and apply reverb to the track signals. 1. Press the DISPLAY ACCESS [PATCH] but - ton repeatedly until...
Owner's Manual
Page 39
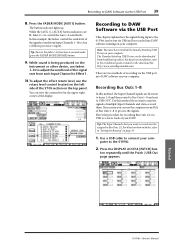
... level in the download file. For details on how to do this example, the faders control the send level of the display. Recording to the 01V96i can be sent via USB and be recorded into DAW software on your computer. The button indicator lights up. Note: You must be downloaded from... sent to buses 1-8 and then routed to Bus Outs 1-8 and sent to connect your computer. The Yamaha Steinberg USB Driver can use the compressors and EQ of Bus Outs 1-8 to Effect 1. 10.To adjust the effect return level, use faders 1-16 to adjust the send level of your computer. For details on the...
... level in the download file. For details on how to do this example, the faders control the send level of the display. Recording to the 01V96i can be sent via USB and be recorded into DAW software on your computer. The button indicator lights up. Note: You must be downloaded from... sent to buses 1-8 and then routed to Bus Outs 1-8 and sent to connect your computer. The Yamaha Steinberg USB Driver can use the compressors and EQ of Bus Outs 1-8 to Effect 1. 10.To adjust the effect return level, use faders 1-16 to adjust the send level of your computer. For details on the...

Owner's Manual
Page 42
... the conditions you wish to name and store snapshots of the display. ORY Up [ ] or Down [ ] buttons to of the 01V96i's mix parameters, internal effect processor settings, remote layers, and input/output patch settings. 42 Tutorial 9. Now you select a Scene memory other than the currently-recalled Scene, its number flashes ...
... the conditions you wish to name and store snapshots of the display. ORY Up [ ] or Down [ ] buttons to of the 01V96i's mix parameters, internal effect processor settings, remote layers, and input/output patch settings. 42 Tutorial 9. Now you select a Scene memory other than the currently-recalled Scene, its number flashes ...

Owner's Manual
Page 43
... button, then pressing [ENTER]. The new name is automatically added to the Short name. On the other hand, a newly-entered Short name is now effective. You can specify Short names in the parameter boxes (1) in the center column, and Long names in the parameter boxes (2) in the Input Patch library... to select a port for editing the names and using the Name Input Auto Copy check box and the INITIALIZE button is on the page. Tutorial 01V96i-Owner's Manual Press the DISPLAY ACCESS [PATCH] but- Move the cursor to edit the name. The procedure for which enables you want to right...
... button, then pressing [ENTER]. The new name is automatically added to the Short name. On the other hand, a newly-entered Short name is now effective. You can specify Short names in the parameter boxes (1) in the center column, and Long names in the parameter boxes (2) in the Input Patch library... to select a port for editing the names and using the Name Input Auto Copy check box and the INITIALIZE button is on the page. Tutorial 01V96i-Owner's Manual Press the DISPLAY ACCESS [PATCH] but- Move the cursor to edit the name. The procedure for which enables you want to right...
Owner's Manual
Page 50
... Have you downloaded and installed the Yamaha Steinberg USB Driver? ❍ You must connect the 01V96i to the computer and power-on your DAW software ❍ Could the EQ gain be excessively low? ❍ Routing a signal through GEQ or an effect will decrease the level at a specific... frequency Can't control the 01V96i console from 01V96i Editor The 01V96i console is mixed with the same signal routed differently, a comb filter effect will delay it relative to one of USB1-16? 01V96i-Owner's Manual If a signal ...
... Have you downloaded and installed the Yamaha Steinberg USB Driver? ❍ You must connect the 01V96i to the computer and power-on your DAW software ❍ Could the EQ gain be excessively low? ❍ Routing a signal through GEQ or an effect will decrease the level at a specific... frequency Can't control the 01V96i console from 01V96i Editor The 01V96i console is mixed with the same signal routed differently, a comb filter effect will delay it relative to one of USB1-16? 01V96i-Owner's Manual If a signal ...


