
User Guide
Page 3
... 1-8 More Information 1-10 Resources 1-10 Xerox Support Centre 1-11 2 Network Basics Overview of Network Setup and Configuration 2-2 Choosing a Connection Method 2-3 Connecting via Ethernet (Recommended 2-3 Connecting via USB 2-4 Configuring the Network Address 2-5 TCP/IP and IP Addresses 2-5 Automatically Setting the Printer's IP Address 2-6 Dynamic Methods of Setting the Printer's IP Address 2-6 Manually Setting the Printer's IP Address 2-7 Installing the...
... 1-8 More Information 1-10 Resources 1-10 Xerox Support Centre 1-11 2 Network Basics Overview of Network Setup and Configuration 2-2 Choosing a Connection Method 2-3 Connecting via Ethernet (Recommended 2-3 Connecting via USB 2-4 Configuring the Network Address 2-5 TCP/IP and IP Addresses 2-5 Automatically Setting the Printer's IP Address 2-6 Dynamic Methods of Setting the Printer's IP Address 2-6 Manually Setting the Printer's IP Address 2-7 Installing the...
User Guide
Page 17
Network Basics This chapter includes: ■ Overview of Network Setup and Configuration on page 2-2 ■ Choosing a Connection Method on page 2-3 ■ Configuring the Network Address on page 2-5 ■ Installing the Printer Drivers on page 2-9 This chapter provides basic information about setting up and connecting to your printer. See also: Advanced Features Guide at www.xerox.com/office/8560Psupport Phaser® 8560 Color Printer 2-1
Network Basics This chapter includes: ■ Overview of Network Setup and Configuration on page 2-2 ■ Choosing a Connection Method on page 2-3 ■ Configuring the Network Address on page 2-5 ■ Installing the Printer Drivers on page 2-9 This chapter provides basic information about setting up and connecting to your printer. See also: Advanced Features Guide at www.xerox.com/office/8560Psupport Phaser® 8560 Color Printer 2-1

User Guide
Page 18
... in this chapter for referencing network settings. 4. Overview of Network Setup and Configuration Overview of Network Setup and Configuration To set the printer's TCP/IP address on the control panel. 5. Install the driver software on the printer and the computer. 3. See also: Advanced Features Guide at www.xerox.com/office/8560Psupport Phaser® 8560 Color Printer 2-2 You can download the latest...
... in this chapter for referencing network settings. 4. Overview of Network Setup and Configuration Overview of Network Setup and Configuration To set the printer's TCP/IP address on the control panel. 5. Install the driver software on the printer and the computer. 3. See also: Advanced Features Guide at www.xerox.com/office/8560Psupport Phaser® 8560 Color Printer 2-2 You can download the latest...

User Guide
Page 19
...and cabling requirements vary for networking. It supports many printers and systems on the hub except the uplink port. Network Connection Depending on your desktop. A USB connection is a direct connection from your particular setup, the following hardware and ...Network Address on page 2-5 Installing the Printer Drivers on page 2-4 Connecting via Ethernet or USB. It also allows you are generally not included with the second cable. This section includes: ■ Connecting via Ethernet (Recommended) on page 2-3 ■ Connecting via USB on page 2-9 Phaser® 8560 Color Printer...
...and cabling requirements vary for networking. It supports many printers and systems on the hub except the uplink port. Network Connection Depending on your desktop. A USB connection is a direct connection from your particular setup, the following hardware and ...Network Address on page 2-5 Installing the Printer Drivers on page 2-4 Connecting via Ethernet or USB. It also allows you are generally not included with the second cable. This section includes: ■ Connecting via Ethernet (Recommended) on page 2-3 ■ Connecting via USB on page 2-9 Phaser® 8560 Color Printer...
User Guide
Page 22
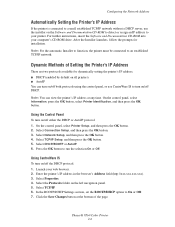
Select Network Setup, and then press the OK button. 4. Select DHCP/BOOTP or AutoIP. 6. In the BOOTP/DHCP Settings section, set the BOOTP/DHCP option to an established TCP/IP network. Click the Save Changes button at any time. Phaser® 8560 Color Printer 2-6 Dynamic Methods of the page.... On the control panel, select Information, press the OK button, select Printer Identification, and then press the OK button. ...
Select Network Setup, and then press the OK button. 4. Select DHCP/BOOTP or AutoIP. 6. In the BOOTP/DHCP Settings section, set the BOOTP/DHCP option to an established TCP/IP network. Click the Save Changes button at any time. Phaser® 8560 Color Printer 2-6 Dynamic Methods of the page.... On the control panel, select Information, press the OK button, select Printer Identification, and then press the OK button. ...
User Guide
Page 23
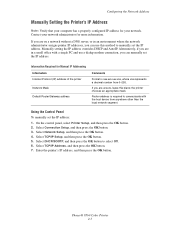
...OK button. 3. Select DHCP/BOOTP, and then press the OK button to manually set the IP address: 1. Contact your network. the printer chooses an appropriate mask. Select Network Setup, and then press the OK button. 4. Router address is xxx.xxx.xxx.xxx, where xxx represents a decimal number ... overrides DHCP and AutoIP. If you are on a network without a DNS server, or in a small office with the host device from 0-255. Select TCP/IP Address, and then press the OK button. 7. Phaser® 8560 Color Printer 2-7 Select TCP/IP Setup, and then press the OK button. 5. On the...
...OK button. 3. Select DHCP/BOOTP, and then press the OK button to manually set the IP address: 1. Contact your network. the printer chooses an appropriate mask. Select Network Setup, and then press the OK button. 4. Router address is xxx.xxx.xxx.xxx, where xxx represents a decimal number ... overrides DHCP and AutoIP. If you are on a network without a DNS server, or in a small office with the host device from 0-255. Select TCP/IP Address, and then press the OK button. 7. Phaser® 8560 Color Printer 2-7 Select TCP/IP Setup, and then press the OK button. 5. On the...
User Guide
Page 155
..., 2-5 connection, 2-3 Ethernet, 2-3 creating a Local Area Network (LAN), 2-5 manually setting IP address, 2-7 mask, 2-6 setup and configuration, 2-2 TCP/IP and IP addresses, 2-5 O Office Color color correction, 4-4 Online Support Assistant, 1-10 operating systems printer drivers, 2-9 operational safety, A-3 options additional trays, 1-5 internal hard drive, 1-5 memory, 1-5 printing, 3-21 ordering supplies, 5-15 P packing the printer, 5-24 PANTONE colors, 4-11 paper 2nd side, 3-27...
..., 2-5 connection, 2-3 Ethernet, 2-3 creating a Local Area Network (LAN), 2-5 manually setting IP address, 2-7 mask, 2-6 setup and configuration, 2-2 TCP/IP and IP addresses, 2-5 O Office Color color correction, 4-4 Online Support Assistant, 1-10 operating systems printer drivers, 2-9 operational safety, A-3 options additional trays, 1-5 internal hard drive, 1-5 memory, 1-5 printing, 3-21 ordering supplies, 5-15 P packing the printer, 5-24 PANTONE colors, 4-11 paper 2nd side, 3-27...
Advanced Features Guide
Page 46
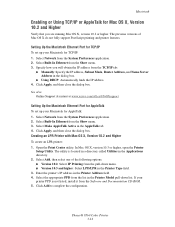
...that you will obtain the IP address from the list in the dialog box. ■ Using DHCP: Automatically finds the IP address. 4. Select Network from the Show menu. 3. Select the appropriate PPD from the TCP/IP tab: ■ Manually: Specify the IP address, Subnet Mask, Router... TCP/IP: 1. Open the Print Center utility. Phaser® 8560 Color Printer 3-12 Click Apply, and then close the dialog box. In Mac OS X, version 10.3 or higher, open the Printer Setup Utility. See also: Online Support Assistant at www.xerox.com/office/8560Psupport Setting Up the Macintosh Ethernet Port ...
...that you will obtain the IP address from the list in the dialog box. ■ Using DHCP: Automatically finds the IP address. 4. Select Network from the Show menu. 3. Select the appropriate PPD from the TCP/IP tab: ■ Manually: Specify the IP address, Subnet Mask, Router... TCP/IP: 1. Open the Print Center utility. Phaser® 8560 Color Printer 3-12 Click Apply, and then close the dialog box. In Mac OS X, version 10.3 or higher, open the Printer Setup Utility. See also: Online Support Assistant at www.xerox.com/office/8560Psupport Setting Up the Macintosh Ethernet Port ...

Quick Use Guide
Page 5
... chapter in the User Guide. Verify guide positions. Walk-Up Features Information Paper Tray Setup Printer Setup Troubleshooting Troubleshooting Paper Jams Print Quality Problems Network Problems Service Tools Print Quality Problems Troubleshooting Print Quality Page Eliminate Light Stripes Remove Print ...Smears For Print-Quality Solutions: See the Print Quality Problems menu and print the Troubleshooting Print Quality page. Xerox Support Centre www.xerox...
... chapter in the User Guide. Verify guide positions. Walk-Up Features Information Paper Tray Setup Printer Setup Troubleshooting Troubleshooting Paper Jams Print Quality Problems Network Problems Service Tools Print Quality Problems Troubleshooting Print Quality Page Eliminate Light Stripes Remove Print ...Smears For Print-Quality Solutions: See the Print Quality Problems menu and print the Troubleshooting Print Quality page. Xerox Support Centre www.xerox...
System Administrator Guide
Page 46
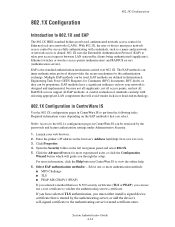
... selected TLS authentication, you must pass network access control by the authenticating server, or add the device's self-signed certificate to the 802.1x configuration pages in the browser's Address field (http://xxx.xxx.xxx.xxx). 3. Enter the printer's IP address in CentreWare IS can help... . 6. For more authentication methods: ■ MD5 Challenge ■ TLS ■ PEAP-MS-CHAPv2 (PEAP) If you selected a method that uses X.509 security certificates (TLS or PEAP), you through the setup. EAP methods are defined...
... selected TLS authentication, you must pass network access control by the authenticating server, or add the device's self-signed certificate to the 802.1x configuration pages in the browser's Address field (http://xxx.xxx.xxx.xxx). 3. Enter the printer's IP address in CentreWare IS can help... . 6. For more authentication methods: ■ MD5 Challenge ■ TLS ■ PEAP-MS-CHAPv2 (PEAP) If you selected a method that uses X.509 security certificates (TLS or PEAP), you through the setup. EAP methods are defined...