

Installation Instructions
Page 4
... C. Do not use a 50-amp rated cord with a qualified electrician or service technician if you will not slide all local codes and ordinances. Check with kit. Do not modify the power supply cord plug. Range Rating* 120/240 Volts 8.8 - 16.5 KW 16.6 - 22.5 KW 120/208 Volts 7.8 - 12.5 ... a nominal 1³⁄₈" (34.9 mm) diameter connection opening. ■ A time-delay fuse or circuit breaker is recommended. ■ The range can be connected directly to the cabinet. This cord contains 4 copper conductors with ring terminals or open-end spade terminals with the rating of the...
... C. Do not use a 50-amp rated cord with a qualified electrician or service technician if you will not slide all local codes and ordinances. Check with kit. Do not modify the power supply cord plug. Range Rating* 120/240 Volts 8.8 - 16.5 KW 16.6 - 22.5 KW 120/208 Volts 7.8 - 12.5 ... a nominal 1³⁄₈" (34.9 mm) diameter connection opening. ■ A time-delay fuse or circuit breaker is recommended. ■ The range can be connected directly to the cabinet. This cord contains 4 copper conductors with ring terminals or open-end spade terminals with the rating of the...

Installation Instructions
Page 5
... the wall receptacle is less than 30" (76.2 cm), adjust the ³⁄₈" (1.0 cm) dimension. Countertop Preparation (for Slide-in Ranges Only) The cooktop sides of the slide-in death, fire, or electrical shock. 30" (76.2 cm) 30 ¾" (78.1 cm) ³⁄₈" (1.0 cm... if you have molded edge shaved flat ³⁄₈" (1.0 cm) from : Canadian Standards Association 178 Rexdale Blvd. A copy of range's final location. ■ Do not use an extension cord. This cord contains 3 copper conductors with ring terminals or open-end spade terminals...
... the wall receptacle is less than 30" (76.2 cm), adjust the ³⁄₈" (1.0 cm) dimension. Countertop Preparation (for Slide-in Ranges Only) The cooktop sides of the slide-in death, fire, or electrical shock. 30" (76.2 cm) 30 ¾" (78.1 cm) ³⁄₈" (1.0 cm... if you have molded edge shaved flat ³⁄₈" (1.0 cm) from : Canadian Standards Association 178 Rexdale Blvd. A copy of range's final location. ■ Do not use an extension cord. This cord contains 3 copper conductors with ring terminals or open-end spade terminals...

Installation Instructions
Page 6
... storage drawer. 2. Position mounting bracket in front of the cutout. B A A. Place them lengthwise on the floor behind the range to engage the anti-tip bracket. Adjust the leveling legs to rear range foot. Before sliding range into a standing position, put a sheet of another. Centerline B. 14¹⁄₄" (36.2 cm) 6 Place cardboard or hardboard...
... storage drawer. 2. Position mounting bracket in front of the cutout. B A A. Place them lengthwise on the floor behind the range to engage the anti-tip bracket. Adjust the leveling legs to rear range foot. Before sliding range into a standing position, put a sheet of another. Centerline B. 14¹⁄₄" (36.2 cm) 6 Place cardboard or hardboard...
Installation Instructions
Page 8
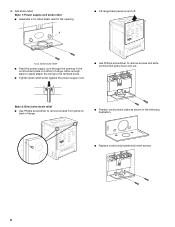
Style 2: Direct wire strain relief ■ Use Phillips screwdriver to remove screws and slide cord/conduit plate down and out. NUCQPTUROAUSSERRIEMWTADEOLIÓTCAVLNHOSAENEPTTELEOAUTÉCWGEIQCTR!EATUUCRRRESAICTCEESAOLORD A. UL listed strain relief &#... through the opening . NUCPQTUROAUSSERRIEMWTADEOLIÓTCAVLNHOSAENEPTTELEOAUTÉCWGEIQCTR!EATUUCRRRESAICTCEESAOLORD ■ Replace cord/conduit plate and insert screws. 8 A ■ Lift range back panel up and off. Style 1: Power supply cord strain relief ■ Assemble a UL listed strain relief in the opening in ...
Style 2: Direct wire strain relief ■ Use Phillips screwdriver to remove screws and slide cord/conduit plate down and out. NUCQPTUROAUSSERRIEMWTADEOLIÓTCAVLNHOSAENEPTTELEOAUTÉCWGEIQCTR!EATUUCRRRESAICTCEESAOLORD A. UL listed strain relief &#... through the opening . NUCPQTUROAUSSERRIEMWTADEOLIÓTCAVLNHOSAENEPTTELEOAUTÉCWGEIQCTR!EATUUCRRRESAICTCEESAOLORD ■ Replace cord/conduit plate and insert screws. 8 A ■ Lift range back panel up and off. Style 1: Power supply cord strain relief ■ Assemble a UL listed strain relief in the opening in ...
Installation Instructions
Page 12
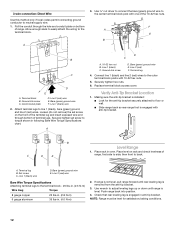
... Direct Wire Use this method only if local codes permit connecting ground conductor to the terminal block. Ground-link screw D. B C D E Level Range 1. Check that rear leveling leg is removed from the anti-tip bracket. 3. Allow enough slack to easily attach the wiring to neutral supply wire..... A. Use ³⁄₈" nut driver to connect the bare (green) ground wire to floor or wall. ■ Slide range back so rear range foot is level. Bare (green) ground wire E. Making sure the anti-tip bracket is installed: ■ Look for satisfactory baking...
... Direct Wire Use this method only if local codes permit connecting ground conductor to the terminal block. Ground-link screw D. B C D E Level Range 1. Check that rear leveling leg is removed from the anti-tip bracket. 3. Allow enough slack to easily attach the wiring to neutral supply wire..... A. Use ³⁄₈" nut driver to connect the bare (green) ground wire to floor or wall. ■ Slide range back so rear range foot is level. Bare (green) ground wire E. Making sure the anti-tip bracket is installed: ■ Look for satisfactory baking...

Installation Instructions
Page 13
.... Connect anti-tip bracket to avoid damaging the floor covering. Failure to floor or wall. ■ Slide range back so rear range foot is level. 13 Slide range forward. 3. Complete cleaning or maintenance. 4. Check that you have all parts are not bent. 8. ...into its final location. Check that range is under anti-tip bracket. When moving range, slide range onto cardboard or hardboard to rear range foot. Check that the range is level. Slide range into appropriate outlet. Replace storage drawer. 9. Moving the Range WARNING Tip Over Hazard A child...
.... Connect anti-tip bracket to avoid damaging the floor covering. Failure to floor or wall. ■ Slide range back so rear range foot is level. 13 Slide range forward. 3. Complete cleaning or maintenance. 4. Check that you have all parts are not bent. 8. ...into its final location. Check that range is under anti-tip bracket. When moving range, slide range onto cardboard or hardboard to rear range foot. Check that the range is level. Slide range into appropriate outlet. Replace storage drawer. 9. Moving the Range WARNING Tip Over Hazard A child...


