
User Manual
Page 3
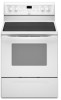
...Plastic anchors (2) C. #10 x 1¹⁄₂" screws (2) ■ Anti-tip bracket must be used will not discolor, delaminate or sustain other damage. Parts needed ■ Tape measure drive ratchet ■ Flat-blade screwdriver ■ ¼" nut driver ■ Level ■ Hammer ■ Hand or electric ...surface units, cabinet storage space located above the surface units should be located for concrete/ceramic floors) ■ Masking tape Parts supplied Check that all governing codes and ordinances. ■ It is to be provided, the risk can be securely mounted ...
...Plastic anchors (2) C. #10 x 1¹⁄₂" screws (2) ■ Anti-tip bracket must be used will not discolor, delaminate or sustain other damage. Parts needed ■ Tape measure drive ratchet ■ Flat-blade screwdriver ■ ¼" nut driver ■ Level ■ Hammer ■ Hand or electric ...surface units, cabinet storage space located above the surface units should be located for concrete/ceramic floors) ■ Masking tape Parts supplied Check that all governing codes and ordinances. ■ It is to be provided, the risk can be securely mounted ...

User Manual
Page 4
... so can be obtained from: Canadian Standards Association 178 Rexdale Blvd. Toronto, ON M9W 1R3 CANADA ■ Check with CSA Standard C22.1, Canadian Electrical Code, Part 1 - Cabinet Dimensions Cabinet opening dimensions shown are in accordance with zero clearance. Failure to top of cooktop, see NOTE* D. 31" (78.7 cm) min. required between...
... so can be obtained from: Canadian Standards Association 178 Rexdale Blvd. Toronto, ON M9W 1R3 CANADA ■ Check with CSA Standard C22.1, Canadian Electrical Code, Part 1 - Cabinet Dimensions Cabinet opening dimensions shown are in accordance with zero clearance. Failure to top of cooktop, see NOTE* D. 31" (78.7 cm) min. required between...

User Manual
Page 5
... range and be centered in the "Location Requirements" section, adjust template so range will be killed. B A. ³⁄₈" drive ratchet B. Remove oven racks and parts package from range. Place template on the floor in cabinet opening so that specified in cabinet opening edge, align template with Storage Drawers: Remove the...
... range and be centered in the "Location Requirements" section, adjust template so range will be killed. B A. ³⁄₈" drive ratchet B. Remove oven racks and parts package from range. Place template on the floor in cabinet opening so that specified in cabinet opening edge, align template with Storage Drawers: Remove the...

User Manual
Page 7
... or maintenance. 4. Complete Installation 1. Check that anti-tip bracket is level. 7 See "Level Range." 5. Reconnect the anti-tip bracket, if the range is an extra part, go back through the steps to remove waxy residue caused by shipping material. Slide range forward. 2. Check that you have all of /recycle all...
... or maintenance. 4. Complete Installation 1. Check that anti-tip bracket is level. 7 See "Level Range." 5. Reconnect the anti-tip bracket, if the range is an extra part, go back through the steps to remove waxy residue caused by shipping material. Slide range forward. 2. Check that you have all of /recycle all...


