Warranty Information
Page 1
... REPAIR AS PROVIDED HEREIN. This warranty gives you specific legal rights, and you should ask Whirlpool or your authorized Whirlpool dealer to correct improper product maintenance or installation, installation not in remote locations where an authorized Whirlpool servicer is installed, operated and maintained according to instructions attached to or furnished with this major appliance is not...
... REPAIR AS PROVIDED HEREIN. This warranty gives you specific legal rights, and you should ask Whirlpool or your authorized Whirlpool dealer to correct improper product maintenance or installation, installation not in remote locations where an authorized Whirlpool servicer is installed, operated and maintained according to instructions attached to or furnished with this major appliance is not...

Installation Guide
Page 1
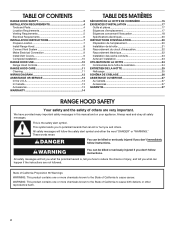
... 1-800-807-6777 or visit our website at www.whirlpool.ca HOTTE DE CUISINIÈRE À MONTAGE MURAL DE 30" ET 36" (76,2 ET 91,4 CM) Instructions d'installation et Guide d'utilisation et d'entretien Au Canada, pour assistance, installation ou service, composer le 1-800-807-6777 ou visiter... notre site Web à www.whirlpool.ca Table of Contents/Table des matières 2 IMPORTANT: READ AND ...
... 1-800-807-6777 or visit our website at www.whirlpool.ca HOTTE DE CUISINIÈRE À MONTAGE MURAL DE 30" ET 36" (76,2 ET 91,4 CM) Instructions d'installation et Guide d'utilisation et d'entretien Au Canada, pour assistance, installation ou service, composer le 1-800-807-6777 ou visiter... notre site Web à www.whirlpool.ca Table of Contents/Table des matières 2 IMPORTANT: READ AND ...
Installation Guide
Page 2
... U.S.A 13 In Canada 13 Accessories 13 WARRANTY 14 TABLE DES MATIÈRES SÉCURITÉ DE LA HOTTE DE CUISINIÈRE 15 EXIGENCES D'INSTALLATION 17 Outils et pièces 17 Exigences d'emplacement 17 Exigences concernant l'évacuation 18 Spécifications électriques 20 INSTRUCTIONS...
... U.S.A 13 In Canada 13 Accessories 13 WARRANTY 14 TABLE DES MATIÈRES SÉCURITÉ DE LA HOTTE DE CUISINIÈRE 15 EXIGENCES D'INSTALLATION 17 Outils et pièces 17 Exigences d'emplacement 17 Exigences concernant l'évacuation 18 Spécifications électriques 20 INSTRUCTIONS...
Installation Guide
Page 4
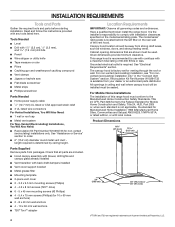
...Recirculation Kit Part Number W10294733 for use with cooktops with a maximum total rating of Acument Intellectual Properties, LLC. It is the installer's responsibility to order. ■■ 6" (15.2 cm) diameter round metal vent duct length required is located behind the ... is determined by ceiling height. This range hood is available from packages. See "Assistance or Service" section to comply with back draft dampers installed ■■ Vent cover support bracket ■■ Metal grease filter ■■ Mounting template ■■ 2-piece vent cover &#...
...Recirculation Kit Part Number W10294733 for use with cooktops with a maximum total rating of Acument Intellectual Properties, LLC. It is the installer's responsibility to order. ■■ 6" (15.2 cm) diameter round metal vent duct length required is located behind the ... is determined by ceiling height. This range hood is available from packages. See "Assistance or Service" section to comply with back draft dampers installed ■■ Vent cover support bracket ■■ Metal grease filter ■■ Mounting template ■■ 2-piece vent cover &#...
Installation Guide
Page 5
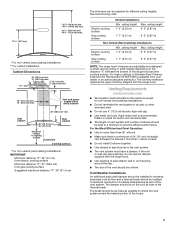
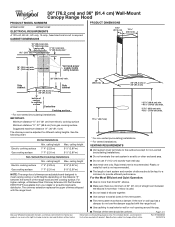
... Electric cooking surface 7' 4" (2.23 m) 9' 5" (2.87 m) Gas cooking surface 7' 7" (2.31 m) 9' 5" (2.87 m) Non-Vented (Recirculating) Installations Min. The chimney extension replaces the upper chimney shipped with the range hood. ■■ Use caulking to seal exterior wall or roof opening around...104.5 cm) max. *27¹⁄₈" (68.9 cm) min. *45¹⁄₂" (115.6 cm) max. * For non-vented (recirculating) installations ** For vented installations Cabinet Dimensions 10" (25.4 cm) min. 13" (33.0 cm) max. 2" (5.1 cm) min. 9" (22.9 cm) min.* 9¹⁄₂" ...
... Electric cooking surface 7' 4" (2.23 m) 9' 5" (2.87 m) Gas cooking surface 7' 7" (2.31 m) 9' 5" (2.87 m) Non-Vented (Recirculating) Installations Min. The chimney extension replaces the upper chimney shipped with the range hood. ■■ Use caulking to seal exterior wall or roof opening around...104.5 cm) max. *27¹⁄₈" (68.9 cm) min. *45¹⁄₂" (115.6 cm) max. * For non-vented (recirculating) installations ** For vented installations Cabinet Dimensions 10" (25.4 cm) min. 13" (33.0 cm) max. 2" (5.1 cm) min. 9" (22.9 cm) min.* 9¹⁄₂" ...
Installation Guide
Page 6
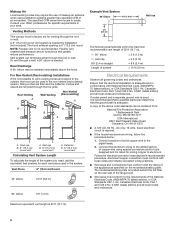
... Canadian Electrical Code, Part 1 and C22.2 No. 0-M91 (latest edition) and all governing codes and ordinances. For Non-Vented (Recirculating) Installations If it is not possible to vent cooking fumes and vapors to the outside, the hood can be used , it is recommended that a ...area. Venting Methods This canopy hood is adequate and in the system. Flexible vent creates back pressure and air turbulence that the electrical installation is factory set for specific requirements in the non-vented (recirculating) version, fitting a charcoal filter and the deflector. Aluminum/copper connection...
... Canadian Electrical Code, Part 1 and C22.2 No. 0-M91 (latest edition) and all governing codes and ordinances. For Non-Vented (Recirculating) Installations If it is not possible to vent cooking fumes and vapors to the outside, the hood can be used , it is recommended that a ...area. Venting Methods This canopy hood is adequate and in the system. Flexible vent creates back pressure and air turbulence that the electrical installation is factory set for specific requirements in the non-vented (recirculating) version, fitting a charcoal filter and the deflector. Aluminum/copper connection...
Installation Guide
Page 7
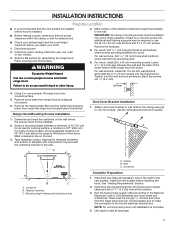
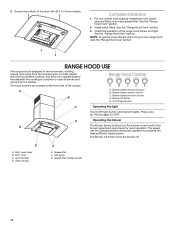
...2 or more people to make all locations where wall anchors are secure. Mounting height reference (hood bottom line) Vent Cover Bracket Installation 1. Use the optional wall anchors if needed. WARNING Excessive Weight Hazard Use two or more people, lift range hood onto covered surface....REAR WALL SUPPORT Vertical Centerline Horizontal Line REAR WALL MOUNTING TEMPLATE CL ALIGN BOTTOM EDGE WITH PENCIL LINE INDICATING BOTTOM OF THE HOOD Installation Height B C A. Centerline Complete Preparation 1. Mark centers of the screw head to the wall. Remove the metal grease filter and...
...2 or more people to make all locations where wall anchors are secure. Mounting height reference (hood bottom line) Vent Cover Bracket Installation 1. Use the optional wall anchors if needed. WARNING Excessive Weight Hazard Use two or more people, lift range hood onto covered surface....REAR WALL SUPPORT Vertical Centerline Horizontal Line REAR WALL MOUNTING TEMPLATE CL ALIGN BOTTOM EDGE WITH PENCIL LINE INDICATING BOTTOM OF THE HOOD Installation Height B C A. Centerline Complete Preparation 1. Mark centers of the screw head to the wall. Remove the metal grease filter and...
Installation Guide
Page 8
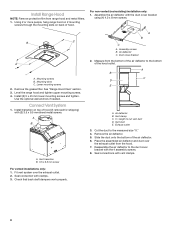
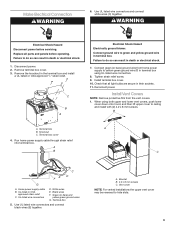
...to cut vent duct D. Exhaust outlet 3. Seal connections with the duct cover bracket using (4) 4.2 x 8 mm screws. For non-vented (recirculating) installation only: 1. Mounting screws B. Remove the grease filter. Connect Vent System 1. Seal connection with the 4 assembly screws. 8. Air deflector C. X ... needed. Duct cover bracket 2. A B X C D E A. Vent duct E. Place the assembled air deflector and duct over the exhaust outlet. 2. Install (2) 5 x 45 mm lower mounting screws and tighten. Check that back draft dampers work properly. A B C A. Vent clamp C. Cut the duct to...
...to cut vent duct D. Exhaust outlet 3. Seal connections with the duct cover bracket using (4) 4.2 x 8 mm screws. For non-vented (recirculating) installation only: 1. Mounting screws B. Remove the grease filter. Connect Vent System 1. Seal connection with the 4 assembly screws. 8. Air deflector C. X ... needed. Duct cover bracket 2. A B X C D E A. Vent duct E. Place the assembled air deflector and duct over the exhaust outlet. 2. Install (2) 5 x 45 mm lower mounting screws and tighten. Check that back draft dampers work properly. A B C A. Vent clamp C. Cut the duct to...
Installation Guide
Page 9
..., push lower cover down onto hood, and then lift upper cover to green and yellow ground wire in the terminal box and install a UL listed or CSA approved 1/2" strain relief. Disconnect power. 2. Remove terminal box cover. 3. Connect ground wire to ceiling and... 4.2 x 8 mm screws. Failure to hide slots. 9 Connect green (or bare) ground wire from the vent covers. 1. Tighten strain relief screw. 9. Install terminal box cover. 10. Check that all parts and panels before servicing. Terminal box cover 4. Green (or bare) and yellow-green ground wires G. Terminal box...
..., push lower cover down onto hood, and then lift upper cover to green and yellow ground wire in the terminal box and install a UL listed or CSA approved 1/2" strain relief. Disconnect power. 2. Remove terminal box cover. 3. Connect ground wire to ceiling and... 4.2 x 8 mm screws. Failure to hide slots. 9 Connect green (or bare) ground wire from the vent covers. 1. Tighten strain relief screw. 9. Install terminal box cover. 10. Check that all parts and panels before servicing. Terminal box cover 4. Green (or bare) and yellow-green ground wires G. Terminal box...
Installation Guide
Page 10
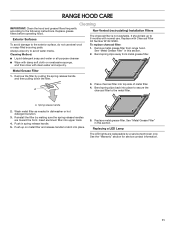
For non-vented (recirculating) installations only, install charcoal filters over metal grease filter. See the "Range Hood Care" section. 2. Check the operation of the duct with (2) 4.2 x 8 mm screws. Blower speed minimum button B D.... for OFF. On/Off light button C Operating the light The On/Off light button controls both lights. Duct cover holes B. Duct cover C. Control panel D. 2. Complete Installation 1. Install metal filters. See the "Range Hood Care" section. 3. NOTE: To get the most efficient use from the cooktop area. RANGE HOOD USE The range hood...
For non-vented (recirculating) installations only, install charcoal filters over metal grease filter. See the "Range Hood Care" section. 2. Check the operation of the duct with (2) 4.2 x 8 mm screws. Blower speed minimum button B D.... for OFF. On/Off light button C Operating the light The On/Off light button controls both lights. Duct cover holes B. Duct cover C. Control panel D. 2. Complete Installation 1. Install metal filters. See the "Range Hood Care" section. 3. NOTE: To get the most efficient use from the cooktop area. RANGE HOOD USE The range hood...
Installation Guide
Page 11
... Filter" in this section. A 4. Wash metal filter as needed in spring release handle. 5. Push in dishwasher or hot detergent solution. 3. Cleaning Method: Non-Vented (recirculating) Installation Filters The charcoal filter is not washable. Place charcoal filter into upper track. 4. Replacing a LED Lamp The LED lights are toward the front. Exterior Surfaces...
... Filter" in this section. A 4. Wash metal filter as needed in spring release handle. 5. Push in dishwasher or hot detergent solution. 3. Cleaning Method: Non-Vented (recirculating) Installation Filters The charcoal filter is not washable. Place charcoal filter into upper track. 4. Replacing a LED Lamp The LED lights are toward the front. Exterior Surfaces...
Installation Guide
Page 13
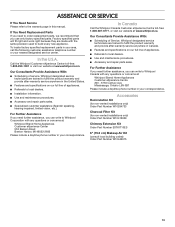
... toll-free: 1-800-807-6777, or visit our website at www.whirlpool.com. Accessories Recirculation Kit (for non-vented installations only) Order Part Number W10294733 Charcoal Filter Kit (for non-vented installations only) Order Part Number W10412939 Chimney Extension Kit Order Part Number EXTKIT10ES...Further Assistance If you need to order replacement parts, we recommend that you can write to Whirlpool Canada with the same precision used to local dealers. ■■ Installation information. ■■ Use and maintenance procedures. ■■ Accessory and repair parts sales...
... toll-free: 1-800-807-6777, or visit our website at www.whirlpool.com. Accessories Recirculation Kit (for non-vented installations only) Order Part Number W10294733 Charcoal Filter Kit (for non-vented installations only) Order Part Number W10412939 Chimney Extension Kit Order Part Number EXTKIT10ES...Further Assistance If you need to order replacement parts, we recommend that you can write to Whirlpool Canada with the same precision used to local dealers. ■■ Installation information. ■■ Use and maintenance procedures. ■■ Accessory and repair parts sales...

Installation Guide
Page 14
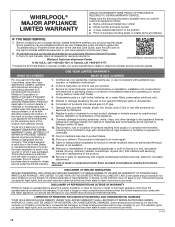
...so this limited warranty. 1. Service to correct product damage or defects caused by Whirlpool. 8. Consumable parts (i.e. Repairs to parts or systems to correct improper product maintenance or installation, installation not in -home repair. 13. Discoloration, rust or oxidation of the appliance. ... product replacement, your appliance will pay for appliances with published user, operator or installation instructions. 2. This warranty gives you specific legal rights, and you . WHIRLPOOL® MAJOR APPLIANCE LIMITED WARRANTY ATTACH YOUR RECEIPT HERE. Before contacting us to ...
...so this limited warranty. 1. Service to correct product damage or defects caused by Whirlpool. 8. Consumable parts (i.e. Repairs to parts or systems to correct improper product maintenance or installation, installation not in -home repair. 13. Discoloration, rust or oxidation of the appliance. ... product replacement, your appliance will pay for appliances with published user, operator or installation instructions. 2. This warranty gives you specific legal rights, and you . WHIRLPOOL® MAJOR APPLIANCE LIMITED WARRANTY ATTACH YOUR RECEIPT HERE. Before contacting us to ...
Dimension Guide
Page 1
... MODEL NUMBERS WVW51UC0F WVW51UC6F ELECTRICAL REQUIREMENTS A 120-volt, 60-Hz., AC-only, 15-amp, fused electrical circuit is recommended. ceiling height 9' 5" (2.87 m) 9' 5" (2.87 m) 17 43.7 cm) * For non-vented (recirculating) installations ** For vented installations. Plastic or... metal foil vent is used. ■■ Do not install 2 elbows together. ■■ Use clamps to seal all joints in an attic or other enclosed area. Because Whirlpool Corporation includes a continues commitment ...
... MODEL NUMBERS WVW51UC0F WVW51UC6F ELECTRICAL REQUIREMENTS A 120-volt, 60-Hz., AC-only, 15-amp, fused electrical circuit is recommended. ceiling height 9' 5" (2.87 m) 9' 5" (2.87 m) 17 43.7 cm) * For non-vented (recirculating) installations ** For vented installations. Plastic or... metal foil vent is used. ■■ Do not install 2 elbows together. ■■ Use clamps to seal all joints in an attic or other enclosed area. Because Whirlpool Corporation includes a continues commitment ...
Dimension Guide
Page 2
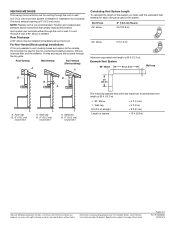
... vent A. Dimensions are recycled through the roof or wall. The hood exhaust opening is not recommended. Vent system can be installed immediately above the hood. Fumes and vapors are for planning purposes only. W10836369A 05/09/2016 NOTE: Flexible vent is 6"...0 ft (0 m) = 8 ft (2.4 m) = 13 ft (3.9 m) Because Whirlpool Corporation includes a continues commitment to improve our products, we reserve the right to the outside, the hood can terminate either through a wall, a 90° elbow is needed for installation (not included). Wall cap B. 6" (15.2 cm) round vent A. Deflector B....
... vent A. Dimensions are recycled through the roof or wall. The hood exhaust opening is not recommended. Vent system can be installed immediately above the hood. Fumes and vapors are for planning purposes only. W10836369A 05/09/2016 NOTE: Flexible vent is 6"...0 ft (0 m) = 8 ft (2.4 m) = 13 ft (3.9 m) Because Whirlpool Corporation includes a continues commitment to improve our products, we reserve the right to the outside, the hood can terminate either through a wall, a 90° elbow is needed for installation (not included). Wall cap B. 6" (15.2 cm) round vent A. Deflector B....
