
Use & Care Guide
Page 3
RANGE HOOD SAFETY Your safety and the safety of injury, and tell you what the potential hazard is the safety alert symbol. All safety messages will tell ...
RANGE HOOD SAFETY Your safety and the safety of injury, and tell you what the potential hazard is the safety alert symbol. All safety messages will tell ...

Use & Care Guide
Page 5
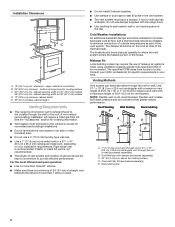
...: ■■ Charcoal Filter Kit. See the "Electrical Requirements" section. ■■ All openings in ceiling and wall where range hood will be installed must be away from package. Models that all governing codes and ordinances. ■■ It is the installer's ... 280) or when such standard is not applicable, the standard for 30" (76.2 cm) models I. 55/64" (2.2 cm) †®TORX is located inside the range hood on ordering, see the "Accessories" section. Product Dimensions B AI C Centerline D H E GF A. 619/54" (16 cm) B. 2" (5 cm) C. 825/64" (21.3 cm...
...: ■■ Charcoal Filter Kit. See the "Electrical Requirements" section. ■■ All openings in ceiling and wall where range hood will be installed must be away from package. Models that all governing codes and ordinances. ■■ It is the installer's ... 280) or when such standard is not applicable, the standard for 30" (76.2 cm) models I. 55/64" (2.2 cm) †®TORX is located inside the range hood on ordering, see the "Accessories" section. Product Dimensions B AI C Centerline D H E GF A. 619/54" (16 cm) B. 2" (5 cm) C. 825/64" (21.3 cm...
Use & Care Guide
Page 6
... opening width for vent system. cabinet opening around the cap. Rigid metal vent is not recommended. Roof/Wall cap with the range hood. ■■ Use caulking to provide efficient performance. clearance - Recirculating grid 6 Venting Methods Vent system can terminate either through... models D. 12" (30.5 cm) minimum cabinet depth E. 36" (91.4 cm) base cabinet height Venting Requirements ■■ This range hood is not recommended. ■■ The length of vent system and number of the thermal break. See the "Accessories" section for ordering ...
... opening width for vent system. cabinet opening around the cap. Rigid metal vent is not recommended. Roof/Wall cap with the range hood. ■■ Use caulking to provide efficient performance. clearance - Recirculating grid 6 Venting Methods Vent system can terminate either through... models D. 12" (30.5 cm) minimum cabinet depth E. 36" (91.4 cm) base cabinet height Venting Requirements ■■ This range hood is not recommended. ■■ The length of vent system and number of the thermal break. See the "Accessories" section for ordering ...
Use & Care Guide
Page 8
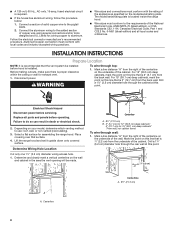
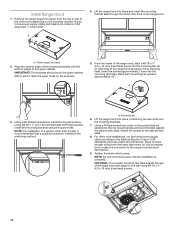
...the added section of the cabinet. Electrical Shock Hazard Disconnect power before operating. Depending on the underside of the cabinet. Lift the range hood and set it upside down onto covered surface. Drill a 1¹⁄4" (3.2 cm) diameter hole through wall: 1. The model/...A B Centerline A. 8³⁄8" (21.3 cm) B. 2" (5.1 cm) for 12" (30.5 cm) deep cabinets* 5" (12.7 cm) for assembling the range hood. INSTALLATION INSTRUCTIONS Prepare Location NOTE: It is recommended that is 7⁄8" (2.2 cm) from the back wall. Select a flat surface for 15" (38.1 cm) deep ...
...the added section of the cabinet. Electrical Shock Hazard Disconnect power before operating. Depending on the underside of the cabinet. Lift the range hood and set it upside down onto covered surface. Drill a 1¹⁄4" (3.2 cm) diameter hole through wall: 1. The model/...A B Centerline A. 8³⁄8" (21.3 cm) B. 2" (5.1 cm) for 12" (30.5 cm) deep cabinets* 5" (12.7 cm) for assembling the range hood. INSTALLATION INSTRUCTIONS Prepare Location NOTE: It is recommended that is 7⁄8" (2.2 cm) from the back wall. Select a flat surface for 15" (38.1 cm) deep ...
Use & Care Guide
Page 10
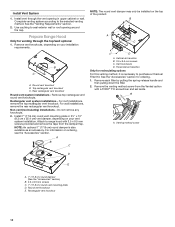
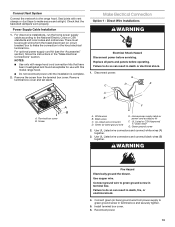
...Round vent knockout E. Top rectangular vent knockout C. Rectangular vent system installations - B A C B D A. A A. Rectangular vent knockout 10 Use caulking to range hood with a TORX® T10 screwdriver and set aside. Do not remove any knockouts. 2. Install 7" (17.8 cm) round vent mounting plate or 3¹&#...vent opening around the cap. Remove each filter by pulling the spring-release handle and then pulling down the filter. 2. Prepare Range Hood Only for ordering. 1. A B C A. Remove top rectangular and round vent knockouts. For roof installations, remove the top...
...Round vent knockout E. Top rectangular vent knockout C. Rectangular vent system installations - B A C B D A. A A. Rectangular vent knockout 10 Use caulking to range hood with a TORX® T10 screwdriver and set aside. Do not remove any knockouts. 2. Install 7" (17.8 cm) round vent mounting plate or 3¹&#...vent opening around the cap. Remove each filter by pulling the spring-release handle and then pulling down the filter. 2. Prepare Range Hood Only for ordering. 1. A B C A. Remove top rectangular and round vent knockouts. For roof installations, remove the top...
Use & Care Guide
Page 12
...or circuit breaker) box to the wall using the upper holes. Lift the range hood into place and insert the mounting bracket tabs through the slots in the back of the range hood as shown in the range hood electrical terminal box. 9. There must be enough wiring from the top or rear... of the vent hood (depending on the brackets. 5. From the inside of the range hood, start a #8-18 x 5⁄8" (4.2 x 16 mm)...
...or circuit breaker) box to the wall using the upper holes. Lift the range hood into place and insert the mounting bracket tabs through the slots in the back of the range hood as shown in the range hood electrical terminal box. 9. There must be enough wiring from the top or rear... of the vent hood (depending on the brackets. 5. From the inside of the range hood, start a #8-18 x 5⁄8" (4.2 x 16 mm)...
Use & Care Guide
Page 13
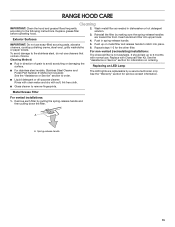
...bare) ground wire from power supply to make secure and airtight. Check that have been investigated and found acceptable for use with range hood cord connection kits that the backdraft dampers work properly. Use UL Listed wire connectors and connect white wires (A) together. 3. Power... Installation 1. Remove terminal box cover and set aside. Disconnect power. White wires B. NOTES: ■■ Use only with this model range hood. ■■ Do not reconnect power until the installation is complete. 2. Remove the screw from the fused disconnect (or circuit breaker)...
...bare) ground wire from power supply to make secure and airtight. Check that have been investigated and found acceptable for use with range hood cord connection kits that the backdraft dampers work properly. Use UL Listed wire connectors and connect white wires (A) together. 3. Power... Installation 1. Remove terminal box cover and set aside. Disconnect power. White wires B. NOTES: ■■ Use only with this model range hood. ■■ Do not reconnect power until the installation is complete. 2. Remove the screw from the fused disconnect (or circuit breaker)...
Use & Care Guide
Page 14
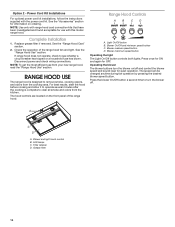
...that have been investigated and found acceptable for quiet operation. Replace grease filter if removed. See the "Range Hood Use" section. If range hood does not operate, check to turn the blower on/off . Range Hood Controls A B C D A. Operating the blower The blower buttons turn the blower off and control ... button controls both lights. Blower medium speed button D. Press once for ON and again for information on the front panel of the range hood fan and light. Press the blower On/Off button a second time to see whether a circuit breaker has tripped or a household fuse...
...that have been investigated and found acceptable for quiet operation. Replace grease filter if removed. See the "Range Hood Use" section. If range hood does not operate, check to turn the blower on/off . Range Hood Controls A B C D A. Operating the blower The blower buttons turn the blower off and control ... button controls both lights. Blower medium speed button D. Press once for ON and again for information on the front panel of the range hood fan and light. Press the blower On/Off button a second time to see whether a circuit breaker has tripped or a household fuse...
Use & Care Guide
Page 15
...): See the "Assistance or Service" section to the following instructions. Metal Grease Filter For vented installations: 1. RANGE HOOD CARE Cleaning IMPORTANT: Clean the hood and grease filters frequently according to order. Replace grease filter before operating hood. Cleaning Method: ■■ Rub in direction of grain to the stainless steel, do not use soap...
...): See the "Assistance or Service" section to the following instructions. Metal Grease Filter For vented installations: 1. RANGE HOOD CARE Cleaning IMPORTANT: Clean the hood and grease filters frequently according to order. Replace grease filter before operating hood. Cleaning Method: ■■ Rub in direction of grain to the stainless steel, do not use soap...


