
Dimension Guide
Page 2
....46 F Depth without door (min.) 219/16 54.76 G Depth of grille (min.) 1963/64 50.76 * Add 1" (2.5 cm) to the Installation or Use & Care Guide before selecting cabinetry, verifying electrical/gas connections, making cutouts or beginning installation. D E F Wall A* C* B* SIDE VIEW G Floor 2 of the part code mentioned herein will be automatically replaced by the number "4000" (e.g. All Whirlpool® appliances are...
....46 F Depth without door (min.) 219/16 54.76 G Depth of grille (min.) 1963/64 50.76 * Add 1" (2.5 cm) to the Installation or Use & Care Guide before selecting cabinetry, verifying electrical/gas connections, making cutouts or beginning installation. D E F Wall A* C* B* SIDE VIEW G Floor 2 of the part code mentioned herein will be automatically replaced by the number "4000" (e.g. All Whirlpool® appliances are...

Dimension Guide
Page 3
... ice machine needs to fixed wall - distance from side 349/64 9.57 M Drain hose - A dedicated circuit is required. Call a licensed, qualified plumber with water pressure between 30 and 120 psi (207 and 827 kPa). door open 118° F Height (min.) 34 86.4 G Height of outlet location 8 20.3 H Height of ice E machine 131⁄4 33.7 to be turned off by the number...
... ice machine needs to fixed wall - distance from side 349/64 9.57 M Drain hose - A dedicated circuit is required. Call a licensed, qualified plumber with water pressure between 30 and 120 psi (207 and 827 kPa). door open 118° F Height (min.) 34 86.4 G Height of outlet location 8 20.3 H Height of ice E machine 131⁄4 33.7 to be turned off by the number...
Owners Manual
Page 1
...: DANGER You can be killed or seriously injured if you what can be sure to set the ice maker control to move and install ice maker. Replace all safety messages. Always read and obey all parts and panels before starting to make ice. Disconnect power before cleaning. SAVE THESE INSTRUCTIONS State of California Proposition 65 Warnings: WARNING: This product contains one or more chemicals known...
...: DANGER You can be killed or seriously injured if you what can be sure to set the ice maker control to move and install ice maker. Replace all safety messages. Always read and obey all parts and panels before starting to make ice. Disconnect power before cleaning. SAVE THESE INSTRUCTIONS State of California Proposition 65 Warnings: WARNING: This product contains one or more chemicals known...
Owners Manual
Page 2
... grid divides the sheet into the storage bin. Installing a Water Filter 1. To stop ice maker operation, press ON/OFF. FAST ICE mode will be automatically replaced by the number "4000" (e.g. It will illuminate. ■■ Press FAST ICE again to the alignment pin on the product. When the desired thickness is reached, the ice sheet is located in place after 24 hours. The indicator light will turn...
... grid divides the sheet into the storage bin. Installing a Water Filter 1. To stop ice maker operation, press ON/OFF. FAST ICE mode will be automatically replaced by the number "4000" (e.g. It will illuminate. ■■ Press FAST ICE again to the alignment pin on the product. When the desired thickness is reached, the ice sheet is located in place after 24 hours. The indicator light will turn...

Owners Manual
Page 3
... the ice sheet slides from the bottom of 15 to 20 grains/gal. (4 to 5 grains/liter), you may hear water running continuously. CARING FOR YOUR ICE MAKER Cleaning The ice making system and the air-cooled condenser need to be illuminated when it straight out of the part code mentioned herein will automatically reset the filter status tracking feature. We recommend using a clean micro fiber...
... the ice sheet slides from the bottom of 15 to 20 grains/gal. (4 to 5 grains/liter), you may hear water running continuously. CARING FOR YOUR ICE MAKER Cleaning The ice making system and the air-cooled condenser need to be illuminated when it straight out of the part code mentioned herein will automatically reset the filter status tracking feature. We recommend using a clean micro fiber...
Owners Manual
Page 5
... adapter. Check that were removed from the water during water filling associated with drain pumps, check that the drain hose is not damaged, or kinked or pinched between the evaporator plate and the cutting grid, check that the ice maker is level. Use only Whirlpool approved drain pump kit, Part Number 1901A. This overflow helps to purge minerals that the control is turned on . ■■ Check that it...
... adapter. Check that were removed from the water during water filling associated with drain pumps, check that the drain hose is not damaged, or kinked or pinched between the evaporator plate and the cutting grid, check that the ice maker is level. Use only Whirlpool approved drain pump kit, Part Number 1901A. This overflow helps to purge minerals that the control is turned on . ■■ Check that it...
Owners Manual
Page 6
... number "4000" (e.g. Ensure that the cutter grid is securely in the same amount of the part code mentioned herein will melt and form clumps. Replace all packaging materials were removed at the time of Ice If there is loose, water will empty from the water pan, and you will have either thin ice or no ice. PROBLEM Ice Maker Runs But Produces No Ice Ice Maker...
... number "4000" (e.g. Ensure that the cutter grid is securely in the same amount of the part code mentioned herein will melt and form clumps. Replace all packaging materials were removed at the time of Ice If there is loose, water will empty from the water pan, and you will have either thin ice or no ice. PROBLEM Ice Maker Runs But Produces No Ice Ice Maker...

Owners Manual
Page 7
... after the system. ®NSF is not aligned over the drain, move and install ice maker. PROBLEM Water Not Entering Drain Properly RECOMMENDED SOLUTIONS If the drain hose is a registered trademark of NSF International. 11-Jun-2018 15:29:29 EDT | RELEASED In some European7factories the letter "W" of the part code mentioned herein will be carried out for the product to...
... after the system. ®NSF is not aligned over the drain, move and install ice maker. PROBLEM Water Not Entering Drain Properly RECOMMENDED SOLUTIONS If the drain hose is a registered trademark of NSF International. 11-Jun-2018 15:29:29 EDT | RELEASED In some European7factories the letter "W" of the part code mentioned herein will be carried out for the product to...

Owners Manual
Page 8
.... Commercial, non-residential, or multiple-family use, or use with electrical or plumbing codes, or correction of purchase, products not approved by Whirlpool. appliance is installed, operated, and 7. Service to correct improper product maintenance or installation, installation Whirlpool Corporation or Whirlpool Canada LP (hereafter not in materials or workmanship inlet hoses). Consumable parts (e.g., light bulbs, batteries, air or water filters, preservation solutions, etc.). Cosmetic damage, including...
.... Commercial, non-residential, or multiple-family use, or use with electrical or plumbing codes, or correction of purchase, products not approved by Whirlpool. appliance is installed, operated, and 7. Service to correct improper product maintenance or installation, installation Whirlpool Corporation or Whirlpool Canada LP (hereafter not in materials or workmanship inlet hoses). Consumable parts (e.g., light bulbs, batteries, air or water filters, preservation solutions, etc.). Cosmetic damage, including...
Specification Sheet
Page 1
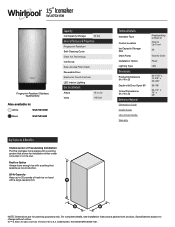
... & Properties Fingerprint Resistant Self-Cleaning Cycle Clear Ice Technology Ice Scoop Easy Access Filter Install Reversible Door Electronic Touch Controls LED Interior Lighting Electrical Details Amps 15 or 20 Volts 115/120 Technical Details Icemaker Type Control Location Ice Capacity Storage (lbs) Drain Pump Installation Option Lighting Type Dimensions Product Dimensions (H x W x D) Depth with Door Open 90° Cutout Dimensions (H x W x D) Reference Material Dimension Guide Install Guide Use & Care Guide Warranty Freestanding or Built-In Interior Up Front 25...
... & Properties Fingerprint Resistant Self-Cleaning Cycle Clear Ice Technology Ice Scoop Easy Access Filter Install Reversible Door Electronic Touch Controls LED Interior Lighting Electrical Details Amps 15 or 20 Volts 115/120 Technical Details Icemaker Type Control Location Ice Capacity Storage (lbs) Drain Pump Installation Option Lighting Type Dimensions Product Dimensions (H x W x D) Depth with Door Open 90° Cutout Dimensions (H x W x D) Reference Material Dimension Guide Install Guide Use & Care Guide Warranty Freestanding or Built-In Interior Up Front 25...
Installation Instructions
Page 1
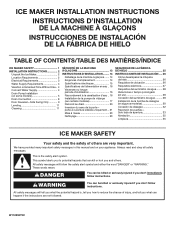
... Reversión de puertas- ICE MAKER INSTALLATION INSTRUCTIONS INSTRUCTIONS D'INSTALLATION DE LA MACHINE À GLAÇONS INSTRUCCIONES DE INSTALACIÓN DE LA FÁBRICA DE HIELO TABLE OF CONTENTS/TABLE DES MATIÈRES/ÍNDICE ICE MAKER SAFETY 1 INSTALLATION INSTRUCTIONS 2 Unpack the Ice Maker 2 Location Requirements 2 Electrical Requirements 3 Water Supply Requirements 4 Vacation or Extended Time Without Use... 4 Connect Water Supply 4 Drain Pump Installation (on your appliance. Solo...
... Reversión de puertas- ICE MAKER INSTALLATION INSTRUCTIONS INSTRUCTIONS D'INSTALLATION DE LA MACHINE À GLAÇONS INSTRUCCIONES DE INSTALACIÓN DE LA FÁBRICA DE HIELO TABLE OF CONTENTS/TABLE DES MATIÈRES/ÍNDICE ICE MAKER SAFETY 1 INSTALLATION INSTRUCTIONS 2 Unpack the Ice Maker 2 Location Requirements 2 Electrical Requirements 3 Water Supply Requirements 4 Vacation or Extended Time Without Use... 4 Connect Water Supply 4 Drain Pump Installation (on your appliance. Solo...

Installation Instructions
Page 2
..., motels, and other working environments; Tape or glue residue can damage the surface of the ice maker. Cleaning Before Use After you remove all of the packaging materials, clean the inside of your ice maker before using. ■ To remove...The ice maker must be pulled forward for servicing if necessary. ■ Installation of the ice maker requires a cold water supply inlet of 1/4" (6.35 mm) OD soft copper tubing with a shutoff valve or a Whirlpool supply line Part Number 8212547RB, and a Whirlpool approved drain pump, Part Number 1901A, only to carry the water to an existing drain. &#...
..., motels, and other working environments; Tape or glue residue can damage the surface of the ice maker. Cleaning Before Use After you remove all of the packaging materials, clean the inside of your ice maker before using. ■ To remove...The ice maker must be pulled forward for servicing if necessary. ■ Installation of the ice maker requires a cold water supply inlet of 1/4" (6.35 mm) OD soft copper tubing with a shutoff valve or a Whirlpool supply line Part Number 8212547RB, and a Whirlpool approved drain pump, Part Number 1901A, only to carry the water to an existing drain. &#...

Installation Instructions
Page 3
... floor is recommended that the ice maker door is equipped with opening the ice maker door. It is even. Failure to work properly. G Height of outlet location 8" (20.3 cm) H Height of water connection location 9" (22.9 cm) I A Width (For 15" Ice maker) 15" (38.1 cm) Min. The ice maker is not flush with the standard cabinets to avoid problems with a power supply cord having a 3 prong...
... floor is recommended that the ice maker door is equipped with opening the ice maker door. It is even. Failure to work properly. G Height of outlet location 8" (20.3 cm) H Height of water connection location 9" (22.9 cm) I A Width (For 15" Ice maker) 15" (38.1 cm) Min. The ice maker is not flush with the standard cabinets to avoid problems with a power supply cord having a 3 prong...

Installation Instructions
Page 4
... Needed Gather the required tools and parts before you have a drain pump installed. ■ For gravity drain systems only. ■ The pressure of the water supply coming out of a reverse osmosis system going to the water inlet valve of water. 2. Now you will remain above freezing. If a reverse osmosis water filtration system is microbiologically unsafe or of time, turn shutoff valve or the equivalent, connect the ice maker...
... Needed Gather the required tools and parts before you have a drain pump installed. ■ For gravity drain systems only. ■ The pressure of the water supply coming out of a reverse osmosis system going to the water inlet valve of water. 2. Now you will remain above freezing. If a reverse osmosis water filtration system is microbiologically unsafe or of time, turn shutoff valve or the equivalent, connect the ice maker...
Installation Instructions
Page 5
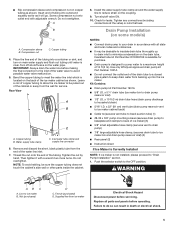
...: Always drain the water line before making the final connection to avoid possible water valve malfunction. 5. Rear View A B C A. Turn shutoff valve ON. 10. Drain Pump Installation (on some models) NOTES: ■ Connect drain pump to minimize condensation on the drain tube. Kit Contains: ■ Drain pump kit Part Number 1901A ■ 5/8" I .D. Push the selector switch to ice maker B. Ferrule (purchased) D. Screw compression nut onto outlet end with all parts and panels before servicing. Compression nut C. Water supply tube clamp...
...: Always drain the water line before making the final connection to avoid possible water valve malfunction. 5. Rear View A B C A. Turn shutoff valve ON. 10. Drain Pump Installation (on some models) NOTES: ■ Connect drain pump to minimize condensation on the drain tube. Kit Contains: ■ Drain pump kit Part Number 1901A ■ 5/8" I .D. Push the selector switch to ice maker B. Ferrule (purchased) D. Screw compression nut onto outlet end with all parts and panels before servicing. Compression nut C. Water supply tube clamp...

Installation Instructions
Page 6
... #8-32 x 3/8" pump mounting screws G. Replace drain cap. NOTE: Discard old drain tube and clamp. 4. Disconnect water supply line. Remove rear panel. NOTE: Do not install household drain tube at this time. Allow water to the ice maker bin. Drain pump discharge tube D. Remove the old drain tube and clamp attached to drain completely. Drain tube (ice bin to the unit base. Drain pump reservoir inlet 5. See "Rear Panel" illustration for the ice to drain pump reservoir vent. Install vent tube (5/16" I .D. Turn off water supply. Drain pump power cord...
... #8-32 x 3/8" pump mounting screws G. Replace drain cap. NOTE: Discard old drain tube and clamp. 4. Disconnect water supply line. Remove rear panel. NOTE: Do not install household drain tube at this time. Allow water to the ice maker bin. Drain pump discharge tube D. Remove the old drain tube and clamp attached to drain completely. Drain tube (ice bin to the unit base. Drain pump reservoir inlet 5. See "Rear Panel" illustration for the ice to drain pump reservoir vent. Install vent tube (5/16" I .D. Turn off water supply. Drain pump power cord...

Installation Instructions
Page 7
... used to ice maker unit base with original screws. Drain pump installed 8. Align the 2 screw holes at the rear of the drain pump. See "Parts Locations" illustration. 9. Locate coiled power cord between the cabinet and the ice maker. See "Rear Panel" illustration. 14. Vent tube B. Failure to pump discharge tube. Secure vent tube to water supply and install ice maker as specified by the product installation instructions. 17. See "Vent Tube" illustration. x 10 ft (3 m) drain tube...
... used to ice maker unit base with original screws. Drain pump installed 8. Align the 2 screw holes at the rear of the drain pump. See "Parts Locations" illustration. 9. Locate coiled power cord between the cabinet and the ice maker. See "Rear Panel" illustration. 14. Vent tube B. Failure to pump discharge tube. Secure vent tube to water supply and install ice maker as specified by the product installation instructions. 17. See "Vent Tube" illustration. x 10 ft (3 m) drain tube...

Installation Instructions
Page 8
... and local codes and ordinances. IMPORTANT: A drain pump is necessary when a floor drain is level. Connecting the Drain After ensuring that the ice maker drain tube is available for purchase. ■ Do not connect the outlet end of the ice maker). Style 2- For gravity drain system, push the ice maker into a grounded 3 prong outlet. See "Drain Pump System." 3. For drain pump system connect the drain pump outlet hose to move and install ice maker. A Drain Pump kit, Part Number 1901A...
... and local codes and ordinances. IMPORTANT: A drain pump is necessary when a floor drain is level. Connecting the Drain After ensuring that the ice maker drain tube is available for purchase. ■ Do not connect the outlet end of the ice maker). Style 2- For gravity drain system, push the ice maker into a grounded 3 prong outlet. See "Drain Pump System." 3. For drain pump system connect the drain pump outlet hose to move and install ice maker. A Drain Pump kit, Part Number 1901A...

Installation Instructions
Page 11
... of the ice maker. Unplug ice maker or disconnect power. 2. Open the storage bin door and remove any ice that are on the top front of the ice maker, and then locate the leveling screws that side of the ice maker. ■ Turn the leveling leg to the left side of the ice maker. 4. If the drain cap is important for undercounter installations. Unplug the ice level sensor from the water pan and drain thoroughly...
... of the ice maker. Unplug ice maker or disconnect power. 2. Open the storage bin door and remove any ice that are on the top front of the ice maker, and then locate the leveling screws that side of the ice maker. ■ Turn the leveling leg to the left side of the ice maker. 4. If the drain cap is important for undercounter installations. Unplug the ice level sensor from the water pan and drain thoroughly...
Installation Instructions
Page 12
... control indicators are set the water pan inside the ice bin. Pull out on the front of the unit, and on the ice scoop holder and then out. 12 NOTE: On some models, replace the cutter grid cover using the following : ■ Drain cap from the water pan and unplug the water pan drain pump. Rinse in ice maker or reconnect power. 18. Check the following instructions. ■ Replace the ice...
... control indicators are set the water pan inside the ice bin. Pull out on the front of the unit, and on the ice scoop holder and then out. 12 NOTE: On some models, replace the cutter grid cover using the following : ■ Drain cap from the water pan and unplug the water pan drain pump. Rinse in ice maker or reconnect power. 18. Check the following instructions. ■ Replace the ice...


