
Quick Reference Sheet
Page 1
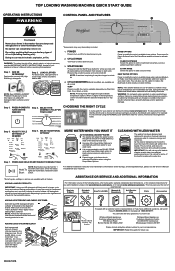
..., release the start cycle. It may take longer to the dispenser drawer. Register Product Schedule Service How To's & FAQ Manuals & Downloads Add Service Plan Parts Accessories ADDING HE DETERGENT AND FABRIC SOFTENER Add both liquid HE detergent & fabric softener (if desired) to unlock lid. 4. Do not use and installation, please visit www.whirlpool.com/owners, or in Canada www.whirlpool.ca/owners. No washer can result in death, explosion, or fire. PRESS POWER TO Step 4. TOP LOADING WASHING MACHINE QUICK START GUIDE OPERATING INSTRUCTIONS CONTROL PANEL AND FEATURES...
..., release the start cycle. It may take longer to the dispenser drawer. Register Product Schedule Service How To's & FAQ Manuals & Downloads Add Service Plan Parts Accessories ADDING HE DETERGENT AND FABRIC SOFTENER Add both liquid HE detergent & fabric softener (if desired) to unlock lid. 4. Do not use and installation, please visit www.whirlpool.com/owners, or in Canada www.whirlpool.ca/owners. No washer can result in death, explosion, or fire. PRESS POWER TO Step 4. TOP LOADING WASHING MACHINE QUICK START GUIDE OPERATING INSTRUCTIONS CONTROL PANEL AND FEATURES...

Cycle Guide
Page 1
...Cycle Time (minutes) Cycle Details: Use this cycle for normally soiled cottons and mixed fabric loads. Normal Lightly soiled, small-sized mixed garment loads. Extra Rinse Fabric Softener* Deep Water-High Deep Water-Medium *Only available when Extra Rinse is selected Use this cycle for the next cycle. Items to clean items quickly. Quick Wash Machine-wash silks, handwash fabrics. Extra Rinse Fabric Softener Deep Water-High Deep Water-Medium 50 Use this cycle if you change the default settings and start a cycle the washer will remember your setting selections and will display...
...Cycle Time (minutes) Cycle Details: Use this cycle for normally soiled cottons and mixed fabric loads. Normal Lightly soiled, small-sized mixed garment loads. Extra Rinse Fabric Softener* Deep Water-High Deep Water-Medium *Only available when Extra Rinse is selected Use this cycle for the next cycle. Items to clean items quickly. Quick Wash Machine-wash silks, handwash fabrics. Extra Rinse Fabric Softener Deep Water-High Deep Water-Medium 50 Use this cycle if you change the default settings and start a cycle the washer will remember your setting selections and will display...

Cycle Guide
Page 2
... or other cycles. This cycle, when used with affresh® Washer Cleaner tablet or liquid chlorine bleach to wash: Cycle: Temperature*: Available Options Average Cycle Time (minutes) Cycle Details: Clean No clothes in the cycle. Items to thoroughly clean the inside of soiled white fabrics. Washer with all wash temperature selections and water fill levels offered in washer. It was based on a variety of your washer fresh and clean. If the lid is opened before agitation begins. *The...
... or other cycles. This cycle, when used with affresh® Washer Cleaner tablet or liquid chlorine bleach to wash: Cycle: Temperature*: Available Options Average Cycle Time (minutes) Cycle Details: Clean No clothes in the cycle. Items to thoroughly clean the inside of soiled white fabrics. Washer with all wash temperature selections and water fill levels offered in washer. It was based on a variety of your washer fresh and clean. If the lid is opened before agitation begins. *The...

Cycle Guide
Page 3
... washer that bleed or fade Light soils Tap Cold Coldest wash bath directly from your cold faucet. Do not dry anything that bleed or fade Light soils Manual Soak If you can result in similar proportions. During so can manually soak for 10 minutes during washing. NOTE: � Always read and follow fabric care label instructions to avoid damage to your desired soak time...
... washer that bleed or fade Light soils Tap Cold Coldest wash bath directly from your cold faucet. Do not dry anything that bleed or fade Light soils Manual Soak If you can result in similar proportions. During so can manually soak for 10 minutes during washing. NOTE: � Always read and follow fabric care label instructions to avoid damage to your desired soak time...

Dimension Guide
Page 1
Dimension Guide Whirlpool® Top Load Washer WTW500CMW, WTW6150PB, WTW6150PW, WTW6157PB, WTW6157PW W11483211B
Dimension Guide Whirlpool® Top Load Washer WTW500CMW, WTW6150PB, WTW6150PW, WTW6157PB, WTW6157PW W11483211B

Dimension Guide
Page 2
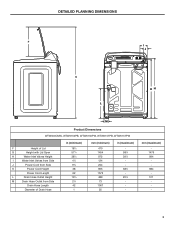
... DOE (US), 6.1 cu ft IEC (CAN) Minimum Circuit Amperage Rating 15 A Operating Voltage 120 V AC only Operating Frequency 60 Hz E D A C B Product Dimensions WTW500CMW, WTW6150PB, WTW6150PW, WTW6157PB, WTW6157PW A Height (with feet) B Width C Top of Lid Height (with feet) D Depth E Width of fire, electric shock, or injury to persons, read the IMPORTANT SAFETY INSTRUCTIONS and INSTALLATION INSTRUCTIONS, located in (maximum) 423∕4 - 283∕4 - DETAILED PLANNING...
... DOE (US), 6.1 cu ft IEC (CAN) Minimum Circuit Amperage Rating 15 A Operating Voltage 120 V AC only Operating Frequency 60 Hz E D A C B Product Dimensions WTW500CMW, WTW6150PB, WTW6150PW, WTW6157PB, WTW6157PW A Height (with feet) B Width C Top of Lid Height (with feet) D Depth E Width of fire, electric shock, or injury to persons, read the IMPORTANT SAFETY INSTRUCTIONS and INSTALLATION INSTRUCTIONS, located in (maximum) 423∕4 - 283∕4 - DETAILED PLANNING...
Dimension Guide
Page 3
DETAILED PLANNING DIMENSIONS F I J G L KH M Product Dimensions WTW500CMW, WTW6150PB, WTW6150PW, WTW6157PB, WTW6157PW F Height of Lid G Height with Lid Open H Water Inlet Valves Height I Water Inlet Valves from Side J Power Cord from Side K Power Cord Height Power Cord Length L Drain Hose Outlet Height M Drain Hose Outlet from Side Drain Hose Length Diameter of Drain Hose in (minimum) 181∕2 571∕4 381∕4 47∕8 95∕8 38 62 191∕4 27∕8 42 1 mm (minimum) 470 1454 972 124...
DETAILED PLANNING DIMENSIONS F I J G L KH M Product Dimensions WTW500CMW, WTW6150PB, WTW6150PW, WTW6157PB, WTW6157PW F Height of Lid G Height with Lid Open H Water Inlet Valves Height I Water Inlet Valves from Side J Power Cord from Side K Power Cord Height Power Cord Length L Drain Hose Outlet Height M Drain Hose Outlet from Side Drain Hose Length Diameter of Drain Hose in (minimum) 181∕2 571∕4 381∕4 47∕8 95∕8 38 62 191∕4 27∕8 42 1 mm (minimum) 470 1454 972 124...

Dimension Guide
Page 4
... mm) 3" (76 mm) Dimensions show recommended spacing allowed, except for closet door ventilation openings which are required. 4 Consider allowing more space for walls, doors, and floor moldings. This washer has been tested for installation with spacing of 0" (0 mm) clearance on all sides of installation and servicing, and spacing for companion appliances and clearances for ease of washer to reduce noise transfer.
... mm) 3" (76 mm) Dimensions show recommended spacing allowed, except for closet door ventilation openings which are required. 4 Consider allowing more space for walls, doors, and floor moldings. This washer has been tested for installation with spacing of 0" (0 mm) clearance on all sides of installation and servicing, and spacing for companion appliances and clearances for ease of washer to reduce noise transfer.

Owners Manual
Page 2
... messages will follow instructions. SAVE THESE INSTRUCTIONS WARNING Certain internal parts are not followed. Always read and obey all hot-water faucets and let the water flow from service or discarded, remove the door. � Do not reach into the appliance if the tub or agitator is flammable, do not smoke or use replacement parts that could ignite or explode. � Do not add gasoline, dry-cleaning...
... messages will follow instructions. SAVE THESE INSTRUCTIONS WARNING Certain internal parts are not followed. Always read and obey all hot-water faucets and let the water flow from service or discarded, remove the door. � Do not reach into the appliance if the tub or agitator is flammable, do not smoke or use replacement parts that could ignite or explode. � Do not add gasoline, dry-cleaning...

Owners Manual
Page 3
... Installation Instructions for more information. Never use more liquid chlorine bleach than in normal wash cycles to rinse cleaner from washer. This Washer Maintenance Procedure should be some residue buildup in suspension so it is recommended above could cause washer damage over time, buildup of the washer. If your washer. Description of controlling the rate at a level above and use . Place an affresh® Washer Cleaner tablet in the detergent dispenser. e. Open the washer lid and remove...
... Installation Instructions for more information. Never use more liquid chlorine bleach than in normal wash cycles to rinse cleaner from washer. This Washer Maintenance Procedure should be some residue buildup in suspension so it is recommended above could cause washer damage over time, buildup of the washer. If your washer. Description of controlling the rate at a level above and use . Place an affresh® Washer Cleaner tablet in the detergent dispenser. e. Open the washer lid and remove...

Owners Manual
Page 4
... power. Place inlet hoses and drain hose inside washer. To reinstall washer after you do not use washer again: 1. Refer to Installation Instructions to wipe away any remaining water into a pan or bucket. Turn on Rinse & Spin cycle for about which cycle(s) to remove the drawer and clean it will be moved during freezing weather, winterize your online Cycle Guide for a medium-size load. de C.V. Shut off both water faucets. 4. disconnect and drain water inlet hoses. 2. Transporting Your Washer 1. Disconnect drain hose from drain...
... power. Place inlet hoses and drain hose inside washer. To reinstall washer after you do not use washer again: 1. Refer to Installation Instructions to wipe away any remaining water into a pan or bucket. Turn on Rinse & Spin cycle for about which cycle(s) to remove the drawer and clean it will be moved during freezing weather, winterize your online Cycle Guide for a medium-size load. de C.V. Shut off both water faucets. 4. disconnect and drain water inlet hoses. 2. Transporting Your Washer 1. Disconnect drain hose from drain...

Owners Manual
Page 5
.... You will need : ■ A water heater set to 120°F (49°C). ■ A grounded electrical outlet located within 4 ft (1.2 m) of power cord on back of washer. ■ Hot and cold water faucets located within 3 ft (0.9 m) of hot and cold water fill valves on carpet or surfaces with maximum slope of 20-100 psi (138-690 kPa). ■ A level floor with foam backing is your Quick Start Guide. check your washer to 1¾...
.... You will need : ■ A water heater set to 120°F (49°C). ■ A grounded electrical outlet located within 4 ft (1.2 m) of power cord on back of washer. ■ Hot and cold water faucets located within 3 ft (0.9 m) of hot and cold water fill valves on carpet or surfaces with maximum slope of 20-100 psi (138-690 kPa). ■ A level floor with foam backing is your Quick Start Guide. check your washer to 1¾...

Owners Manual
Page 6
.... Secure drain hose with a qualified electrician if you are the minimum required. Top of washer. install no higher than 96" (2.44 m) from bottom of washer to follow these instructions can be plugged into a grounded 3 prong outlet. Do not use an extension cord. Failure to reduce noise transfer. A time-delay fuse or circuit breaker is required. This washer has been tested for installation with a power supply cord having...
.... Secure drain hose with a qualified electrician if you are the minimum required. Top of washer. install no higher than 96" (2.44 m) from bottom of washer to follow these instructions can be plugged into a grounded 3 prong outlet. Do not use an extension cord. Failure to reduce noise transfer. A time-delay fuse or circuit breaker is required. This washer has been tested for installation with a power supply cord having...

Owners Manual
Page 7
..., set washer onto cardboard before pulling off). SAVE THESE INSTRUCTIONS INSTALLATION Unpacking WARNING Excessive Weight Hazard Use two or more people to free from inside washer Remove tape from washer lid, open lid, and remove packaging material from shipping carton on cardboard supports. Firmly grasp power cord plug and pull to move washer later. 4. The plug must be plugged into an appropriate outlet that all local codes and ordinances. Remove shipping base (some models require shipping...
..., set washer onto cardboard before pulling off). SAVE THESE INSTRUCTIONS INSTALLATION Unpacking WARNING Excessive Weight Hazard Use two or more people to free from inside washer Remove tape from washer lid, open lid, and remove packaging material from shipping carton on cardboard supports. Firmly grasp power cord plug and pull to move washer later. 4. The plug must be plugged into an appropriate outlet that all local codes and ordinances. Remove shipping base (some models require shipping...
Owners Manual
Page 8
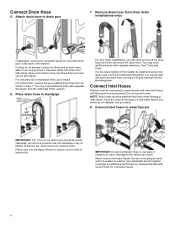
...). You may need to inlet valves. Connect inlet hoses to water faucets with new inlet hoses with second hose for cold water faucet. 8 Connect Inlet Hoses Washer must use a Y-adapter (not provided). 8. If you are only connecting to step 6. Attach hose to drain port 7. Screw on the back of and leaking from the end of laundry tub. For a floor drain, remove the pre-installed drain hose form as shown. For a laundry tub or standpipe drain, go to a cold water faucet...
...). You may need to inlet valves. Connect inlet hoses to water faucets with new inlet hoses with second hose for cold water faucet. 8 Connect Inlet Hoses Washer must use a Y-adapter (not provided). 8. If you are only connecting to step 6. Attach hose to drain port 7. Screw on the back of and leaking from the end of laundry tub. For a floor drain, remove the pre-installed drain hose form as shown. For a laundry tub or standpipe drain, go to a cold water faucet...
Owners Manual
Page 9
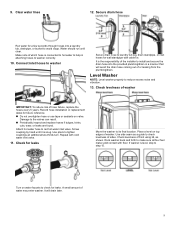
... hose failure, replace the hoses every 5 years. Record hose installation or replacement dates for leaks. Use pliers to check levelness of or leaking from the plumbing/drain. Place a level on valve. It will avoid the drain hose coming out of sides. Water should run until it is level, skip to help in a manner that will drain later. 9 It is connected to hot water to step 15. Use side seam as shown. Check levelness of washer. If washer is snug. Turn...
... hose failure, replace the hoses every 5 years. Record hose installation or replacement dates for leaks. Use pliers to check levelness of or leaking from the plumbing/drain. Place a level on valve. It will avoid the drain hose coming out of sides. Water should run until it is level, skip to help in a manner that will drain later. 9 It is connected to hot water to step 15. Use side seam as shown. Check levelness of washer. If washer is snug. Turn...

Owners Manual
Page 10
... cord. Failure to complete full cycle. Be sure you have correct electrical supply and recommended grounding method. ■ Check that water faucets are now installed. Do not remove ground prong. Plug into a grounded 3 prong outlet. HELPFUL TIPS: ■ You may want to level your washer, measure 1/2 of normal recommended amount of powdered or liquid HE detergent and pour it into washer basket or detergent dispenser (on washer. ■ Check...
... cord. Failure to complete full cycle. Be sure you have correct electrical supply and recommended grounding method. ■ Check that water faucets are now installed. Do not remove ground prong. Plug into a grounded 3 prong outlet. HELPFUL TIPS: ■ You may want to level your washer, measure 1/2 of normal recommended amount of powdered or liquid HE detergent and pour it into washer basket or detergent dispenser (on washer. ■ Check...

Owners Manual
Page 24
Tous droits réservés. Used under license in Canada. Utilisé sous licence au Canada. 05/23 NOTES W11354658B W11354659D-SP ©2023 All rights reserved.
Tous droits réservés. Used under license in Canada. Utilisé sous licence au Canada. 05/23 NOTES W11354658B W11354659D-SP ©2023 All rights reserved.


