
Owners Manual
Page 6
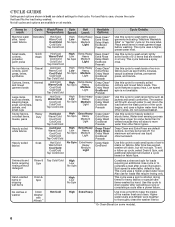
... wash portion of the cycle begins, and uses a higher water level than other cycles. Use this cycle to complete a load after a power failure. Do not overload basket. Use this cycle for normally soiled cottons and mixed fabric loads. To set -in stains on fabrics. For... the inside of 2-3 items that require rinsing only. Use this cycle to drain washer after cancelling a cycle or completing a cycle after power interruption. Spin speed is high. default is selectable; Also use liquid chlorine bleach. Higher water levels and Affresh work together to shorten drying...
... wash portion of the cycle begins, and uses a higher water level than other cycles. Use this cycle to complete a load after a power failure. Do not overload basket. Use this cycle for normally soiled cottons and mixed fabric loads. To set -in stains on fabrics. For... the inside of 2-3 items that require rinsing only. Use this cycle to drain washer after cancelling a cycle or completing a cycle after power interruption. Spin speed is high. default is selectable; Also use liquid chlorine bleach. Higher water levels and Affresh work together to shorten drying...
Owners Manual
Page 8
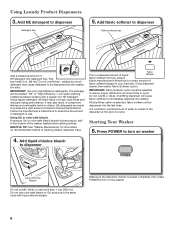
...Softener option. If Extra Rinse option is selected, fabric softener will cause fabric softener to turn on washer 4. Starting Your Washer 6. Press POWER to immediately dispense into the last rinse. Add liquid chlorine bleach to remain in cycle. Do not overfill tray - The package will likely ...same cycle with a regular non-HE detergent. Overfilling dispenser will be marked "HE" or "High Efficiency." It is closed completely, then press POWER to use. Do not use more than 1 cup (250 mL). Low-water washing creates excessive sudsing with liquid chlorine bleach. Using Oxi or...
...Softener option. If Extra Rinse option is selected, fabric softener will cause fabric softener to turn on washer 4. Starting Your Washer 6. Press POWER to immediately dispense into the last rinse. Add liquid chlorine bleach to remain in cycle. Do not overfill tray - The package will likely ...same cycle with a regular non-HE detergent. Overfilling dispenser will be marked "HE" or "High Efficiency." It is closed completely, then press POWER to use. Do not use more than 1 cup (250 mL). Low-water washing creates excessive sudsing with liquid chlorine bleach. Using Oxi or...
Owners Manual
Page 10
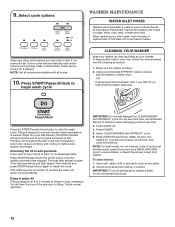
... and fresh as Deep Clean or Extra Rinse. Close washer lid. 4. Press START/Pause/Unlock. Select cycle options Select any spills. 2. Press POWER. 5. These can be interrupted, press Power and run a RINSE AND SPIN cycle to open for 2 to 3 minutes to restart the cycle. Make sure the washer is normal operation. Press...
... and fresh as Deep Clean or Extra Rinse. Close washer lid. 4. Press START/Pause/Unlock. Select cycle options Select any spills. 2. Press POWER. 5. These can be interrupted, press Power and run a RINSE AND SPIN cycle to open for 2 to 3 minutes to restart the cycle. Make sure the washer is normal operation. Press...
Owners Manual
Page 11
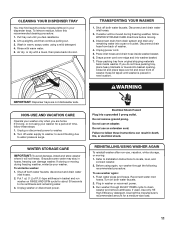
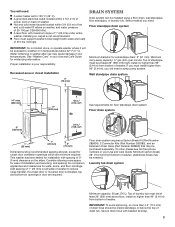
...your dispenser trays. If storing or moving during freezing weather, follow WINTER STORAGE CARE directions before moving. 3. Unplug washer or disconnect power. Before using again, run washer on both water faucets. 2. Flush water pipes and hoses. Run washer through the following recommended procedure...supply to washer, to avoid flooding due to locate, level, and connect washer. 2. If washer will not freeze. Unplug power cord. 5. Drape power cord over lid and down front of time, follow this recommended cleaning procedure: 1. Place packing tray from original shipping materials ...
...your dispenser trays. If storing or moving during freezing weather, follow WINTER STORAGE CARE directions before moving. 3. Unplug washer or disconnect power. Before using again, run washer on both water faucets. 2. Flush water pipes and hoses. Run washer through the following recommended procedure...supply to washer, to avoid flooding due to locate, level, and connect washer. 2. If washer will not freeze. Unplug power cord. 5. Drape power cord over lid and down front of time, follow this recommended cleaning procedure: 1. Place packing tray from original shipping materials ...
Owners Manual
Page 13
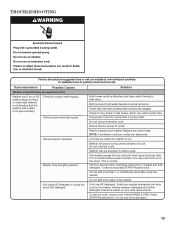
... into a grounded 3 prong outlet. Ensure there is power to 3 minutes before water is normal. Replace any kinks in basket and add detergent. Do not interrupt cycle. Washer may take 2 to outlet. The washer ... Start/Pause/Unlock. Check that the washer was unable to inlet valve. TROUBLESHOOTING First try the solutions suggested here or visit our website at www.whirlpool.com/help for assistance and to the washer. If you experience Possible Causes Solution Washer not performing as expected (cont.) Washer won't run . Both hoses...
... into a grounded 3 prong outlet. Ensure there is power to 3 minutes before water is normal. Replace any kinks in basket and add detergent. Do not interrupt cycle. Washer may take 2 to outlet. The washer ... Start/Pause/Unlock. Check that the washer was unable to inlet valve. TROUBLESHOOTING First try the solutions suggested here or visit our website at www.whirlpool.com/help for assistance and to the washer. If you experience Possible Causes Solution Washer not performing as expected (cont.) Washer won't run . Both hoses...
Installation Instructions
Page 3
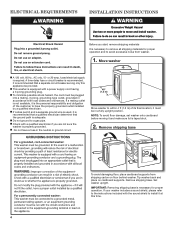
... openings in low temperatures. Add spacing of 1" (25 mm) on washer, and water pressure of washer. n Hot and cold water faucets located within 4 ft (1.2 m) of power cord on back of 1" (25 mm) under entire washer. install no more space for installation with beaded tie strap. 3 Recessed area or closet installation 3" (76...
... openings in low temperatures. Add spacing of 1" (25 mm) on washer, and water pressure of washer. n Hot and cold water faucets located within 4 ft (1.2 m) of power cord on back of 1" (25 mm) under entire washer. install no more space for installation with beaded tie strap. 3 Recessed area or closet installation 3" (76...
Installation Instructions
Page 4
... and make sure lid is recommended that the ground path is properly grounded. n To minimize possible shock hazard, the cord must be in accordance with a power supply cord having a 3 prong grounding plug. Tip washer back and place on floor behind washer. A time-delay fuse or circuit breaker is necessary to remove...
... and make sure lid is recommended that the ground path is properly grounded. n To minimize possible shock hazard, the cord must be in accordance with a power supply cord having a 3 prong grounding plug. Tip washer back and place on floor behind washer. A time-delay fuse or circuit breaker is necessary to remove...
Installation Instructions
Page 5
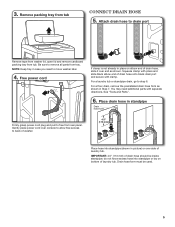
... of drain hose should be used. 5 For a laundry tub or standpipe drain, go to free from tub. Free power cord If clamp is not already in Step 7. See "Tools and Parts". 6. Gently place power cord over end as shown in place on bottom of laundry tub. Be sure to back of washer... access to remove all parts from tub Connect Drain Hose 5. do not force excess hose into standpipe (shown in standpipe Drain hose form Firmly grasp power cord plug and pull to step 6. 3. Remove packing tray from tray.
... of drain hose should be used. 5 For a laundry tub or standpipe drain, go to free from tub. Free power cord If clamp is not already in Step 7. See "Tools and Parts". 6. Gently place power cord over end as shown in place on bottom of laundry tub. Be sure to back of washer... access to remove all parts from tub Connect Drain Hose 5. do not force excess hose into standpipe (shown in standpipe Drain hose form Firmly grasp power cord plug and pull to step 6. 3. Remove packing tray from tray.

