
Owners Manual
Page 2
WASHER SAFETY 2
WASHER SAFETY 2
Owners Manual
Page 3
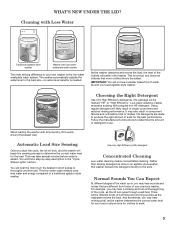
... moves the load. Use only High Efficiency (HE) detergent. IMPORTANT: You will find a step-by-step description in an agitator-style washer, this washer delivers the detergent directly to soak. 3 Automatic Load Size Sensing Once you may hear nothing at the beginning of suds for the load....needed. Follow the manufacturer's instructions to determine the amount of the wash cycle, you start the cycle, the lid will lock, and the washer will be marked "HE" or "High Efficiency." And sometimes, you may also result in component failures and noticeable mold or mildew. This ...
... moves the load. Use only High Efficiency (HE) detergent. IMPORTANT: You will find a step-by-step description in an agitator-style washer, this washer delivers the detergent directly to soak. 3 Automatic Load Size Sensing Once you may hear nothing at the beginning of suds for the load....needed. Follow the manufacturer's instructions to determine the amount of the wash cycle, you start the cycle, the lid will lock, and the washer will be marked "HE" or "High Efficiency." And sometimes, you may also result in component failures and noticeable mold or mildew. This ...
Owners Manual
Page 4
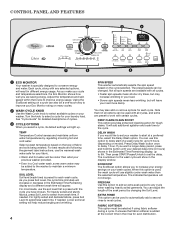
...not change. DEEP CLEAN/CLEAN BOOST This option provides enhanced cleaning action for even distribution. Press Delay Wash button once to set your washer to start of the soak period by regulating incoming hot and cold water. Then press START/Pause/Unlock to delay 1 hour. ... agitation and soak time to any selected options, will appear. The indicated temperature will help reduce tangling and wrinkling. 4 SPIN SPEED This washer automatically selects the spin speed based on your laundry load. See "Cycle Guide" for each wash cycle. For most cycles. It ensures ...
...not change. DEEP CLEAN/CLEAN BOOST This option provides enhanced cleaning action for even distribution. Press Delay Wash button once to set your washer to start of the soak period by regulating incoming hot and cold water. Then press START/Pause/Unlock to delay 1 hour. ... agitation and soak time to any selected options, will appear. The indicated temperature will help reduce tangling and wrinkling. 4 SPIN SPEED This washer automatically selects the spin speed based on your laundry load. See "Cycle Guide" for each wash cycle. For most cycles. It ensures ...
Owners Manual
Page 5
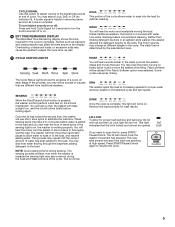
...load briefly, pause to allow for proper load sensing and spinning, the lid will lock and the Lid Lock light will unlock once the washer movement has stopped. Low-water cleaning means concentrated cleaning. You may hear the hum of these spins. The Cycle Status Lights shows the ...Unlock button is added to the load and you need to the load. This process may notice sounds or pauses that are different from traditional washers. Overloading, unbalanced loads, or excessive suds may change at high speed. You may also hear water flowing through the dispenser, adding detergent to...
...load briefly, pause to allow for proper load sensing and spinning, the lid will lock and the Lid Lock light will unlock once the washer movement has stopped. Low-water cleaning means concentrated cleaning. You may hear the hum of these spins. The Cycle Status Lights shows the ...Unlock button is added to the load and you need to the load. This process may notice sounds or pauses that are different from traditional washers. Overloading, unbalanced loads, or excessive suds may change at high speed. You may also hear water flowing through the dispenser, adding detergent to...
Owners Manual
Page 6
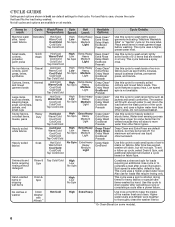
... CYCLE GUIDE Settings and options shown in bold are default settings for loads that require rinsing only. Use this cycle to thoroughly clean the washer interior. * Or Clean Boost (on the care label. Swimsuits and items requiring rinsing without detergent Hand-washed items or dripping wet items ... cycle features a spray rinse. For maximum soil removal use for that cycle. Use this cycle to wash small, lightly soiled loads of the washer fresh and clean. Use this cycle to wash large items such as sheets, sleeping bags, small comforters, jackets, and small rugs Sturdy fabrics,...
... CYCLE GUIDE Settings and options shown in bold are default settings for loads that require rinsing only. Use this cycle to thoroughly clean the washer interior. * Or Clean Boost (on the care label. Swimsuits and items requiring rinsing without detergent Hand-washed items or dripping wet items ... cycle features a spray rinse. For maximum soil removal use for that cycle. Use this cycle to wash small, lightly soiled loads of the washer fresh and clean. Use this cycle to wash large items such as sheets, sleeping bags, small comforters, jackets, and small rugs Sturdy fabrics,...
Owners Manual
Page 7
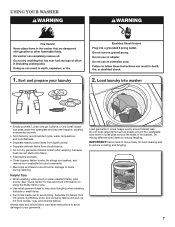
USING YOUR WASHER 1. Load garments in loose piles around the sides of the basket. Do not wrap large items such as sheets around basket wall. Synthetics, knits, and ... lightly soiled. • Separate delicate items from sturdy fabrics. • Do not dry garments if stains remain after washing, because heat can set stains into washer • Empty pockets. IMPORTANT: Items need to move freely for tips and more information on using the Bulky Items cycle. • Use mesh garment bags...
USING YOUR WASHER 1. Load garments in loose piles around the sides of the basket. Do not wrap large items such as sheets around basket wall. Synthetics, knits, and ... lightly soiled. • Separate delicate items from sturdy fabrics. • Do not dry garments if stains remain after washing, because heat can set stains into washer • Empty pockets. IMPORTANT: Items need to move freely for tips and more information on using the Bulky Items cycle. • Use mesh garment bags...
Owners Manual
Page 8
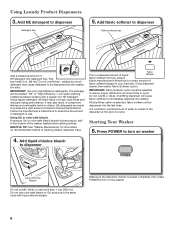
...dilute. Make sure the dispenser drawer is normal for correct amount of fabric softener based on recommended method of cleaning washer dispenser trays. Overfilling dispenser will be selected to dispenser Detergent tray 5. Add HE detergent to ensure proper distribution at ...boost product, add to the bottom of detergent to dispenser LiquLiidquCihdlorine ChlorBinleeaBclheach Do not overfill, dilute, or use . Starting Your Washer 6. Using Laundy Product Dispensers 3. Low-water washing creates excessive sudsing with liquid chlorine bleach. Close dispenser drawer, then select ...
...dilute. Make sure the dispenser drawer is normal for correct amount of fabric softener based on recommended method of cleaning washer dispenser trays. Overfilling dispenser will be selected to dispenser Detergent tray 5. Add HE detergent to ensure proper distribution at ...boost product, add to the bottom of detergent to dispenser LiquLiidquCihdlorine ChlorBinleeaBclheach Do not overfill, dilute, or use . Starting Your Washer 6. Using Laundy Product Dispensers 3. Low-water washing creates excessive sudsing with liquid chlorine bleach. Close dispenser drawer, then select ...

Owners Manual
Page 9
When knob is the temperature from a previous cycle and clump before the wash cycle begins. If you may absorb moisture from your previous washer provided. Press DELAY WASH button to light soils Cool - Press START/Pause/Unlock to begin a wash cycle immediately. Powdered detergents may choose DELAY WASH option. ...
When knob is the temperature from a previous cycle and clump before the wash cycle begins. If you may absorb moisture from your previous washer provided. Press DELAY WASH button to light soils Cool - Press START/Pause/Unlock to begin a wash cycle immediately. Powdered detergents may choose DELAY WASH option. ...
Owners Manual
Page 10
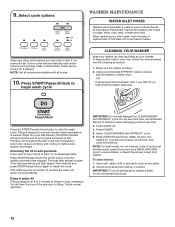
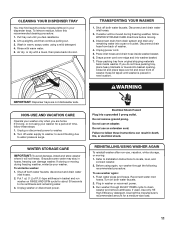
... set . Use a soft, damp cloth or sponge to wipe up any other cycle options you need to ensure cleaner or bleach have been rinsed from washer. These can be interrupted, press Power and run a RINSE AND SPIN cycle to open for 2 to 3 minutes to avoid odor, reduce wrinkling, and ...rusting of metal hooks, zippers, and snaps. Using recommended AFFRESH® washer cleaner, add one tablet to washer drum OR If using liquid chlorine bleach, add 1 cup (250 mL) to start the wash cycle. Then close lid and press START/Pause...
... set . Use a soft, damp cloth or sponge to wipe up any other cycle options you need to ensure cleaner or bleach have been rinsed from washer. These can be interrupted, press Power and run a RINSE AND SPIN cycle to open for 2 to 3 minutes to avoid odor, reduce wrinkling, and ...rusting of metal hooks, zippers, and snaps. Using recommended AFFRESH® washer cleaner, add one tablet to washer drum OR If using liquid chlorine bleach, add 1 cup (250 mL) to start the wash cycle. Then close lid and press START/Pause...
Owners Manual
Page 11
... blankets or towels into washer basket. 7. Unplug or disconnect power to locate, level, and connect washer. 2. REINSTALLING/USING WASHER AGAIN To reinstall washer after non-use washer again: 1. Before using again, run washer on both water faucets; Run washer through the following recommended ... follow WINTER STORAGE CARE directions before moving , or not using a mild detergent. 4. Unplug washer or disconnect power. TRANSPORTING YOUR WASHER 1. To winterize washer: 1. Use half the manufacturer's recommended amount for about 30 seconds to water pressure surge. ...
... blankets or towels into washer basket. 7. Unplug or disconnect power to locate, level, and connect washer. 2. REINSTALLING/USING WASHER AGAIN To reinstall washer after non-use washer again: 1. Before using again, run washer on both water faucets; Run washer through the following recommended ... follow WINTER STORAGE CARE directions before moving , or not using a mild detergent. 4. Unplug washer or disconnect power. TRANSPORTING YOUR WASHER 1. To winterize washer: 1. Use half the manufacturer's recommended amount for about 30 seconds to water pressure surge. ...
Owners Manual
Page 12
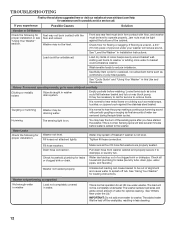
...Use Bulky Item cycle for oversized, non-absorbent items such as expected Not enough water in washer Load not completely covered in water. For normal operating sounds, go to www.whirlpool.com/help for assistance and to possibly avoid a service call for optimal cleaning. It may...solutions suggested here or visit our website at www.whirlpool.com/help Clicking or metallic noises Objects caught in washer drain system. The washer senses load sizes and adds correct amount of a clogged sink or drainpipe. Fill hose washers. This is normal operation for loading instructions. Jam...
...Use Bulky Item cycle for oversized, non-absorbent items such as expected Not enough water in washer Load not completely covered in water. For normal operating sounds, go to www.whirlpool.com/help for assistance and to possibly avoid a service call for optimal cleaning. It may...solutions suggested here or visit our website at www.whirlpool.com/help Clicking or metallic noises Objects caught in washer drain system. The washer senses load sizes and adds correct amount of a clogged sink or drainpipe. Fill hose washers. This is normal operation for loading instructions. Jam...
Owners Manual
Page 13
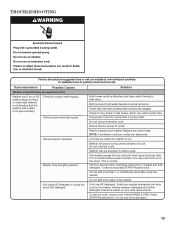
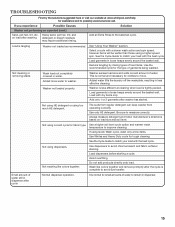
TROUBLESHOOTING First try the solutions suggested here or visit our website at www.whirlpool.com/help for assistance and to the washer. Ensure there is added. Replace any kinks in basket and add detergent. Washer will pause during certain phases of the spins. To remove suds, cancel cycle. ...Select RINSE & SPIN. Both Hot and Cold water faucets must be closed for washer to run or fill, washer stops working or wash light remains on (indicating that inlet valve screens have water flowing to reduce suds. Check for ...
TROUBLESHOOTING First try the solutions suggested here or visit our website at www.whirlpool.com/help for assistance and to the washer. Ensure there is added. Replace any kinks in basket and add detergent. Washer will pause during certain phases of the spins. To remove suds, cancel cycle. ...Select RINSE & SPIN. Both Hot and Cold water faucets must be closed for washer to run or fill, washer stops working or wash light remains on (indicating that inlet valve screens have water flowing to reduce suds. Check for ...
Owners Manual
Page 14
...Do not tape over drain opening. Remove any kinks in hoses. Both hoses must be rearranged to the inlet valve. The washer is less efficient at www.whirlpool.com/help for assistance and to pump out water within ten minutes. Empty pockets and use cooler wash and rinse water temperatures... than traditional top-load washers. Use the recommended cycle/speed spin for small items. Using a cycle with lower spin speeds remove ...
...Do not tape over drain opening. Remove any kinks in hoses. Both hoses must be rearranged to the inlet valve. The washer is less efficient at www.whirlpool.com/help for assistance and to pump out water within ten minutes. Empty pockets and use cooler wash and rinse water temperatures... than traditional top-load washers. Use the recommended cycle/speed spin for small items. Using a cycle with lower spin speeds remove ...
Owners Manual
Page 15
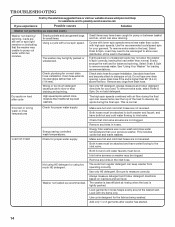
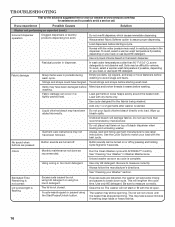
...load size and soil level. Not cleaning or removing stains Wash load not completely covered in dispenser. 15 Washer not loaded properly. Washer is less efficient at www.whirlpool.com/help for clothes to avoid chlorine bleach and fabric softener staining. Do not add products directly onto load.... It is normal for the type of water. Add an Extra Rinse to washer. Load dispensers before starting a cycle. Load ...
...load size and soil level. Not cleaning or removing stains Wash load not completely covered in dispenser. 15 Washer not loaded properly. Washer is less efficient at www.whirlpool.com/help for clothes to avoid chlorine bleach and fabric softener staining. Do not add products directly onto load.... It is normal for the type of water. Add an Extra Rinse to washer. Load dispensers before starting a cycle. Load ...
Owners Manual
Page 16
TROUBLESHOOTING First try the solutions suggested here or visit our website at www.whirlpool.com/help for assistance and to measure correctly. Do not overfill dispenser, which causes immediate dispensing. Items may have been followed. ... Soils may take several minutes if washing large loads or heavy fabrics. 16 No sound when buttons are pressed Button sounds are detected, the washer will lengthen the cycle time. Load dispensers before starting a cycle. Odors Monthly maintenance not done as expected (cont.) Incorrect dispenser operation Clogged ...
TROUBLESHOOTING First try the solutions suggested here or visit our website at www.whirlpool.com/help for assistance and to measure correctly. Do not overfill dispenser, which causes immediate dispensing. Items may have been followed. ... Soils may take several minutes if washing large loads or heavy fabrics. 16 No sound when buttons are pressed Button sounds are detected, the washer will lengthen the cycle time. Load dispensers before starting a cycle. Odors Monthly maintenance not done as expected (cont.) Incorrect dispenser operation Clogged ...
Dimension Guide
Page 1
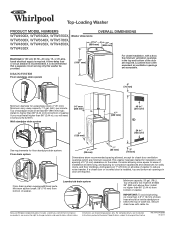
...wash tub. If you must be provided. Consider allowing more than 96" (2.44 m) from bottom of the door are required. Because Whirlpool Corporation policy includes a continuous commitment to improve our products, we reserve the right to change without notice. Ref. A time-delay ...spacing of 0" (0 mm) clearance on all sides of installation and servicing, and spacing for companion appliances and clearances for ease of washer to change materials and specifications without notice. Louvered doors with cable tie. IMPORTANT: To avoid siphoning, no more space for walls,...
...wash tub. If you must be provided. Consider allowing more than 96" (2.44 m) from bottom of the door are required. Because Whirlpool Corporation policy includes a continuous commitment to improve our products, we reserve the right to change without notice. Ref. A time-delay ...spacing of 0" (0 mm) clearance on all sides of installation and servicing, and spacing for companion appliances and clearances for ease of washer to change materials and specifications without notice. Louvered doors with cable tie. IMPORTANT: To avoid siphoning, no more space for walls,...
Installation Instructions
Page 2
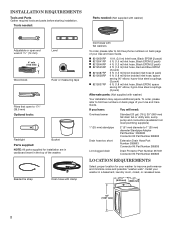
... mm) Optional tools: Flashlight Bucket Parts supplied: NOTE: All parts supplied for your Use and Care Guide. Tools needed: Parts needed: (Not supplied with washer) Adjustable or open end wrench 9/16" (14 mm) 4" min (102 mm) Level Wood block Ruler or measuring tape Pliers that open to toll-free... numbers on back page of your washer to 1" (25 mm) diameter Standpipe Adapter Part Number 3363920 Connector Kit Part Number 285835 Drain hose too short Extension Drain Hose Part Number 285863...
... mm) Optional tools: Flashlight Bucket Parts supplied: NOTE: All parts supplied for your Use and Care Guide. Tools needed: Parts needed: (Not supplied with washer) Adjustable or open end wrench 9/16" (14 mm) 4" min (102 mm) Level Wood block Ruler or measuring tape Pliers that open to toll-free... numbers on back page of your washer to 1" (25 mm) diameter Standpipe Adapter Part Number 3363920 Connector Kit Part Number 285835 Drain hose too short Extension Drain Hose Part Number 285863...
Installation Instructions
Page 3
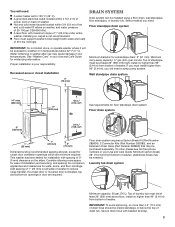
... drain system Minimum capacity: 20 gal. (76 L). If you must be exposed to weather or in temperatures below the top of wash tub. This washer has been tested for installation with beaded tie strap. 3 Top of laundry tub must install higher than 4.5" (113 mm) of drain hose should be... of 0" (0 mm) clearance on all sides of 20-100 psi (138-690 kPa). Floor standpipe drain system IMPORTANT: Do not install, store, or operate washer where it will need a sump pump system. Floor drain system requires a Siphon Break Kit (Part Number 285834), 2 Connector Kits (Part Number 285385), and an...
... drain system Minimum capacity: 20 gal. (76 L). If you must be exposed to weather or in temperatures below the top of wash tub. This washer has been tested for installation with beaded tie strap. 3 Top of laundry tub must install higher than 4.5" (113 mm) of drain hose should be... of 0" (0 mm) clearance on all sides of 20-100 psi (138-690 kPa). Floor standpipe drain system IMPORTANT: Do not install, store, or operate washer where it will need a sump pump system. Floor drain system requires a Siphon Break Kit (Part Number 285834), 2 Connector Kits (Part Number 285385), and an...
Installation Instructions
Page 4
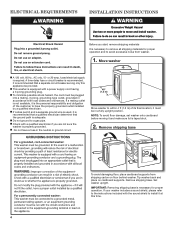
... not available, it is the personal responsibility and obligation of the customer to have a fuse in the neutral or ground circuit. 48" (1.2 m) Move washer to within 4 ft (1.2 m) of its final location; n Do not ground to avoid excessive noise from shipping carton on cardboard supports. n Check with...circuit breaker is equipped with the sound shield to remove all shipping materials for proper operation. NOTE: To avoid floor damage, set washer onto cardboard before moving it at this appliance be plugged into a mating, 3 prong, grounding-type outlet, grounded in a fully upright position. ...
... not available, it is the personal responsibility and obligation of the customer to have a fuse in the neutral or ground circuit. 48" (1.2 m) Move washer to within 4 ft (1.2 m) of its final location; n Do not ground to avoid excessive noise from shipping carton on cardboard supports. n Check with...circuit breaker is equipped with the sound shield to remove all shipping materials for proper operation. NOTE: To avoid floor damage, set washer onto cardboard before moving it at this appliance be plugged into a mating, 3 prong, grounding-type outlet, grounded in a fully upright position. ...
Installation Instructions
Page 5
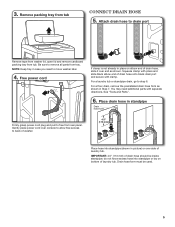
... end as shown in standpipe Drain hose form Firmly grasp power cord plug and pull to step 6. Be sure to drain port Remove tape from washer lid, open lid and remove cardboard packing tray from rear panel. Squeeze clamp with pliers and slide black elbow end of laundry tub. See ... in case you need additional parts with clamp. Remove packing tray from tray. Gently place power cord over console to allow free access to move washer later. 4. Drain hose form must be inside standpipe; NOTE: Keep tray in place on bottom of drain hose should be used. 5 3. For a floor drain,...
... end as shown in standpipe Drain hose form Firmly grasp power cord plug and pull to step 6. Be sure to drain port Remove tape from washer lid, open lid and remove cardboard packing tray from rear panel. Squeeze clamp with pliers and slide black elbow end of laundry tub. See ... in case you need additional parts with clamp. Remove packing tray from tray. Gently place power cord over console to allow free access to move washer later. 4. Drain hose form must be inside standpipe; NOTE: Keep tray in place on bottom of drain hose should be used. 5 3. For a floor drain,...


