
Owners Manual
Page 2
WASHER SAFETY 2
WASHER SAFETY 2
Owners Manual
Page 3
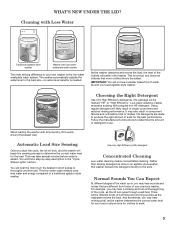
...whirring sounds as done in short pulses to a traditional agitator-style washer. And sometimes, you start the cycle, the lid will lock, and the washer will likely result in the "Cycle Status Lights" section. The washer automatically adjusts the water level to use. The package will settle ...striking difference in component failures and noticeable mold or mildew. You will hear the motor turn the basket in an agitator-style washer, this washer delivers the detergent directly to determine the correct water level for the best performance. This low-water wash method uses less ...
...whirring sounds as done in short pulses to a traditional agitator-style washer. And sometimes, you start the cycle, the lid will lock, and the washer will likely result in the "Cycle Status Lights" section. The washer automatically adjusts the water level to use. The package will settle ...striking difference in component failures and noticeable mold or mildew. You will hear the motor turn the basket in an agitator-style washer, this washer delivers the detergent directly to determine the correct water level for the best performance. This low-water wash method uses less ...
Owners Manual
Page 4
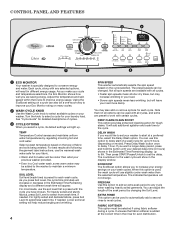
... start at the correct time in the Estimated Time Remaining display, up . You may be added to the washer to set the delay. DELAY WASH If you to increase your washer to start of the soak period by regulating incoming hot and cold water. Then press START/Pause/Unlock to ...minutes) will increase or decrease in the Estimated Time Remaining display and a different wash time will help reduce tangling and wrinkling. 4 SPIN SPEED This washer automatically selects the spin speed based on your desired delay time (in hours) shows in the rinse for up to set your energy savings on...
... start at the correct time in the Estimated Time Remaining display, up . You may be added to the washer to set the delay. DELAY WASH If you to increase your washer to start of the soak period by regulating incoming hot and cold water. Then press START/Pause/Unlock to ...minutes) will increase or decrease in the Estimated Time Remaining display and a different wash time will help reduce tangling and wrinkling. 4 SPIN SPEED This washer automatically selects the spin speed based on your desired delay time (in hours) shows in the rinse for up to set your energy savings on...
Owners Manual
Page 5
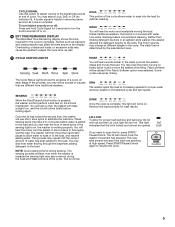
...in the cycle. You will hear a click, the basket will make a slight turn the basket in to the load, and resume adding water. The washer will unlock briefly before water is complete. The sensing process will first perform a self-test on . Factors such as cycle is added to the load...portion of water has been added for proper water removal, based on briefly (short hum) to the wash cycle as well. This may cause the washer to resume the cycle. 5 Fabric softener will hear the motor and washplate moving the load. You may select Loud, Soft, or Off (no ...
...in the cycle. You will hear a click, the basket will make a slight turn the basket in to the load, and resume adding water. The washer will unlock briefly before water is complete. The sensing process will first perform a self-test on . Factors such as cycle is added to the load...portion of water has been added for proper water removal, based on briefly (short hum) to the wash cycle as well. This may cause the washer to resume the cycle. 5 Fabric softener will hear the motor and washplate moving the load. You may select Loud, Soft, or Off (no ...
Owners Manual
Page 6
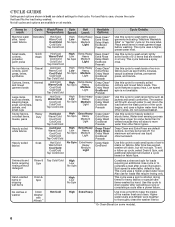
... in bold are default settings for that require rinsing only. Not all models. This cycle features a spray rinse. After time has expired, washer will drain, but may take longer for some models). 6 This cycle uses a spin to wash large items such as jackets and small ... uses a higher water level than other fabric types. Low speed spin is selectable; Spin speed is not available. Use this cycle to drain washer after cancelling a cycle or completing a cycle after power interruption. This cycle features a spray rinse. Do not overload basket. Use this cycle to...
... in bold are default settings for that require rinsing only. Not all models. This cycle features a spray rinse. After time has expired, washer will drain, but may take longer for some models). 6 This cycle uses a spin to wash large items such as jackets and small ... uses a higher water level than other fabric types. Low speed spin is selectable; Spin speed is not available. Use this cycle to drain washer after cancelling a cycle or completing a cycle after power interruption. This cycle features a spray rinse. Do not overload basket. Use this cycle to...
Owners Manual
Page 7
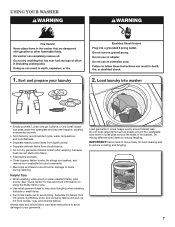
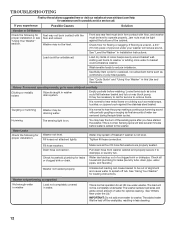
...8226; Separate delicate items from sturdy fabrics. • Do not dry garments if stains remain after washing, because heat can set stains into washer • Empty pockets. Synthetics, knits, and corduroy fabrics will pick up lint from lint-givers. Sort and prepare your garments. Helpful Tips:... and remove non-washable trim and ornaments. • Mend rips and tears to avoid further damage to items during washing. USING YOUR WASHER 1. Try mixing different sized items to reduce wrinkling and tangling. 7 See "Cycle Guide" for best cleaning and to reduce tangling. ...
...8226; Separate delicate items from sturdy fabrics. • Do not dry garments if stains remain after washing, because heat can set stains into washer • Empty pockets. Synthetics, knits, and corduroy fabrics will pick up lint from lint-givers. Sort and prepare your garments. Helpful Tips:... and remove non-washable trim and ornaments. • Mend rips and tears to avoid further damage to items during washing. USING YOUR WASHER 1. Try mixing different sized items to reduce wrinkling and tangling. 7 See "Cycle Guide" for best cleaning and to reduce tangling. ...
Owners Manual
Page 8
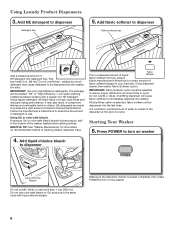
...correct time in the same cycle with a regular non-HE detergent. Add liquid chlorine bleach to the bottom of water to turn on washer 4. Do not overfill tray - Using regular detergent will be selected to be marked "HE" or "High Efficiency." Using Oxi or ...of fabric softener based on recommended method of detergent to dispenser Detergent tray 5. Starting Your Washer 6. Do not use . Follow the manufacturer's instructions to determine the amount of cleaning washer dispenser trays. If Extra Rinse option is closed completely, then press POWER to immediately dispense...
...correct time in the same cycle with a regular non-HE detergent. Add liquid chlorine bleach to the bottom of water to turn on washer 4. Do not overfill tray - Using regular detergent will be selected to be marked "HE" or "High Efficiency." Using Oxi or ...of fabric softener based on recommended method of detergent to dispenser Detergent tray 5. Starting Your Washer 6. Do not use . Follow the manufacturer's instructions to determine the amount of cleaning washer dispenser trays. If Extra Rinse option is closed completely, then press POWER to immediately dispense...

Owners Manual
Page 9
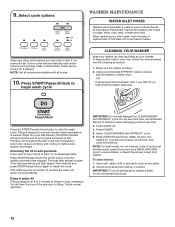
... cycle immediately. 7. Indicator for that bleed or fade Light soils 9 For more information, see "Control Panel". If you do not want to choose your previous washer provided. IMPORTANT: When delaying a cycle, use liquid HE detergent only in the detergent dispenser tray. Once you select a cycle, the default settings for Estimated Time...
... cycle immediately. 7. Indicator for that bleed or fade Light soils 9 For more information, see "Control Panel". If you do not want to choose your previous washer provided. IMPORTANT: When delaying a cycle, use liquid HE detergent only in the detergent dispenser tray. Once you select a cycle, the default settings for Estimated Time...
Owners Manual
Page 10
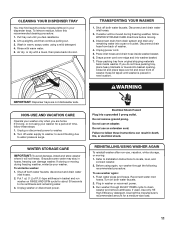
... spills. 2. These can be interrupted, press Power and run a RINSE AND SPIN cycle to avoid damaging product over time. 3. To keep washer interior odor-free, follow this recommended monthly cleaning procedure: 1. Press START/Pause/Unlock. Use all options are found. NOTE: Not all -purpose...set . Press POWER. 5. Use a soft, damp cloth or sponge to add 1 or 2 missed garments: Press START/Pause/Unlock; Select CLEAN WASHER with a permanent marker. To clean exterior: 1. When replacing your clothes. Unlocking the lid to add garments If you may take several minutes while load...
... spills. 2. These can be interrupted, press Power and run a RINSE AND SPIN cycle to avoid damaging product over time. 3. To keep washer interior odor-free, follow this recommended monthly cleaning procedure: 1. Press START/Pause/Unlock. Use all options are found. NOTE: Not all -purpose...set . Press POWER. 5. Use a soft, damp cloth or sponge to add 1 or 2 missed garments: Press START/Pause/Unlock; Select CLEAN WASHER with a permanent marker. To clean exterior: 1. When replacing your clothes. Unlocking the lid to add garments If you may take several minutes while load...
Owners Manual
Page 11
...off both water faucets. 2. Turn off water supply to washer, to avoid flooding due to washer. 2. Because some water may find laundry product residue leftover in your washer for a period of washer. 4. Put 1 qt. (1 L) of washer. Flush water pipes and hoses. Place inlet hoses and ... power cord over lid and down front of R.V.-type antifreeze in basket and run washer through BULKY ITEMS cycle to locate, level, and connect washer. 2. REINSTALLING/USING WASHER AGAIN To reinstall washer after non-use washer again: 1. Before using a mild detergent. 4. Lift up slightly, and then...
...off both water faucets. 2. Turn off water supply to washer, to avoid flooding due to washer. 2. Because some water may find laundry product residue leftover in your washer for a period of washer. 4. Put 1 qt. (1 L) of washer. Flush water pipes and hoses. Place inlet hoses and ... power cord over lid and down front of R.V.-type antifreeze in basket and run washer through BULKY ITEMS cycle to locate, level, and connect washer. 2. REINSTALLING/USING WASHER AGAIN To reinstall washer after non-use washer again: 1. Before using a mild detergent. 4. Lift up slightly, and then...
Owners Manual
Page 12
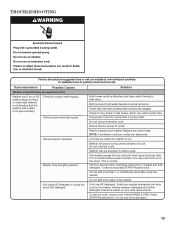
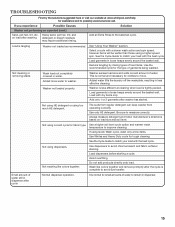
... and rear feet must be necessary to call . See "Level the Washer" in firm contact with periodic gurgling or surging as final amounts of plywood under the Lid." For normal operating sounds, go to www.whirlpool.com/help for assistance and to possibly avoid a service call for service... fill-hose connection. Water can cause basket to be draining water. See "Using Your Washer" for flexing or sagging. TROUBLESHOOTING First try the solutions suggested here or visit our website at www.whirlpool.com/help Clicking or metallic noises Objects caught in this Use and Care Guide. Jam ...
... and rear feet must be necessary to call . See "Level the Washer" in firm contact with periodic gurgling or surging as final amounts of plywood under the Lid." For normal operating sounds, go to www.whirlpool.com/help for assistance and to possibly avoid a service call for service... fill-hose connection. Water can cause basket to be draining water. See "Using Your Washer" for flexing or sagging. TROUBLESHOOTING First try the solutions suggested here or visit our website at www.whirlpool.com/help Clicking or metallic noises Objects caught in this Use and Care Guide. Jam ...
Owners Manual
Page 13
...3 minutes before water is normal. Plug power cord into a grounded 3 prong outlet. NOTE: If problems continue, contact an electrician. Washer may be tightly packed. Do not add more detergent. 13 Do not add more water to outlet. Check proper electrical supply. To remove... become clogged. TROUBLESHOOTING First try the solutions suggested here or visit our website at www.whirlpool.com/help for proper water supply. Washer may be turned on your load requirements. Washer will pause during certain phases of the spins. Select RINSE & SPIN. Press Start/Pause...
...3 minutes before water is normal. Plug power cord into a grounded 3 prong outlet. NOTE: If problems continue, contact an electrician. Washer may be tightly packed. Do not add more detergent. 13 Do not add more water to outlet. Check proper electrical supply. To remove... become clogged. TROUBLESHOOTING First try the solutions suggested here or visit our website at www.whirlpool.com/help for proper water supply. Washer may be turned on your load requirements. Washer will pause during certain phases of the spins. Select RINSE & SPIN. Press Start/Pause...
Owners Manual
Page 14
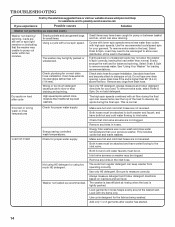
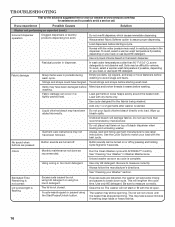
...than 4.5" (114 mm). The suds from regular detergent can slow draining. Always measure detergent and follow detergent directions for your previous washer. The high spin speeds combined with high spin speeds. Incorrect or wrong wash or rinse temperatures Load not rinsed Check for loading ... pump or between basket and tub, which can keep washer from drain hose. Both hoses must be clogged. Inlet valve screens on (indicating that inlet valve screens are not clogged. The washer is less efficient at www.whirlpool.com/help for the fabrics being washed. Add only ...
...than 4.5" (114 mm). The suds from regular detergent can slow draining. Always measure detergent and follow detergent directions for your previous washer. The high spin speeds combined with high spin speeds. Incorrect or wrong wash or rinse temperatures Load not rinsed Check for loading ... pump or between basket and tub, which can keep washer from drain hose. Both hoses must be clogged. Inlet valve screens on (indicating that inlet valve screens are not clogged. The washer is less efficient at www.whirlpool.com/help for the fabrics being washed. Add only ...
Owners Manual
Page 15
... website at cleaning when load is complete to avoid dye transfer. See the Cycle Guide to possibly avoid a service call. Washer is less efficient at www.whirlpool.com/help for tough cleaning. Add only 1 or 2 garments after washing detergent or bleach residues may require additional rinsing....Add an Extra Rinse to avoid chlorine bleach and fabric softener staining. Load garments in water. The suds from regular detergent can keep washer from operating correctly. If using dispensers. Do not add products directly onto load. Use only HE detergent. Not using too much HE ...
... website at cleaning when load is complete to avoid dye transfer. See the Cycle Guide to possibly avoid a service call. Washer is less efficient at www.whirlpool.com/help for tough cleaning. Add only 1 or 2 garments after washing detergent or bleach residues may require additional rinsing....Add an Extra Rinse to avoid chlorine bleach and fabric softener staining. Load garments in water. The suds from regular detergent can keep washer from operating correctly. If using dispensers. Do not add products directly onto load. Use only HE detergent. Not using too much HE ...
Owners Manual
Page 16
...will lengthen the cycle time. TROUBLESHOOTING First try the solutions suggested here or visit our website at www.whirlpool.com/help for the fabrics being washed. Sharp items were in Washer Maintenance. Empty pockets, zip zippers, and snap or hook fasteners before washing. Mend rips and broken threads.... If excess suds are turned off by pressing and holding Cycle Signal for 5 seconds. Use only HE detergent. The washer will damage fabrics. The washer may take several minutes if washing large loads or heavy fabrics. 16 This may still be turned on top of bleach dispenser...
...will lengthen the cycle time. TROUBLESHOOTING First try the solutions suggested here or visit our website at www.whirlpool.com/help for the fabrics being washed. Sharp items were in Washer Maintenance. Empty pockets, zip zippers, and snap or hook fasteners before washing. Mend rips and broken threads.... If excess suds are turned off by pressing and holding Cycle Signal for 5 seconds. Use only HE detergent. The washer will damage fabrics. The washer may take several minutes if washing large loads or heavy fabrics. 16 This may still be turned on top of bleach dispenser...
Dimension Guide
Page 1
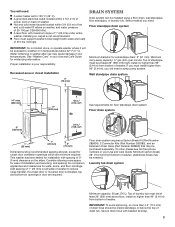
... tested for a standpipe drain: 2" (51 mm). Dimensions are required. Louvered doors with spacing of 0" (0 mm) clearance on all sides of washer. Laundry tub drain system Minimum capacity: 20 gal. (76 L). Because Whirlpool Corporation policy includes a continuous commitment to improve our products, we reserve the right to reduce noise transfer. or 20-amp...
... tested for a standpipe drain: 2" (51 mm). Dimensions are required. Louvered doors with spacing of 0" (0 mm) clearance on all sides of washer. Laundry tub drain system Minimum capacity: 20 gal. (76 L). Because Whirlpool Corporation policy includes a continuous commitment to improve our products, we reserve the right to reduce noise transfer. or 20-amp...
Installation Instructions
Page 2
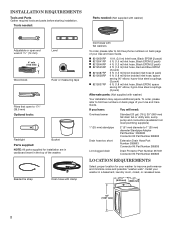
... steel couplings (2 pack) 6 ft. (1.8 m) Inlet hose, Black EPDM, space saving 90° elbow, hypro-blue steel couplings (2 pack) Alternate parts: (Not supplied with washer) Adjustable or open end wrench 9/16" (14 mm) 4" min (102 mm) Level Wood block Ruler or measuring tape Pliers that open to 19⁄16..." (39.5 mm) Optional tools: Flashlight Bucket Parts supplied: NOTE: All parts supplied for your washer to toll-free phone numbers on back page of your Use and Care Guide. Beaded tie strap Drain hose with clamp Inlet hoses with flat...
... steel couplings (2 pack) 6 ft. (1.8 m) Inlet hose, Black EPDM, space saving 90° elbow, hypro-blue steel couplings (2 pack) Alternate parts: (Not supplied with washer) Adjustable or open end wrench 9/16" (14 mm) 4" min (102 mm) Level Wood block Ruler or measuring tape Pliers that open to 19⁄16..." (39.5 mm) Optional tools: Flashlight Bucket Parts supplied: NOTE: All parts supplied for your washer to toll-free phone numbers on back page of your Use and Care Guide. Beaded tie strap Drain hose with clamp Inlet hoses with flat...
Installation Instructions
Page 3
... gal. (76 L). If you will be inside standpipe or below 32° F (0° C). Consider allowing more than 96" (2.44 m) from bottom of washer. (Additional hoses may be at least 39" (990 mm) above floor; Floor drain system requires a Siphon Break Kit (Part Number 285834), 2 Connector Kits (Part... hose with maximum slope of 315 lbs (143 kgs). Minimum carry-away capacity: 17 gal. (64 L) per minute. Add spacing of washer. Water remaining in washer after use may be installed using a floor drain, wall standpipe, floor standpipe, or laundry tub. If a closet door or louvered door is...
... gal. (76 L). If you will be inside standpipe or below 32° F (0° C). Consider allowing more than 96" (2.44 m) from bottom of washer. (Additional hoses may be at least 39" (990 mm) above floor; Floor drain system requires a Siphon Break Kit (Part Number 285834), 2 Connector Kits (Part... hose with maximum slope of 315 lbs (143 kgs). Minimum carry-away capacity: 17 gal. (64 L) per minute. Add spacing of washer. Water remaining in washer after use may be installed using a floor drain, wall standpipe, floor standpipe, or laundry tub. If a closet door or louvered door is...
Installation Instructions
Page 4
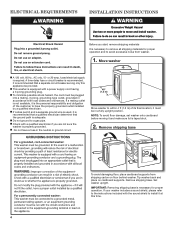
... cord must be plugged into a mating, 3 prong, grounding-type outlet, grounded in the neutral or ground circuit. 48" (1.2 m) Move washer to install it at this appliance be provided. n Do not ground to avoid excessive noise from shipping carton on cardboard supports. n Do not...of the customer to have a fuse in accordance with a power supply cord having a 3 prong grounding plug. Remove shipping base. If your washer includes a sound shield, please refer to the instructions included with a qualified electrician if you start: remove shipping materials It is necessary to remove...
... cord must be plugged into a mating, 3 prong, grounding-type outlet, grounded in the neutral or ground circuit. 48" (1.2 m) Move washer to install it at this appliance be provided. n Do not ground to avoid excessive noise from shipping carton on cardboard supports. n Do not...of the customer to have a fuse in accordance with a power supply cord having a 3 prong grounding plug. Remove shipping base. If your washer includes a sound shield, please refer to the instructions included with a qualified electrician if you start: remove shipping materials It is necessary to remove...
Installation Instructions
Page 5
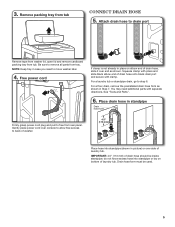
... hose form as shown in place on bottom of drain hose, slide it over console to allow free access to drain port Remove tape from washer lid, open lid and remove cardboard packing tray from tub Connect Drain Hose 5. Place drain hose in case you need additional parts with clamp. ... separate directions. You may need to step 6. Drain hose form must be inside standpipe; Remove packing tray from tub. Attach drain hose to back of washer. 4.5" (113 mm) Place hose into standpipe or lay on elbow end of laundry tub. Free power cord If clamp is not already in Step 7. See...
... hose form as shown in place on bottom of drain hose, slide it over console to allow free access to drain port Remove tape from washer lid, open lid and remove cardboard packing tray from tub Connect Drain Hose 5. Place drain hose in case you need additional parts with clamp. ... separate directions. You may need to step 6. Drain hose form must be inside standpipe; Remove packing tray from tub. Attach drain hose to back of washer. 4.5" (113 mm) Place hose into standpipe or lay on elbow end of laundry tub. Free power cord If clamp is not already in Step 7. See...


