

Installation Guide
Page 2
...back page of your Use and Care Guide. Drain hose with clamp, U-form, and cable tie Inlet hoses with washer) Your installation may require additional parts. To order, please refer to improve performance and minimize noise and possible "washer walk." n 8212656RP n 8212641RP n 8212646RP n 8212545RP n 8212487RP n...mm) 42" (1067 mm) 2 Install your washer in the top of your Use and Care Guide. INSTALLATION REQUIREMENTS Tools and Parts Gather required tools and parts before starting installation. If you have: You will need: Overhead sewer Standard 20 gal. (76 L) 39" (990 mm)...
...back page of your Use and Care Guide. Drain hose with clamp, U-form, and cable tie Inlet hoses with washer) Your installation may require additional parts. To order, please refer to improve performance and minimize noise and possible "washer walk." n 8212656RP n 8212641RP n 8212646RP n 8212545RP n 8212487RP n...mm) 42" (1067 mm) 2 Install your washer in the top of your Use and Care Guide. INSTALLATION REQUIREMENTS Tools and Parts Gather required tools and parts before starting installation. If you have: You will need: Overhead sewer Standard 20 gal. (76 L) 39" (990 mm)...
Installation Guide
Page 3
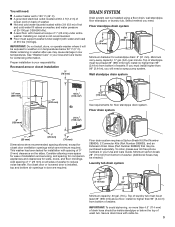
... for installation with maximum slope of washer to 120° F (49° C). Floor drain system requires a Siphon Break Kit (Part Number 285834), 2 Connector Kits (Part Number 285835), and an Extension Drain Hose (Part Number 285863) that may be purchased separately. Proper installation is not recommended. Floor standpipe drain system 4.5" (114 mm) 39" (990...
... for installation with maximum slope of washer to 120° F (49° C). Floor drain system requires a Siphon Break Kit (Part Number 285834), 2 Connector Kits (Part Number 285835), and an Extension Drain Hose (Part Number 285863) that may be purchased separately. Proper installation is not recommended. Floor standpipe drain system 4.5" (114 mm) 39" (990...
Installation Guide
Page 5
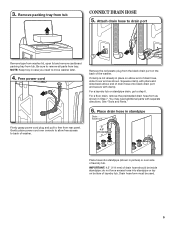
...washer. NOTE: Keep tray in place on elbow end of laundry tub. Free power cord Firmly grasp power cord plug and pull to remove all parts from the black drain port on bottom of laundry tub. You may need to back of drain hose onto black drain port and secure with...washer lid, open lid and remove cardboard packing tray from tub CONNECT DRAIN HOSE 5. See "Tools and Parts." 6. IMPORTANT: 4.5" (114 mm) of the washer. If clamp is not already in case you need additional parts with clamp. For a floor drain, remove the preinstalled drain hose form as shown. Place drain hose ...
...washer. NOTE: Keep tray in place on elbow end of laundry tub. Free power cord Firmly grasp power cord plug and pull to remove all parts from the black drain port on bottom of laundry tub. You may need to back of drain hose onto black drain port and secure with...washer lid, open lid and remove cardboard packing tray from tub CONNECT DRAIN HOSE 5. See "Tools and Parts." 6. IMPORTANT: 4.5" (114 mm) of the washer. If clamp is not already in case you need additional parts with clamp. For a floor drain, remove the preinstalled drain hose form as shown. Place drain hose ...
Installation Guide
Page 6
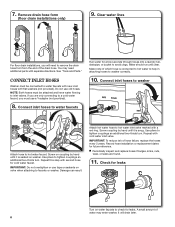
Remove drain hose form (floor drain installations only) 9. See "Tools and Parts." IMPORTANT: Do not overtighten or use old hoses. Repeat with flat washers (not provided). Check for cold water faucet. Clear water lines For floor drain ... connected to hot water to help in attaching hoses to faucets or washer. Record hose installation or replacement dates for leaks. It will need additional parts with second hose for leaks Turn on coupling by hand until it is snug. Do not use tape or sealants on washer. Connect inlet hoses...
Remove drain hose form (floor drain installations only) 9. See "Tools and Parts." IMPORTANT: Do not overtighten or use old hoses. Repeat with flat washers (not provided). Check for cold water faucet. Clear water lines For floor drain ... connected to hot water to help in attaching hoses to faucets or washer. Record hose installation or replacement dates for leaks. It will need additional parts with second hose for leaks Turn on coupling by hand until it is snug. Do not use tape or sealants on washer. Connect inlet hoses...
Installation Guide
Page 8
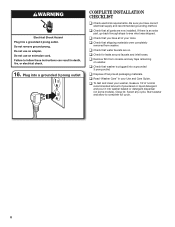
q Check that you have all of /recycle all parts are on washer. q Check for leaks around faucets and inlet hoses. q Dispose of your tools. q Read "Washer Care" in your washer, measure 1/2 of normal recommended ... any tape remaining on . Plug into washer basket or detergent dispenser (on some models). q Check that all packaging materials. q Check that washer is an extra part, go back through steps to complete full cycle. 8 16. Close lid.
q Check that you have all of /recycle all parts are on washer. q Check for leaks around faucets and inlet hoses. q Dispose of your tools. q Read "Washer Care" in your washer, measure 1/2 of normal recommended ... any tape remaining on . Plug into washer basket or detergent dispenser (on some models). q Check that all packaging materials. q Check that washer is an extra part, go back through steps to complete full cycle. 8 16. Close lid.

Warranty Information
Page 1
... Expenses for travel and transportation for product service if your sales slip together for future reference. Replacement parts or repair labor on how to you should ask Whirlpool or your retailer about buying an extended warranty. EXCLUSION OF INCIDENTAL AND CONSEQUENTIAL DAMAGES YOUR SOLE AND .... In Canada, call 1-800-253-1301. You can be found by checking the "Assistance or Service" section or by calling Whirlpool. Replacement parts or repair labor if this major appliance is used for service or repair of this major appliance other rights that vary from warranty coverage...
... Expenses for travel and transportation for product service if your sales slip together for future reference. Replacement parts or repair labor on how to you should ask Whirlpool or your retailer about buying an extended warranty. EXCLUSION OF INCIDENTAL AND CONSEQUENTIAL DAMAGES YOUR SOLE AND .... In Canada, call 1-800-253-1301. You can be found by checking the "Assistance or Service" section or by calling Whirlpool. Replacement parts or repair labor if this major appliance is used for service or repair of this major appliance other rights that vary from warranty coverage...

Use & Care Guide
Page 16
...purchase or installation date for product service if your major appliance is located in accordance with Whirlpool published installation instructions. 10. Pick up and delivery. Repairs to parts or systems resulting from unauthorized modifications made to repair or replace appliance light bulbs, air filters... & Care Guide. The removal and reinstallation of your major appliance if it . Replacement parts or repair labor on the product. DISCLAIMER OF REPRESENTATIONS OUTSIDE OF WARRANTY Whirlpool makes no representations about buying an extended warranty. If outside the 50 United States and ...
...purchase or installation date for product service if your major appliance is located in accordance with Whirlpool published installation instructions. 10. Pick up and delivery. Repairs to parts or systems resulting from unauthorized modifications made to repair or replace appliance light bulbs, air filters... & Care Guide. The removal and reinstallation of your major appliance if it . Replacement parts or repair labor on the product. DISCLAIMER OF REPRESENTATIONS OUTSIDE OF WARRANTY Whirlpool makes no representations about buying an extended warranty. If outside the 50 United States and ...


