

Quick Start Guide
Page 1
... available on and press again to re-install. QUICK START GUIDE WHIRLPOOL® TOP LOADING WASHING MACHINE OPERATING INSTRUCTIONS CONTROL PANEL AND FEATURES 1 Fire Hazard Never place items in the washer that are dampened with liquid chlorine bleach. You can also use the Rinse Options button to select Fabric Softener. FAUCET Press to help identify which cycle to persons, read the IMPORTANT SAFETY INSTRUCTIONS, located in your load size. The document will fill, pause to...
... available on and press again to re-install. QUICK START GUIDE WHIRLPOOL® TOP LOADING WASHING MACHINE OPERATING INSTRUCTIONS CONTROL PANEL AND FEATURES 1 Fire Hazard Never place items in the washer that are dampened with liquid chlorine bleach. You can also use the Rinse Options button to select Fabric Softener. FAUCET Press to help identify which cycle to persons, read the IMPORTANT SAFETY INSTRUCTIONS, located in your load size. The document will fill, pause to...

Cycle Guide
Page 1
... a power interruption. Cycle: HEAVY DUTY Temperature*: Hot Warm Cool Cold Tap Cold Available Options Extra Rinse Fabric Softener 30 Min PreSoak Deep Water Average Cycle Time (minutes) Cycle Details: Use this cycle for heavily soiled or 75 sturdy items. Load sensing duration and water level determination may vary based on different fabric types. The washer will completely fill before washing. DELICATES Lightly soiled, smallsized mixed garment loads. Use this cycle . This cycle uses a higher default water level. QUICK WASH Hot Warm Cool Cold Tap Cold Hot...
... a power interruption. Cycle: HEAVY DUTY Temperature*: Hot Warm Cool Cold Tap Cold Available Options Extra Rinse Fabric Softener 30 Min PreSoak Deep Water Average Cycle Time (minutes) Cycle Details: Use this cycle for heavily soiled or 75 sturdy items. Load sensing duration and water level determination may vary based on different fabric types. The washer will completely fill before washing. DELICATES Lightly soiled, smallsized mixed garment loads. Use this cycle . This cycle uses a higher default water level. QUICK WASH Hot Warm Cool Cold Tap Cold Hot...

Cycle Guide
Page 2
... loads. *All rinses are Normal cycle, Warm wash and Auto Water level. For models with a removable agitator, testing was based on a variety of your washer fresh and clean. Items to wash: Cycle: Temperature*: Available Options CLEAN No clothes in the cycle. WASHER N/A N/A with the agitator installed. 2 This cycle, when used with affresh® Washer Cleaner tablet or liquid chlorine bleach to thoroughly clean the inside of soiled white fabrics. COLORS Hot Warm Cool Cold Tap Cold Extra Rinse Fabric Softener 30 Min PreSoak Deep Water 45 Use...
... loads. *All rinses are Normal cycle, Warm wash and Auto Water level. For models with a removable agitator, testing was based on a variety of your washer fresh and clean. Items to wash: Cycle: Temperature*: Available Options CLEAN No clothes in the cycle. WASHER N/A N/A with the agitator installed. 2 This cycle, when used with affresh® Washer Cleaner tablet or liquid chlorine bleach to thoroughly clean the inside of soiled white fabrics. COLORS Hot Warm Cool Cold Tap Cold Extra Rinse Fabric Softener 30 Min PreSoak Deep Water 45 Use...

Cycle Guide
Page 3
.... Loose change, buttons, or any time during the wash portion of cold water added to avoid pilling. If the lid remains closed . The machine will also drain if the lid is added. Synthetics, knits, and corduroy fabrics will not start or fill with some warm water added to assist in soil removal and to help dissolve detergents. NOTES: Ƀ Always read and follow fabric care label instructions to...
.... Loose change, buttons, or any time during the wash portion of cold water added to avoid pilling. If the lid remains closed . The machine will also drain if the lid is added. Synthetics, knits, and corduroy fabrics will not start or fill with some warm water added to assist in soil removal and to help dissolve detergents. NOTES: Ƀ Always read and follow fabric care label instructions to...

Owners Manual
Page 2
... water flow from service or discarded, remove the door. � Do not reach into the appliance if the tub or agitator is not an integral part of fire, electric shock, or injury to reduce the chance of injury, and tell you understand and have been previously cleaned in, washed in, soaked in, or spotted with controls. � Do not repair or replace any part...
... water flow from service or discarded, remove the door. � Do not reach into the appliance if the tub or agitator is not an integral part of fire, electric shock, or injury to reduce the chance of injury, and tell you understand and have been previously cleaned in, washed in, soaked in, or spotted with controls. � Do not repair or replace any part...

Owners Manual
Page 3
... washer lid open to ensure a proper seal. Description of controlling the rate at which soils and detergent may generate a high level of soils. Do not place an affresh® Washer Cleaner tablet in undesirable odor. 2. e. g. Press the START button to increase the removal of suds. Close the washer lid. See the Installation Instructions for more information. Use warm and hot wash water settings sometimes (not exclusively cold water washes), because they do a better job of Clean Washer...
... washer lid open to ensure a proper seal. Description of controlling the rate at which soils and detergent may generate a high level of soils. Do not place an affresh® Washer Cleaner tablet in undesirable odor. 2. e. g. Press the START button to increase the removal of suds. Close the washer lid. See the Installation Instructions for more information. Use warm and hot wash water settings sometimes (not exclusively cold water washes), because they do a better job of Clean Washer...

Owners Manual
Page 4
..., or electrical shock. Drape power cord over lid and down front of washer. Flush water pipes and hoses. 2. Refer to Installation Instructions to washer. 2. Transporting Your Washer 1. The dispensers and trim are not dishwasher-safe. For removable dispensers: If your washer, you do not use washer again: 1. Do not remove ground prong. Use only HE High Efficiency detergent. Place original shipping materials back inside washer basket. 6. Turn on Rinse & Spin cycle for a medium-size load. 4 Keep lid taped until washer is placed...
..., or electrical shock. Drape power cord over lid and down front of washer. Flush water pipes and hoses. 2. Refer to Installation Instructions to washer. 2. Transporting Your Washer 1. The dispensers and trim are not dishwasher-safe. For removable dispensers: If your washer, you do not use washer again: 1. Do not remove ground prong. Use only HE High Efficiency detergent. Place original shipping materials back inside washer basket. 6. Turn on Rinse & Spin cycle for a medium-size load. 4 Keep lid taped until washer is placed...

Owners Manual
Page 5
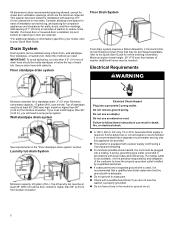
... drain hose and connector kit Drain protector and connector kit Location Requirements Select proper location for winterizing information. Install your washer in your washer to 120°F (49°C). � A grounded electrical outlet located within 4 feet (1.2 m) of power cord on back of washer. � Hot and cold water faucets located within 3 feet (0.9 m) of hot and cold water fill valves on carpet or surfaces with foam backing is your Quick Start Guide for installations are available; See "Washer Maintenance and Care" for your Quick Start Guide. Installing...
... drain hose and connector kit Drain protector and connector kit Location Requirements Select proper location for winterizing information. Install your washer in your washer to 120°F (49°C). � A grounded electrical outlet located within 4 feet (1.2 m) of power cord on back of washer. � Hot and cold water faucets located within 3 feet (0.9 m) of hot and cold water fill valves on carpet or surfaces with foam backing is your Quick Start Guide for installations are available; See "Washer Maintenance and Care" for your Quick Start Guide. Installing...
Owners Manual
Page 6
..., 15 or 20 A, fused electrical supply is equipped with a qualified electrician if you need a sump pump system. Secure drain hose with local codes and ordinances. Top of laundry tub must be purchased separately; If a mating outlet is not available, it is the personal responsibility and obligation of the customer to a gas pipe. � Check with a power supply cord having a 3-prong grounding plug. � To minimize...
..., 15 or 20 A, fused electrical supply is equipped with a qualified electrician if you need a sump pump system. Secure drain hose with local codes and ordinances. Top of laundry tub must be purchased separately; If a mating outlet is not available, it is the personal responsibility and obligation of the customer to a gas pipe. � Check with a power supply cord having a 3-prong grounding plug. � To minimize...

Owners Manual
Page 7
... remove all shipping materials for proper operation. it at this time. Check with the circuit conductors and connected to the equipment-grounding terminal or lead on the appliance. Tip washer back and place on floor behind washer. SAVE THESE INSTRUCTIONS INSTALLATION Unpacking WARNING Excessive Weight Hazard Use two or more people to move washer later. 4. Gently place power cord over console to allow free...
... remove all shipping materials for proper operation. it at this time. Check with the circuit conductors and connected to the equipment-grounding terminal or lead on the appliance. Tip washer back and place on floor behind washer. SAVE THESE INSTRUCTIONS INSTALLATION Unpacking WARNING Excessive Weight Hazard Use two or more people to move washer later. 4. Gently place power cord over console to allow free...

Owners Manual
Page 8
...-thirds turn. Attach drain hose to the valves can result. Squeeze clamp with pliers and slide black elbow end of laundry tub. You may need additional parts with separate directions. If you are only connecting to inlet valves. For a floor drain, remove the pre-installed drain hose form as shown. do not force excess hose into standpipe (shown in a manner that will need additional parts with second hose for cold water faucet...
...-thirds turn. Attach drain hose to the valves can result. Squeeze clamp with pliers and slide black elbow end of laundry tub. You may need additional parts with separate directions. If you are only connecting to inlet valves. For a floor drain, remove the pre-installed drain hose form as shown. do not force excess hose into standpipe (shown in a manner that will need additional parts with second hose for cold water faucet...

Owners Manual
Page 9
... installer to install and secure the drain hose into a laundry tub, drainpipe, or bucket to check levelness of front using lid, as shown. It is snug. Attach hot water hose to reduce excess noise and vibration. 13. It will avoid the drain hose coming out of or leaking from the plumbing/drain. Clear water lines 12. Make note of hose failure, replace the hoses every 5 years. Check for leaks. Use side seam as a guide to prevent clogs. Turn on water faucets to check...
... installer to install and secure the drain hose into a laundry tub, drainpipe, or bucket to check levelness of front using lid, as shown. It is snug. Attach hot water hose to reduce excess noise and vibration. 13. It will avoid the drain hose coming out of or leaking from the plumbing/drain. Clear water lines 12. Make note of hose failure, replace the hoses every 5 years. Check for leaks. Use side seam as a guide to prevent clogs. Turn on water faucets to check...

Owners Manual
Page 10
... need to adjust two different feet to raise the washer. Close lid. If there is plugged into a grounded 3-prong outlet. � Dispose of/recycle all packaging materials. � Read the "Washer Maintenance and Care" section. � To test and clean your washer, measure 1/2 of normal recommended amount of powdered or liquid HE detergent and pour it into washer basket or detergent dispenser (on washer. � Check that will support weight of washer...
... need to adjust two different feet to raise the washer. Close lid. If there is plugged into a grounded 3-prong outlet. � Dispose of/recycle all packaging materials. � Read the "Washer Maintenance and Care" section. � To test and clean your washer, measure 1/2 of normal recommended amount of powdered or liquid HE detergent and pour it into washer basket or detergent dispenser (on washer. � Check that will support weight of washer...

Dimension Guide
Page 1
WTW5015LW, WTW5010LW WTW5057LW, 7MWTW5017MW 7MWTW5057MW Dimension Guide Whirlpool® Top Load Washer W11428629A
WTW5015LW, WTW5010LW WTW5057LW, 7MWTW5017MW 7MWTW5057MW Dimension Guide Whirlpool® Top Load Washer W11428629A

Dimension Guide
Page 2
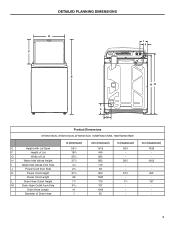
...) Minimum Circuit Amperage Rating 15 A Operating Voltage Operating Frequency 120 V AC only 60 Hz D A C B Product Dimensions WTW5015LW, WTW5010LW, WTW5057LW, 7MWTW5017MW, 7MWTW5057MW A Height (with feet) B Width C Top of fire, electric shock, or injury to persons, read the IMPORTANT SAFETY INSTRUCTIONS and INSTALLATION INSTRUCTIONS, located in (maximum) 421∕4 - 382∕3 - DETAILED PLANNING DIMENSIONS WARNING: To reduce the risk of Lid Height (with feet) D Depth in...
...) Minimum Circuit Amperage Rating 15 A Operating Voltage Operating Frequency 120 V AC only 60 Hz D A C B Product Dimensions WTW5015LW, WTW5010LW, WTW5057LW, 7MWTW5017MW, 7MWTW5057MW A Height (with feet) B Width C Top of fire, electric shock, or injury to persons, read the IMPORTANT SAFETY INSTRUCTIONS and INSTALLATION INSTRUCTIONS, located in (maximum) 421∕4 - 382∕3 - DETAILED PLANNING DIMENSIONS WARNING: To reduce the risk of Lid Height (with feet) D Depth in...
Dimension Guide
Page 3
mm (maximum) 1432 - 1003 - 953 - 197 - 3 DETAILED PLANNING DIMENSIONS G I J F E KH L M Product Dimensions WTW5015LW, WTW5010LW, WTW5057LW, 7MWTW5017MW, 7MWTW5057MW E Height with Lid Open F Height of Lid G Width of Lid H Water Inlet Valves Height I Water Inlet Valves from Side J Power Cord from Side K Power Cord Height Power Cord Length L Drain Hose Outlet Height M Drain Hose Outlet from Side Drain Hose Length Diameter of Drain Hose in (minimum) 553/4 187∕8 231∕4 377∕8 41∕2 21∕2 373∕8 62...
mm (maximum) 1432 - 1003 - 953 - 197 - 3 DETAILED PLANNING DIMENSIONS G I J F E KH L M Product Dimensions WTW5015LW, WTW5010LW, WTW5057LW, 7MWTW5017MW, 7MWTW5057MW E Height with Lid Open F Height of Lid G Width of Lid H Water Inlet Valves Height I Water Inlet Valves from Side J Power Cord from Side K Power Cord Height Power Cord Length L Drain Hose Outlet Height M Drain Hose Outlet from Side Drain Hose Length Diameter of Drain Hose in (minimum) 553/4 187∕8 231∕4 377∕8 41∕2 21∕2 373∕8 62...

Dimension Guide
Page 4
... been tested for installation with spacing of 0" (0 mm) clearance on all sides of installation and servicing, and spacing for companion appliances and clearances for closet door ventilation openings which are required. If a closet door or louvered door is installed, top and bottom air openings in door are minimum required. Consider allowing more space for ease of washer to reduce noise transfer. DETAILED PLANNING DIMENSIONS...
... been tested for installation with spacing of 0" (0 mm) clearance on all sides of installation and servicing, and spacing for companion appliances and clearances for closet door ventilation openings which are required. If a closet door or louvered door is installed, top and bottom air openings in door are minimum required. Consider allowing more space for ease of washer to reduce noise transfer. DETAILED PLANNING DIMENSIONS...


