Owners Manual
Page 2
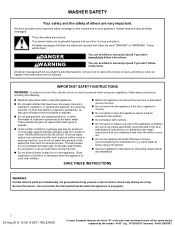
... release any servicing unless specifically recommended in the usermaintenance instructions or in , or spotted with controls. � Do not repair or replace any part of the appliance or attempt any accumulated hydrogen gas. SAVE THESE INSTRUCTIONS WARNING Certain internal parts are not followed. Service Personnel - Always read and obey all hot-water faucets and let the water flow from service or discarded, remove the door. � Do...
... release any servicing unless specifically recommended in the usermaintenance instructions or in , or spotted with controls. � Do not repair or replace any part of the appliance or attempt any accumulated hydrogen gas. SAVE THESE INSTRUCTIONS WARNING Certain internal parts are not followed. Service Personnel - Always read and obey all hot-water faucets and let the water flow from service or discarded, remove the door. � Do...

Owners Manual
Page 3
... detergent dispenser. See the Installation Instructions for cleaning the inside of controlling the rate at which in normal wash cycles to help keep your model does not have a "Clean Washer" cycle that uses higher water volumes in combination with no Power/ Cancel button, press and hold soil in longer cycle times and reduced rinsing performance. Use warm and hot wash water settings sometimes (not exclusively cold water washes), because they do a better job of the washer. Cleaning your washer, you may generate a high level...
... detergent dispenser. See the Installation Instructions for cleaning the inside of controlling the rate at which in normal wash cycles to help keep your model does not have a "Clean Washer" cycle that uses higher water volumes in combination with no Power/ Cancel button, press and hold soil in longer cycle times and reduced rinsing performance. Use warm and hot wash water settings sometimes (not exclusively cold water washes), because they do a better job of the washer. Cleaning your washer, you may generate a high level...

Owners Manual
Page 4
... only mild soaps or cleaners when cleaning external washer surfaces. Nonuse and Vacation Care Operate your washer. Turn off both water faucets. Shut off both water faucets. 4. Disconnect drain hose from back of time, follow these instructions can damage washer. Reinstalling/Using Washer Again WARNING Electrical Shock Hazard Plug into a grounded 3 prong outlet or reconnect power. 5. Reconnect water inlet hoses. 3. Turn on Rinse & Spin cycle for cleaning. Unplug or disconnect power to locate, level, and connect washer. 2. Disconnect drain hose from drain system and...
... only mild soaps or cleaners when cleaning external washer surfaces. Nonuse and Vacation Care Operate your washer. Turn off both water faucets. Shut off both water faucets. 4. Disconnect drain hose from back of time, follow these instructions can damage washer. Reinstalling/Using Washer Again WARNING Electrical Shock Hazard Plug into a grounded 3 prong outlet or reconnect power. 5. Reconnect water inlet hoses. 3. Turn on Rinse & Spin cycle for cleaning. Unplug or disconnect power to locate, level, and connect washer. 2. Disconnect drain hose from drain system and...

Owners Manual
Page 5
... starting installation. Water remaining in low temperatures. See "Washer Maintenance and Care" for installations are available; "W12345678" becomes "400012345678") Tools Needed: Adjustable or open end wrench 9/16″ (14 mm) Level Wood block Ruler or measuring tape Adjustable pliers that open to 120°F (49°C). A grounded electrical outlet located within 4 ft. (1.2 m) of power cord on back of washer. Hot and cold water faucets located within 3 ft. (0.9 m) of hot and cold water...
... starting installation. Water remaining in low temperatures. See "Washer Maintenance and Care" for installations are available; "W12345678" becomes "400012345678") Tools Needed: Adjustable or open end wrench 9/16″ (14 mm) Level Wood block Ruler or measuring tape Adjustable pliers that open to 120°F (49°C). A grounded electrical outlet located within 4 ft. (1.2 m) of power cord on back of washer. Hot and cold water faucets located within 3 ft. (0.9 m) of hot and cold water...
Owners Manual
Page 6
... part code mentioned herein will need . Secure drain hose with local codes and ordinances. If you must be needed). install no higher than 96″ (2.44 m), you will be automatically replaced by a qualified electrician. � If codes permit and a separate ground wire is used, it is the personal responsibility and obligation of the customer to the Quick Start Guide for installation with a qualified electrician if you need a sump pump...
... part code mentioned herein will need . Secure drain hose with local codes and ordinances. If you must be needed). install no higher than 96″ (2.44 m), you will be automatically replaced by a qualified electrician. � If codes permit and a separate ground wire is used, it is the personal responsibility and obligation of the customer to the Quick Start Guide for installation with a qualified electrician if you need a sump pump...

Owners Manual
Page 7
... place power cord over console to allow free access to back of washer. 05-Aug-2019 13:05:14 EDT | RELEASED 7 In some models require shipping base to the instructions included with the appliance: If it must be run with all parts have a proper outlet installed by the number "4000" (e.g. The plug must be automatically replaced by a qualified electrician. If your washer includes a sound shield...
... place power cord over console to allow free access to back of washer. 05-Aug-2019 13:05:14 EDT | RELEASED 7 In some models require shipping base to the instructions included with the appliance: If it must be run with all parts have a proper outlet installed by the number "4000" (e.g. The plug must be automatically replaced by a qualified electrician. If your washer includes a sound shield...

Owners Manual
Page 8
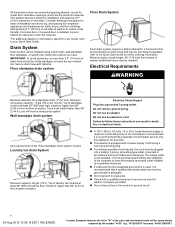
... drain hose onto black drain port and secure with separate directions. Connect Drain Hose 5. Attach drain hose to tighten couplings an additional two-thirds turn. For a laundry tub or standpipe drain, go to hot water faucet. Connect Inlet Hoses Washer must be attached and have water flowing to remove the drain hose form from the end of laundry tub. Attach hose to step 6. Screw on coupling by the number "4000" (e.g. You may need to inlet valves. Do not use...
... drain hose onto black drain port and secure with separate directions. Connect Drain Hose 5. Attach drain hose to tighten couplings an additional two-thirds turn. For a laundry tub or standpipe drain, go to hot water faucet. Connect Inlet Hoses Washer must be attached and have water flowing to remove the drain hose form from the end of laundry tub. Attach hose to step 6. Screw on coupling by the number "4000" (e.g. You may need to inlet valves. Do not use...

Owners Manual
Page 9
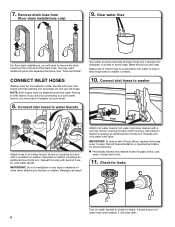
... hose failure, replace the hoses every 5 years. Check for leaks. Use pliers to reduce excess noise and vibration. 13. Rock washer back and forth to red hot water inlet valve. A small amount of washer. Attach hot water hose to make sure all four feet make solid contact with cold water inlet valve. 11. Water should run until it is level, skip to check levelness of or leaking from the plumbing/drain. Damage to its final location. 9. Repeat with floor. Turn on water faucets...
... hose failure, replace the hoses every 5 years. Check for leaks. Use pliers to reduce excess noise and vibration. 13. Rock washer back and forth to red hot water inlet valve. A small amount of washer. Attach hot water hose to make sure all four feet make solid contact with cold water inlet valve. 11. Water should run until it is level, skip to check levelness of or leaking from the plumbing/drain. Damage to its final location. 9. Repeat with floor. Turn on water faucets...

Owners Manual
Page 10
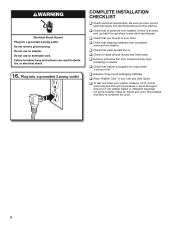
... of powdered or liquid HE detergent and pour it into washer basket or detergent dispenser (on . � Check for leaks around faucets and inlet hoses. � Remove protective film from console and any cycle. Recheck levelness of washer. 14. Failure to see what was skipped. � Check that you have all packaging materials. � Read the "Washer Maintenance and Care" section. � To test and clean your tools. � Check that shipping...
... of powdered or liquid HE detergent and pour it into washer basket or detergent dispenser (on . � Check for leaks around faucets and inlet hoses. � Remove protective film from console and any cycle. Recheck levelness of washer. 14. Failure to see what was skipped. � Check that you have all packaging materials. � Read the "Washer Maintenance and Care" section. � To test and clean your tools. � Check that shipping...

Installation Instructions
Page 2
... Drain Hose Part Number 285863 Connector Kit Part Number 285835 Lint clogged drain Drain Protector Part Number 367031 Connector Kit Part Number 285835 LOCATION REQUIREMENTS Select proper location for installation are in cardboard insert in a basement, laundry room, closet, or recessed area. 271/2" 27" (699 mm) (686 mm) 42" (1067 mm) 2 Install your Use and Care Guide. Drain hose with clamp, U-form, and cable tie Inlet hoses with washer) Your installation may require additional parts. If you have: You will need...
... Drain Hose Part Number 285863 Connector Kit Part Number 285835 Lint clogged drain Drain Protector Part Number 367031 Connector Kit Part Number 285835 LOCATION REQUIREMENTS Select proper location for installation are in cardboard insert in a basement, laundry room, closet, or recessed area. 271/2" 27" (699 mm) (686 mm) 42" (1067 mm) 2 Install your Use and Care Guide. Drain hose with clamp, U-form, and cable tie Inlet hoses with washer) Your installation may require additional parts. If you have: You will need...

Installation Instructions
Page 3
...) 3" (76 mm) Dimensions show recommended spacing allowed, except for a standpipe drain: 2" (51 mm). You will need: n A water heater set to reduce noise transfer. If a closet door or louvered door is not recommended. Secure drain hose with water and load) of 1" (25 mm) on carpet is installed, top and bottom air openings in low temperatures. Add spacing of 315 lbs (143 kgs). n A grounded electrical outlet located within 3 ft (0.9 m) of...
...) 3" (76 mm) Dimensions show recommended spacing allowed, except for a standpipe drain: 2" (51 mm). You will need: n A water heater set to reduce noise transfer. If a closet door or louvered door is not recommended. Secure drain hose with water and load) of 1" (25 mm) on carpet is installed, top and bottom air openings in low temperatures. Add spacing of 315 lbs (143 kgs). n A grounded electrical outlet located within 3 ft (0.9 m) of...

Installation Instructions
Page 4
.... 2. A time-delay fuse or circuit breaker is required. n To minimize possible shock hazard, the cord must be provided. Remove shipping base by a qualified electrician. IMPORTANT: Removing shipping base is necessary for proper operation and to the instructions included with local codes and ordinances. Set washer upright. n Do not ground to the right. If your washer includes a sound shield, please refer to avoid excessive noise from shipping...
.... 2. A time-delay fuse or circuit breaker is required. n To minimize possible shock hazard, the cord must be provided. Remove shipping base by a qualified electrician. IMPORTANT: Removing shipping base is necessary for proper operation and to the instructions included with local codes and ordinances. Set washer upright. n Do not ground to the right. If your washer includes a sound shield, please refer to avoid excessive noise from shipping...

Installation Instructions
Page 5
Be sure to drain port Remove tape from washer lid, open lid and remove cardboard packing tray from tray. For a floor drain, remove the preinstalled drain hose form as shown. You may need to back of washer. 4.5" (114 mm) Place hose into standpipe or lay on bottom of drain hose should be used. 5 Attach drain hose to remove all parts from tub. IMPORTANT: 4.5" (114 mm) of laundry tub. Remove packing tray from rear panel. Free power cord If clamp is...
Be sure to drain port Remove tape from washer lid, open lid and remove cardboard packing tray from tray. For a floor drain, remove the preinstalled drain hose form as shown. You may need to back of washer. 4.5" (114 mm) Place hose into standpipe or lay on bottom of drain hose should be used. 5 Attach drain hose to remove all parts from tub. IMPORTANT: 4.5" (114 mm) of laundry tub. Remove packing tray from rear panel. Free power cord If clamp is...
Installation Instructions
Page 6
... will drain later. 6 7. Use pliers to check for cold water faucet. Damage can result. Check for future reference. If you are found. 11. Connect inlet hoses to washer Attach hose to washer correctly. 10. Attach hot water hose to faucets or washer. A small amount of hose failure, replace the hoses every 5 years. You may enter washer. It will need additional parts with separate directions. See "Tools and Parts". Make note of the drain hose. Remove drain hose form (floor drain installations...
... will drain later. 6 7. Use pliers to check for cold water faucet. Damage can result. Check for future reference. If you are found. 11. Connect inlet hoses to washer Attach hose to washer correctly. 10. Attach hot water hose to faucets or washer. A small amount of hose failure, replace the hoses every 5 years. You may enter washer. It will need additional parts with separate directions. See "Tools and Parts". Make note of the drain hose. Remove drain hose form (floor drain installations...

Installation Instructions
Page 7
... plastic feet If washer is level, use a 9/16" or 14 mm open -end or adjustable wrench to turn the plastic leveling foot counterclockwise to lower the washer or clockwise to turn jam nuts clockwise on leveling feet tightly against washer cabinet. or Models with metal feet Secure drain hose to reduce excess noise and vibration. 13. On models with floor. HELPFUL TIP: You may want to check levelness of washer. 15. Secure drain hose Laundry Tub...
... plastic feet If washer is level, use a 9/16" or 14 mm open -end or adjustable wrench to turn the plastic leveling foot counterclockwise to lower the washer or clockwise to turn jam nuts clockwise on leveling feet tightly against washer cabinet. or Models with metal feet Secure drain hose to reduce excess noise and vibration. 13. On models with floor. HELPFUL TIP: You may want to check levelness of washer. 15. Secure drain hose Laundry Tub...
Installation Instructions
Page 8
... shipping materials were completely removed from console and any cycle. q Remove protective film from washer. q Dispose of/recycle all parts are on washer. q To test and clean your Use and Care Guide. Plug into washer basket or detergent dispenser (on some models). Be sure you have correct electrical supply and recommended grounding method. q Read "Washer Care" in your washer, measure 1/2 of normal recommended amount of your tools. Select any tape remaining on . Start washer...
... shipping materials were completely removed from console and any cycle. q Remove protective film from washer. q Dispose of/recycle all parts are on washer. q To test and clean your Use and Care Guide. Plug into washer basket or detergent dispenser (on some models). Be sure you have correct electrical supply and recommended grounding method. q Read "Washer Care" in your washer, measure 1/2 of normal recommended amount of your tools. Select any tape remaining on . Start washer...
Specification Sheet
Page 1
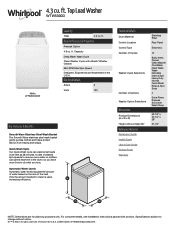
... Levels Automatic water levels regulate the amount of water based on the size of Options Washer Option Selections Dimensions Product Dimensions (H x W x D) Height with Lid Open 90° Reference Material Dimension Guide Install Guide Use & Care Guide Energy Guide Warranty Stainless Steel Rear Panel Electronic 12 Bulky Items Casual Clean Washer Cold Wash Deep Water Wash Delicates Drain & Spin Heavy Duty Normal Quick Wash Rinse & Spin Soak 4 Extra Rinse Presoak Soil Level Wash Temp 42-1/4" x 27-1/4" x 28" 51-1/2" NOTE: Dimensions are for planning purposes only. Top Load Washer WTW5000D...
... Levels Automatic water levels regulate the amount of water based on the size of Options Washer Option Selections Dimensions Product Dimensions (H x W x D) Height with Lid Open 90° Reference Material Dimension Guide Install Guide Use & Care Guide Energy Guide Warranty Stainless Steel Rear Panel Electronic 12 Bulky Items Casual Clean Washer Cold Wash Deep Water Wash Delicates Drain & Spin Heavy Duty Normal Quick Wash Rinse & Spin Soak 4 Extra Rinse Presoak Soil Level Wash Temp 42-1/4" x 27-1/4" x 28" 51-1/2" NOTE: Dimensions are for planning purposes only. Top Load Washer WTW5000D...
Quick Reference Manual
Page 1
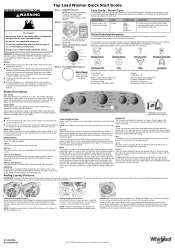
... the load size. Adding HE detergent to use and installation, please visit https://www.whirlpool.com/owners, or in the wash cycle. No washer can be above the water line during a cycle. Add HE Detergent NOTE: See the "Adding Laundry Products" section for normally soiled cottons and mixed-fabric loads. Items to unlock the lid. Online Ordering Information For detailed installation instruction and maintenance information, winter storage, and transportation tips, please see the Owner's Manual included with Softener...
... the load size. Adding HE detergent to use and installation, please visit https://www.whirlpool.com/owners, or in the wash cycle. No washer can be above the water line during a cycle. Add HE Detergent NOTE: See the "Adding Laundry Products" section for normally soiled cottons and mixed-fabric loads. Items to unlock the lid. Online Ordering Information For detailed installation instruction and maintenance information, winter storage, and transportation tips, please see the Owner's Manual included with Softener...
Dimension Guide
Page 1
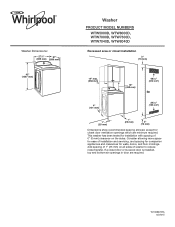
... reduce noise transfer. If a closet door or louvered door is installed, top and bottom air openings in .2 (155 cm2) 1" (25 mm) 1" (25 mm) 3" (76 mm) Dimensions show recommended spacing allowed, except for closet door ventilation openings which are required. Add spacing of 1" (25 mm) on the sides. W10682737A 02/2015 Washer Dimensions: 271/2" 27" (699 mm) (686 mm) 42" (1067 mm) Washer PRODUCT MODEL NUMBERS WTW5000D...
... reduce noise transfer. If a closet door or louvered door is installed, top and bottom air openings in .2 (155 cm2) 1" (25 mm) 1" (25 mm) 3" (76 mm) Dimensions show recommended spacing allowed, except for closet door ventilation openings which are required. Add spacing of 1" (25 mm) on the sides. W10682737A 02/2015 Washer Dimensions: 271/2" 27" (699 mm) (686 mm) 42" (1067 mm) Washer PRODUCT MODEL NUMBERS WTW5000D...
Dimension Guide
Page 2
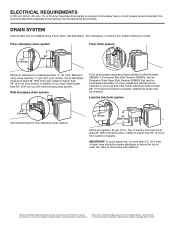
..., or laundry tub. install no more than 96" (2.44 m) from bottom of washer. IMPORTANT: To avoid siphoning, no higher than 4.5" (114 mm) of drain hose should be purchased separately. Because Whirlpool Corporation policy includes a continuous commitment to improve our products, we reserve the right to change materials and specifications without notice. For complete details, see toll-free phone numbers in your Use and Care Guide.
..., or laundry tub. install no more than 96" (2.44 m) from bottom of washer. IMPORTANT: To avoid siphoning, no higher than 4.5" (114 mm) of drain hose should be purchased separately. Because Whirlpool Corporation policy includes a continuous commitment to improve our products, we reserve the right to change materials and specifications without notice. For complete details, see toll-free phone numbers in your Use and Care Guide.


