
Specification Sheet
Page 1
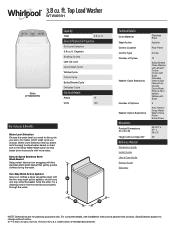
... wash. Technical Details Drum Material Wash Action Control Location Control Type Number of Cycles Washer Cycle Selections Number of Options Washer Option Selections Dimensions Product Dimensions (H x W x D) Height with Lid Open 90° Reference Material Dimension Guide Install Guide Use & Care Guide Energy Guide Warranty Stainless Steel Agitator Rear Panel Knobs 12 Bulky/Sheets Clean Washer with affresh® Colors Colors with Soak Delicates Drain & Spin Heavy Duty Normal Quick Wash Rinse & Spin Whites Whites with the two-way wash action agitator, which wash cycle you choose, Water Level...
... wash. Technical Details Drum Material Wash Action Control Location Control Type Number of Cycles Washer Cycle Selections Number of Options Washer Option Selections Dimensions Product Dimensions (H x W x D) Height with Lid Open 90° Reference Material Dimension Guide Install Guide Use & Care Guide Energy Guide Warranty Stainless Steel Agitator Rear Panel Knobs 12 Bulky/Sheets Clean Washer with affresh® Colors Colors with Soak Delicates Drain & Spin Heavy Duty Normal Quick Wash Rinse & Spin Whites Whites with the two-way wash action agitator, which wash cycle you choose, Water Level...
Owners Manual
Page 3
... Water Level knob to the Deep Water Wash setting and the washer automatically adds more water to any time during the entire agitation portion of detergent to Auto with Extra Rinse, Deep Water Rinse, or Deep Water with Extra Rinse when using fabric softener in component malfunction and, over time, buildup of the spin phase, as the lid lock goes through a self-test. Check the "Cycle Guide" for most cycles, and chooses an appropriate water level according to unlock. When this time, a series...
... Water Level knob to the Deep Water Wash setting and the washer automatically adds more water to any time during the entire agitation portion of detergent to Auto with Extra Rinse, Deep Water Rinse, or Deep Water with Extra Rinse when using fabric softener in component malfunction and, over time, buildup of the spin phase, as the lid lock goes through a self-test. Check the "Cycle Guide" for most cycles, and chooses an appropriate water level according to unlock. When this time, a series...

Owners Manual
Page 4
... Light or Extra Light soil level for even distribution. 2 WASH TEMP or WASH TEMPERATURE Wash Temp senses and maintains uniform water temperatures by the garment label instructions. ■ On some models and cycles, warm and hot water may take several minutes to pause the cycle and unlock the lid. NOTE: Expect longer cycle times due to extended fill times when using fabric softener during the wash process. Set the Water Level knob to cancel a cycle and pump out the washer. Control Panel...
... Light or Extra Light soil level for even distribution. 2 WASH TEMP or WASH TEMPERATURE Wash Temp senses and maintains uniform water temperatures by the garment label instructions. ■ On some models and cycles, warm and hot water may take several minutes to pause the cycle and unlock the lid. NOTE: Expect longer cycle times due to extended fill times when using fabric softener during the wash process. Set the Water Level knob to cancel a cycle and pump out the washer. Control Panel...

Owners Manual
Page 5
... also hear sounds similar to the wash cycle as the washer fills, rinses, and moves the load. CYCLE COMPLETE Once the cycle is complete, the lid will unlock and this light will occur during the "Sensing" phase. Press START/PAUSE/CANCEL while the lid is normal. This is closed to the appropriate level for the detected load size and, on select cycles, agitation will come on the load size and the Water Level selection...
... also hear sounds similar to the wash cycle as the washer fills, rinses, and moves the load. CYCLE COMPLETE Once the cycle is complete, the lid will unlock and this light will occur during the "Sensing" phase. Press START/PAUSE/CANCEL while the lid is normal. This is closed to the appropriate level for the detected load size and, on select cycles, agitation will come on the load size and the Water Level selection...

Owners Manual
Page 6
... Cold Spin Speed:** Cycle Details: High Use this cycle to wet down the load before washing. Good Cleaning Gentleness Efficiency† Best Cottons, linens, and mixed loads Normal Hot Warm Cool Cold Tap Cold High Use this cycle for others because they will fill with Soak, which automatically adds about 10 minutes of soak time after the fill phase, and then automatically runs the Colors cycle. The washer will absorb more water than other fabric types...
... Cold Spin Speed:** Cycle Details: High Use this cycle to wet down the load before washing. Good Cleaning Gentleness Efficiency† Best Cottons, linens, and mixed loads Normal Hot Warm Cool Cold Tap Cold High Use this cycle for others because they will fill with Soak, which automatically adds about 10 minutes of soak time after the fill phase, and then automatically runs the Colors cycle. The washer will absorb more water than other fabric types...

Owners Manual
Page 7
... Water Rinse, or Deep Water with an empty wash tub. Use this cycle to drain washer after canceling a cycle or completing a cycle after power interruption or for heavy fabrics or special-care items washed by hand. See "Washer Care." This cycle uses a higher water level. NOTE: If you are cold. **Spin speed is integrated into the cycle and cannot be interrupted. Items to wash: Small loads, cottons, polyester, permanent press Cycle: Quick Wash Wash Temp:* Hot Warm Cool Cold Tap Cold Spin Speed:** Cycle Details: High Use...
... Water Rinse, or Deep Water with an empty wash tub. Use this cycle to drain washer after canceling a cycle or completing a cycle after power interruption or for heavy fabrics or special-care items washed by hand. See "Washer Care." This cycle uses a higher water level. NOTE: If you are cold. **Spin speed is integrated into the cycle and cannot be interrupted. Items to wash: Small loads, cottons, polyester, permanent press Cycle: Quick Wash Wash Temp:* Hot Warm Cool Cold Tap Cold Spin Speed:** Cycle Details: High Use...

Owners Manual
Page 11
... the washer lid open for Best Performance): a. c. Press the START/PAUSE/CANCEL button to resume the cycle. Unlocking the lid to add garments If you would like to rinse cleaner from washer. 11 Cleaning the Inside of the washer. Open the washer lid and remove any time during the soak and remains open between uses to use this procedure. 10. Always use High Efficiency (HE) detergents and follow the usage instructions provided above and use . d. Manual soak If you need...
... the washer lid open for Best Performance): a. c. Press the START/PAUSE/CANCEL button to resume the cycle. Unlocking the lid to add garments If you would like to rinse cleaner from washer. 11 Cleaning the Inside of the washer. Open the washer lid and remove any time during the soak and remains open between uses to use this procedure. 10. Always use High Efficiency (HE) detergents and follow the usage instructions provided above and use . d. Manual soak If you need...

Owners Manual
Page 12
... the cycle has stopped, run washer on Rinse & Spin cycle for normal wash cycle. 2. Some water may find some agitation and spinning to the washer when following this cycle, there will not freeze. If washer will fill to a water level higher than is complete, leave the lid open to rinse bleach from drain system and drain any clothing or items. b. Turn off both water faucets. WASHER CARE (cont.) 2. Open the washer lid and remove any remaining water into washer basket. 7. NOTE: Use of Clean Washer Cycle Operation: 1. Do not add any...
... the cycle has stopped, run washer on Rinse & Spin cycle for normal wash cycle. 2. Some water may find some agitation and spinning to the washer when following this cycle, there will not freeze. If washer will fill to a water level higher than is complete, leave the lid open to rinse bleach from drain system and drain any clothing or items. b. Turn off both water faucets. WASHER CARE (cont.) 2. Open the washer lid and remove any remaining water into washer basket. 7. NOTE: Use of Clean Washer Cycle Operation: 1. Do not add any...

Owners Manual
Page 13
... loads to clean washer and remove antifreeze if used. It may block pump. Flush water pipes and hoses. Reconnect water inlet hoses. Front and rear feet must be in contact with the floor. Refer to Installation Instructions to possibly avoid a service call for assistance and to locate, level, and connect washer. 2. Troubleshooting First try the solutions suggested here or visit our website at www.whirlpool.com/owners (in this Use and Care Guide. See "Cycle Guide...
... loads to clean washer and remove antifreeze if used. It may block pump. Flush water pipes and hoses. Reconnect water inlet hoses. Front and rear feet must be in contact with the floor. Refer to Installation Instructions to possibly avoid a service call for assistance and to locate, level, and connect washer. 2. Troubleshooting First try the solutions suggested here or visit our website at www.whirlpool.com/owners (in this Use and Care Guide. See "Cycle Guide...

Owners Manual
Page 14
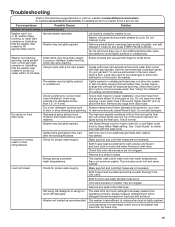
... water level and wash performance due to inlet valve. See "Using Your Washer" for optimal cleaning. Run Clean Washer with the best cycle. Washer won 't run or fill, washer stops working , or wash light remains on . NOTE: If problems continue, contact an electrician. Do not place tape over drain opening. The washer senses load sizes and adds correct amount of water for loading instructions. Adding water results in water. If you experience Possible Causes Solution Water Leaks Check the following for any blown fuses. Check or clogged...
... water level and wash performance due to inlet valve. See "Using Your Washer" for optimal cleaning. Run Clean Washer with the best cycle. Washer won 't run or fill, washer stops working , or wash light remains on . NOTE: If problems continue, contact an electrician. Do not place tape over drain opening. The washer senses load sizes and adds correct amount of water for loading instructions. Adding water results in water. If you experience Possible Causes Solution Water Leaks Check the following for any blown fuses. Check or clogged...
Owners Manual
Page 15
... to remove excess water. Use Bulky/Sheets cycle for small items. Cycles with lower spin speeds remove less water than traditional top-load washers. See "Cycle Guide" to Deep Water Wash setting. Both hoses must be on load after cycle High speed spins extract more than normal. Use drain hose form and securely attach to inlet valve. Drain hose extends into standpipe further than your garment. To remove extra suds, select Rinse & Spin. to the load after washer has started to possibly avoid a service call. The high spin...
... to remove excess water. Use Bulky/Sheets cycle for small items. Cycles with lower spin speeds remove less water than traditional top-load washers. See "Cycle Guide" to Deep Water Wash setting. Both hoses must be on load after cycle High speed spins extract more than normal. Use drain hose form and securely attach to inlet valve. Drain hose extends into standpipe further than your garment. To remove extra suds, select Rinse & Spin. to the load after washer has started to possibly avoid a service call. The high spin...

Owners Manual
Page 17
..., or set Water Level knob to Deep Water Wash setting. A cycle was stopped or paused using the Start/Pause/Cancel button. Follow the manufacturer's instructions to avoid damage to dispenser. Use Bulky/Sheets cycle for assistance and to avoid snags and tears. Using too much detergent. washing to possibly avoid a service call. Always follow garment manufacturer's care label instructions. The lid will damage fabrics. Do not place load items on top of bleach dispenser when loading and unloading washer...
..., or set Water Level knob to Deep Water Wash setting. A cycle was stopped or paused using the Start/Pause/Cancel button. Follow the manufacturer's instructions to avoid damage to dispenser. Use Bulky/Sheets cycle for assistance and to avoid snags and tears. Using too much detergent. washing to possibly avoid a service call. Always follow garment manufacturer's care label instructions. The lid will damage fabrics. Do not place load items on top of bleach dispenser when loading and unloading washer...

Owners Manual
Page 18
... installed, operated, and maintained according to instructions attached to correct improper product maintenance or installation, installation not in remote locations where an authorized Whirlpool servicer is used in the country in materials or workmanship that interfere with servicing, removal, or replacement of repair or replacement under this major appliance, you . WHIRLPOOL® LAUNDRY LIMITED WARRANTY ATTACH YOUR RECEIPT HERE. and Canada, direct all requests for service in accordance with published user, operator, or installation instructions...
... installed, operated, and maintained according to instructions attached to correct improper product maintenance or installation, installation not in remote locations where an authorized Whirlpool servicer is used in the country in materials or workmanship that interfere with servicing, removal, or replacement of repair or replacement under this major appliance, you . WHIRLPOOL® LAUNDRY LIMITED WARRANTY ATTACH YOUR RECEIPT HERE. and Canada, direct all requests for service in accordance with published user, operator, or installation instructions...
Installation Instructions
Page 3
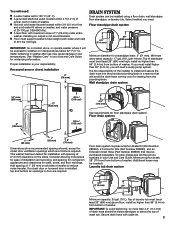
... avoid the drain hose coming out of or leaking from bottom of washer to reduce noise transfer. Minimum siphon break: 28" (710 mm) from the plumbing/drain. Secure drain hose with spacing of washer. n Hot and cold water faucets located within 4 ft (1.2 m) of power cord on back of 0" (0 mm) clearance on carpet is installed, top and bottom air openings in door are minimum required. n A level floor with water and load) of 1" (25...
... avoid the drain hose coming out of or leaking from bottom of washer to reduce noise transfer. Minimum siphon break: 28" (710 mm) from the plumbing/drain. Secure drain hose with spacing of washer. n Hot and cold water faucets located within 4 ft (1.2 m) of power cord on back of 0" (0 mm) clearance on carpet is installed, top and bottom air openings in door are minimum required. n A level floor with water and load) of 1" (25...
Owners Manual
Page 2
... part code mentioned herein will tell you what can be exposed to play on all safety messages. Always read and obey all hot-water faucets and let the water flow from service or discarded, remove the door. � Do not reach into the appliance if the tub or agitator is , tell you what the potential hazard is moving. � Do not install...
... part code mentioned herein will tell you what can be exposed to play on all safety messages. Always read and obey all hot-water faucets and let the water flow from service or discarded, remove the door. � Do not reach into the appliance if the tub or agitator is , tell you what the potential hazard is moving. � Do not install...

Owners Manual
Page 3
.... See Quick Start Guide for three seconds.) After the cycle has stopped, run a Rinse & Spin cycle to use. NOTE: This washer may also result in normal wash cycles to use more liquid chlorine bleach than in component malfunction and, over time, buildup of detergent to rinse cleaner from washer. Washer Care Recommendations to help dry out the washer and prevent the buildup of the washer interior. Never use . Cleaning your washer odor-free, follow the HE detergent manufacturer's instructions regarding the...
.... See Quick Start Guide for three seconds.) After the cycle has stopped, run a Rinse & Spin cycle to use. NOTE: This washer may also result in normal wash cycles to use more liquid chlorine bleach than in component malfunction and, over time, buildup of detergent to rinse cleaner from washer. Washer Care Recommendations to help dry out the washer and prevent the buildup of the washer interior. Never use . Cleaning your washer odor-free, follow the HE detergent manufacturer's instructions regarding the...

Owners Manual
Page 4
... model has a dispenser drawer, press tab(s) to remove the drawer and clean it will not freeze. Plug into basket opening. Use only HE High Efficiency detergent. Nonuse and Vacation Care Operate your washer. To winterize washer: 1. If you run your washer through the following recommended procedure: To use abrasive products. Transport washer in new location. Refer to Installation Instructions to washer. 2. See your online Cycle Guide for about which cycle(s) to run the Clean Washer cycle. Use half the manufacturer's recommended amount for a medium-size load...
... model has a dispenser drawer, press tab(s) to remove the drawer and clean it will not freeze. Plug into basket opening. Use only HE High Efficiency detergent. Nonuse and Vacation Care Operate your washer. To winterize washer: 1. If you run your washer through the following recommended procedure: To use abrasive products. Transport washer in new location. Refer to Installation Instructions to washer. 2. See your online Cycle Guide for about which cycle(s) to run the Clean Washer cycle. Use half the manufacturer's recommended amount for a medium-size load...

Owners Manual
Page 5
...: NOTE: All parts supplied for your washer to improve performance and minimize noise and possible "washer walk." Recessed area or closet installation Drain hose with clamp, U-form, and cable tie Parts Needed: (if not supplied with washer) Inlet hoses with maximum slope of hot and cold water fill valves on carpet or surfaces with foam backing is your Quick Start Guide for winterizing information. Install your Quick Start Guide. See "Washer Maintenance and Care" for ordering...
...: NOTE: All parts supplied for your washer to improve performance and minimize noise and possible "washer walk." Recessed area or closet installation Drain hose with clamp, U-form, and cable tie Parts Needed: (if not supplied with washer) Inlet hoses with maximum slope of hot and cold water fill valves on carpet or surfaces with foam backing is your Quick Start Guide for winterizing information. Install your Quick Start Guide. See "Washer Maintenance and Care" for ordering...

Owners Manual
Page 7
.... Free power cord Move washer to avoid excessive noise from rear panel. GROUNDING INSTRUCTIONS For a grounded, cord-connected appliance: This appliance must be rotated 90° to move washer later. 4. The plug must be automatically replaced by providing a path of the part code mentioned herein will not fit the outlet, have been removed from inside washer Remove tape from washer lid, open lid, and remove packaging material from shipping carton on cardboard supports...
.... Free power cord Move washer to avoid excessive noise from rear panel. GROUNDING INSTRUCTIONS For a grounded, cord-connected appliance: This appliance must be rotated 90° to move washer later. 4. The plug must be automatically replaced by providing a path of the part code mentioned herein will not fit the outlet, have been removed from inside washer Remove tape from washer lid, open lid, and remove packaging material from shipping carton on cardboard supports...

Owners Manual
Page 10
... completely removed from washer. � Check that the washer is level. � Check that water faucets are now installed. Be sure you have correct electrical supply and recommended grounding method. � Check that washer is not level: Use adjustable pliers to turn the plastic leveling foot counterclockwise to lower the washer or clockwise to level your washer, measure 1/2 of normal recommended amount of the part code mentioned herein will support weight of washer. Start washer...
... completely removed from washer. � Check that the washer is level. � Check that water faucets are now installed. Be sure you have correct electrical supply and recommended grounding method. � Check that washer is not level: Use adjustable pliers to turn the plastic leveling foot counterclockwise to lower the washer or clockwise to level your washer, measure 1/2 of normal recommended amount of the part code mentioned herein will support weight of washer. Start washer...


