
Installation Guide
Page 2
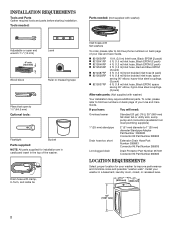
... (25 mm) diameter Standpipe Adapter Part Number 3363920 Connector Kit Part Number 285835 Drain hose too short Extension Drain Hose Part Number 285863 Connector Kit Part Number 285835 Lint clogged drain Drain Protector Part Number 367031 Connector Kit Part Number 285835 LOCATION REQUIREMENTS Select proper .... (1.8 m) Inlet hose, Black EPDM, space saving 90° elbow, hypro-blue steel couplings (2 pack) Alternate parts: (Not supplied with washer) Your installation may require additional parts. If you have: You will need: Overhead sewer Standard 20 gal. (76 L) 39" (990 mm) tall drain...
... (25 mm) diameter Standpipe Adapter Part Number 3363920 Connector Kit Part Number 285835 Drain hose too short Extension Drain Hose Part Number 285863 Connector Kit Part Number 285835 Lint clogged drain Drain Protector Part Number 367031 Connector Kit Part Number 285835 LOCATION REQUIREMENTS Select proper .... (1.8 m) Inlet hose, Black EPDM, space saving 90° elbow, hypro-blue steel couplings (2 pack) Alternate parts: (Not supplied with washer) Your installation may require additional parts. If you have: You will need: Overhead sewer Standard 20 gal. (76 L) 39" (990 mm) tall drain...
Installation Guide
Page 3
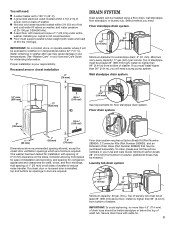
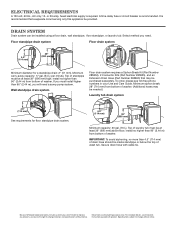
... floor moldings. Consider allowing more than 96" (2.44 m) from bottom of wash tub. Floor drain system requires a Siphon Break Kit (Part Number 285834), 2 Connector Kits (Part Number 285835), and an Extension Drain Hose (Part Number 285863) that may be at least 39" (990 mm) above floor; install no higher than 96" (2.44 m), you...
... floor moldings. Consider allowing more than 96" (2.44 m) from bottom of wash tub. Floor drain system requires a Siphon Break Kit (Part Number 285834), 2 Connector Kits (Part Number 285835), and an Extension Drain Hose (Part Number 285863) that may be at least 39" (990 mm) above floor; install no higher than 96" (2.44 m), you...
Installation Guide
Page 5
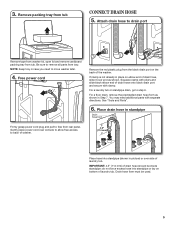
... clamp. Squeeze clamp with pliers and slide black elbow end of laundry tub. You may need to remove all parts from tub CONNECT DRAIN HOSE 5. NOTE: Keep tray in standpipe Drain hose form Firmly grasp power cord plug and pull to back of washer. 4.5" (114 ... mm) of drain hose, slide it over console to allow free access to free from rear panel. Remove packing tray from tray. See "Tools and Parts". 6. do not force excess hose into standpipe (shown in Step 7. 3. For a laundry tub or standpipe drain, go to drain port Remove tape from washer lid...
... clamp. Squeeze clamp with pliers and slide black elbow end of laundry tub. You may need to remove all parts from tub CONNECT DRAIN HOSE 5. NOTE: Keep tray in standpipe Drain hose form Firmly grasp power cord plug and pull to back of washer. 4.5" (114 ... mm) of drain hose, slide it over console to allow free access to free from rear panel. Remove packing tray from tray. See "Tools and Parts". 6. do not force excess hose into standpipe (shown in Step 7. 3. For a laundry tub or standpipe drain, go to drain port Remove tape from washer lid...
Installation Guide
Page 6
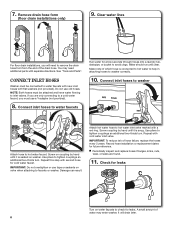
...water faucet, you will drain later. 6 Check for leaks Turn on valve when attaching to water faucets Run water for leaks. See "Tools and Parts". CONNECT INLET HOSES Washer must be attached and have water flowing to avoid clogs. Connect inlet hoses to washer Attach hose to tighten couplings an...the drain hose form from the end of water may need to water faucets with new inlet hoses with separate directions. It will need additional parts with flat washers (not provided). Damage can result. Do not use tape or sealants on water faucets to check for a few seconds ...
...water faucet, you will drain later. 6 Check for leaks Turn on valve when attaching to water faucets Run water for leaks. See "Tools and Parts". CONNECT INLET HOSES Washer must be attached and have water flowing to avoid clogs. Connect inlet hoses to washer Attach hose to tighten couplings an...the drain hose form from the end of water may need to water faucets with new inlet hoses with separate directions. It will need additional parts with flat washers (not provided). Damage can result. Do not use tape or sealants on water faucets to check for a few seconds ...
Installation Guide
Page 8
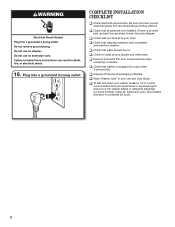
q Check that you have all of /recycle all parts are on washer. q Dispose of your tools. q Read "Washer Care" in your washer, measure 1/2 of normal recommended amount of powdered or liquid detergent and pour .... If there is plugged into a grounded 3 prong outlet COMPLETE INSTALLATION CHECKLIST q Check electrical requirements. q Check that all packaging materials. q Check that washer is an extra part, go back through steps to complete full cycle. 8 Plug into a grounded 3 prong outlet. q Check for leaks around faucets and inlet hoses. q Remove protective film from...
q Check that you have all of /recycle all parts are on washer. q Dispose of your tools. q Read "Washer Care" in your washer, measure 1/2 of normal recommended amount of powdered or liquid detergent and pour .... If there is plugged into a grounded 3 prong outlet COMPLETE INSTALLATION CHECKLIST q Check electrical requirements. q Check that all packaging materials. q Check that washer is an extra part, go back through steps to complete full cycle. 8 Plug into a grounded 3 prong outlet. q Check for leaks around faucets and inlet hoses. q Remove protective film from...
Dimension Guide
Page 2
...from bottom of washer. Wall standpipe drain system Floor drain system requires a Siphon Break Kit (Part Number 285834), 2 Connector Kits (Part Number 285835), and an Extension Drain Hose (Part Number 285863) that a separate circuit serving only this appliance be at least 39" (990 mm... may be installed using a floor drain, wall standpipe, floor standpipe, or laundry tub. Select method you will need . Because Whirlpool Corporation policy includes a continuous commitment to improve our products, we reserve the right to change materials and specifications without notice. Minimum ...
...from bottom of washer. Wall standpipe drain system Floor drain system requires a Siphon Break Kit (Part Number 285834), 2 Connector Kits (Part Number 285835), and an Extension Drain Hose (Part Number 285863) that a separate circuit serving only this appliance be at least 39" (990 mm... may be installed using a floor drain, wall standpipe, floor standpipe, or laundry tub. Select method you will need . Because Whirlpool Corporation policy includes a continuous commitment to improve our products, we reserve the right to change materials and specifications without notice. Minimum ...


