
Installation Guide
Page 2
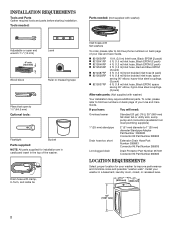
... Drain Hose Part Number 285863 Connector Kit Part Number 285835 Lint clogged drain Drain Protector Part Number 367031 Connector Kit Part Number 285835 LOCATION REQUIREMENTS Select proper location for installation are in cardboard insert in the top of your washer to toll-free numbers on back page of the washer. Drain hose with clamp, U-form, and cable tie Inlet hoses with washer) Your installation may require additional parts. To order, please refer to improve performance and minimize noise and possible "washer...
... Drain Hose Part Number 285863 Connector Kit Part Number 285835 Lint clogged drain Drain Protector Part Number 367031 Connector Kit Part Number 285835 LOCATION REQUIREMENTS Select proper location for installation are in cardboard insert in the top of your washer to toll-free numbers on back page of the washer. Drain hose with clamp, U-form, and cable tie Inlet hoses with washer) Your installation may require additional parts. To order, please refer to improve performance and minimize noise and possible "washer...
Installation Guide
Page 3
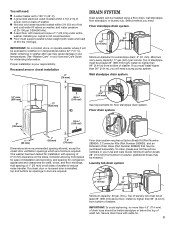
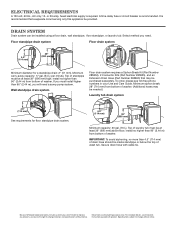
... Break Kit (Part Number 285834), 2 Connector Kits (Part Number 285835), and an Extension Drain Hose (Part Number 285863) that may be installed using a floor drain, wall standpipe, floor standpipe, or laundry tub. Secure drain hose with spacing of wash tub. See "Washer Care" in your responsibility. install no higher than 96" (2.44 m) from bottom of 1" (25 mm) under entire washer. Consider allowing more than 96" (2.44 m), you will need a sump pump system. If you need : n A water heater set...
... Break Kit (Part Number 285834), 2 Connector Kits (Part Number 285835), and an Extension Drain Hose (Part Number 285863) that may be installed using a floor drain, wall standpipe, floor standpipe, or laundry tub. Secure drain hose with spacing of wash tub. See "Washer Care" in your responsibility. install no higher than 96" (2.44 m) from bottom of 1" (25 mm) under entire washer. Consider allowing more than 96" (2.44 m), you will need a sump pump system. If you need : n A water heater set...

Installation Guide
Page 4
... is taped shut. 2. Set washer upright. If your washer includes a sound shield, please refer to avoid excessive noise from shipping carton on cardboard supports. n Check with a power supply cord having a 3 prong grounding plug. Tip washer back and place on floor behind washer. n This washer is equipped with a qualified electrician if you start: remove shipping materials It is necessary to a gas pipe. or 20-amp, fused electrical supply is recommended that...
... is taped shut. 2. Set washer upright. If your washer includes a sound shield, please refer to avoid excessive noise from shipping carton on cardboard supports. n Check with a power supply cord having a 3 prong grounding plug. Tip washer back and place on floor behind washer. n This washer is equipped with a qualified electrician if you start: remove shipping materials It is necessary to a gas pipe. or 20-amp, fused electrical supply is recommended that...
Installation Guide
Page 5
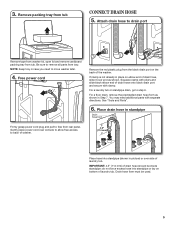
... with separate directions. If clamp is not already in case you need additional parts with clamp. See "Tools and Parts". 6. Drain hose form must be inside standpipe; Be sure to drain port Remove tape from washer lid, open lid and remove cardboard packing tray from tub. IMPORTANT: 4.5" (114 mm) of the washer. 3. do not force excess hose into standpipe (shown in Step 7. Free power cord Remove the red plastic plug from...
... with separate directions. If clamp is not already in case you need additional parts with clamp. See "Tools and Parts". 6. Drain hose form must be inside standpipe; Be sure to drain port Remove tape from washer lid, open lid and remove cardboard packing tray from tub. IMPORTANT: 4.5" (114 mm) of the washer. 3. do not force excess hose into standpipe (shown in Step 7. Free power cord Remove the red plastic plug from...
Installation Guide
Page 6
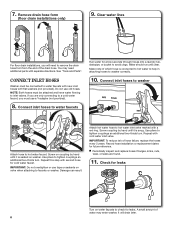
... hoses to faucets or washer. CONNECT INLET HOSES Washer must be attached and have water flowing to hot water inlet valve marked with cold water inlet valve. Attach hot water hose to inlet valves. A small amount of hose failure, replace the hoses every 5 years. See "Tools and Parts". IMPORTANT: To reduce risk of water may need to tighten couplings an additional two-thirds turn . 7. Remove drain hose form (floor drain installations only) 9. Screw on washer. It will need additional parts with separate directions. Use pliers to remove the drain hose...
... hoses to faucets or washer. CONNECT INLET HOSES Washer must be attached and have water flowing to hot water inlet valve marked with cold water inlet valve. Attach hot water hose to inlet valves. A small amount of hose failure, replace the hoses every 5 years. See "Tools and Parts". IMPORTANT: To reduce risk of water may need to tighten couplings an additional two-thirds turn . 7. Remove drain hose form (floor drain installations only) 9. Screw on washer. It will need additional parts with separate directions. Use pliers to remove the drain hose...
Installation Guide
Page 7
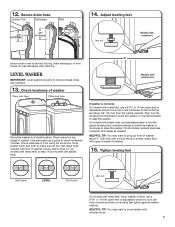
... washer. On models with metal feet, use a 9/16" or 14 mm open -end or adjustable wrench to make solid contact with cable tie. Use side seam as shown. Adjust leveling feet 4.54".5" (114 mm) 4.5" (114 mm) 4.5" (1143 mm) Jam nut Models with metal feet Secure drain hose to reduce excess noise and vibration. 13. Secure drain hose Laundry Tub Standpipe Wall 14. LEVEL WASHER IMPORTANT: Level washer properly to laundry tub leg, drain standpipe, or inlet hoses...
... washer. On models with metal feet, use a 9/16" or 14 mm open -end or adjustable wrench to make solid contact with cable tie. Use side seam as shown. Adjust leveling feet 4.54".5" (114 mm) 4.5" (114 mm) 4.5" (1143 mm) Jam nut Models with metal feet Secure drain hose to reduce excess noise and vibration. 13. Secure drain hose Laundry Tub Standpipe Wall 14. LEVEL WASHER IMPORTANT: Level washer properly to laundry tub leg, drain standpipe, or inlet hoses...
Installation Guide
Page 8
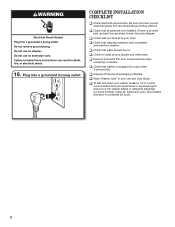
... materials. q Check that water faucets are now installed. q Read "Washer Care" in your tools. q To test and clean your washer, measure 1/2 of normal recommended amount of powdered or liquid detergent and pour it into washer basket or detergent dispenser (on . Plug into a grounded 3 prong outlet. q Remove protective film from washer. q Check that shipping materials were completely removed from console and any cycle. q Check for leaks around faucets and inlet hoses. q Dispose of your Use and Care Guide. 16. Start washer and...
... materials. q Check that water faucets are now installed. q Read "Washer Care" in your tools. q To test and clean your washer, measure 1/2 of normal recommended amount of powdered or liquid detergent and pour it into washer basket or detergent dispenser (on . Plug into a grounded 3 prong outlet. q Remove protective film from washer. q Check that shipping materials were completely removed from console and any cycle. q Check for leaks around faucets and inlet hoses. q Dispose of your Use and Care Guide. 16. Start washer and...
Dimension Guide
Page 1
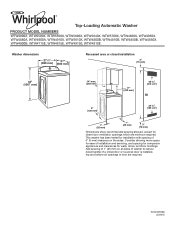
This washer has been tested for installation with spacing of washer to reduce noise transfer. Add spacing of 1" (25 mm) on all sides of 0" (0 mm) clearance on the sides. Consider allowing more space for ease of installation and servicing, and spacing for companion appliances and clearances for closet door ventilation openings which are required. Top-Loading Automatic Washer PRODUCT MODEL NUMBERS WTW4900X, WTW5500X, WTW5550X, WTW5600X, WTW5640X...
This washer has been tested for installation with spacing of washer to reduce noise transfer. Add spacing of 1" (25 mm) on all sides of 0" (0 mm) clearance on the sides. Consider allowing more space for ease of installation and servicing, and spacing for companion appliances and clearances for closet door ventilation openings which are required. Top-Loading Automatic Washer PRODUCT MODEL NUMBERS WTW4900X, WTW5500X, WTW5550X, WTW5600X, WTW5640X...
Dimension Guide
Page 2
... must install higher than 4.5" (114 mm) of wash tub. Minimum siphon break: 28" (710 mm) from bottom of laundry tub must be installed using a floor drain, wall standpipe, floor standpipe, or laundry tub. Top of washer. or 20-amp, fused electrical supply is recommended. install no more than 96" (2.44 m), you need a sump pump system. For complete details, see toll-free phone numbers in your Use and Care Guide. A time-delay fuse or...
... must install higher than 4.5" (114 mm) of wash tub. Minimum siphon break: 28" (710 mm) from bottom of laundry tub must be installed using a floor drain, wall standpipe, floor standpipe, or laundry tub. Top of washer. or 20-amp, fused electrical supply is recommended. install no more than 96" (2.44 m), you need a sump pump system. For complete details, see toll-free phone numbers in your Use and Care Guide. A time-delay fuse or...
Energy Guide
Page 1
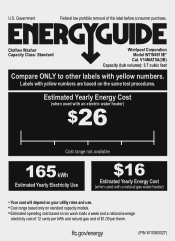
... your utility rates and use. • Cost range based only on standard capacity models. • Estimated operating cost based on the same test procedures. Estimated Yearly Energy Cost (when used with an electric water heater) $26 Cost range not available 165 kWh Estimated Yearly Electricity Use $16 Estimated Yearly Energy Cost (when used with yellow numbers. Government Federal law prohibits removal of $1.09 per therm. Clothes Washer Capacity Class: Standard Whirlpool Corporation Model WTW4915E...
... your utility rates and use. • Cost range based only on standard capacity models. • Estimated operating cost based on the same test procedures. Estimated Yearly Energy Cost (when used with an electric water heater) $26 Cost range not available 165 kWh Estimated Yearly Electricity Use $16 Estimated Yearly Energy Cost (when used with yellow numbers. Government Federal law prohibits removal of $1.09 per therm. Clothes Washer Capacity Class: Standard Whirlpool Corporation Model WTW4915E...


