
Installation Instructions
Page 2
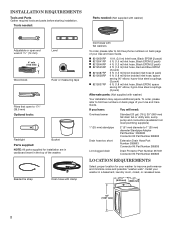
...Parts supplied: NOTE: All parts supplied for your Use and Care Guide. Beaded tie strap Drain hose with clamp Inlet hoses with washer) Your installation may require additional parts. If you have: You will need: Overhead sewer Standard 20 gal. (76 L) 39" ... laundry room, closet, or recessed area. 271/2" 27" (648 mm) (686 mm) 42" (1067 mm) 2 Install your washer in the top of your washer to toll-free phone numbers on back page of the washer. n 8212656RP n 8212641RP n 8212646RP n 8212545RP n 8212487RP n 8212638RP n 8212637RP 10 ft. (3.0 m) Inlet hose, Black EPDM ...
...Parts supplied: NOTE: All parts supplied for your Use and Care Guide. Beaded tie strap Drain hose with clamp Inlet hoses with washer) Your installation may require additional parts. If you have: You will need: Overhead sewer Standard 20 gal. (76 L) 39" ... laundry room, closet, or recessed area. 271/2" 27" (648 mm) (686 mm) 42" (1067 mm) 2 Install your washer in the top of your washer to toll-free phone numbers on back page of the washer. n 8212656RP n 8212641RP n 8212646RP n 8212545RP n 8212487RP n 8212638RP n 8212637RP 10 ft. (3.0 m) Inlet hose, Black EPDM ...
Installation Instructions
Page 3
...mm) 24 in.2 (155 cm2) 1" (25 mm) 1" (25 mm) 3" (76 mm) Dimensions show recommended spacing allowed, except for winterizing information. Add spacing of washer to reduce noise transfer. IMPORTANT: To avoid siphoning, no more space for ease of 315 lbs (143 kgs). Secure drain hose with water and load... allowing more than 96" (2.44 m) from bottom of wash tub. n Hot and cold water faucets located within 4 ft (1.2 m) of power cord on washer, and water pressure of laundry tub must be at least 39" (990 mm) above floor; To order, please see toll-free phone numbers in door...
...mm) 24 in.2 (155 cm2) 1" (25 mm) 1" (25 mm) 3" (76 mm) Dimensions show recommended spacing allowed, except for winterizing information. Add spacing of washer to reduce noise transfer. IMPORTANT: To avoid siphoning, no more space for ease of 315 lbs (143 kgs). Secure drain hose with water and load... allowing more than 96" (2.44 m) from bottom of wash tub. n Hot and cold water faucets located within 4 ft (1.2 m) of power cord on washer, and water pressure of laundry tub must be at least 39" (990 mm) above floor; To order, please see toll-free phone numbers in door...
Installation Instructions
Page 4
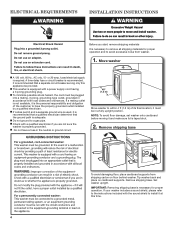
... separate circuit breaker serving only this time. 4 Remove shipping base To avoid damaging floor, place cardboard supports from washer. 1. Tip washer back and place on floor behind washer. It is taped shut. 2. n If codes permit and a separate ground wire is used, it and make ... with a qualified electrician if you start: remove shipping materials It is necessary to remove all shipping materials for proper operation. Set washer upright. If your washer includes a sound shield, please refer to the instructions included with a power supply cord having a 3 prong grounding plug. n ...
... separate circuit breaker serving only this time. 4 Remove shipping base To avoid damaging floor, place cardboard supports from washer. 1. Tip washer back and place on floor behind washer. It is taped shut. 2. n If codes permit and a separate ground wire is used, it and make ... with a qualified electrician if you start: remove shipping materials It is necessary to remove all shipping materials for proper operation. Set washer upright. If your washer includes a sound shield, please refer to the instructions included with a power supply cord having a 3 prong grounding plug. n ...
Installation Instructions
Page 5
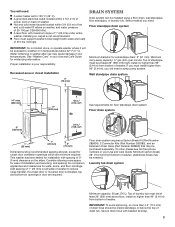
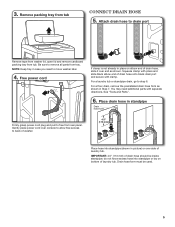
... cord over end as shown in standpipe Drain hose form Firmly grasp power cord plug and pull to back of washer. 4.5" (113 mm) Place hose into standpipe or lay on elbow end of laundry tub. Remove packing tray ... tub Connect Drain Hose 5. Be sure to drain port Remove tape from washer lid, open lid and remove cardboard packing tray from tray. For a laundry tub or standpipe drain, go to... move washer later. 4. You may need to step 6. IMPORTANT: 4.5" (113 mm) of drain hose onto black...
... cord over end as shown in standpipe Drain hose form Firmly grasp power cord plug and pull to back of washer. 4.5" (113 mm) Place hose into standpipe or lay on elbow end of laundry tub. Remove packing tray ... tub Connect Drain Hose 5. Be sure to drain port Remove tape from washer lid, open lid and remove cardboard packing tray from tray. For a laundry tub or standpipe drain, go to... move washer later. 4. You may need to step 6. IMPORTANT: 4.5" (113 mm) of drain hose onto black...
Installation Instructions
Page 6
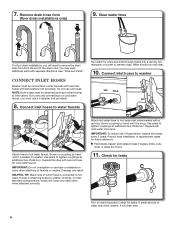
... to tighten couplings an additional two-thirds turn . Clear water lines For floor drain installations, you are found. 11. Connect Inlet Hoses Washer must be connected to prevent clogs. Connect inlet hoses to water faucets Run water for cold water faucet. Repeat this step with separate directions...on valve when attaching to hot water inlet valve marked with a red ring. HELPFUL TIP: Make note of the drain hose. Repeat with flat washers (not provided). 7. If you will need additional parts with second hose for a few seconds through hoses into a laundry tub, drainpipe, or bucket...
... to tighten couplings an additional two-thirds turn . Clear water lines For floor drain installations, you are found. 11. Connect Inlet Hoses Washer must be connected to prevent clogs. Connect inlet hoses to water faucets Run water for cold water faucet. Repeat this step with separate directions...on valve when attaching to hot water inlet valve marked with a red ring. HELPFUL TIP: Make note of the drain hose. Repeat with flat washers (not provided). 7. If you will need additional parts with second hose for a few seconds through hoses into a laundry tub, drainpipe, or bucket...
Installation Instructions
Page 7
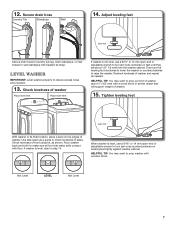
...Then turn the leveling foot clockwise to lower the washer or counterclockwise to step 14. Tighten leveling feet Jam nut With washer in its final location, place a level on top edges of washer. 15. If washer is level, skip to raise the washer. HELPFUL TIP: You may want to check levelness...Check levelness of front using lid, as a guide to prop up front of washer about 1/2" (13 mm) from the washer cabinet. Not Level LEVEL Not Level 7 Check levelness of washer Place level here Place level here If washer is level, use a 9/16" or 14 mm open -end or adjustable wrench...
...Then turn the leveling foot clockwise to lower the washer or counterclockwise to step 14. Tighten leveling feet Jam nut With washer in its final location, place a level on top edges of washer. 15. If washer is level, skip to raise the washer. HELPFUL TIP: You may want to check levelness...Check levelness of front using lid, as a guide to prop up front of washer about 1/2" (13 mm) from the washer cabinet. Not Level LEVEL Not Level 7 Check levelness of washer Place level here Place level here If washer is level, use a 9/16" or 14 mm open -end or adjustable wrench...
Installation Instructions
Page 8
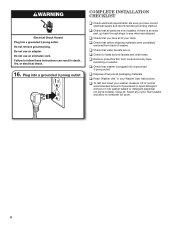
... what was skipped. q Check for leaks around faucets and inlet hoses. Plug into washer basket or detergent dispenser (on washer. q Check that water faucets are now installed. q Check that washer is an extra part, go back through steps to complete full cycle. 8 q...Installation CHECKLIST q Check electrical requirements. Close lid. q Remove protective film from back of your tools. q To test and clean your Washer User Instructions. Be sure you have correct electrical supply and recommended grounding method. Select any tape remaining on some models). q Check that...
... what was skipped. q Check for leaks around faucets and inlet hoses. Plug into washer basket or detergent dispenser (on washer. q Check that water faucets are now installed. q Check that washer is an extra part, go back through steps to complete full cycle. 8 q...Installation CHECKLIST q Check electrical requirements. Close lid. q Remove protective film from back of your tools. q To test and clean your Washer User Instructions. Be sure you have correct electrical supply and recommended grounding method. Select any tape remaining on some models). q Check that...

Dimension Guide
Page 1
... Kits (Part Number 285835), and an Extension Drain Hose (Part Number 285863) that a separate circuit serving only this washer be inside standpipe or below the top of drain hose should be provided. Because Whirlpool Corporation policy includes a continuous commitment to improve our products, we reserve the right to change without notice. Specifications...
... Kits (Part Number 285835), and an Extension Drain Hose (Part Number 285863) that a separate circuit serving only this washer be inside standpipe or below the top of drain hose should be provided. Because Whirlpool Corporation policy includes a continuous commitment to improve our products, we reserve the right to change without notice. Specifications...

Energy Guide
Page 1
... loads a week and a 2007 national average electricity cost of 10.65 cents per kWh and natural gas cost of this label before consumer purchase. Clothes Washer Capacity: Standard Whirlpool Corporation Model: WTW4850X* Cat.
... loads a week and a 2007 national average electricity cost of 10.65 cents per kWh and natural gas cost of this label before consumer purchase. Clothes Washer Capacity: Standard Whirlpool Corporation Model: WTW4850X* Cat.

Use & Care Guide
Page 2
WASHER SAFETY 2
WASHER SAFETY 2

Use & Care Guide
Page 3
...the water line. Concentrated Cleaning Low-water cleaning means concentrated cleaning. For example, you start the cycle, the lid will lock, and the washer will likely result in short pulses to determine the amount of water based on the load size. WHAT'S NEW UNDER THE LID? Use only...at all, as compared to the load size - There will find a step-by using lower water levels and reduced wash temperatures, as the washer determines the correct water level for the best performance. The lower water level combined with a regular non-HE detergent. You will be different kinds...
...the water line. Concentrated Cleaning Low-water cleaning means concentrated cleaning. For example, you start the cycle, the lid will lock, and the washer will likely result in short pulses to determine the amount of water based on the load size. WHAT'S NEW UNDER THE LID? Use only...at all, as compared to the load size - There will find a step-by using lower water levels and reduced wash temperatures, as the washer determines the correct water level for the best performance. The lower water level combined with a regular non-HE detergent. You will be different kinds...
Use & Care Guide
Page 4
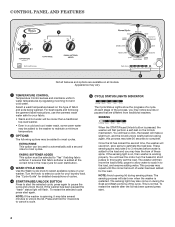
...water to soak in short pulses to cancel a cycle. 5 CYCLE STATUS LIGHTS INDICATOR The Cycle Status Lights show the progress of these spins. The washer will start . 4 Turn the knob to select a cycle for 3 seconds to thoroughly wet the load. At each stage of fabric and soils ...being washed. You will flash. EXTRA RINSE This option can be added to the washer to maintain a minimum temperature. 2 OPTIONS The following the garment label instructions, use short, slow spins to 3 minutes before locking again, this ...
...water to soak in short pulses to cancel a cycle. 5 CYCLE STATUS LIGHTS INDICATOR The Cycle Status Lights show the progress of these spins. The washer will start . 4 Turn the knob to select a cycle for 3 seconds to thoroughly wet the load. At each stage of fabric and soils ...being washed. You will flash. EXTRA RINSE This option can be added to the washer to maintain a minimum temperature. 2 OPTIONS The following the garment label instructions, use short, slow spins to 3 minutes before locking again, this ...

Use & Care Guide
Page 5
...cycle as the tub spins, allowing the rinse water to become saturated. This may change at this stage of the second stage, the washer will hear sounds similar to move quicker during this stage. Press START/Pause/Unlock again to the soils. Concentrated cleaning delivers the detergent ...concentrated cleaning. If you will hear the agitator rotate, followed by a several minutes, allowing the entire load to penetrate the clothes. SPIN The washer spins the load at high speed. You will hear sounds similar to be above the water line during sensing. It is complete, this stage....
...cycle as the tub spins, allowing the rinse water to become saturated. This may change at this stage of the second stage, the washer will hear sounds similar to move quicker during this stage. Press START/Pause/Unlock again to the soils. Concentrated cleaning delivers the detergent ...concentrated cleaning. If you will hear the agitator rotate, followed by a several minutes, allowing the entire load to penetrate the clothes. SPIN The washer spins the load at high speed. You will hear sounds similar to be above the water line during sensing. It is complete, this stage....

Use & Care Guide
Page 6
... Select Fabric Softener Added-Yes if using fabric softener. This cycle features a spray rinse. After time has expired, water will drain, but the washer will use for loads requiring an additional rinse cycle or to complete a load after a power failure. Combines a rinse and high speed spin for... Added-Yes if using fabric softener. Use this cycle to wet down the load before washing. This cycle features a spray rinse. The washer will absorb more water than other fabric types. Do not tightly pack basket. Use this cycle for heavily soiled or sturdy items. Water-level...
... Select Fabric Softener Added-Yes if using fabric softener. This cycle features a spray rinse. After time has expired, water will drain, but the washer will use for loads requiring an additional rinse cycle or to complete a load after a power failure. Combines a rinse and high speed spin for... Added-Yes if using fabric softener. Use this cycle to wet down the load before washing. This cycle features a spray rinse. The washer will absorb more water than other fabric types. Do not tightly pack basket. Use this cycle for heavily soiled or sturdy items. Water-level...

Use & Care Guide
Page 7
...and sashes, and remove non-washable trim and ornaments. • Mend rips and tears to avoid further damage to the bottom of the washer basket, as well. Sort and prepare your garments. Separate lint-takers from towels, rugs, and chenille fabrics. IMPORTANT: Follow the manufacturer...'s instructions to determine the amount of the washer basket before adding clothes. Add HE detergent • Empty pockets. USING YOUR WASHER 1. Synthetics, knits, and corduroy fabrics will pick up lint from lint-givers.
...and sashes, and remove non-washable trim and ornaments. • Mend rips and tears to avoid further damage to the bottom of the washer basket, as well. Sort and prepare your garments. Separate lint-takers from towels, rugs, and chenille fabrics. IMPORTANT: Follow the manufacturer...'s instructions to determine the amount of the washer basket before adding clothes. Add HE detergent • Empty pockets. USING YOUR WASHER 1. Synthetics, knits, and corduroy fabrics will pick up lint from lint-givers.
Use & Care Guide
Page 8
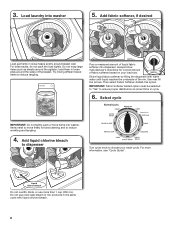
... need to move freely for correct amount of the rim. Do not use more information, see "Cycle Guide". Load laundry into washer. Do not wrap large items such as sheets around basket wall. Then select Fabric Softener Added-Yes option. Add liquid chlorine bleach to dispenser Turn ...
... need to move freely for correct amount of the rim. Do not use more information, see "Cycle Guide". Load laundry into washer. Do not wrap large items such as sheets around basket wall. Then select Fabric Softener Added-Yes option. Add liquid chlorine bleach to dispenser Turn ...

Use & Care Guide
Page 9
... wash temperature by turning the Temperature knob to help dissolve detergents. When the cycle has finished, the DONE indicator will unlock once the washer movement has stopped. Unlocking the lid to add garments If you need to open for load unbalance. Promptly remove garments after cycle has...cooler than your tap cold water is added to save energy. Delay in soil removal and to the appropriate setting based on your previous washer provided. Select Temperature 8. NOTE: Always read and follow fabric care label instructions to avoid damage to filling. This will hear the hum...
... wash temperature by turning the Temperature knob to help dissolve detergents. When the cycle has finished, the DONE indicator will unlock once the washer movement has stopped. Unlocking the lid to add garments If you need to open for load unbalance. Promptly remove garments after cycle has...cooler than your tap cold water is added to save energy. Delay in soil removal and to the appropriate setting based on your previous washer provided. Select Temperature 8. NOTE: Always read and follow fabric care label instructions to avoid damage to filling. This will hear the hum...

Use & Care Guide
Page 10
...and hot temperature. 5. Press and hold the START/Pause/Unlock for 3 seconds to water pressure surge. IMPORTANT: To avoid damaging the washer's finish, do not interrupt cycle. Turn off both hands and squeezing, while pushing upward with a permanent marker. If storing or ... & SPIN cycle for a period of R.V.-type antifreeze in hoses, freezing can damage washer. CLEANING YOUR WASHER Keep your washer as clean and fresh as your washer. Using recommended AFFRESH® washer cleaner, add one tablet to mix antifreeze and remaining water. 3. NON-USE AND VACATION...
...and hot temperature. 5. Press and hold the START/Pause/Unlock for 3 seconds to water pressure surge. IMPORTANT: To avoid damaging the washer's finish, do not interrupt cycle. Turn off both hands and squeezing, while pushing upward with a permanent marker. If storing or ... & SPIN cycle for a period of R.V.-type antifreeze in hoses, freezing can damage washer. CLEANING YOUR WASHER Keep your washer as clean and fresh as your washer. Using recommended AFFRESH® washer cleaner, add one tablet to mix antifreeze and remaining water. 3. NON-USE AND VACATION...

Use & Care Guide
Page 11
...hoses. Disconnect and drain water inlet hoses. 2. Place packing tray from original shipping materials back inside washer basket. 6. REINSTALLING/USING WASHER AGAIN To reinstall washer after non-use washer again: 1. Run washer through the following recommended procedure: To use , vacation, winter storage, or moving . 3. If..., if used. Plug in new location. Turn on both water faucets. Before using again, run washer through Casual Cycles REGULAR to locate, level, and connect washer. 2. Disconnect drain from back of detergent for a medium-size load. 11 Unplug power cord. ...
...hoses. Disconnect and drain water inlet hoses. 2. Place packing tray from original shipping materials back inside washer basket. 6. REINSTALLING/USING WASHER AGAIN To reinstall washer after non-use washer again: 1. Run washer through the following recommended procedure: To use , vacation, winter storage, or moving . 3. If..., if used. Plug in new location. Turn on both water faucets. Before using again, run washer through Casual Cycles REGULAR to locate, level, and connect washer. 2. Disconnect drain from back of detergent for a medium-size load. 11 Unplug power cord. ...

Use & Care Guide
Page 12
...laundry tub. You may block pump. Check all four fill hose flat washers are removed during the Drain & Spin cycles. Check that inlet valve screens have not become clogged. http://www.whirlpool.com/help Clicking or metallic noises Objects caught in this Use and ...Care Guide. See "Level the Washer" in loose heaps evenly around basket wall. Noises - Check household plumbing for flexing...
...laundry tub. You may block pump. Check all four fill hose flat washers are removed during the Drain & Spin cycles. Check that inlet valve screens have not become clogged. http://www.whirlpool.com/help Clicking or metallic noises Objects caught in this Use and ...Care Guide. See "Level the Washer" in loose heaps evenly around basket wall. Noises - Check household plumbing for flexing...


