Installation Instructions
Page 2
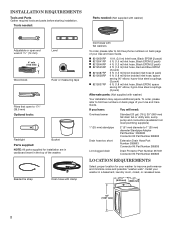
...hypro-blue steel couplings (2 pack) 6 ft. (1.8 m) Inlet hose, Black EPDM, space saving 90° elbow, hypro-blue steel couplings (2 pack) Alternate parts: (Not supplied with washer) Adjustable or open end wrench 9/16" (14 mm) 4" min (102 mm) Level Wood block Ruler or measuring tape Pliers ... room, closet, or recessed area. 271/2" 27" (648 mm) (686 mm) 42" (1067 mm) 2 INSTALLATION REQUIREMENTS Tools and Parts Gather required tools and parts before starting installation. Beaded tie strap Drain hose with clamp Inlet hoses with flat washers To order, please refer to 19⁄16...
...hypro-blue steel couplings (2 pack) 6 ft. (1.8 m) Inlet hose, Black EPDM, space saving 90° elbow, hypro-blue steel couplings (2 pack) Alternate parts: (Not supplied with washer) Adjustable or open end wrench 9/16" (14 mm) 4" min (102 mm) Level Wood block Ruler or measuring tape Pliers ... room, closet, or recessed area. 271/2" 27" (648 mm) (686 mm) 42" (1067 mm) 2 INSTALLATION REQUIREMENTS Tools and Parts Gather required tools and parts before starting installation. Beaded tie strap Drain hose with clamp Inlet hoses with flat washers To order, please refer to 19⁄16...
Installation Instructions
Page 3
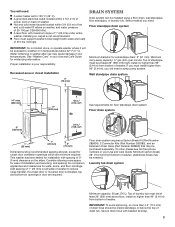
... moldings. Consider allowing more than 96" (2.44 m), you need a sump pump system. Floor drain system requires a Siphon Break Kit (Part Number 285834), 2 Connector Kits (Part Number 285385), and an Extension Drain Hose (Part Number 285863) that may be installed using a floor drain, wall standpipe, floor standpipe, or laundry tub. install no higher than...
... moldings. Consider allowing more than 96" (2.44 m), you need a sump pump system. Floor drain system requires a Siphon Break Kit (Part Number 285834), 2 Connector Kits (Part Number 285385), and an Extension Drain Hose (Part Number 285863) that may be installed using a floor drain, wall standpipe, floor standpipe, or laundry tub. install no higher than...
Installation Instructions
Page 5
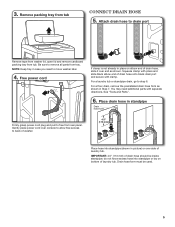
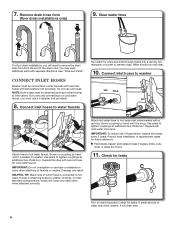
...back of laundry tub. Gently place power cord over end as shown. do not force excess hose into standpipe (shown in case you need additional parts with clamp. For a laundry tub or standpipe drain, go to drain port Remove tape from washer lid, open lid and remove cardboard packing tray... free access to move washer later. 4. Be sure to free from tray. See "Tools and Parts". 6. Place drain hose in standpipe Drain hose form Firmly grasp power cord plug and pull to remove all parts from rear panel. Remove packing tray from tub. For a floor drain, remove the preinstalled drain ...
...back of laundry tub. Gently place power cord over end as shown. do not force excess hose into standpipe (shown in case you need additional parts with clamp. For a laundry tub or standpipe drain, go to drain port Remove tape from washer lid, open lid and remove cardboard packing tray... free access to move washer later. 4. Be sure to free from tray. See "Tools and Parts". 6. Place drain hose in standpipe Drain hose form Firmly grasp power cord plug and pull to remove all parts from rear panel. Remove packing tray from tub. For a floor drain, remove the preinstalled drain ...
Installation Instructions
Page 6
... from the end of the drain hose. Repeat with second hose for future reference. Check for leaks Turn on washer. 7. See "Tools and Parts". Connect inlet hoses to prevent clogs. Repeat this step with cold water inlet valve. n Periodically inspect and replace hoses if bulges, kinks, cuts... connecting to a cold water faucet, you must be connected to tighten couplings an additional two-thirds turn . If you will need additional parts with separate directions. Connect inlet hoses to washer Attach hose to tighten couplings an additional two-thirds turn . HELPFUL TIP: Make note of...
... from the end of the drain hose. Repeat with second hose for future reference. Check for leaks Turn on washer. 7. See "Tools and Parts". Connect inlet hoses to prevent clogs. Repeat this step with cold water inlet valve. n Periodically inspect and replace hoses if bulges, kinks, cuts... connecting to a cold water faucet, you must be connected to tighten couplings an additional two-thirds turn . If you will need additional parts with separate directions. Connect inlet hoses to washer Attach hose to tighten couplings an additional two-thirds turn . HELPFUL TIP: Make note of...
Installation Instructions
Page 8
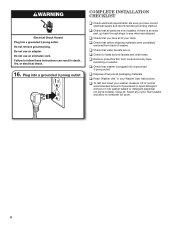
...were completely removed from console and any cycle. q To test and clean your washer, measure 1/2 of normal recommended amount of /recycle all parts are on some models). Start washer and allow to see what was skipped. Plug into a grounded 3 prong outlet Complete Installation CHECKLIST q ...Check electrical requirements. If there is plugged into washer basket or detergent dispenser (on . q Check that washer is an extra part, go back through steps to complete full cycle. 8 16. Select any tape remaining on washer. Be sure you have correct electrical supply...
...were completely removed from console and any cycle. q To test and clean your washer, measure 1/2 of normal recommended amount of /recycle all parts are on some models). Start washer and allow to see what was skipped. Plug into a grounded 3 prong outlet Complete Installation CHECKLIST q ...Check electrical requirements. If there is plugged into washer basket or detergent dispenser (on . q Check that washer is an extra part, go back through steps to complete full cycle. 8 16. Select any tape remaining on washer. Be sure you have correct electrical supply...

Dimension Guide
Page 1
... been tested for walls, doors, and floor moldings. Floor drain system requires a Siphon Break Kit (Part Number 285834), 2 Connector Kits (Part Number 285835), and an Extension Drain Hose (Part Number 285863) that a separate circuit serving only this washer be at least 39" (990 mm) ... per minute. Specifications subject to change without notice. install no more space for planning purposes only. Because Whirlpool Corporation policy includes a continuous commitment to improve our products, we reserve the right to change materials and specifications without notice.
... been tested for walls, doors, and floor moldings. Floor drain system requires a Siphon Break Kit (Part Number 285834), 2 Connector Kits (Part Number 285835), and an Extension Drain Hose (Part Number 285863) that a separate circuit serving only this washer be at least 39" (990 mm) ... per minute. Specifications subject to change without notice. install no more space for planning purposes only. Because Whirlpool Corporation policy includes a continuous commitment to improve our products, we reserve the right to change materials and specifications without notice.
Warranty Information
Page 1
...appliance is located in materials or workmanship and is reported to Whirlpool within 30 days from the date of purchase. 6. You can be repaired in accordance with Whirlpool published installation instructions. 10. Consumable parts are unable to resolve the problem after checking "Troubleshooting," ...repair labor to correct defects in -warranty service. Replacement parts or repair labor on the product. Some states and provinces do not allow limitations on how to use of products not approved by a Whirlpool designated service company. Service calls to correct house wiring or...
...appliance is located in materials or workmanship and is reported to Whirlpool within 30 days from the date of purchase. 6. You can be repaired in accordance with Whirlpool published installation instructions. 10. Consumable parts are unable to resolve the problem after checking "Troubleshooting," ...repair labor to correct defects in -warranty service. Replacement parts or repair labor on the product. Some states and provinces do not allow limitations on how to use of products not approved by a Whirlpool designated service company. Service calls to correct house wiring or...

Use & Care Guide
Page 16
... appliance is intended to be provided by calling Whirlpool. If outside the 50 United States and Canada, contact your authorized Whirlpool dealer to determine if another warranty applies. Repairs to parts or systems resulting from warranty coverage. 4. WHIRLPOOL SHALL NOT BE LIABLE FOR INCIDENTAL OR CONSEQUENTIAL ... vary from state to state or province to province. If you think you . Replacement parts or repair labor if this major appliance is used in your home. 7. WHIRLPOOL CORPORATION LAUNDRY WARRANTY LIMITED WARRANTY For one year from the date of purchase, when this ...
... appliance is intended to be provided by calling Whirlpool. If outside the 50 United States and Canada, contact your authorized Whirlpool dealer to determine if another warranty applies. Repairs to parts or systems resulting from warranty coverage. 4. WHIRLPOOL SHALL NOT BE LIABLE FOR INCIDENTAL OR CONSEQUENTIAL ... vary from state to state or province to province. If you think you . Replacement parts or repair labor if this major appliance is used in your home. 7. WHIRLPOOL CORPORATION LAUNDRY WARRANTY LIMITED WARRANTY For one year from the date of purchase, when this ...


